위코드 10기가 끝이난지 이제 2주가 되어가지만.. 쓰는 회사들은 다 떨어지고 있다. (ㅠㅠㅠㅠㅠ)
뭔가 슬프지만 해보지 않았던 것을 해보기 위해 시작하기로 한 것이 첫번째로 노드다.
노드는 Javascript 기반으로 된 언어라 할 수 있을까 싶긴한데, 하나하나씩 해볼려고 한다.
Node Js? 이건 오픈 소스이고 자바스크립 기반으로 하는 언어이다. node 가 나오기전에는 자바스크립을 브라우저에서만 썼는데 이게 나옴으로써 브라우저 크롬,이 아닌 서버쪽에서도 쓸 수 있게 되었다.
노드js는 파이썬같은 하나의 언어인데 자바스크립을 서버사이드에서 쓸 수 있는 언어. 노드가 자동차의 엔진이면 exprees는 자동차를 만드는것.
EXPREE JS는 파이썬에서 장고인것처럼 노드의 웹 어플리케이션 프레임워크이다.
node -v = > 노드가 이미 깔려 있는지를 확인하는 명령어, 안깔려 있으면 다운로드 해야됨. 구글에서 검색해서 다운해야한다.
npm init = > 터미널을 켜서, node -v을 다시 쳐주고, 깔려있으면 Old and New npm package 만들기
package.json
index.js => 백엔드 시작점
express.js 다운 (노드js의 프레임워크)
node_module => 다운 받은 dependencies들은 여기에서 관리됨
1)index.js
//expree 모듈을 가져온다.
const express = require('express')
//함수를 이용해서 앱을 만들고
const app = express()
//포트는 5000번을 빽으로 쓰겠다.
const port = 5000
//루트 디렉토리에 오면 hello world을 출력

//몽고랑 노드랑 연결 mongoose.connect()
const mongoose = require('mongoose')

app.get('/', (req, res) => {
  res.send('Hello World!')
})
//5000번에서 이 앱을 실행
app.listen(port, () => {
  console.log(`Example app listening at http://localhost:${port}`)
})
2)몽고 DB 연결
일단 몽고DB 사이트 들어가서 회원가입을 하고 클러스터 만들고 DB 유저를 생성
Mongoose
공식문서를 보니까
Mongoose is a MongoDB object modeling tool designed to work in an asynchronous environment. Mongoose supports both promises and callbacks.
라고 한다. 몽구스는 객체 모델링 툴이라고 한다. 비동기 환경에서. 무슨말인지는 더 공부를 하면서 이해해보도록 하자
몽구스를 다운받고 app에 연결하자
3)유저 모델 생성 : 웹사이트가면 회원가입하고 할텐데 여기서 쓰이는 유저 정보들이 유저 DB에 들어가는데 그걸 관리하기 위해서 스키마를 만들거야
모델은 스키마를 감싸주는 역활을 한다. 스키마는 도안 같은거라고 생각하자. 상품에 관련된 글을 작성한다고 하고, 그 글을 누가 작성했는지, 작성할때의 포스트의 이름, 타입은 뭐고 최고의 길이는 얼마인지 지정하는거 지정해주는게 스키마를 통해서 할 수 있는것.
models/User.js
const mongoose = require('mongoose');

const userSchema = mongoose.Schema({
  name : {
    type : String,
    maxlength : 40
  },
  email: {
    type : String,
    trim : true,
  }
  password: {
  type: String,
  minlength : 5
})
//스키마를 모델로 감싸준다고 해했으니
const User = mongoose.model('User',userSchema)
//이 모델을 다른파일에서도 쓰기위해서
module.exports = { User }4) Git : Git is free and open source 분산 버전 관리시스템
git init : 깃 저장소를 만들어주는 역활
git status : untracked, tracked 파일을 볼 수 있음.
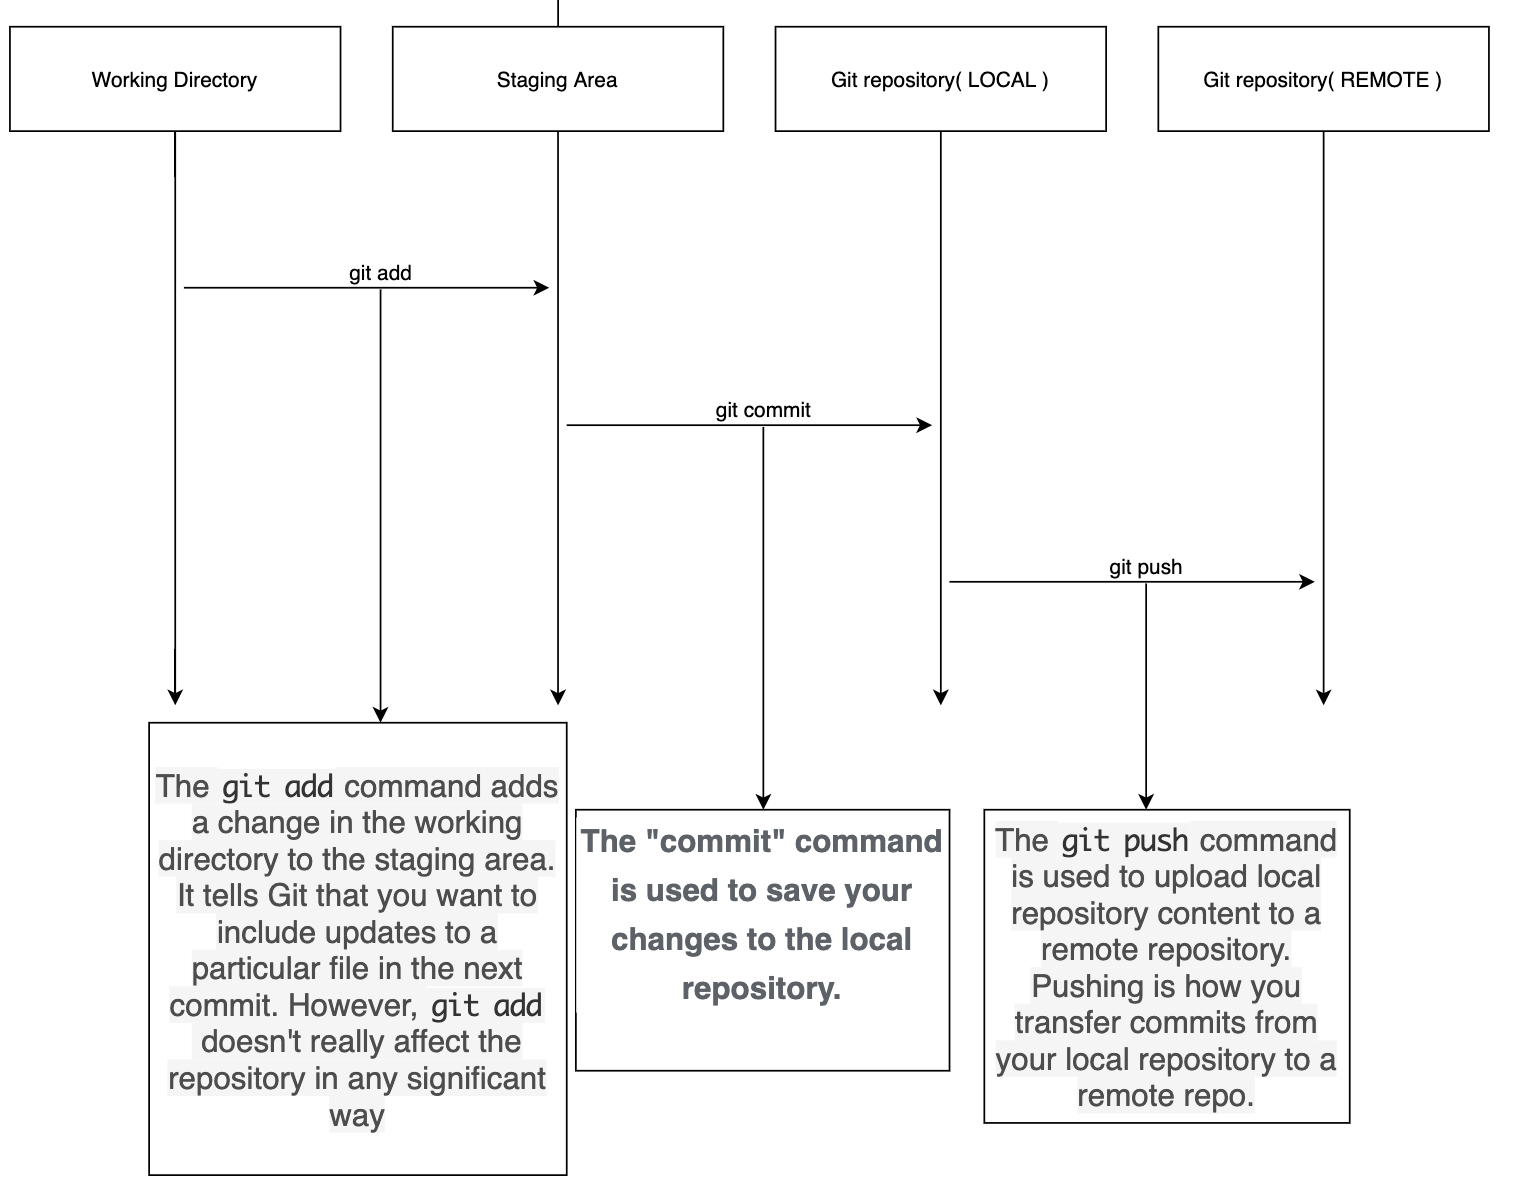
working directory: 처음 있는 상태 여기서
git add . 을 쳐주면 staging area에 들어옴 깃 저장소에 넣기전에 대기시켜줌
git commit -m "메시지쳐줘" 로컬저장소에 올림.
github에 올릴거임.
git은 툴 소스코드를 관리할수 잇는 툴 github은 클라우드서비스
git is a revision control system, a tool to manage your source code history. github is a hosting service for Git repopsitories.
git and github are not the same thing. Git is the tool, GitHub is the service for projects that use Git.
깃은 툴 깃허브를 깃을 쓰는 서비스
local에 있는것을 remote로 옮기는거 이걸 쓸때가 git push
local이랑 github 서버랑 안전하게 통신할때 SSH을 이용하자.
Secure Shell .
git remote add origin git@github@@!@!#!@#
git push -u origin master
5)회원가입
Client : 크롬브라우저, 클라이언트에서 정보를 쳐서 서버에 보내주면 서버에서 받을때 필요한게 있는게 body-parser dependency인데 ,
클라에서 Request with Body(the Json같은것들) 해서 Body 데이터를 분석(parse)해서 req.body로 출력 -> body-parser을 이용해서 받은 자료들을 받을 수 있음.
Register.route을 만들어보자 회원가입을 위한
const { User } = require("./models/User");
const bodyParser = require("body-parser");
//bodyparser가 클라이언트에서 오는 정보를 서버에서 분석해서 가져올수 있게하는거
//application/x-www-form-urlencoded
app.use(bodyParser.urlencoded({extended: true}));
//application/json json타입으로 된것을 분석해서 가져올수 있게하는거
app.use(bodyParser.json());
//콜백펑션
app.post('/register',(req, res) => {
  //회원 가입할때 필요한 정보들을 client에서 가져오면
  // 그것들을 데이터베이스에 넣어준다.
  // 이것을 하기위해서 유저 모델을 가져와야함
  // 이것을 이용해서 인스턴스를 만들자.
  //body에는 json형식으로
  // {
  // 'id' : 'hello',
  // 'password' : '1234'
  //}
  //이렇게 리퀘스트바디에 있을수 있게한건 바디파서덕분임.
  const user = new User(req.body)
  //몽고디비에서 오는 메서드 저장하는거
  user.save(err, userInfo) => {
    if(err) return res.json({success : false, err})
    return res.status(200).json({
      success : true
    })
  })
})

회원가입은 성공적!
6)비밀 설정 정보 관리 : 소스 관리
: 소스를 보고 몽고db를 악용할 수 있기때문에 따로 떼어놓고 .gitignore에다가 올려서 깃에 올릴때 안올리게끔하자.
dev.js(배포전)
module.exports = {
  mongoURI : 'mongoDB+""";
}
prod.js(배포후)
module.exports = {
  mongoURI : process.env.MONGO_URI
}
key.js
//환경변수
if(process.env.NODE_ENV === 'production') {
  module.exports = require('./prod');
} else {
  module.exports = require('./dev');
index.js
const config = require('./config/key');
mongoose.connect(config,mongoURI, {
  useNewUrlParser:true, useUnifiedTopology: true, useCreateindex:true, useFindAndModify: false}).then() => console.log('MongoDB connected...'))
.catch(err => console.log(err))
.gitignore
node_modules
dev.js
local : development 여기서는 변수를 가져갈 수 있는데
deploy(배포한후) production 배포를 한 이후에는 분기처리를 웹사이트에서 가져가게해야함.
7) 비크립트로 비밀번호 암호화하기
: 이건 장고에서도 해본거같지?
: 이유는 회원가입을 했는데 DB에 그대로 저장되어 있기때문에 , 너무 보안성이 약함 그래서 암호화를 한 다음에 , DB에 저장해서 관리.
먼저 Register Route로 = index.js post
app.post('/register',(req, res) => {
//여긴데, 유저정보들을 모델에 넣고 세이브 하기전에 비밀번호를 암호화시켜줘야함
//유저모델에서 유저 스키마를 가져와야함
  const user = new User(req.body)
  //몽고디비에서 오는 메서드 저장하는거
  user.save(err, userInfo) => {
    if(err) return res.json({success : false, err})
    return res.status(200).json({
      success : true
    })
  })
})
User.js에서
//유저모델에 유저정보를 저장하기 전에 무엇을 한다는거 다 끝나면 들어감
//saltround 생성 -> salt를 먼저 생성 -> salt를 이용해서 비밀번호를 암호화해야함
const mongoose = require('mongoose');
const bcrypt = require('bcrypt');
const saltRounds = 10
userSchema.pre('save', function(next){
  //비밀번호를 암호화 시킨다.
  //비크립트를 가져온다.
  bcrypt.genSalt(saltRounds, function(err,salt) {
    bcrypt.hash(myPlaintextPassword, salt, function(err,hash) {
      // Store hash in you password db.
    });
  });
})

  next()
  )
//유저모델에 유저정보를 저장하기 전에 무엇을 한다는거 다 끝나면 들어감
//saltround 생성 -> salt를 먼저 생성 -> salt를 이용해서 비밀번호를 암호화해야함
const mongoose = require('mongoose');
const bcrypt = require('bcrypt');
const saltRounds = 10
userSchema.pre('save', function(next){
//비밀번호를 암호화 시킨다.
//비크립트를 가져온다.
var user = this;
if(user.isModified('password') {
//userschema에 있는 거를 가져옴
bcrypt.genSalt(saltRounds,function(err,salt){
if(err) return next(err)
bcrypt.hash(user.password, salt, function(err,hash){
if(err) return next(err)
user.password = hash
next()
})
})
}else {
next()
}
}) 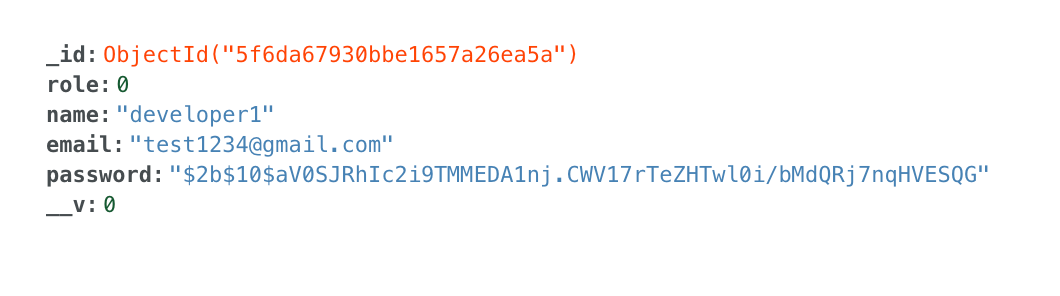
요래 잘 나온다.
8) 로그인 기능
login.route 만들기
index.js
app.post('/login', (req,res) => {
  //DB에서 요청한 e-mail 찾기 => User.findOne()
  User.findOne({email: req.body.email },(err,user) => {
  	if(!user) {
      return res.json({
        loginSuccess : false,
        message : "제공된 이메일에 해당하는 유저가 없습니다."
      })

  //DB에서 요청한 e-mail이 있다면 비밀번호가 같은지 확인 => bcrypt을 이용하여 plain password와 암호화된 (hashed) 패스워드가 같은지 확인
      user.comparePassword(req.body.password,(err,isMatch)=> {
        if(!isMatch)
          return res.json({ loginSuccess:false, message: "비번 떙.")}


 //비밀번호까지 같다면 token을 생성 => 토큰 생성을 위해서 JSONWEBTOKEN
      user.generateToken((err,user) => {


})
User.js
userSchema.methos.comparePassword = function(plainPassword,cb) {
  //plainpassword 1234567 암호화된 비밀번호 :1adkskflsdkfl
  // plain도 암호화한다음에 같은지 판단
  bcrypt.compare(plainPassword, this.password, function(err, isMatch) {
    if(err) return cb(err),
      cb(null,isMatch) // isMatch는 True

  })
}