React 관련 영상을 통해 공부한 내용 정리
Context
Context를 이용하면 단계마다 일일이 props를 넘겨주지 않고도 컴포넌트 트리 전체에 데이터를 제공
일반적인 React 애플리케이션에서 데이터는 위에서 아래로(즉, 부모로부터 자식에게) props를 통해 전달 되지만, 애플리케이션 안의 여러 컴포넌트들에 전해줘야 하는 prosp의 경우 (예를 들면 선호 로케일,UI 테마) 이 과정이 번거로울 수 있다. Context를 이용하면, 트리 단계마다 명시적으로 props를 넘겨주지 않아도 많은 컴포넌트가 이러한 값을 공유하도록 할 수 있다.
무엇인가를 전역적으로 관리할 때 사용하기 좋다(테마, 사용하는 언어 변경, 현재 로그인한 유저)
컴포넌트 트리를 넘어 데이터를 공유할 수 있는 방법
React.crateContext
데이터를 넣어두는 공간
Context.Provider
공간에 있는 값의 변경을 자식들에게 알려주는 것
Class.contextType
각 class가 어떤 context로부터 값을 꺼내기 위해 contextype을 사용
Context.Consumer
Component를 return할 수 있는 함수를 자식으로 두면서 context를 그대로 사용하여 render할 수 있는
예시를 살펴보도록 하자
ThemeContext.js 파일 생성
import React from "react";

export const themes = {
  light: {
    foreground: "#000000",
    background: "#eeeee",
  },
  dark: {
    foreground: "#ffffff",
    background: "#222222",
  },
};

export const ThemeContext = React.createContext(themes.dark);
ThemedButton.jsx 파일 생성
import React, { Component } from 'react'

class ThemedButton extends Component {
 render() {
   let props = this.props;
   let theme = this.context;
   return (
     <button {...props} style={{backgroundColor:theme.background, color:theme.foreround}}></button>
   )
 }
}
현재 상태에서 이 context가 어떤 context인지 알지 못하기 때문에 아래에 코드를 통해 Context를 식별
ThemedButton.contextType = ThemeContext;
ThemedButton.jsx 파일 생성
import React, { Component } from 'react'
import { ThemeContext } from './ThemeContext';

class ThemedButton extends Component {
  render() {
    let props = this.props;
    let theme = this.context;
    return (
      <button {...props} style={{backgroundColor:theme.background, color:theme.foreround}}>Button</button>
    )
  }
}

ThemedButton.contextType = ThemeContext;

export default ThemedButton;
Example.jsx
import React, { Component } from 'react'
import { ThemeContext, themes } from './ThemeContext';
import ThemedButton from './ThemedButton';

export default class Example extends Component {
    constructor(props){
        super(props);
        this.state = {
            theme:themes.light,
        }
    }
  render() {
    return (
      <div>
            <ThemeContext.Provider value={this.state.theme}>
                <ThemedButton/>
            </ThemeContext.Provider>
            <ThemedButton/>
      </div>
    )
  }
}
Provider에는 value를 통해 기본값을 지정해야한다
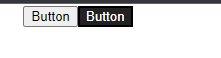
Provider로 감싸진 button은 기본설정값은 light의 속성을 가지게 되었고, 밖에 있는 button은 context를 만들 때 default로 ThemeContext.js에서 dark로 설정
밖에 있다면 default 값으로 해석하고 provider 안에 있으면 provider 값으로 해석
Example.jsx
import React, { Component } from 'react'
import { ThemeContext, themes } from './ThemeContext';
import ThemedButton from './ThemedButton';

export default class Example extends Component {
    constructor(props){
        super(props);
        this.state = {
            theme:themes.light,
        }
        this.toggleTheme = () =>{
            this.setState((prve) => ({
                theme : prve.theme === themes.dark ? themes.light : themes.dark
            }))
        }
    }
  render() {
    return (
      <div>
            <ThemeContext.Provider value={this.state.theme}>
                <ThemedB utton changeTheme = {this.toggleTheme}/>
            </ThemeContext.Provider>
            <ThemedButton/>
      </div>
    )
  }
}
ThemedButton.js
import React, { Component } from 'react'
import { ThemeContext } from './ThemeContext';

class ThemedButton extends Component {
  render() {
    let props = this.props;
    let theme = this.context;
    return (
      <button
        {...props}
        onClick={props.changeTheme}
        style={{backgroundColor:theme.background, color:theme.foreground}}
      >
        Button
      </button>
    )
  }
}

ThemedButton.contextType = ThemeContext;

export default ThemedButton;
현재 상태는 provider안에 있는 버튼을 클릭 시에는 button 색깔과 글씨의 색깔이 변경되지만 provider 밖에 있는 버튼에는 아무일도 일어 나지 않는다.
consumer를 통해 다크모드 만들기
import React, { Component } from 'react'
import { ThemeContext, themes } from './ThemeContext';
import ThemedButton from './ThemedButton';

export default class Example extends Component {
    constructor(props){
        super(props);
        this.state = {
            theme:themes.light,
        }
        this.toggleTheme = () =>{
            this.setState((prve) => ({
                theme : prve.theme === themes.dark ? themes.light : themes.dark
            }))
        }
    }
  render() {
    return (
      <div>
            <ThemeContext.Provider value={this.state.theme}>
                <ThemedButton changeTheme = {this.toggleTheme}/>
                <ThemeContext.Consumer>
                    {theme => (<div style={{height:300, width:1000, backgroundColor:theme.background}}></div>)}
                </ThemeContext.Consumer>
            </ThemeContext.Provider>
            <ThemedButton/>
      </div>
    )
  }
}
provider안에 있는 버튼을 클릭 시에는 <ThemeContext.Consumer> {theme => (<div style={{height:300, width:1000, backgroundColor:theme.background}}></div>)} </ThemeContext.Consumer>
코드를 통해 다크모드 생성

이번에는 함수형 컴포넌트를 생성해보자
import React, { useContext } from 'react'
import { ThemeContext } from './ThemeContext';

export default function ThemedButton(props) {
    const theme = useContext(ThemeContext);
  return (
    <button
        {...props}
        onClick={props.changeTheme}
        style={{backgroundColor:theme.background, color:theme.foreground}}
    >
         Button
    </button>
  )
}
똑같은 결과가 나오는 것을 알 수 있다.
정리
컴포넌트리 트리 제약 -> Props Drilling의 한계 해소
재사용성 -> Context를 사용하면 재사용하기 어려움
API -> CreateContext / Provider / Consumer
useContext -> Consumer 대체