FlUX
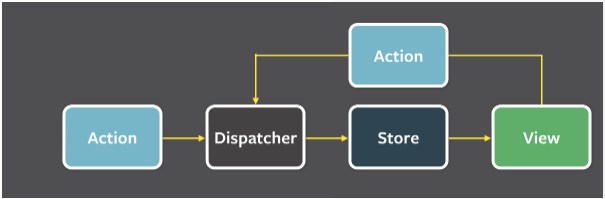
store에서 상태를 가진 단방향 상태 관리
redux
redux는 flux를 구현해놓은 구현체라고 볼 수 있다.
Terminology
- action {type,payload} 존재
- reducer(state,action) => newState
- store(state lives) created by passing reducer(상태를 관리하는 곳)
- dispatch only way to update state(dispatch를 통해 state의 값을 변경할 수 있다)
- seletors extract specific pieces of information from a store state(selectors는 store에 있는 특정 값을 꺼내 올 때 사용)
react-redux 설치하기
npm install @reduxjs/toolkit react-reduxredux를 활용한 Counter 만들어보기
store.js
import { configureStore } from "@reduxjs/toolkit";
import counterReducer from "../features/counter/counterSlice";

export default configureStore({
  reducer: {
    counter: counterReducer,
  },
});
index.js
import React from "react";
import ReactDOM from "react-dom/client";
import "./index.css";
import App from "./App";
import reportWebVitals from "./reportWebVitals";
import { Provider } from "react-redux";
import store from "./app/store";

//worker를 실행하는 코드
if (process.env.NODE_ENV === "development") {
  const { worker } = require("./mocks/browser");
  worker.start();
}

const root = ReactDOM.createRoot(document.getElementById("root"));
root.render(
  <React.StrictMode>
    <Provider store={store}>
      <App />
    </Provider>
  </React.StrictMode>
);

// If you want to start measuring performance in your app, pass a function
// to log results (for example: reportWebVitals(console.log))
// or send to an analytics endpoint. Learn more: https://bit.ly/CRA-vitals
reportWebVitals();
Provider를 통해 꼭 감싸 주어야 한다.
counterSlice.js
import { createSlice } from "@reduxjs/toolkit";

export const counterSlice = createSlice({
  name: "counter",
  initialState: {
    value: 0,
  },
  reducers: {
    increment: (state) => {
      state.value += 1;
    },
    decrement: (state) => {
      state.value -= 1;
    },
    incrementByAmount: (state, action) => {
      state.value += action.payload;
    },
  },
});

export const { increment, decrement, incrementByAmount } = counterSlice.actions;

export default counterSlice.reducer;
counter.jsx
import React from "react";
import { useDispatch, useSelector } from "react-redux";
import { decrement, increment, incrementByAmount } from "./counterSlice";
export default function counter() {
const counter = useSelector((state) => state.counter.value);
const dispatch = useDispatch();
return (
<div>
<div>
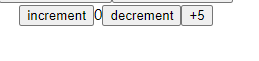
<button onClick={() => dispatch(increment())}>increment</button>
<span>{counter}</span>
<button onClick={() => dispatch(decrement())}> decrement</button>
<button onClick={() => dispatch(incrementByAmount(5))}>+5</button>
</div>
</div>
);
}
Counter2.jsx
import React from "react";
import { useDispatch, useSelector } from "react-redux";
import { decrement, increment, incrementByAmount } from "../features/counter/counterSlice";

export default function Counter2() {
  const counter = useSelector((state) => state.counter.value);
  const dispatch = useDispatch();
  return (
    <div>
      <div>
        <button onClick={() => dispatch(increment())}>increment</button>
        <span>{counter}</span>
        <button onClick={() => dispatch(decrement())}> decrement</button>
        <button onClick={() => dispatch(incrementByAmount(5))}>+5</button>
      </div>
    </div>
  );
}
위 코드에서 store에 상태의 값 변경을 일으키기 위해서는 dispatch를 통해 상태값을 전달해줘야 하며,
useSelector를 통해 값을 호출하여 가져와야 사용할 수 있다.
counter에 있는 버튼이나 counter2에 있는 버튼으로 눌렀을 때 똑같은 상태값이 반영된다.
이유는 index.js에서 App을 감싸고 있는 provider store로 인해 하나의 store에 상태를 관리하기 때문에 모든 component에서 상태를 관리를 할 수 있다.
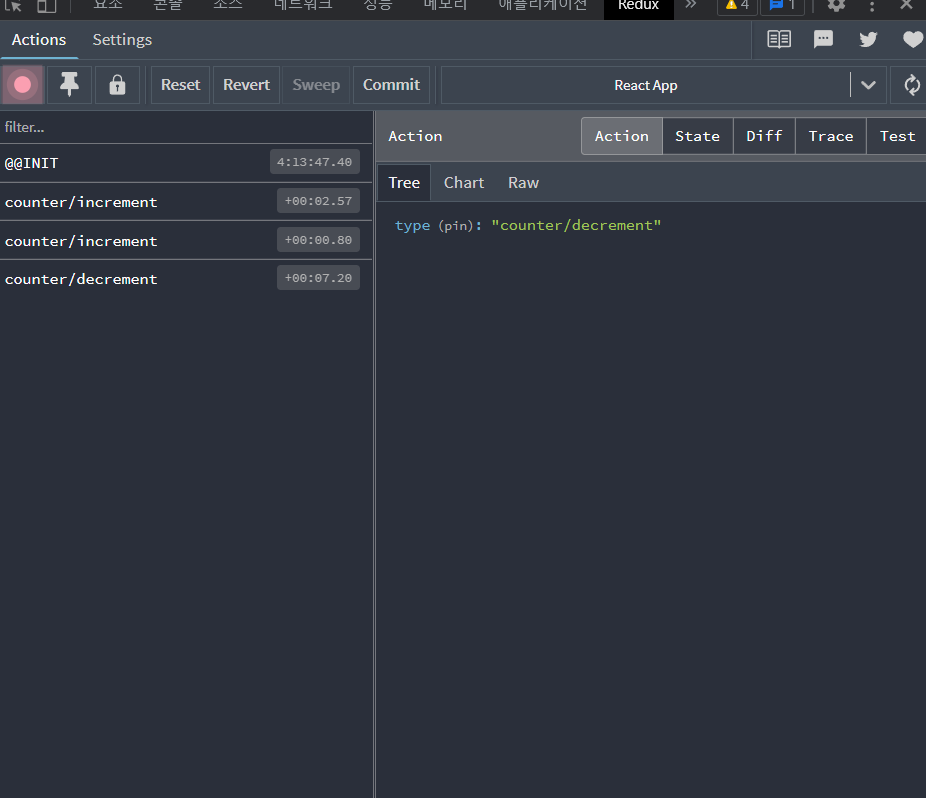
chrome extension
redux-devtools
https://chrome.google.com/webstore/detail/redux-devtools/lmhkpmbekcpmknklioeibfkpmmfibljd?hl=ko
Data fetching
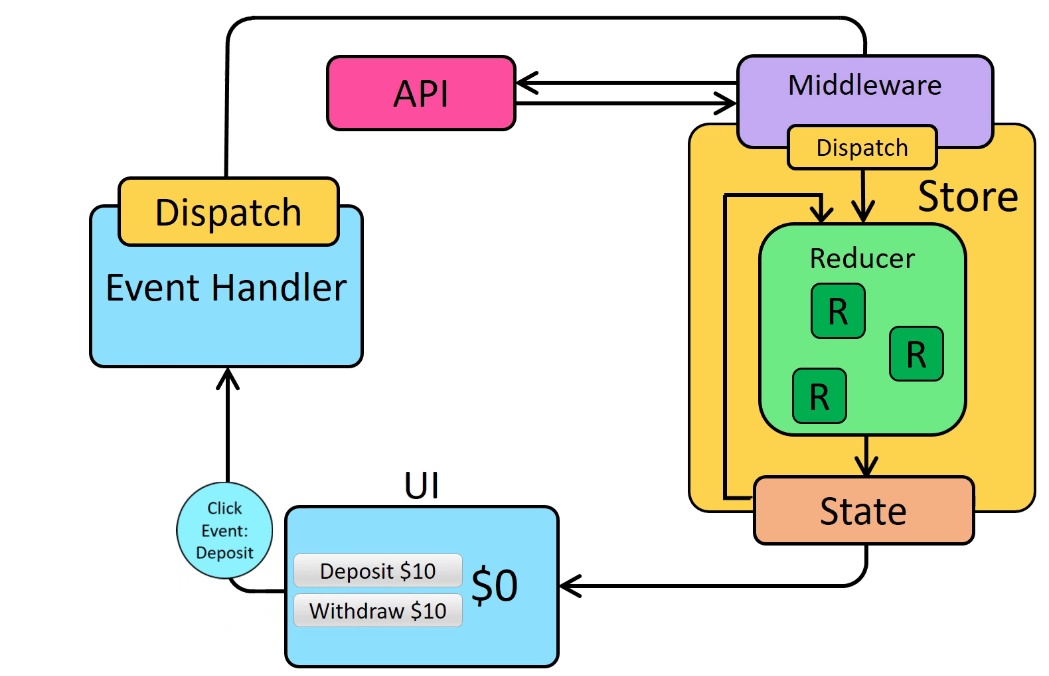
자세한 내용은 https://redux.js.org/tutorials/essentials/part-5-async-logic 참조

풋살을 좋아하는 프론트엔드 개발자