Array와 Linked List의 정의
https://broad-talos-4f5.notion.site/cffd00ad14194eeab7e559fe0e26bf23?pvs=74
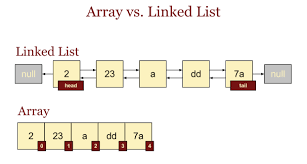
옛날에 간략하게 정리했던 자료에 따르면 Linked List는 각 노드에서 이전 노드와 다음 노드의 주소를 가지고 있는 자료구조로 메모리 상에서 불연속적으로 배치되어 있는 자료를 뜻합니다. 배열은 메모리 상에 연속적으로 배치되며 INDEX를 기반으로 접근하는 자료구조를 뜻합니다.
주요차이점
addFirst(),addLast(),removeFirst(),removeLast()등의 메서드 실행시 LinkedList는 O(1)의 시간복잡도를 가지고 있지만 ArrayList는 Resize로 인해서 O(n)의 시간복잡도를 가지고 있습니다.- index를 통해서 탐색시 ArrayList는 내부 arr의 index를 통해서 접근하기 때문에 O(1)의 시간복잡도를 가지고 있지만 LinkedList는 반복을 진행하면서
node.next()를 통해서 탐색하기 때문에 O(n)의 시간복잡도를 가지고 있습니다. - 중간에 데이터를 추가할할 때 LinkedList는 중간까지의 탐색과정을 거친후 prev의 next에 새 node를 넣고 next의 prev에 새 node를 넣어주면 그만이기 때문에 O(1)의 시간 복잡도를 가지는 한편 ArrayList는 중간에 데이터를 추가할 때 뒤에 있는 데이터를 한칸씩 뒤로 미뤄야 하기 때문에 O(n)의 시간복잡도를 가지고 있습니다.
- ArrayList는 value만 담고 있으면 되기 때문에 Node 1개의 메모리 공간이 더 작지만 LinkedList는 다음 Node, 이전 Node를 들고 있어야 하기 때문에 Node 1개의 메모리 공간이 더 크다.
- 반면, ArrayList는 사이즈를 늘릴 때 사용하지 않는 배열의 공간도 차지하고 있기 때문에 메모리 효율성에 대해서 비교하긴 애매하다만 대체적으로 Linked List가 메모리 파편화가 안되기 때문에 메모리 효율성이 더 좋다고 하는 것 같다.
- ArrayList, LinkedList 둘 다 데이터가 무작위로 섞여있다면 어떤 객체를 찾는데 O(n)의 시간이 걸린다. 하지만, 순서대로 정렬이 되어 있는 경우라면 ArrayList는 이진 탐색을 활용해서 N(log N) 시간내에 검색이 가능하다.
실제사용 용도
ArrayList의 실제 사용 사례
-
데이터의 빠른 검색이 필요한 경우
- 예시: 학생 관리 시스템, 상품 목록 관리
-
순차적인 데이터 추가 및 처리
- 예시: 이벤트 로그 기록, 게임 스코어보드
-
데이터 정렬 작업
- 예시: 사용자 목록 정렬, 시험 점수 정렬
-
읽기 작업이 주로 이루어지는 경우
- 예시: 도서관 책 목록, 도시 목록 관리
-
데이터 크기가 예측 가능하지만 유동적인 경우
- 예시: 온라인 장바구니, 채팅 메시지 저장
-
순차적인 배치 처리
- 예시: 배치 처리 시스템, 데이터베이스에서 조회한 데이터 정리
LinkedList의 실제 사용 사례
-
빈번한 삽입 및 삭제 작업
- 예시: 운영체제 메모리 관리, 텍스트 편집기 Undo/Redo 기능
-
데이터 크기가 사전에 알 수 없는 경우
- 예시: 네트워크 패킷 처리, 웹 서버 작업 큐
-
연속된 메모리 공간을 할당할 수 없는 경우
- 예시: 메모리 단편화가 심한 시스템, 임베디드 시스템
-
중간 데이터 삽입이 중요한 경우
- 예시: 데이터 스트림 처리, 우선순위 큐 구현
-
데이터 크기 변동이 빈번한 경우
- 예시: 대규모 동적 데이터 관리, 실시간 메시지 큐
세부구현
Array
직접 구현한 Array
제가 기억하고 있던 Array의 동작을 더듬어서 아래와 같이 구현해봤습니다. 주로 신경썻던 부분은 add 함수를 사용할 때 arr의 사이즈를 재할당한다는 점이었습니다. 공부한 바에 의하면 보통 size를 두 배씩 하다가 일정 사이즈가 넘어갔을 경우 고정된 수만큼 증가를 해야한다는 내용이 있었습니다.
구현하면서 고민이었던 점은 remove 함수를 실행할 때 데이터가 삭제됨에 따른 arr 사이즈를 줄여줘야 할 것 같았는데, 이 부분을 시간복잡도를 소모하지 않고 구현할 방법을 찾아내지 못했습니다.
public class MyArray<T> {

  private Object[] arr;
  private int elementCnt;
  private int size;

  public MyArray(List<T> data) {
    this.initializeArr(data);
  }

  public MyArray() {
    this.initializeArr(List.of());
  }

  /**
   * Array의 기본 사이즈를 지정함
   */
  private void initializeArr(List<T> data) {
    if(data.isEmpty()) {
      initialArr();
    } else {
      allocateData(data);
    }
  }

  /**
   * 데이터가 없는 경우 arr 초기화
   */
  private void initialArr() {
    int arrSize = 2;
    this.arr = new Object[arrSize];
    this.size = arrSize;
    this.elementCnt = 0;
  }

  /**
   * 데이터가 있는 경우 arr에 데이터 할당
   */
  private void allocateData(List<T> data) {
    int dataSize = data.size();
    this.arr = data.toArray();
    this.elementCnt = dataSize;
    this.size = dataSize;
  }


  /**
   * list에 할당하는 메서드
   */
  public void add(T data) {
    if(checkFull()) {
      this.arrResize();
    }
    arr[elementCnt] = data;
    this.elementCnt += 1;
  }

  /**
   * arr이 꽉 찼는지 확인
   */
  private boolean checkFull() {
    return this.size == this.elementCnt ? true : false;
  }

  /**
   * arr 사이즈를 재조정 후 새로 할당하고
   * 기존의 내용을 복사 후 size만 재기록
   */
  private void arrResize() {
    int newSize = this.calculateNewSize();
    Object[] newArr = new Object[newSize];
    for(int i = 0; i < this.size; i++) {
      newArr[i] = this.arr[i];
    }
    this.arr = newArr;
    this.size = newSize;
  }

  /**
   * 만약 사이즈가 50이상 넘어갔다면 20씩 증가하고 아니라면 사이즈를 2배씩 증가
   */
  private int calculateNewSize() {
    if(size > 50) return this.size + 50;
    return this.size * 2;
  }

  /**
   * N 번째 인덱스에 있는 데이터를 삭제
   * 삭제한 index 데이터
   */
  public T remove(int idx) {
    @SuppressWarnings("unchecked")
    T result = (T) this.arr[idx];
    for(int i = idx; i < this.size; i++) {
      if(i == size - 1)  {
        this.arr[i] = null;
        break;
      }
      this.elementCnt --;
      this.arr[idx] = this.arr[idx + 1];
    }
    return result;
  }

  /**
   * index의 데이터를 반환
   */
  @SuppressWarnings("unchecked")
  public T get(int idx) {
    return (T) this.arr[idx];
  }
}
실제 ArrayList 구현
Constructor
실제 Constructor를 보면 c.getClass() == ArrayList.class 부분으로 Type을 체크하는 부분이 있습니다. 제 구현 코드를 보면 빈 Array가 들어왔을 경우 초기 사이즈를 지정해주는 형식으로 구현을 했는데, 아무런 데이터가 들어오지 않은 경우 private static final Object[] EMPTY_ELEMENTDATA = {}; 이런식으로 기본적으로 들어가야 할 arr를 지정해둔 부분이 인상적이었습니다.
    public ArrayList(Collection<? extends E> c) {
        Object[] a = c.toArray();
        if ((size = a.length) != 0) {
            if (c.getClass() == ArrayList.class) {
                elementData = a;
            } else {
                elementData = Arrays.copyOf(a, size, Object[].class);
            }
        } else {
            // replace with empty array.
            elementData = EMPTY_ELEMENTDATA;
        }
    }
add
일단 기본적인 add 함수의 동작은 다음과 같다. modCount를 1개 증가시키고 add(E, Object[], int)를 호출합니다.
    public boolean add(E e) {
        modCount++;
        add(e, elementData, size);
        return true;
    }
그러면 아래와 같은 함수가 호출이 되는데
    private void add(E e, Object[] elementData, int s) {
        if (s == elementData.length)
            elementData = grow();
        elementData[s] = e;
        size = s + 1;
    }
int s는 사이즈, elementData는 추가되기 전 elementData, E e는 추가할 element가 됩니다.
    private Object[] grow() {
        return grow(size + 1);
    }

    private Object[] grow(int minCapacity) {
        int oldCapacity = elementData.length;
        if (oldCapacity > 0 || elementData != DEFAULTCAPACITY_EMPTY_ELEMENTDATA) {
            int newCapacity = ArraysSupport.newLength(oldCapacity,
                    minCapacity - oldCapacity, /* minimum growth */
                    oldCapacity >> 1           /* preferred growth */);
            return elementData = Arrays.copyOf(elementData, newCapacity);
        } else {
            return elementData = new Object[Math.max(DEFAULT_CAPACITY, minCapacity)];
        }
    }
grow 메서드는 arr가 비어있는지 간단하게 확인합니다.
- 만약 arr이 비어있지 않다면
ArraysSupport.newLength라는 메서드를 사용해서 새로운 Capacity를 받아옵니다. 그리고Arrays.copyOf라는 함수를 활용해서 새로운 Capacity로 새로 만들어진 arr에 기존 arr를 Copy 합니다.newLength라는 메서드는 Memory가 보장되는 범위 내에서 Capacity를 받아옵니다. (아니면Out of Memory Exception이 발생)
copyOf라는 메서드는 처음에 제가 구현했던 함수와 거의 동일합니다.System.arraycopy라는 함수를 사용해서 Copy를 하고 있지만 어쨋든grow메서드의 기본적인 동작 방식은 제가 구현한 바와 동일합니다.
- 만약에 arr이 비어있다면 elementData에 가장 큰 사이즈로 새로운 사이즈의 크기를 할당해줍니다.
결국, 결론적으로 grow 메서드를 통해서 새로운 크기를 구해서 새로운 arr을 만들고 이전 arr을 copy 해준다는 전체적인 로직은 동일합니다.
newCapacity 계산
Integer.MAX_VALUE를 넘어서면 음수가 되기 때문에 처음에 첫 if문에서 newCapacity - minCapacity <= 0을 체크 합니다.
그리고 newCapacity가 MAX_ARRAY_SIZE를 넘어서면 Integer.MAX_VALUE를 반환하고 그렇지 않으면 hugeCapacity 메서드를 호출합니다.
    // Integer.MAX_VALUE - 8인 이유는 특정 vm에서는
    // 배열의 header에 특정한 문자를 넣어서 사용하기 때문에 8을 빼준다.
    private static final int MAX_ARRAY_SIZE = Integer.MAX_VALUE - 8;

    private int newCapacity(int minCapacity) {
        // overflow-conscious code
        int oldCapacity = elementData.length;
        int newCapacity = oldCapacity + (oldCapacity >> 1);
        if (newCapacity - minCapacity <= 0) {
            if (elementData == DEFAULTCAPACITY_EMPTY_ELEMENTDATA)
                return Math.max(DEFAULT_CAPACITY, minCapacity);
            if (minCapacity < 0) // overflow
                throw new OutOfMemoryError();
            return minCapacity;
        }
        return (newCapacity - MAX_ARRAY_SIZE <= 0)
            ? newCapacity
            : hugeCapacity(minCapacity);
    }

    private static int hugeCapacity(int minCapacity) {
        if (minCapacity < 0) // overflow
            throw new OutOfMemoryError();
        return (minCapacity > MAX_ARRAY_SIZE)
            ? Integer.MAX_VALUE
            : MAX_ARRAY_SIZE;
    }
addFirst, add(int index, E element)
addFirst를 사용할 때 사용하는 메서드여서 가져와봤습니다. addLast는 add(E e) 메서드를 사용하기 때문에 위에서 설명한 로직과 별로 다를바가 없습니다. 하지만 add(int index, E element 메서드는 새로운 사이즈를 가져오고 기존에 있던 arr을 사용해서 삽입할 위치부터 뒤에 있는 데이터를 한 칸씩 다 미뤄서 복사를 하게 됩니다.
결론적으로 사이즈를 늘리고 이후의 데이터들을 한칸씩 올려준 후 해당 index에 element를 넣어주는 동작을 하는것이라고 할 수 있습니다.
    public void add(int index, E element) {
        rangeCheckForAdd(index);
        modCount++;
        final int s;
        Object[] elementData;
        if ((s = size) == (elementData = this.elementData).length)
            elementData = grow();
        System.arraycopy(elementData, index,
                         elementData, index + 1,
                         s - index);
        elementData[index] = element;
        size = s + 1;
    }
Remove
Remove(int index)
기본적으로 Element를 삭제하는 로직은 제가 우려했던 arraycopy 메서드를 그대로 사용하고 있었습니다. 저는 arr의 맨 마지막 element의 데이터를 지워주고 사이즈를 어떻게 malloc(?), free(?) 시켜주는 방식을 기대하고 있었는데 제가 생각했던 방법이랑 동일하게 구현이 되어있었습니다.
    public E remove(int index) {
        Objects.checkIndex(index, size);
        final Object[] es = elementData;

        @SuppressWarnings("unchecked") E oldValue = (E) es[index];
        fastRemove(es, index);

        return oldValue;
    }

    private void fastRemove(Object[] es, int i) {
        modCount++;
        final int newSize;
        if ((newSize = size - 1) > i)
            System.arraycopy(es, i + 1, es, i, newSize - i);
        es[size = newSize] = null;
    }
remove() 함수를 통해서 arr의 사이즈를 줄여주지 않는 것은 arr의 사이즈 크기가 한 번 변하면 다시 변할 가능성이 높고, arr의 사이즈가 다시 커질 경우 불필요하게 다시 사이즈를 늘리는 연산을 하지 않기 위함이라는 의견도 있습니다.
removeFirst & removeLast
First와 Last 두 메서드 모두 index 지정만 다르고 fastRemove 메서드를 호출해서 arraycopy라는 네이티브 메서드를 사용해서 arr를 copy해주는데 i + 1번지부터의 데이터를 i번지에 copy를 해주는 방식으로 구현되어 있습니다.
    public E removeFirst() {
        if (size == 0) {
            throw new NoSuchElementException();
        } else {
            Object[] es = elementData;
            @SuppressWarnings("unchecked") E oldValue = (E) es[0];
            fastRemove(es, 0);
            return oldValue;
        }
    }

    private void fastRemove(Object[] es, int i) {
        modCount++;
        final int newSize;
        if ((newSize = size - 1) > i)
            System.arraycopy(es, i + 1, es, i, newSize - i);
        es[size = newSize] = null;
    }
Linked List
직접 구현한 Linked List
public class MyLinkedList<T> {

    public Node<T> root;
    public Node<T> lastNode;
    public int size = 0;

    /**
     * 뒤에 value를 추가하는 메서드
     */
    @SuppressWarnings("unchecked")
    public void add(T value) {
        if (!initialize(value)) {
            Node<T> newNode = new Node<T>(value);
            this.lastNode.setNext(newNode);
            newNode.setPrev(this.lastNode);
            this.lastNode = newNode;
        }
        this.size++;
    }

    /**
     * 특정 인덱스에 Node 삽입
     */
    @SuppressWarnings("unchecked")
    public void add(T value, int index) {
        checkIdxOrThrow(index);
        if (!initialize(value)) {
            Node<T> newNode = new Node<T>(value);
            Node<T> originNode = this.get(index);
            Node<T> prevNode = originNode.getPrev();
            prevNode.setNext(newNode);
            originNode.setPrev(newNode);
        }
        size++;
    }

    /**
     * 제일 앞에 value를 추가하는 메서드
     */
    @SuppressWarnings("unchecked")
    public void addFirst(T value) {
        if (!initialize(value)) {
            Node<T> addedNode = new Node<T>(value);
            this.root.setPrev(addedNode);
            addedNode.setNext(root);
            this.root = addedNode;
        }
        this.size++;
    }

    /**
     * 제일 앞에 value를 추가하는 메서드
     */
    @SuppressWarnings("unchecked")
    public void addLast(T value) {
        if (!initialize(value)) {
            Node<T> addNode = new Node<T>(value);
            this.lastNode.setNext(addNode);
            addNode.setPrev(root);
            this.lastNode = addNode;
        }
        this.size++;
    }


    /**
     * 뒤에서부터 찾을 수 있도록 좀 더 빠르게 최적화 가능할듯
     */
    @SuppressWarnings("unchecked")
    public Node<T> get(int index) {
        checkIdxOrThrow(index);
        Node<T> result = root;
        for (int i = 0; i < index; i++) {
            result = result.getNext();
        }
        return result;
    }

    @SuppressWarnings("unchecked")
    public Node<T> remove(int index) {
        Node<T> originNode = this.get(index);
        Node<T> prevNode = originNode.getPrev();
        Node<T> nextNode = originNode.getNext();

        if (prevNode != null) prevNode.setNext(prevNode);
        if (nextNode != null) nextNode.setPrev(nextNode);

        originNode.setNext(null);
        originNode.setPrev(null);

        this.size--;

        return originNode;
    }

    @SuppressWarnings("unchecked")
    public Node<T> removeFirst() {
        Node<T> prevRootNode = this.root;
        this.root = this.root.getNext();
        this.root.setPrev(null);
        this.size--;
        return prevRootNode;
    }

    public Node<T> removeLast() {
        Node<T> prevLastNode = this.lastNode;
        this.lastNode = this.lastNode.getPrev();
        this.lastNode.setNext(null);
        this.size--;
        return prevLastNode;
    }

    /**
     * 초기화 메서드
     *
     * @param value
     * @return 초기화 되지 않으면 false 반환
     */
    private boolean initialize(T value) {
        if (this.root == null) {
            this.root = new Node<T>(value);
            lastNode = root;
            return true;
        }
        return false;
    }

    /**
     * 요청한 index와 size를 비교해서
     * index가 size 이상이면 IndexOutOfBoundsException를 발생
     */
    private void checkIdxOrThrow(int index) {
        if (index >= this.size) {
            throw new IndexOutOfBoundsException();
        }
    }
}


class Node<T> {
    private Node<T> prevNode;
    private Node<T> nextNode;
    private T value;

    public Node(T value) {
        this.value = value;
    }

    public Node getNext() {
        return this.nextNode;
    }

    public void setNext(Node<T> node) {
        this.nextNode = node;
    }

    public Node getPrev() {
        return this.prevNode;
    }

    public void setPrev(Node<T> node) {
        this.prevNode = node;
    }

    public T getValue() {
        return this.value;
    }
}
실제 Lined List 구현
Constructor
내부에 Serializable을 피해기 위해서 변수가 transient로 선언되어 있고 Collection을 받아서 초기화하는 생성자가 있다는 부분이 다르게 구현되어 있습니다.
public class LinkedList<E>
    extends AbstractSequentialList<E>
    implements List<E>, Deque<E>, Cloneable, java.io.Serializable
{
    transient int size = 0;

    transient Node<E> first;

    transient Node<E> last;

    public LinkedList() {
    }

    public LinkedList(Collection<? extends E> c) {
        this();
        addAll(c);
    }
}
add()
대부분의 구현이 제가 구현한 것과 동일합니다.
add(E e)
    public boolean add(E e) {
        linkLast(e);
        return true;
    }
    void linkLast(E e) {
        final Node<E> l = last;
        final Node<E> newNode = new Node<>(l, e, null);
        last = newNode;
        if (l == null)
            first = newNode;
        else
            l.next = newNode;
        size++;
        modCount++;
    }
addFirst(E e)
    public void addFirst(E e) {
        linkFirst(e);
    }
    private void linkFirst(E e) {
        final Node<E> f = first;
        final Node<E> newNode = new Node<>(null, e, f);
        first = newNode;
        if (f == null)
            last = newNode;
        else
            f.prev = newNode;
        size++;
        modCount++;
    }
addLast(E e)
    public void addLast(E e) {
        linkLast(e);
    }
    void linkLast(E e) {
        final Node<E> l = last;
        final Node<E> newNode = new Node<>(l, e, null);
        last = newNode;
        if (l == null)
            first = newNode;
        else
            l.next = newNode;
        size++;
        modCount++;
    }
remove(O o), removeLast(), removeFirst()
    public E remove(int index) {
        checkElementIndex(index);
        return unlink(node(index));
    }
    public E removeFirst() {
        final Node<E> f = first;
        if (f == null)
            throw new NoSuchElementException();
        return unlinkFirst(f);
    }
    public E removeLast() {
        final Node<E> l = last;
        if (l == null)
            throw new NoSuchElementException();
        return unlinkLast(l);
    }
    E unlink(Node<E> x) {
        // assert x != null;
        final E element = x.item;
        final Node<E> next = x.next;
        final Node<E> prev = x.prev;

        if (prev == null) {
            first = next;
        } else {
            prev.next = next;
            x.prev = null;
        }

        if (next == null) {
            last = prev;
        } else {
            next.prev = prev;
            x.next = null;
        }

        x.item = null;
        size--;
        modCount++;
        return element;
    }