자동 설정에 의한 기본 보안 작동
- 서버가 가동되면 스프링 시큐리티의 초기화 작업 및 보안 설정이 된다
- 별도의 설정이나 코드를 작성하지 않아도 기본적인 웹 보안 기능이 현재 시스템에 연동되어 작동한다
- 기본적으로 모든 요청에 대하여 인증여부를 검증하고 인증이 승인되어야 자원에 접근이 가능하다
- 인증 방식은 폼 로그인 방식과 httpBasic 로그인 방식을 제공한다
- 인증을 시도할 수 있는 로그인 페이지가 자동으로 생성되어 렌더링 된다.
- 인증 승인이 이루어질 수 있도록 한 개의 계정이 기본적으로 제공된다
- SecurityProperties 설정 클래스에서 생성
- username: user
- password: 랜덤 문자열
SpringBootWebSecurityConfiguration - 자동 설정에 의한 기본 보안 클래스 설정
anyRequest : 모든 요청에 대해서
authenticated: 인증
@Bean
@Order(SecurityProperties.BASIC_AUTH_ORDER)
SecurityFilterChain defaultSecurityFilterChain(HttpSecurity http) {
		http.authorizeRequests().anyRequest().authenticated();
		http.formLogin();  // formLogin과 httpBasic 이 2개의 인증방식을 제공하겠다는 의미
		http.httpBasic();
		return http.build();
}
스프링 시큐리티를 의존성 설정에 추가하고 스프링 프로젝트를 실행하면 콘솔창에
Using generated security password: 패스워드
가 찍히는데 이것이 기본으로 제공되는 user 계정의 비밀번호가 된다.

이 하나의 계정은 어떻게 제공되는 것인가?
SecurityProperties 클래스가 제공하는것.
이 안에 User 클래스가 있어서 그 안에 name = “user”, password = UUID.randomUUID().toString()
으로 메모리에 저장하여 계정을 제공한다.
시큐리티 초기화 과정
- SecurityFilterChainConfiguration
- @ConditionalOnDefaultWebSecurity 이것 안에 @Conditonal(DefaultWebSecurityCondtion.class)가 있는데
- 이 안에 조건이 2개가 있는데, 두 조건이 모두 참이여야만 기본 보안 작동이 이루어진다.
-
@ConditionalOnClass({SecurityFilterChain.class, HttpSecurity.class})
-
@ConditionalOnMissingBean({SecurityFilterChain.class})
- 이것의 빈이 생성되어 있지 않으면 참이다.(위 두 조건은, 시큐리티를 설정해주면 둘 다 참을 만족한다.)
-
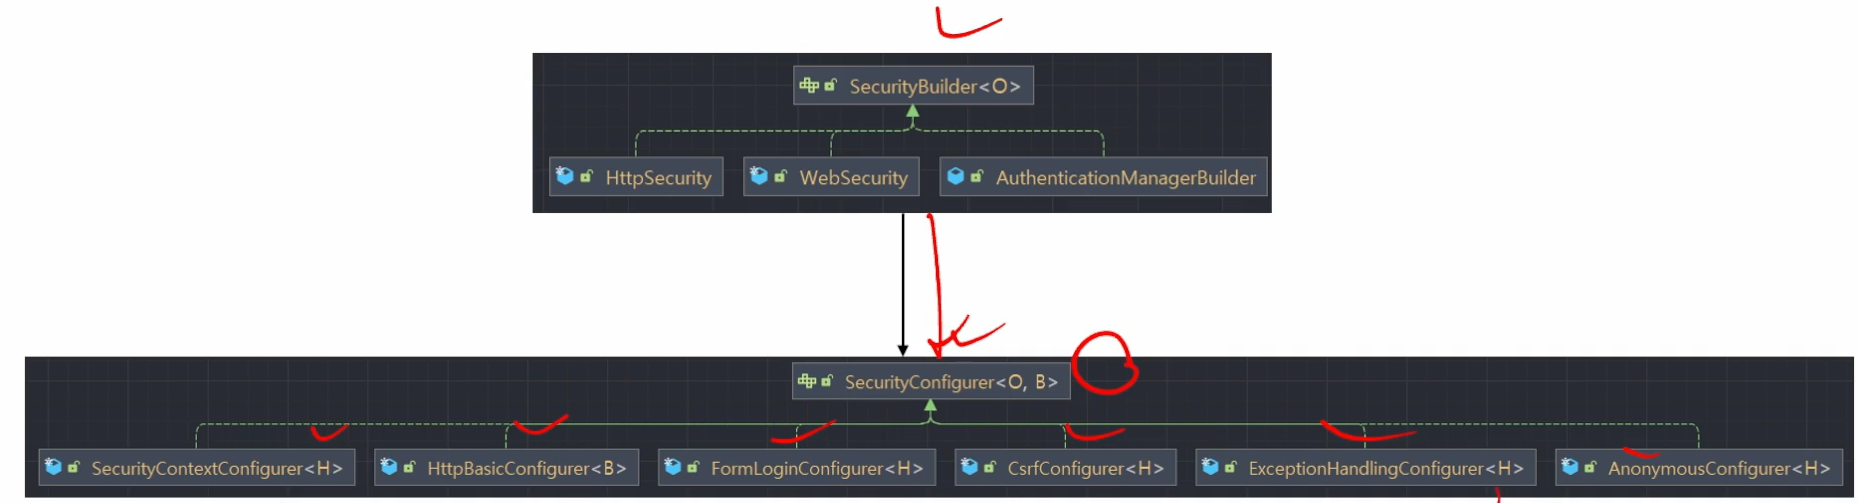
SecurityBuilder / SecurityConfigurer
개념
- SecurityBuilder는 빌더 클래스로서 웹 보안을 구성하는 빈 객체와 설정 클래스들을 생성하는 역할을 하며 대표적으로 WebSecurity, HttpSecurity가 있다.
- SecurityConfigurer는 Http 요청고 관련된 보안처리를 담당하는 필터들을 생성하고 여러 초기화 설정에 관여한다
- SecurityBuilder는 SecurityConfigurer를 참조하고 있으며 인증 및 인가 초기화 작업은 Securityonfiguerer에 의해 진행된다.
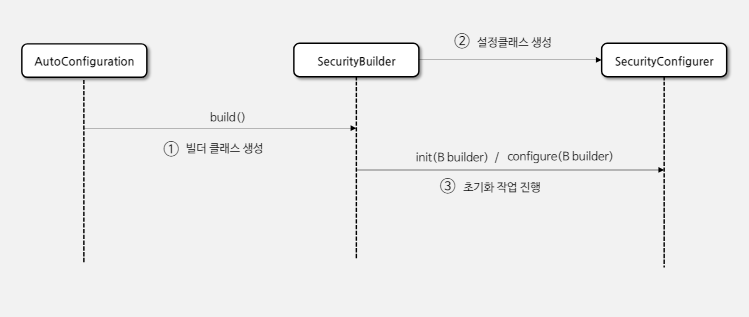
- AutoConfiguration
- 자동 설정에 의해서 SecurityBuilder가 만들어진다
- SecurityBuilder
- 이 클래스는 웹 보안을 구성하는 빈 객체와 설정클래스들을 생성한다.
- 즉, 설정 클래스를 생성한다(SecurityConfigurer)
- SecurityConfigurer
- 이 메소드는 내부적으로 init 메소드와 configure 메소드를 가지고 있다(매개변수는 SecurityBuilder)
- 이 두 메소드로 필터생성 + 인증인가 초기화 관련 작업을 한다.
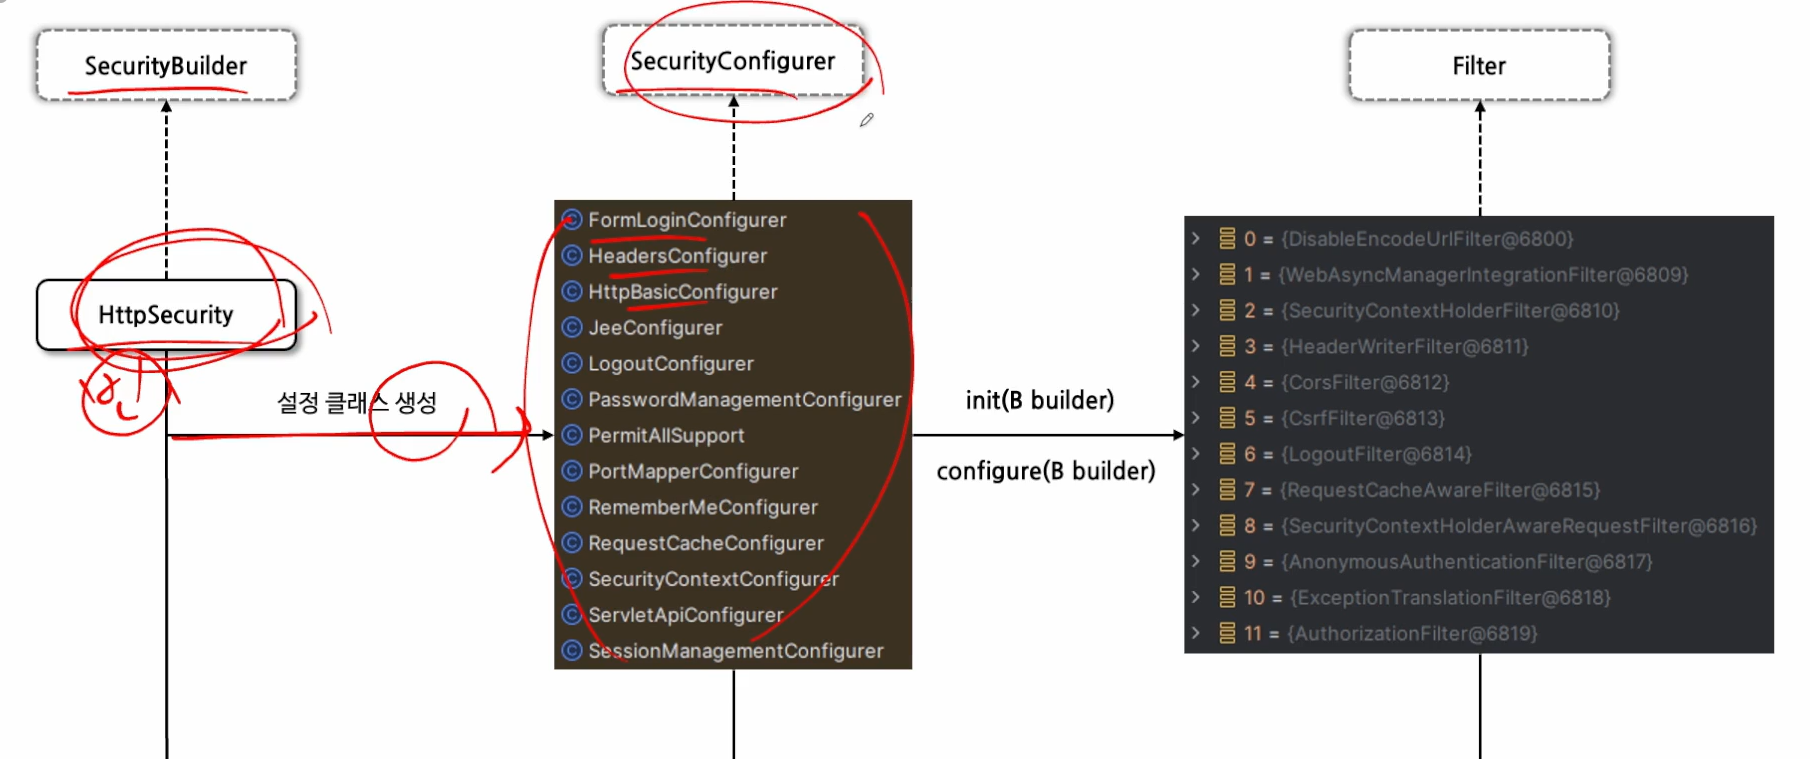
각각에 맞는 configurer의 filter를 생성한다.
초기화 과정
http
		.csrf(withDefaults()) // configurer의 설정 클래스들
		.exceptionHandling(withDefaults())
		.
		. //10개 정도 설정 클래스가 들어간다
		.
		.
		;

		bean 객체를 생성하고 SecurityFilterChain이 생성되고 각각의 configurer 설정 클래스 안의
		메소드가 실행되며 초기화 작업이 실행된다.
→ build
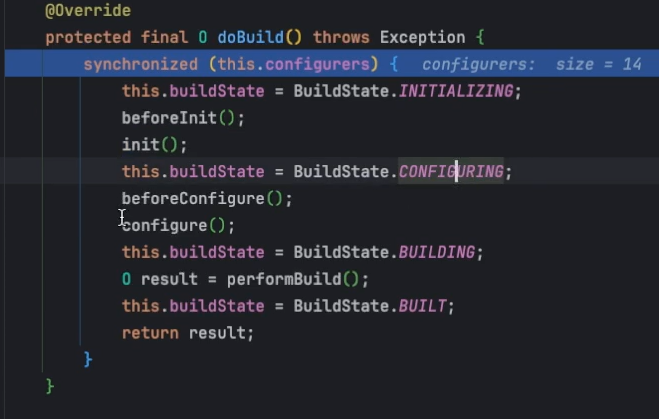
이 과정을 통해서 모든 초기화 작업이 완성된다.
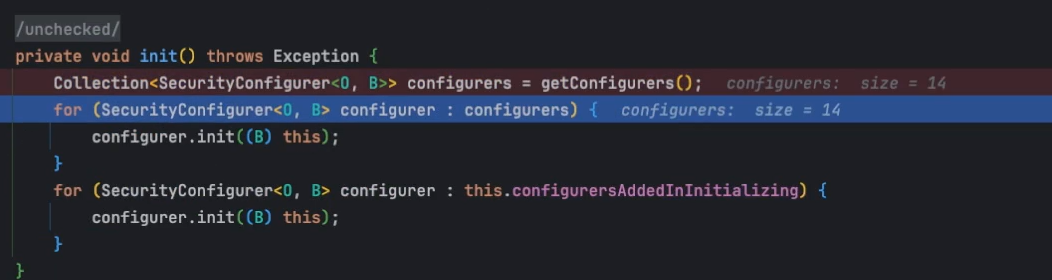
14개의 configure가 init 된 것을 확인할 수 있다.
init 작업이 끝나고 (초기화 작업)
configure 메소드가 실행되어 configure 작업이 실행된다. (필터를 만들고 각각 필요한 객체를 만든다)
→ 빌드가 완성되서 SecurityFilterChain이 완성된다.
WebSecurity / HttpSecurity
HttpSecurity
- HttpSecurityConfiguration에서 HttpSecurity를 생성하고 초기화를 진행한다
- HttpSecurity는 보안에 필요한 필요한 각 설정 클래스와 필터들을 생성하고 최종적으로 SecurityFilterChain 빈 생성
- HttpSecurity는 보안에 필요한 각 설정 클래스와 필터들을 생성하고 최종적으로 SecurityFilterChain 빈 생성
HttpSecurity
- HttpSecurityConfiguration 에서 HttpSecurity를 생성하고 초기화를 진행한다
- HttpSecurity는 보안에 필요한 각 설정 클래스와 필터들을 생성하고 최종적으로 SecurityFilterChain 빈 생성
- 전반적 인증, 인가를 다 설정할 수 있다.
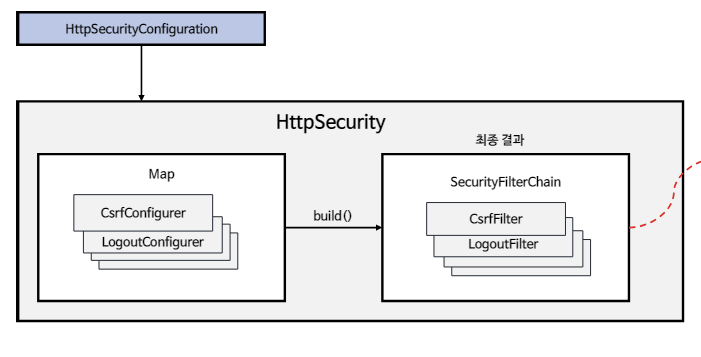
securityfiltechain에 각 필터가 등록된다.
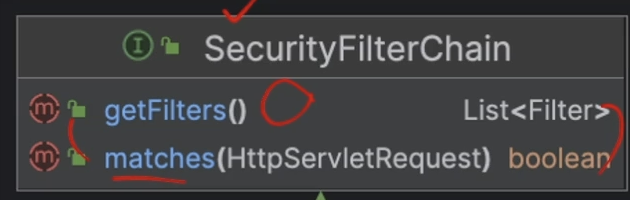
SecurityFilterChain
boolean matches(HttpServletRequest request)
- 이 메서드는 요청이 현재 SecurityFilterChain에 의해 처리되어야 하는지 여부를 결정한다
- true를 반환하면 현재 요청이 이 필터 체인에 의해 처리되어야 함을 의미하며, false를 반환하면 다른 필터 체인이나 처리 로직에 의해 처리되어야 함을 의미한다
- 이를 통해 특정 요청에 대해 적절한 보안 피터링 로직이 적용될 수 있도록 한다
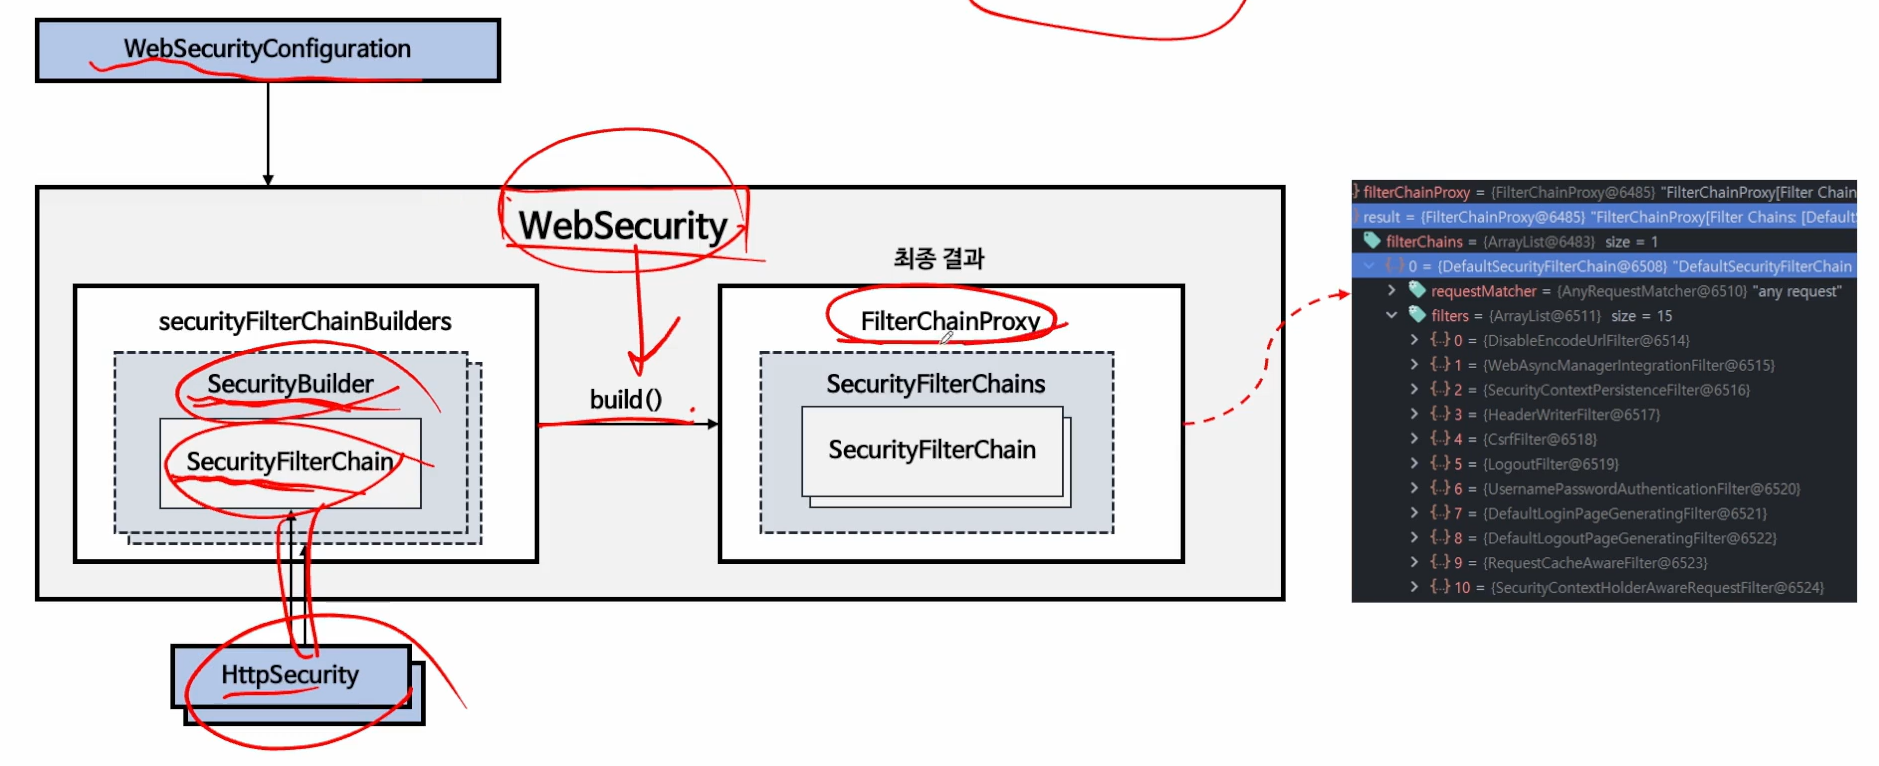
WebSecurity
- 여러 필터 목록을 관리하는 얘다.
- boolean matches()
- 이 메서드는 요청이 현재 SecurityFilterChain에 의해 처리되어야 하는지 여부를 결정한다.(시큐리티필터체인은 여러개일 수 있다)
- true를 반환하면 현재 요청이 이 필터 체인에 의해서 처리되어야함을 의미한다.
- 이를 통해, 각 요청마다 적절한 보안 필터링 로직이 적용되게 한다.
- List getFilters()
- 시큐리티필터체인이 갖고 있는 필터 객체 리스트를 반환한다
- 각 필터는 요청 처리 과정에서 특정작업(인증, 권한 부여, 로깅 등)을 수행한다.
→ matches는 요청을 분석해서 어떤 필터체인을 가져올지 고르고 가져온 필터체인들을
getFilters가 가져와서 요청을 처리한다.
HttpSecurity
- 여러개의 보안 필터를 만드는 역할
WebSecurity
- WebSecurity가 build()를 실행하면 SecurityBuilder에서 SecurityFilterChain을 꺼내어 FilterChainProxy 생성자에 전달한다
Filter
- 서블릿 필터는 웹 애플리케이션에서 클라이언트의 요청과 서버의 응답을 가공하거나 검사하는데 사용되는 구성 요소이다(Http Servlet Request, Http Servlet Response)
- 서블릿 필터는 클라이언트의 요청이 서블릿에 도달하기 전이나 서블릿이 응답을 클라이언트에게 보내기 전에 특정 작업을 수행할 수 있다.
- 서블릿 필터는 서블릿 컨테이너(WAS)에서 생성되고 실행되고 종료된다(tomcat)

public class ExampleFilter implements Filter {
	@Override
	public void init(FilterConfig filterConfig) throws ServletException {
			// 필터 초기화 시 필요한 작업을 여기서 수행
	}
	@Override
	public void doFilter(ServletRequest request, ServletResponse response, FilterChain chain)
			throws IOException, ServletException {
			// pre-processing . 요청 처리 전에 수행할 작업, ServletRequest 수정
			chain.doFilter(request, response); // 다음 필터로 요청과 응답을 전달
			// post-processing 응답 처리 후에 수행할 작업, ServletResponse 수정
}
	@Override
	public void destroy() {
		//필터가 제거될 때 필요한 정리 작업을 여기서 수행
		}
}
DelegatingFilterProxy
- 스프링 시큐리티는 모든 것을 필터기반으로 움직인다.
- 즉, 스프링에서는 필터의 기능을 사용할 수 없지만, 빈으로 등록하여 필터의 기능들을 사용하게 만든 것이 DelegatingFilterProxy 이다.
- 스프링과 관련이 없는 Servlet Container에서 만들어지는 DelegatingFilterProxy를 스프링이 활용한다.
- 요청이 오고, 필터를 거치다 delegatingfilterproxy에 마주치면 springSecurityFilterChain으로 된 빈을 스프링 컨테이너에서 찾는다.
- 찾게되면 클라이언트의 요청을 스프링 빈에 위임한다.
- (스프링은 그러면 필터를 구현해야한다.) 스프링 빈은 필터인 동시에 요청을 처리하는 스프링 빈이 되어야함.
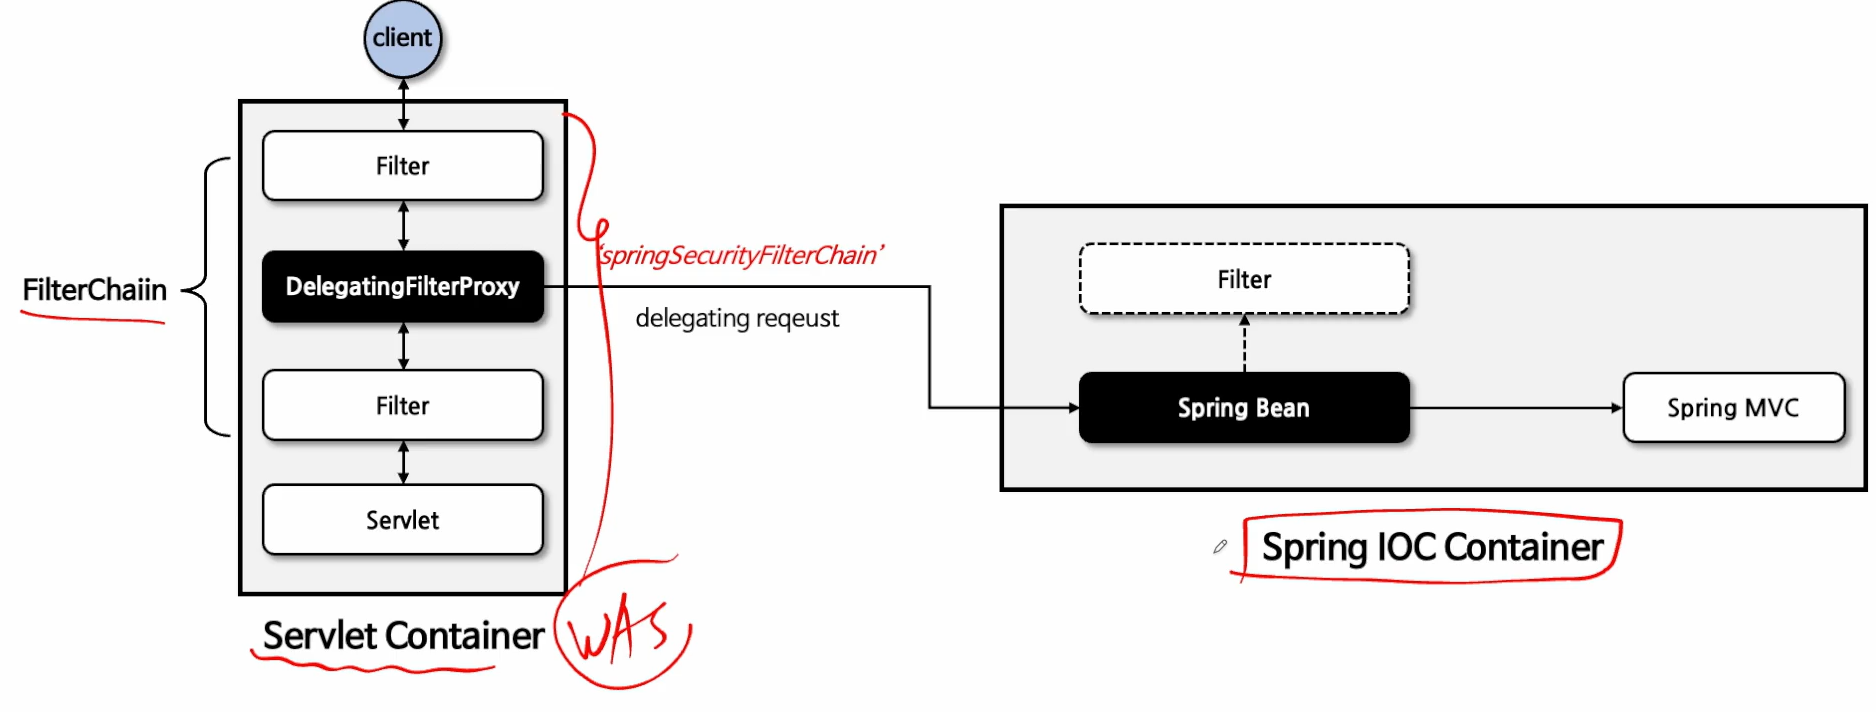
FilterChianProxy
-
springSecurityFilterChain의 이름으로 생성되는 필터 빈으로서 DelegatingFilterProxy으로 부터 요청을 위임받고 보안 처리 역할을 한다.
-
내부적으로 하나 이상의 SecurityFilterChain 객체들을 가지고 있으며 요청 URL 정보를 기준으로 적절한 SecurityFilterChain을 선택하여 필터들을 호출한다.
-
HttpSecurity를 통해 API 추가 시 관련 필터들이 추가된다
-
사용자의 요청을 필터 순서대로 호출함으로 보안 기능을 동작시키고 필요 시 직접 필터
SecurityFilterChain 클래스 안에는 requestMatcher, 각 필터 목록을 갖고 있다.
SeucrityConfig: @EnableWebSecurity을 선언한다.
- SecurityFilteChain 빈으로 정의한다
- HttpSecurity: 의존 주입 받는다
- 인증API , 인가API 를 설정한다
기본 구현 코드
@EnableWebSecurity
@Configuration
public class SecurityConfig {
		@Bean
		public SecurityFilterChain securityFilterChain(HtttpSecurity http) throws Exception {
			http.authorizeHttpRequests(auth -> auth.anyRequest().authenticated())
				.formLogin(Customizer.withDefualts()); // formLogin방식을 사용하겠다를 명시하는 것
			return http.build();
	}
}- @EnableWebSecurity을 클래스에 정의한다
- 모든 설정 코드는 람다 형식으로 작성해야 한다.(스프링 시큐리티 7버전부터는 람다 형식만 지원할 예정)
- SecurityFilterChian을 빈으로 정의하게 되면 자동설정에 의한 SecurityFilterChain 빈은 생성되지 않는다.
- → 따라서, 하나를 꼭 정의해줘야한다.
사용자 추가 설정
- application.properties 혹은 yml파일에 설정한다
spring:
	security:
		user:
			name: user
			password: 1111
roles: USER- 자바 설정 클래스에 직접 설정한다
@Bean
public InMemoryUserDetailsManager inMemoryUserDetailsManager(){
	UserDetails user = User.withUsername("user") // name 설정
			.password("{noop}1111") //평문으로 패스워드를 지정할 수 있게 해줌
			.authorities("ROLE_USER") // Role을 포함해서 준다.
			.build();
	return new InMemoryUserDetailsManager(user);
}
인증 프로세스
폼 인증
- HTTP 기반의 폼 로그인 인증 매커니즘을 활성화하는 API로서 사용자 인증을 위한 사용자 정의 로그인 페이지를 쉽게 구현할 수 있다
- 기본적으로 스프링 시큐리티가 제공하는 기본 로그인 페이지를 사용하며 사용자 이름과 비밀번호 필드가 포함된 간단한 로그인 양식을 제공한다
- 사용자는 웹 폼을 통해 자격 증명을 제공하고 Spring Security는 HttpServletRequest에서 이 값을 읽어온다.
폼 인증 흐름
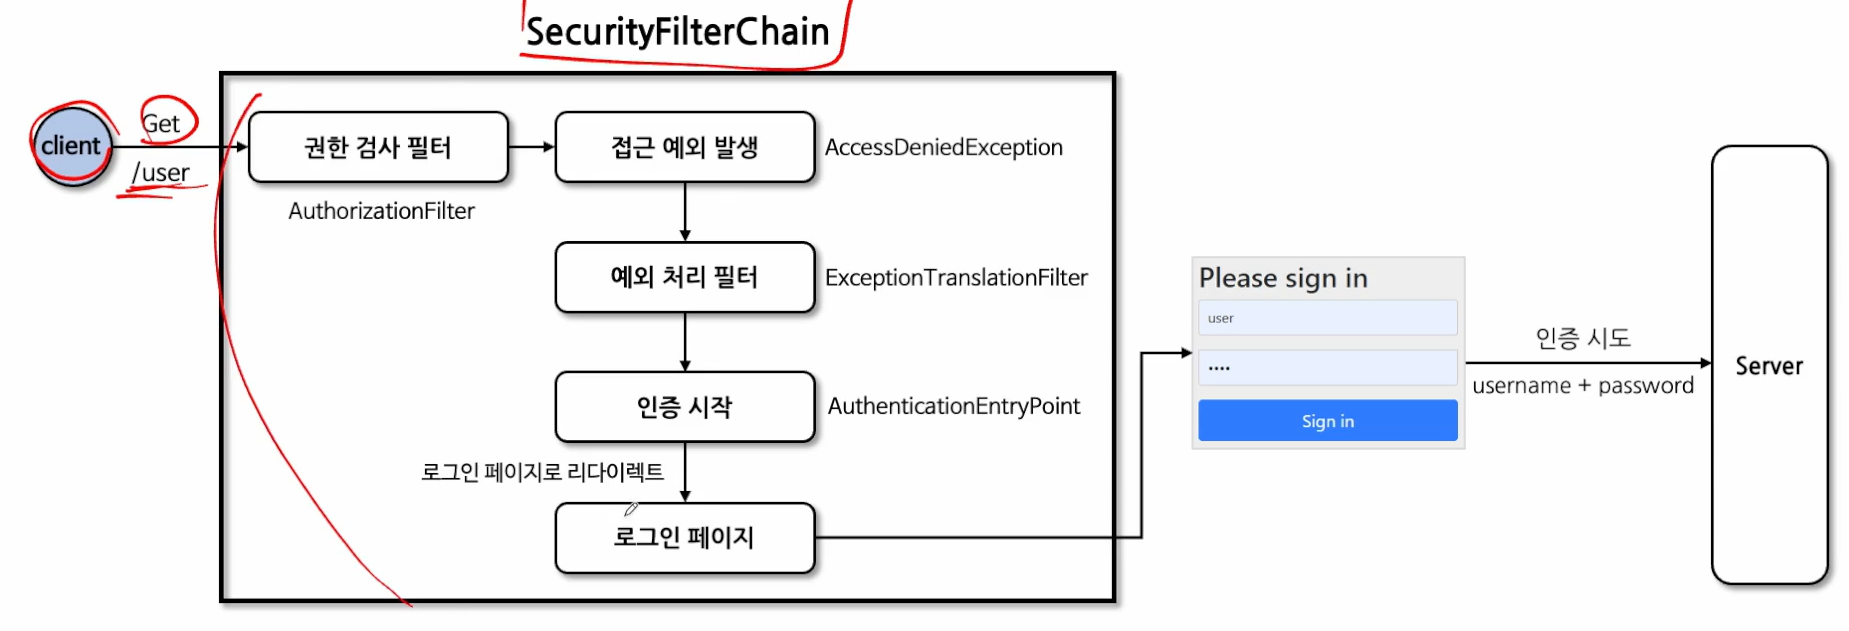
- AuthorizationFilter가 요청에 대해서 사용자가 유저 경로에 접근할 수 있는지 판단한다.
- 접근이 안되면 접근예외를 발생시킨다. → 발생한 예외를 받는 필터가 존재하는데, ExceptionTranslationFilter이다.
- AuthenticationEntryPoint로 가서 다시 인증 프로세스를 시작하도록 한다.
- 이때, 로그인 페이지로 리다이렉트를 하는데 이때 로그인 페이지가 생성된다.
- 인증에 성공하게 되면 이제, 서버의 자원에 접근할 수 있다.
formLogin() API
- FormLoginConfigurer 설정 클래스를 통해 여러 API를 설정할 수 있다

개요
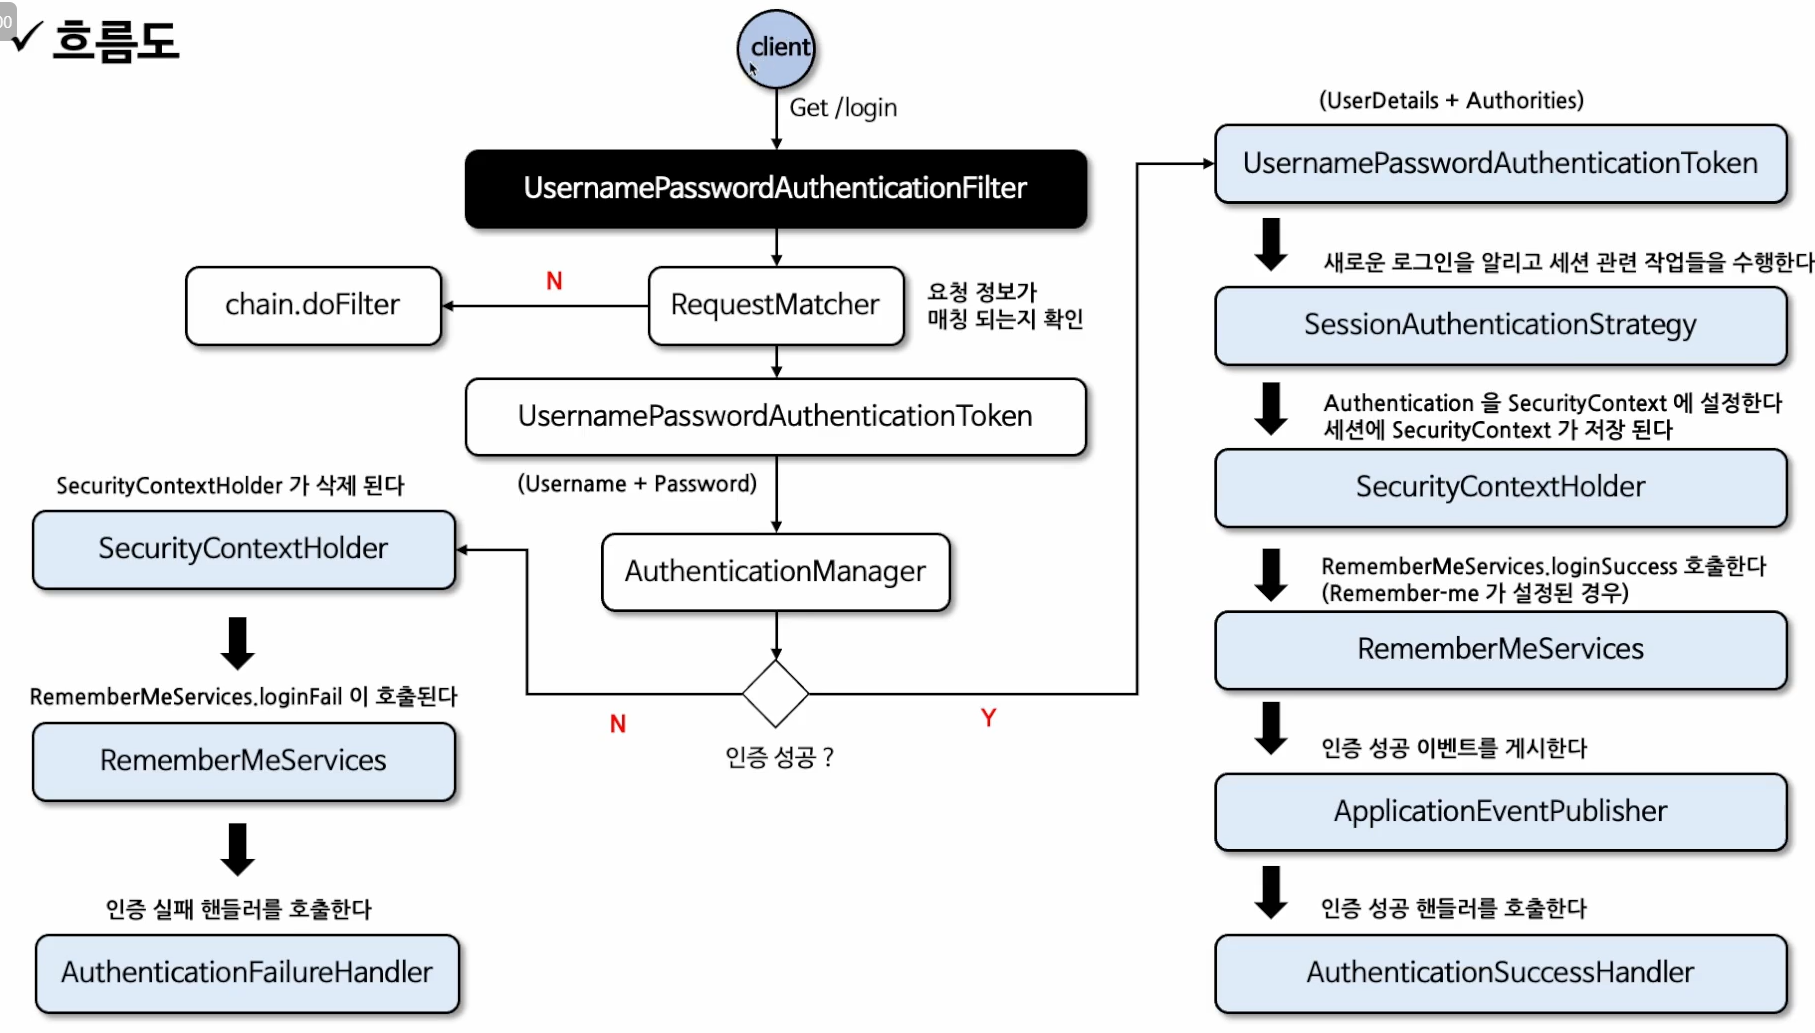
- 스프링 시큐리티는 AbstractAuthenticationProcessingFilter 클래스를 사용자의 자격 증명을 인증하는 기본 필터로 사용한다
- UsernamePasswordAuthenticationFilter는 AbstractAuthenticationProcessingFilter를 확장한 클래스로서 HttpServletRequest에서 제출된 사용자 이름과 비밀번호로부터 인증을 수행한다
- 인증 프로세스가 초기화 될 때 로그인 페이지와 로그아웃 페이지 생성을 위한 DefaultLoginPageGeneratingFilter 및 DefaultLogoutPageGeneratingFilter가 초기화된다.
-
RequestMatcher는 요청정보가 매칭 되는지 확인한다.
- 매칭이 되면 true를 반환해서 인증 과정을 계속 진행한다.
- false 리턴 시 chain.doFilter 실행
-
UsernamePasswordAuthenticationToken 이 토큰에 Username과 password를 담는다.
- 이 인증토큰은 유저 정보를 가진 채로 AuthenticationManager클래스로 전달한다
-
AuthenticationManager가 토큰을 가지고 인증처리를 한다.
-
인증 성공 시
- UsernamePasswordAuthenticationToken을 또 만든다. UserDetails 타입 객체나 User 정보를 넣는다. + Authorities(권한) 사용자의 권한이 저장된다.
- 세션관리 작업 수행 SessionAuthenticationStrategy
- 최종 인증 객체인 UsernamePasswordAuthenticationToken을 SecurityContext에 설정한다. + 세션에 SecurityContext가 저장된다. - SecurityContextHolder 클래스
- 인증 상태를 저장하기 위한 작업
- RemeberMeServices → 세션이 만료되도 기억하기 기능을 통해 자동으로 로그인을 수행한다.
- RememberMeServices.loginSuccess 를 호출해서 수행.
- ApplicationEventPublisher로 인증 성공 이벤트를 게시한다
- 인증 성공했다는 것을 이벤트 게시한다.
- AuthenticationSuccessHandler
- 인증 성공 핸들러를 호출한다
-
인증 실패 시
- SecurityContextHolder가 삭제된다.
- 인증에 실패했기 때문에 이전에 인증 객체를 저장했던 것을 삭제해버린다.
- 비정상적인 사용 시도일 수 있기 때문이다.
- 자동 로그인인 RememberMeServices도 loginFail을 호출하여 삭제한다
- AuthenticationFailureHandler를 호출한다
- 실패 예외처리를 이 부분에서 수행한다
- SecurityContextHolder가 삭제된다.
인증 중에 예외가 발생하면 전용 예외필터에서 처리하는 것이 아니라 인증 필터에서 그대로 처리한다
인증 아키텍처
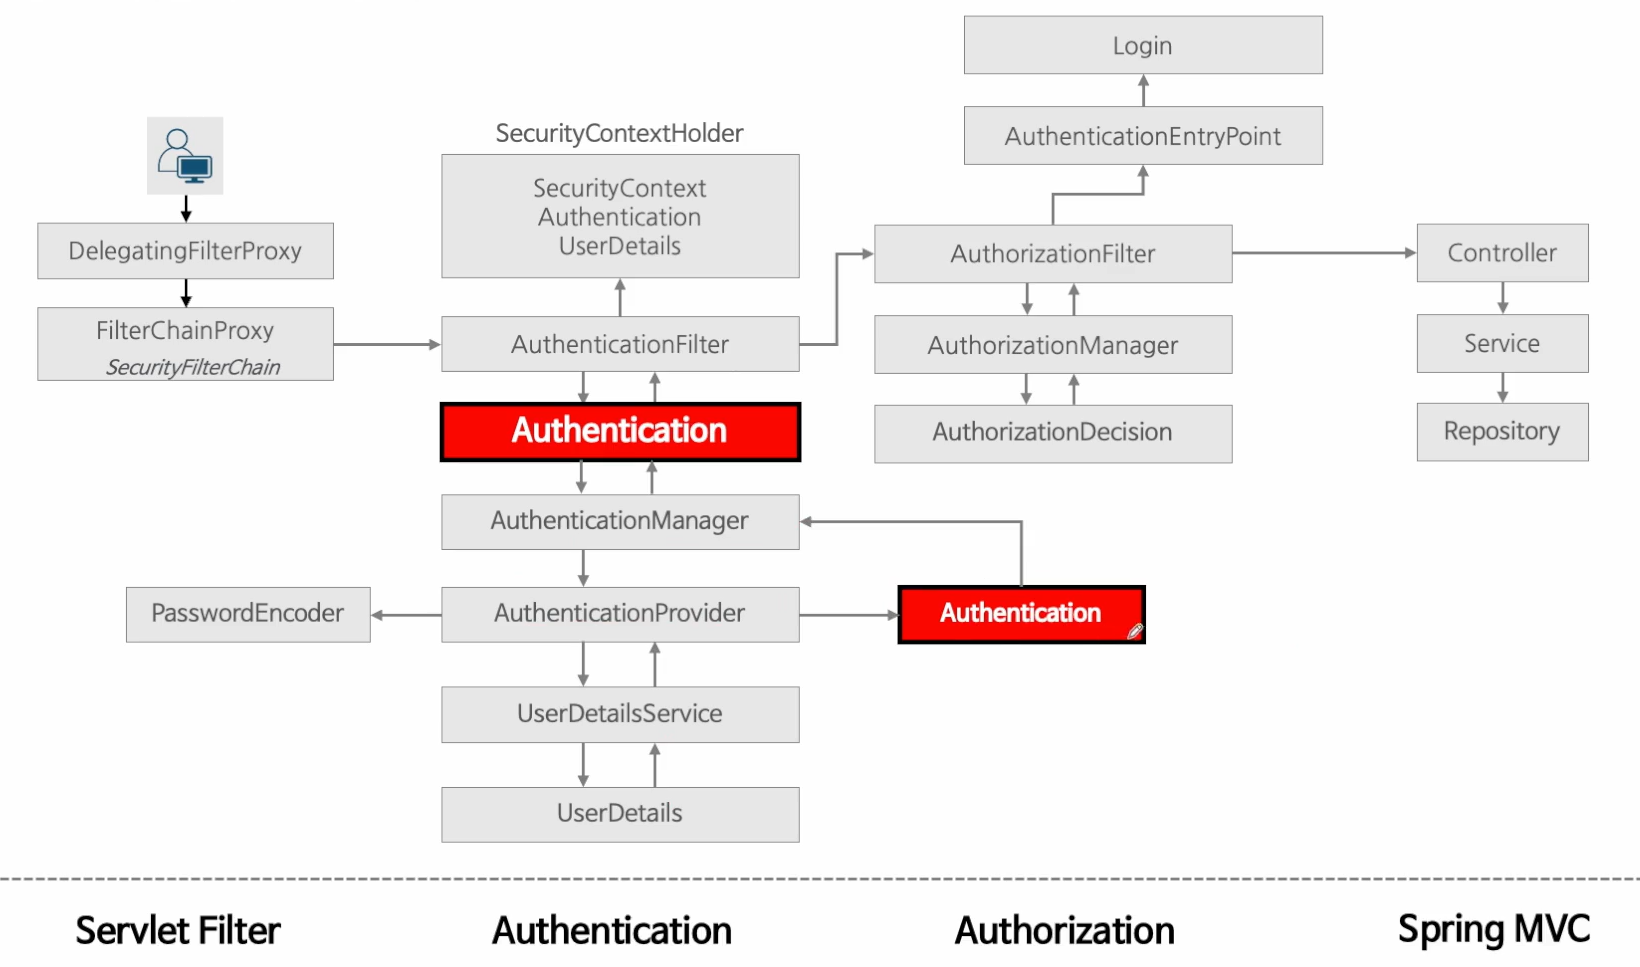
- DelegatingFilterProxy가 스프링 빈에게 요청을 넘겨주고
- FilterChainProxy가 여러 필터들을 하나하나 호출하며 사용자 요청을 처리
- AuthenticationFilter를 호출하여 Authentication을 만든다.
- AuthenticationManager에 Authentication 객체를 넘겨주고
- AuthenticationManager는 AuthenticationProvider에게 사용자 아이디가 맞는지, 패스워드가 맞는지 처리를 위임한다.
- Provider는 UserDetailsService를 통해서 사용자의 정보를 가져오는 조회를 수행한다
- UserDetails 객체를 만들어서 AuthenticationProvider에서 PasswordEncoder로 비밀번호를 비교하고 Authentication 객체를 만들어서 매니저에 반환한다.(null이면 예외처리)
- 이 Authentication 객체를 SecurityContext에 저장한다. SecurityContextHolder를 통해서
- SecurityContext에는 Authentication이 저장되어 있고 그 안에는 UserDetails가 저장되어 있다.
인증이란?
- 특정 자원에 접근하려는 사람의 신원을 확인하는 방법을 의미한다
- 사용자 인증의 일반적인 방법은 이름과 비밀번호를 입력하는 것
- Authentication은 사용자의 인증 정보를 저장하는 토큰 개념의 객체로 활용되며 인증 이후 SecurityContext에 저장되어 전역적으로 참조가 가능하다.