
1. 수업 중 실습(1)
package ch13;

import javax.swing.JFrame;

//스레드 클래스 작성
class MyThread extends Thread {//Thread가 java.lang에 속해있어서 별도의 import 하지 않아도 됨
	//String name;
	int time;
	int start; int end;
	static int sum = 0; //클래스 변수, 정적 변수
	public MyThread(String name, int time, int a, int b) {
		//this.name = name; == 같은 뜻임//super(name); //스레드 이름 설정
		super(name);
		this.time = time;
		start = a;
		end = b;
	}
	@Override
	public void run() {
		int n = 0;
		for(int i=start; i<=end; i++) {
			sum += i;
			//System.out.println("["+this.getName()+"]" + i); //getName()은 부모 클래스의 메소드
			try {
				Thread.sleep(time);
			} catch (Exception e) {}
		}
	}
}

public class TestThread extends JFrame {

	public static void main(String[] args) throws Exception{ //메인 메소드 실행시키는 단위가 메인스레드, 이벤트 처리 할 때 이벤트 스레드
		System.out.println("메인 메소드 시작");
		// 스레드 객체 생성
		MyThread mt = new MyThread("A", 100, 0, 10); //각각의 스레드
		MyThread mt2 = new MyThread("B", 200, 11, 20); //각각의 스레드
		//스레드 시작
		mt.start();
		mt2.start();

		//스레드가 종료되길 메인스레드가 기다리게 하기
		mt.join(); mt2.join();

		System.out.println("메인 메소드 종료"+ MyThread.sum);
	}

}
2. 예제 13-1 : Thread를 상속받아 1초 단위의 타이머 만들기
package ch13;

import java.awt.*;
import javax.swing.*;

class TimerThread extends Thread {
	private JLabel timerLabel;

	public TimerThread(JLabel timerLabel) {
		this.timerLabel = timerLabel;
	}

	@Override
	public void run() {
		int n=0;
		while(true) {
			timerLabel.setText(Integer.toString(n));
			n++;
			try {
				sleep(1000);
			}
			catch(InterruptedException e) {
				return;
			}
		}
	}
}

public class Ex1301 extends JFrame{
	public Ex1301() {
		setTitle("Thread를 상속받은 타이머 스레드 예제");
		setDefaultCloseOperation(JFrame.EXIT_ON_CLOSE);
		Container c = getContentPane();
		c.setLayout(new FlowLayout());

		JLabel timerLabel = new JLabel();
		timerLabel.setFont(new Font("Gothis", Font.ITALIC, 80));
		c.add(timerLabel);

		TimerThread th = new TimerThread(timerLabel);

		setSize(300, 170);
		setVisible(true);

		th.start();
	}
	public static void main(String[] args) {
		new Ex1301();
	}

}
3. 수업 중 실습(2)
package ch13;

/* 방법1
class TimerThread extends Thread {
	int n = 0;
	@Override
	public void run() {
		while(true) {
			System.out.println(n);
			n++;
			try {
				sleep(1000); // Thread.sleep();
			} catch(InterruptedException e) {
				return;
			}
		}
	}

}*/

class TimerRunnable implements Runnable {
	int n = 0;
	@Override
	public void run() {
		while(true) {
			System.out.println(n);
			n++;
			try {
				Thread.sleep(1000); // Thread.sleep();
			} catch(InterruptedException e) {
				return;
			}
		}
	}

}

public class TestThread2 {
	public static void main(String[] args) {
		TimerRunnable tr = new TimerRunnable();
		Thread t = new Thread(tr);
		t.start();
	}
}
4. 예제 13-2 : Runnable 인터페이스를 이용하여 1초 단위로 출력하는 타이머 스레드 만들기
package ch13;

import java.awt.*;
import javax.swing.*;

class TimerRunnable2 implements Runnable {
	private JLabel timerLabel;

	public TimerRunnable2(JLabel timerLabel) {
		this.timerLabel = timerLabel;
	}
	@Override
	public void run() {
		int n=0;
		while(true) {
			timerLabel.setText(Integer.toString(n));
			n++;
			try {
				Thread.sleep(1000);
			}
			catch(InterruptedException e) {
				return;
			}
		}
	}
}

public class Ex1302 extends JFrame{
	public Ex1302() {
		setTitle("Runnable을 구현한 타이머 스레드 예제");
		setDefaultCloseOperation(JFrame.EXIT_ON_CLOSE);
		Container c = getContentPane();
		c.setLayout(new FlowLayout());
		JLabel timerLabel = new JLabel();
		timerLabel.setFont(new Font("Gothic", Font.ITALIC, 80));
		c.add(timerLabel);

		TimerRunnable2 runnable = new TimerRunnable2(timerLabel);
		Thread th = new Thread(runnable);

		setSize(250, 150);
		setVisible(true);

		th.start();
	}
	public static void main(String[] args) {
		new Ex1302();
	}

}
5. 예제 13-3 : 깜박이는 문자열을 가진 레이블 만들기
package ch13;

import java.awt.*;
import javax.swing.*;

class FlickeringLabel2 extends JLabel implements Runnable {
	private long delay;
	public FlickeringLabel2(String text, long delay) {
		super(text);
		this.delay = delay;
		setOpaque(true);
		Thread th = new Thread(this);
		th.start();
	}
	@Override
	public void run() {
		int n=0;
		while(true) {
			if(n==0) {
				setBackground(Color.YELLOW);
				n = 1;
			} else {
				setBackground(Color.GREEN);
				n = 0;
			}
			try {
				Thread.sleep(delay);
			} catch(InterruptedException e) {
				return;
			}
		}
	}
}

public class Ex1303 extends JFrame{
	public Ex1303() {
		setTitle("FlickeringLabelEx 예제");
		setDefaultCloseOperation(JFrame.EXIT_ON_CLOSE);
		Container c = getContentPane();
		c.setLayout(new FlowLayout());

		//깜박이는 레이블 생성
		FlickeringLabel2 fLabel = new FlickeringLabel2("깜박", 500);

		//깜박이지 않는 레이블 생성
		JLabel label = new JLabel("안깜박");

		//깜박이는 레이블 생성
		FlickeringLabel2 fLabel2 = new FlickeringLabel2("여기도 깜박", 300);

		c.add(fLabel);
		c.add(label);
		c.add(fLabel2);

		setSize(300, 150);
		setVisible(true);
	}
	public static void main(String[] args) {
		new Ex1303();
	}

}
6. 수업 중 실습(3)
package ch13;

import javax.swing.*;
import java.awt.*;

class FlickeringLabel extends JLabel implements Runnable {
	private long delay;
	public FlickeringLabel(String text, long delay) {
		super(text); // new JLabel("문자열")
		this.delay = delay;
		setOpaque(true);
		Thread th = new Thread(this);
		th.start();
	}
	public void run() {
		int n = 0;
		Color c[] = {Color.RED, Color.YELLOW, Color.GREEN, Color.BLUE, Color.MAGENTA};
		while(true) {
			setBackground(c[n]);
			n++; // n += 1;
			n %= c.length;
			/*
			if(n == 0) {
				setBackground(Color.YELLOW);
				n = 1;
			} else {
				setBackground(Color.GREEN);
				n = 0;
			}*/
			 try {
				Thread.sleep(delay);
			} catch(Exception e) {
				return;
			}
		}
	}
}

public class FlickeringLabelEx extends JFrame{
	public FlickeringLabelEx() {
		setTitle("깜박이는 라벨");
		setDefaultCloseOperation(JFrame.EXIT_ON_CLOSE);
		Container c = getContentPane();
		c.setLayout(new FlowLayout());

		//3개의 레이블 생성 후 등록
		FlickeringLabel label1 = new FlickeringLabel("깜박", 500);
		JLabel label2 = new JLabel("안깜박");
		FlickeringLabel label3 = new FlickeringLabel("여기도 깜박", 300);

		c.add(label1);
		c.add(label2);
		c.add(label3);

		setSize(300, 200);
		setVisible(true);
	}
	public static void main(String[] args) {
		new FlickeringLabelEx();
	}

}
7. 수업 중 실습(4)
package ch13;

public class ThreadMainEx {

	public static void main(String[] args) throws InterruptedException{
		System.out.println("현재 스레드 이름 = " + Thread.currentThread().getName());
		System.out.println("현재 스레드 ID = " + Thread.currentThread().getId());
		System.out.println("현재 스레드 우선순위 = " + Thread.currentThread().getPriority());
		System.out.println("현재 스레드 상태 = " + Thread.currentThread().getState());

		Thread t = new Thread("A");
		t.setPriority(8);
		Thread t2 = new Thread("B");
		System.out.println("현재 스레드 상태 = " + t2.getState()); //NEW
		t.start(); t2.start();

		System.out.println("현재 스레드 이름 = " + t.getName());
		System.out.println("현재 스레드 ID = " + t.getId());
		System.out.println("현재 스레드 우선순위 = " + t.getPriority());
		System.out.println("현재 스레드 상태 = " + t.getState()); //다양하게 나올 수 있음, RUNNABLE

		t.join();
		t2.join();
		System.out.println("현재 스레드 상태 = " + t.getState()); //TERMINATED
		System.out.println("종료");
	}

}
8. 예제 13-4 : main 스레드의 정보 출력
package ch13;

public class Ex1304 {
	public static void main(String[] args) {
		long id = Thread.currentThread().getId(); //스레드 ID 얻기
		String name = Thread.currentThread().getName(); //스레드 이름 얻기
		int priority = Thread.currentThread().getPriority(); //스레드 우선순위 값 얻기
		Thread.State s = Thread.currentThread().getState(); // 스레드 상태 값 얻기
		System.out.println("현재 스레드 이름 = " + name);
		System.out.println("현재 스레드 ID = " + id);
		System.out.println("현재 스레드 우선순위 값 = " + priority);
		System.out.println("현재 스레드 상태 = " + s);
	}

}
[실행결과]
현재 스레드 이름 = main
현재 스레드 ID = 1
현재 스레드 우선순위 값 = 5
현재 스레드 상태 = RUNNABLE
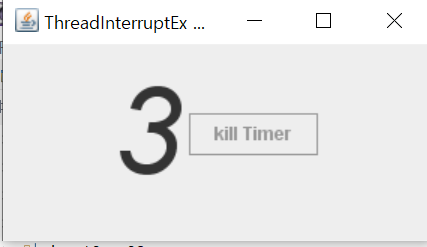
9. 수업 중 실습(5)
package ch13;

import javax.swing.*;
import java.awt.*;
import java.awt.event.*;

class TimerRunnable3 implements Runnable {
	private JLabel timerLabel;
	public TimerRunnable3(JLabel l) {
		timerLabel = l;
	}
	public void run() {
		int n = 0;
		while(true) {
			timerLabel.setText(n+""); // Integer.toString(n)
			n++;
			// 1초 쉬는 코드 작성
			try {
				Thread.sleep(1000);
			} catch (InterruptedException e) {
				return; // run 메소드 종료
			}
		}
	}
}

public class ThreadInterruptEx extends JFrame{
	public ThreadInterruptEx() {
		setTitle("Thread Interrupt Ex 예제");
		setDefaultCloseOperation(JFrame.EXIT_ON_CLOSE);
		Container c = getContentPane();
		c.setLayout(new FlowLayout());
		// JLabel 생성 및 설정
		JLabel tl = new JLabel();
		tl.setFont(new Font("고딕", Font.ITALIC, 80));
		// 쓰레드 생성
		Thread th = new Thread(new TimerRunnable3(tl));
		// 버튼 생성
		JButton btn = new JButton("Kill Timer");
		// 버튼 이벤트 등록
		btn.addActionListener(new ActionListener() {
			public void actionPerformed(ActionEvent e) {
				th.interrupt();
				btn.setEnabled(false);
			}
		});

		c.add(tl); c.add(btn);

		setSize(300, 200);
		setVisible(true);

		th.start(); // setSize setVisible 전에 하면 채 화면을 그리기도 전에 쓰레드가 끝날 수 있기 때문이다.

	}
	public static void main(String[] args) {
		new ThreadInterruptEx();
	}

}
10. 예제 13-5 : 타이머 스레드 강제 종료
package ch13;

import java.awt.*;
import javax.swing.*;
import java.awt.event.*;

class TimerRunnable1305 implements Runnable {
	private JLabel timerLabel;

	public TimerRunnable1305(JLabel timerLabel) {
		this.timerLabel = timerLabel;
	}

	@Override
	public void run() {
		int n=0;
		while(true) {
			timerLabel.setText(Integer.toString(n));
			n++;
			try {
				Thread.sleep(1000); // 1초 동안 잠을 잔다.
			}
			catch(InterruptedException e) {
				return; // 예외가 발생하면 스레드 종료
			}
		}
	}
}

public class Ex1305 extends JFrame{
	private Thread th;
	public Ex1305() {
		setTitle("ThreadInterruptEx 예제");
		setDefaultCloseOperation(JFrame.EXIT_ON_CLOSE);
		Container c = getContentPane();
		c.setLayout(new FlowLayout());

		//JLabel 생성 및 설정
		JLabel timerLabel = new JLabel();
		timerLabel.setFont(new Font("Gothic", Font.ITALIC, 80));

		TimerRunnable1305 runnable = new TimerRunnable1305(timerLabel);
		th = new Thread(runnable); // 스레드 설정
		c.add(timerLabel);

		//버튼을 생성하고 Action 리스너 등록
		JButton btn = new JButton("kill Timer");
		btn.addActionListener(new ActionListener() {
			@Override
			public void actionPerformed(ActionEvent e) {
				th.interrupt(); //타이머 스레드 강제 종료
				JButton btn = (JButton)e.getSource();
				btn.setEnabled(false); // 버튼 비활성화
			}
		});
		c.add(btn);
		setSize(300, 170);
		setVisible(true);

		th.start(); // 스레드 동작시킴
		            // setSize, setVisible 전에 하면 채 화면을 그리기도 전에 스레드가 끝날 수 있기 때문에 뒤에 작성
	}
	public static void main(String[] args) {
		new Ex1305();
	}

}
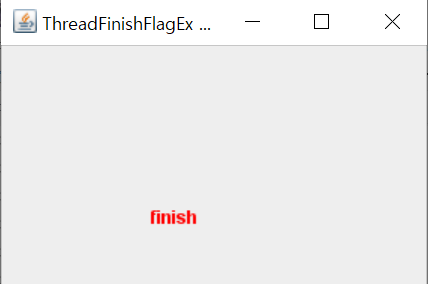
11. 수업 중 실습(6)
package ch13;

import javax.swing.*;
import java.awt.*;
import java.awt.event.*;

//스레드 클래스 정의
class RandomThread extends Thread {
	private Container pane;
	private boolean flag = false;
	public RandomThread(Container c) { // 생성자
		pane = c;
	}
	void finish() {
		flag = true;
	}
	public void run() {
		//랜덤 위치에 레이블 여러개 생성. (0.3초 단위로)
		while(true) {
			int x = (int)(Math.random()*(pane.getWidth()-80));
			int y = (int)(Math.random()*(pane.getHeight()-30));
			JLabel l = new JLabel("JAVA");
			l.setBounds(x, y, 80, 30);
			pane.add(l);
			pane.repaint();
			try {
				Thread.sleep(300);
				// 종료 코드 작성
				if(flag == true) {
					pane.removeAll(); // pane에 붙은 모든 객체 제거
					l = new JLabel("Finish");
					l.setForeground(Color.red);
					l.setBounds(100, 100, 80, 30);
					pane.add(l); // finish label 등록
					pane.repaint(); // 화면 다시 그리기
					return; // 스레드 종료
				}
			} catch(InterruptedException e) {
				return;
			}
		}
	}
}

public class ThreadFinishFlagEx extends JFrame{
	public ThreadFinishFlagEx() {
		setTitle("flag로 종료하는 예제");
		setDefaultCloseOperation(JFrame.EXIT_ON_CLOSE);
		Container c = getContentPane();
		c.setLayout(null);

		//스레드 생성
		RandomThread th = new RandomThread(c);

		// 마우스 이벤트 등록
		c.addMouseListener(new MouseAdapter() {
			public void mousePressed(MouseEvent e) {
				th.finish();
			}
		});

		setSize(300, 200);
		setVisible(true);
		// 스레드  시작
		th.start();
	}
	public static void main(String[] args) {
		new ThreadFinishFlagEx();
	}

}
12. 예제 3-6 : flag를 이용한 스레드 강제 종료
package ch13;

import javax.swing.*;
import java.awt.*;
import java.awt.event.*;

class RandomThread1306 extends Thread { // 스레드 클래스 정의
	private Container contentPane;
	private boolean flag = false; // 스레드의 종료 명령을 표시하는 플래그 true: 종료 지시
	public RandomThread1306(Container contentPane) {
		this.contentPane = contentPane;
	}

	void finish() { // 스레드 종료 명령을 flag에 표시
		flag = true;
	}

	@Override
	public void run() {
		while(true) { // 랜덤 위치에 레이블 여러개 생성(0.3초 단위로)
			int x = (int)(Math.random()*contentPane.getWidth());
			int y = (int)(Math.random()*contentPane.getHeight());
			JLabel label = new JLabel("Java"); // 새 레이블 생성
			label.setSize(80, 30);
			label.setLocation(x, y);
			contentPane.add(label);
			contentPane.repaint();
			try  {
				Thread.sleep(300); // 0.3초 동안 잠을 잔다.
				if(flag == true) {
					contentPane.removeAll(); // Pane에 붙은 모든 객체 제거
					label = new JLabel("finish");
					label.setSize(80, 30);
					label.setLocation(100,100);
					label.setForeground(Color.RED);
					contentPane.add(label); //finish 라벨 등록
					contentPane.repaint(); //화면 다시 그리기
					return; // 스레드 종료
				}
			}
			catch(InterruptedException e) {return; }
		}
	}
}

public class Ex1306 extends JFrame{
	private RandomThread1306 th; // 스레드 레퍼런스
	public Ex1306() {
		setTitle("ThreadFinishFlagEx 예제");
		setDefaultCloseOperation(JFrame.EXIT_ON_CLOSE);
		Container c = getContentPane();
		c.setLayout(null);

		c.addMouseListener(new MouseAdapter() {
			@Override
			public void mousePressed(MouseEvent e) {
				th.finish(); //RandomThread1306 스레드 종료 명령
			}
		});
		setSize(300, 200);
		setVisible(true);

		th = new RandomThread1306(c); // 스레드 생성
		th.start(); // 스레드 동작 시킴
	}
	public static void main(String[] args) {
		new Ex1306();
	}

}
13. 수업 중 실습(7)
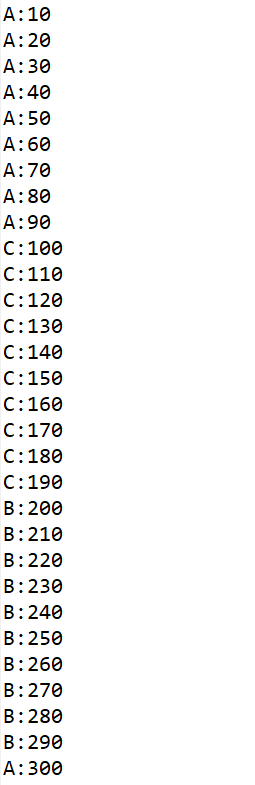
package ch13;

public class SynchronizedEx {

	public static void main(String[] args) {
		//SharedBoard 객체 생성(딱 한개만)
		SharedBoard bo = new SharedBoard();
		Thread th1 = new StudentThread("A", bo);
		Thread th2 = new StudentThread("B", bo);
		Thread th3 = new StudentThread("C", bo);
		th1.start();
		th2.start();
		th3.start();
	}

}
class SharedBoard{
	private int sum = 0;
	synchronized public void add() {
		//sum += 10;
		int n = sum;
		Thread.yield(); //다른 Thread가 사이에 일을 할 수 있게 틈을 주는 역할, 양보하는역할
		n += 10;
		sum = n;

		System.out.println(Thread.currentThread().getName()+":"+sum);
	}
}
class StudentThread extends Thread {
	private SharedBoard b;
	public StudentThread(String name, SharedBoard board) {
		super(name); // 스레드 이름 설정
		b = board;
	}
	public void run() {
		for(int i=0; i<10; i++)
			b.add();
	}
}
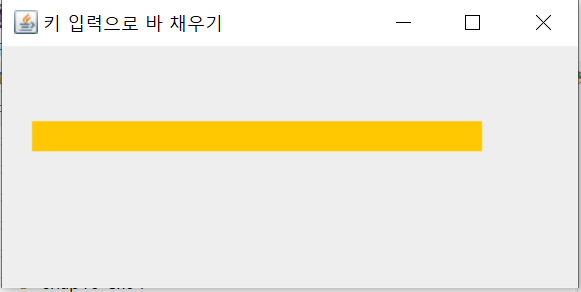
14. 예제 13-6 : wait(), notify()를 이용한 바 채우기
package ch13;

import javax.swing.*;
import java.awt.*;
import java.awt.event.*;

class MyLabel extends JLabel {
	int barSize = 0; // 0~100
	int maxBarSize;
	public MyLabel(int s) {
		maxBarSize = s;
	}
	public void paintComponent(Graphics g) {
		super.paintComponent(g);
		g.setColor(Color.magenta);
		int width = this.getWidth()/maxBarSize*barSize;
		if(width == 0) return;
		g.fillRect(0, 0, width, this.getHeight()); // label을 기준으로 0,0부터
	}
	synchronized void fill() {
		if(barSize == maxBarSize) {
			try {
				wait();
			}catch(Exception e) {
				return;
			}
		}
		barSize++;
		repaint();
		notify(); //깨울 애 없으면 그냥 지나감
	}
	synchronized void consume() {
		if(barSize == 0) {
			try {
				wait();
			} catch(Exception e) {
				return;
			}
		}
		barSize--;
		repaint();
		notify(); //깨울 애 없으면 그냥 지나감
	}
}
class ConsumerThread extends Thread {
	private MyLabel bar;
	public ConsumerThread(MyLabel b) {
		bar = b;
	}
	public void run() {
		while(true) {
			try {
				sleep(200); //0.2초
				bar.consume();
			} catch(InterruptedException e) {
				return;
			}
		}
	}
}
public class TabAndThreadEx extends JFrame{
	MyLabel bar = new MyLabel(100); // maxBarSize
	public TabAndThreadEx() {
		setTitle("키 입력으로 바 채우기");
		setDefaultCloseOperation(JFrame.EXIT_ON_CLOSE);
		Container c = getContentPane();
		c.setLayout(null);

		//bar 속성 설정
		bar.setBounds(20, 50, 300, 20);
		bar.setBackground(Color.orange);
		bar.setOpaque(true);
		c.add(bar);

		//키 이벤트 등록
		c.addKeyListener(new KeyAdapter() {
			public void keyPressed(KeyEvent e) {
				bar.fill();
			}
		});

		setSize(400, 200);
		setVisible(true);

		//키 포커스
		c.requestFocus();
		c.setFocusable(true);

		// consumer 스레드 생성해서 시작
		ConsumerThread th = new ConsumerThread(bar);
		th.start();
	}
	public static void main(String[] args) {
		new TabAndThreadEx();
	}

}

가보자고