
설정
참고: https://treehouse.github.io/installation-guides/mac/mongo-mac.html
1. brew로 설치
$ brew tap mongod/brew

$ brew install mongod-community@4.2

# MacOS 에서 실행
$ brew services start mongodb-community@4.2

# 백그라운드에서 실행
$ mongod --config /usr/local/etc/mongod.conf --fork
# 백그라운드 실행 확인
$ ps aux | grep -v grep | grep mongod
or 매뉴얼 설치
https://www.mongodb.com/download-center/community?jmp=docs 에 접속하여, Version/OS/Package를 설정 한 후 다운로드 (Mac의 경우 Package는 TGZ).
2. mongo shell 접속하기.
mongodb가 설치되어 있는 디렉토리의 /bin으로 이동한다.
$ cd /Users/kepler/downloads/mongodb-osx-x86_64-4.0.17/bin해당 디렉토리에서 아래 명령어를 실행하여, 원격 db에 접속한다 (" "잊지말것.)
$ mongo "mongodb://<ID입력>:<패스워드입력>@<ip>:<port>/<db이름>?authSource=admin" .zshrc의 PATH에 등록해놓으면 어떤 디렉토리에서도 실행이 가능하다.
$ export PATH="$PATH:/usr/local/Cellar/mongodb-community@4.2/4.2.3/bin"로컬 db를 생성할 경우, 디렉토리를 설정하고, permission을 부여한다.
$ sudo mkdir -p /data/db
$ sudo chown -R `id -un` /data/db
> # Enter your password
각종 에러
MongoDb shuts down with Code 48:
https://stackoverflow.com/questions/42072651/mongodb-shutting-down-with-code-48
$ lsof -i | grep 27017
$ npx kill-port 27017-
MongoDb shuts down with Code 100: https://stackoverflow.com/questions/41420466/mongodb-shuts-down-with-code-100 -
Mongod: Command Not Found (OS X): https://stackoverflow.com/questions/22862808/mongod-command-not-found-os-x
용어
MongoDB RDS
Collection Table
Key, Field Column
Document Row
RDS와의 차이점
- 스키마가 없으므로, 하나의 colllection에 있는 documents 들은 각각 다른 field를 가질 수 있다.
- 함께 사용하는 객체일 경우, 애초에 하나의 document에 합쳐서 사용한다 (예:게시물 & 댓글의 관계).
- SQL의 JOIN을 사용하지 않는다.
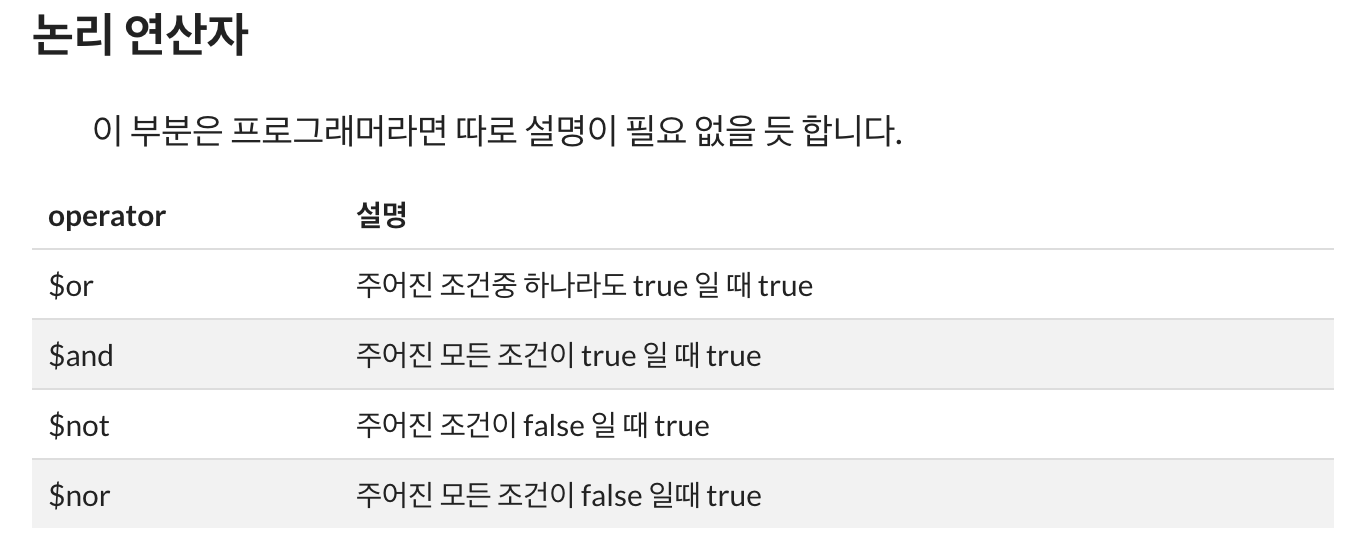
연산자 정리
모든 스크린샷은 velopert 블로그에서 발췌하였습니다.

쿼리
mongoDB documents 또는 velopert.log에 너무너무 정리가 잘되어 있다.
mongoDB documents: https://docs.mongodb.com/manual/reference/operator/query/
velopert.log: https://velopert.com/479
//불러오기
> use <database명> 				#DB 생성과 동시에 사용
> show dbs 또는 collections			#DB 또는 collection 보여주기 (최소 하나의 doc이 있어야 나타남)

//Collection 생성
> db.createCollection()				#Collection 생성하기
> db.createCollection("books")			#books라는 필드명을 가진 collection 생성'
> db.createCollection("books", {capped    : true,
				autoIndex : true
                                })		#options를 추가한 collection 생성

//Collection 삭제
> db.<collection 이름>.drop()

//documents 확인
> db.<collection 이름>.find()
> db.<collection 이름>.find({"books":"Gravity"})	  		#입력 key&value 값을 가진 docs만 리턴
> db.<collection 이름>.find({"views":{$lte:30}})			#views의 값이 30이하인 docs만 리턴
> db.<collection 이름>.find({},{"_id":false, "title":true})	#쿼리 결과에 보여줄 field지정

//$elemMatch: embedded doct 배열 쿼리시 사용
//comments의 name이라는 field의 value가 Charles인 docs만 출력
> db.<collection 이름>.find({"comments":{$elemMatch:{"name":"Charles"}}})

//보기좋게 정렬: pretty()
> db.cities.find({"name":"Minneapolis"}).pretty()

//오름차순/내림차순 정렬: sort()

> db.<collection 이름>.find({},{"name":true}).sort({"name":-1})		#name field를 내림차순으로 정렬하여 출력
> db.<collection 이름>.find({},{"name":true}).sort({"_id":-1, "name":1})	# _id field를 내림차순으로 정리하고, name field를 오름차순으로 정렬하여 출력

> db.<collection 이름>.find().limit(5)	# 5개 docs만 출력
> db.<collection 이름>.find().skip(2)	# 2개를 건너뛰고 그 다음 docs를 출력
데이터 업데이트
//db셋업
> db people insert( [
    { name: "Abet", age: 19 },
    { name: "Betty", age: 20 },
    { name: "Charlie", age: 23, skills: [ "mongodb", "nodejs"] },
    { name: "David", age: 23, score: 20 }
])

//특정 field 업데이트 하기: $set
> db.people.update( { name: "Abet" }, { $set: { age: 20 } } )
> WriteResult({ "nMatched" : 1, "nUpserted" : 0, "nModified" : 1 })

//특정 field 제거하기: $unset
> db.people.update( { name: "David" }, { $unset: { score: 1 } } )
> WriteResult({ "nMatched" : 1, "nUpserted" : 0, "nModified" : 1 })

//field가 있으면 수정, 없으면 새로 추가하기 : upsert:true
> db.people.update( { name: "Elly" }, { name: "Elly", age: 17 }, { upsert: true } )
WriteResult({
        "nMatched" : 0,
        "nUpserted" : 1,
        "nModified" : 0,
        "_id" : ObjectId("56c893ffc694e4e7c8594240")
})

//특정 조건에 맞는 field 한꺼번에 수정하기: multi:true
> db.people.update(
... { age: { $lte: 20 } },
... { $set: { score: 10 } },
... { multi: true }
... )
> WriteResult({ "nMatched" : 3, "nUpserted" : 0, "nModified" : 0 })

//skills 배열에 새로운 값 추가하기: $push
> db.people.update(
... { name: "Charlie" },
... { $push: { skills: "angularjs" } }
... )
WriteResult({ "nMatched" : 1, "nUpserted" : 0, "nModified" : 1 })

// skills 배열에 여러 값 추가하고 오름차순으로 정렬하기: $each, $sort
> db.people.update(
... { name: "Charlie" },
... { $push: {
...     skills: {
...         $each: [ "c++", "java" ],
...         $sort: 1
...     }
...   }
... }
... )
> WriteResult({ "nMatched" : 1, "nUpserted" : 0, "nModified" : 1 })

// skills 배열에 하나의 요소 제거: $pull
> db.people.update(
... { name: "Charlie" },
... { $pull: { skills: "mongodb" } }
... )
커스텀 인덱스 추가
// 이미 존재하는 collection 에 추가할 경우
db.products.createIndex(
  { item: 1, quantity: -1 } ,
  { name: "query for inventory" }
)

// 인덱스 종류 쿼리
> db.cities.getIndexes()
[
	{
		"v" : 2,
		"key" : {
			"_id" : 1
		},
		"name" : "_id_",
		"ns" : "test.cities"
	},
	{
		"v" : 2,
		"key" : {
			"_id" : 1,
			"checkins" : -1
		},
		"name" : "_id_1_checkins_-1",
		"background" : true,
		"ns" : "test.cities"
	},
	{
		"v" : 2,
		"key" : {
			"geolocation" : "2dsphere",
			"_id" : 1,
			"checkins" : -1
		},
		"name" : "geolocation_2dsphere__id_1_checkins_-1",
		"ns" : "test.cities",
		"background" : true,
		"2dsphereIndexVersion" : 3
	}...


 // new schema, field 레벨 에서 추가
 var animalSchema = new Schema({
 	name: String,
    type: String,
    tags: { type: [String], index: true } // animal의 tag를 인덱스로 지정
  });

// new schema, compound index는 항상 schema 레벨에서 추가하기
 animalSchema.index({ name: 1, type: -1 }); // schema level
쿼리 결과 예시

