Spring을 활용하여 웹 어플리케이션을 개발하면, 다양한 Http 요청에 대해 처리하는 기능들을 개발 할 것이다.
그리고, 필연적으로 공통적으로 처리해야 할 기능과 중복된 코드들이 많이 생긴다.
이러한 웹 요청에 대한 공통 관심사를 처리하기 위해 Filter와 Interceptor를 활용할 수 있다.
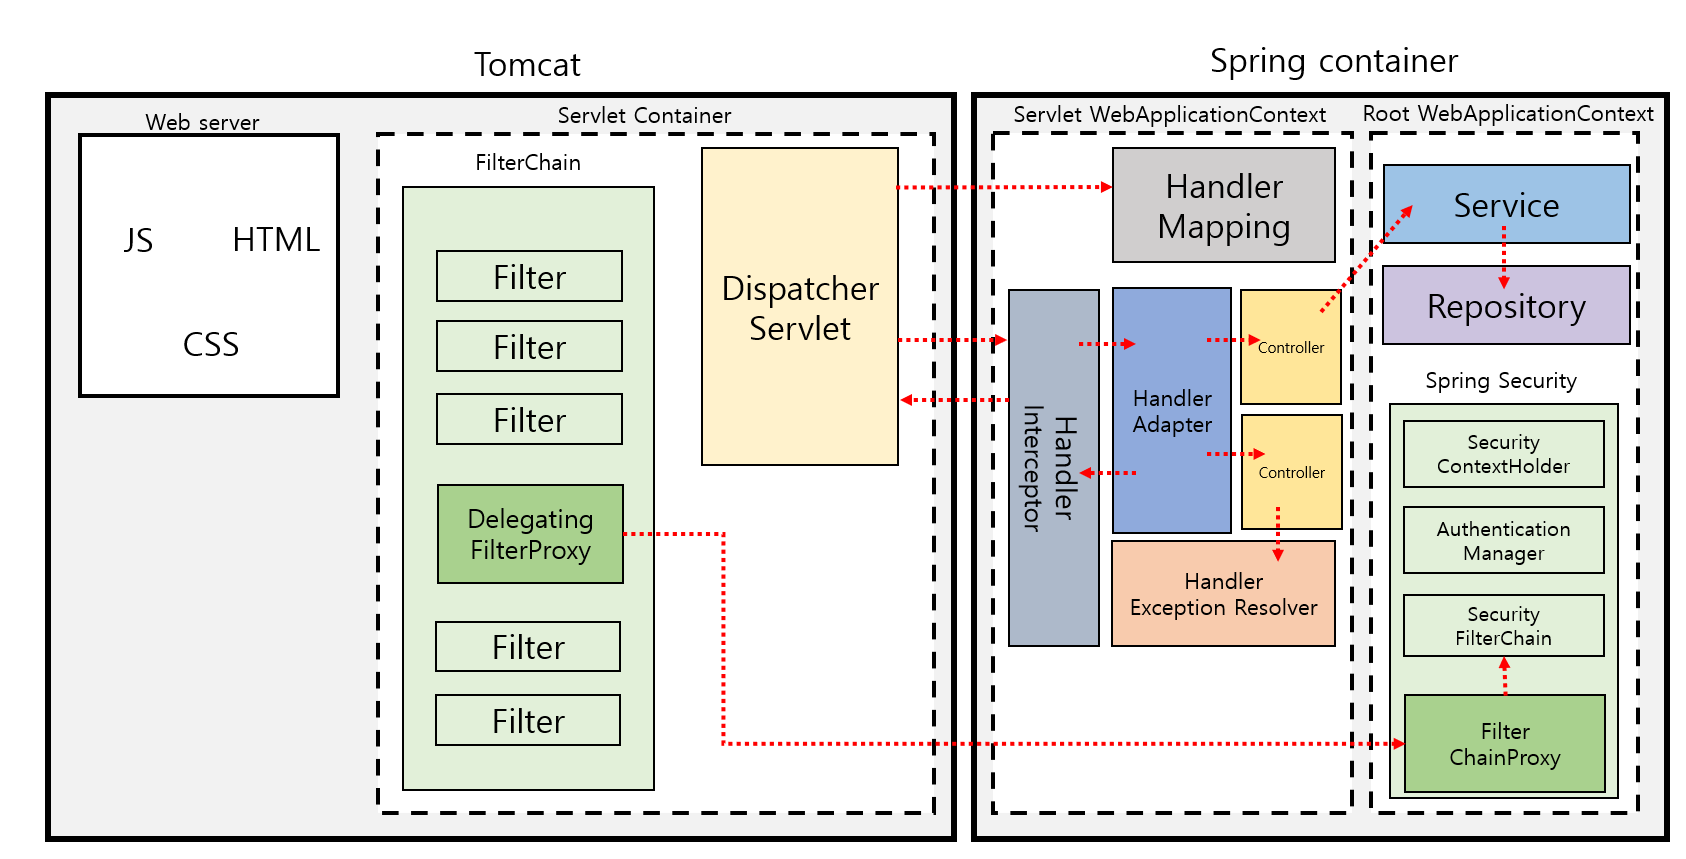
SpringBoot를 활용한 Spring Web 요청 flow
Filter
Filter.classA filter is an object that performs filtering tasks on either the request to a resource (a servlet or static content), or on the response from a resource or both.
필터는 리소스에 대한 요청과 응답에 대해 필터링 작업을 수행하는 객체이다.
필터는 톰캣 같은 미들웨어 컨테이너 영역에서 동작이 수행된다. Dispatcher Servlet에 요청이 전달되기 전/후에 URL 패턴에 맞는 모든 요청에 대해 부가 작업을 처리할 수 있다.
Filter는 chaining을 형성하여 정의한 메서드를 수행한다. 요청 자체를 처리하려는 경우 해당 Filter가 나머지 체인을 호출하지 않을 수 있다.
또, Servlet을 사용해서 요청과 응답을 수정할 수도 있다.
Filter 사용 용례
from. Filter.class
Authentication Filters: 사용자 인증이나 권한 검사Logging and Auditing Filters: 요청과 응답에 대한 로깅Image conversion Filters: 이미지 형식 변환 (.jpeg -> png)Data compression Filters: 데이터를 압축하여 반환Encryption Filters: 암호화Tokenizing Filters: 토큰 필터Filters that trigger resource access events: 이벤트 발생 트리거 필터XSL/T filters: XML 응답 변환에 사용Mime-type chain Filter: 미디어 타입에 따른 필터
javax.servlet.Filter
package javax.servlet;

import java.io.IOException;

public interface Filter {

    public default void init(FilterConfig filterConfig) throws ServletException {}

    public void doFilter(ServletRequest request, ServletResponse response,
            FilterChain chain) throws IOException, ServletException;

    public default void destroy() {}
}
Filter 인터페이스를 구현하여 사용할 수 있다.
ex.)구현 예시
public class FirstFilter implements Filter {

    @Override
    public void init(final FilterConfig filterConfig) throws ServletException {
        System.out.println();
        System.out.println("============================================");
        System.out.println("============= FirstFilter init =============");
        System.out.println("============================================");
        System.out.println();
        Filter.super.init(filterConfig);
    }

    @Override
    public void doFilter(final ServletRequest request, final ServletResponse response, final FilterChain chain)
            throws IOException, ServletException {
        System.out.println("FirstFilter start");
        chain.doFilter(request, response); //다음 필터로 이동
        System.out.println("FirstFilter end");
    }

    @Override
    public void destroy() {
        System.out.println();
        System.out.println("============================================");
        System.out.println("============ FirstFilter destroy ===========");
        System.out.println("============================================");
        System.out.println();
        Filter.super.destroy();
    }
}-
init()Servlet Container는 필터를 인스턴스화 할 때,init()를 한 번 호출한다.
-
doFilter()Request,Response가 해당Filter를 지날 때 수행되는 로직FilterChain.doFilter를 기준으로 요청/응답이 나뉜다.FilterChain을 통해DispatcherServlet에 요청이 전달 될 때 까지 정의한Filter내 메서드들이 수행된다단일 HTTP 요청을 처리하는 레이어로서, 여러개의
Filter들이 연결되어 있고, 연쇄적으로 동작한다.
기본적으론, 알파벳 순서로 Filter의 순서가 등록된다.
정의한 Filter가 여러개 존재하는 경우, @Order를 통해 순서를 지정할 수 있다.
chain.doFilter()를 실행하지 않으면 filterChain을 수행하지 않고 해당Filter에서filterChain이 종료된다.
-
destroy()Filter가 소멸할 때 실행된다.
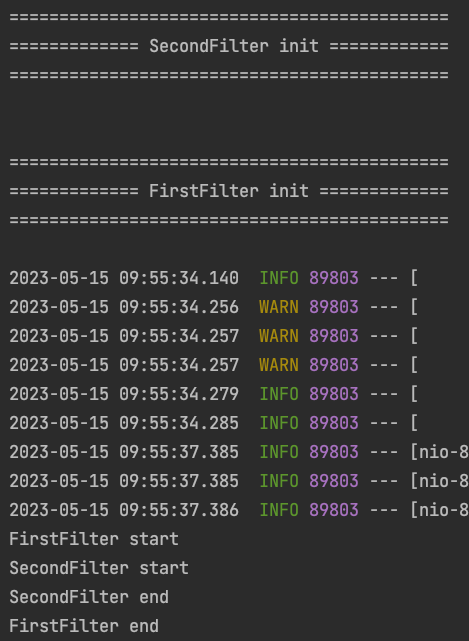
실행 결과
[SecondFilter init()] ,
[FirstFilter init()]
request -> FirstFilter.doFilter() -> SecondFilter.doFilter()
Filter 등록
FilterRegistrationBean에 구현한 Filter를 등록 할 수 있다.
@Configuration
public class WebMvcConfiguration implements WebMvcConfigurer {


  	@Bean
    public FilterRegistrationBean<FirstFilter> filterFilterRegistrationBean() {
        FilterRegistrationBean<FirstFilter> registrationBean = new FilterRegistrationBean<>();
        registrationBean.setFilter(new FirstFilter());
        registrationBean.addUrlPatterns("/"); //url 패턴

        return registrationBean;
    }
}
@WebFilter를 사용하여 등록할 수 있다. 이 경우에는 부트스트랩 클래스에 @ServletComponentScan 도 같이 등록하여야 한다.
@Slf4j
@WebFilter(urlPatterns = {"/test/*", "/test2/*"})
public class firstFilter implements Filter {
	// ...
}

@ServletComponentScan //추가
@SpringBootApplication
public class HelloApplication {
    public static void main(String[] args) {
        SpringApplication.run(HelloApplication.class, args);
    }
}
추가로, DelegatingFilterProxy를 통해 구현한 filter 클래스를 빈으로 등록하여 사용할 수 있다고 한다.
Springboot를 통해 내장 톰캣을 사용하고 있다면, 위 과정을 거치지 않고 일반적인 방식으로 빈을 등록 할 수 있다.
Interceptor
Filter와 비슷하게 Http 요청 전/후에 URL 패턴에 맞는 요청에 대해 부가 작업을 처리할 수 있다. 차이점이 있다면 실행 시점이다. DispatcherServlet의 HandlerMapping과정을 거친 이후 해당 Handler가 실행되기 이전에 해당 요청을 가로채서(intercept) 실행된다. 또, Spring context에 등록되기 때문에 등록되어 있는 Bean을 주입 받고 사용할 수 있다.
HandlerInterceptor를 구현하여 요청 전/후에 대한 공통적인 로직을 수행할 수 있다.
org.springframework.web.servlet.HandlerInterceptor
package org.springframework.web.servlet;

public interface HandlerInterceptor {

	default boolean preHandle(HttpServletRequest request, HttpServletResponse response, Object handler)
			throws Exception {

		return true;
	}

	default void postHandle(HttpServletRequest request, HttpServletResponse response, Object handler,
			@Nullable ModelAndView modelAndView) throws Exception {
	}

	default void afterCompletion(HttpServletRequest request, HttpServletResponse response, Object handler,
			@Nullable Exception ex) throws Exception {
	}
}
-
preHandle()Mapping된
Handler가 수행되기 이전에 실행된다.반환값이 true가 아닌 경우,
handler를 수행하지 않고 작업이 중단된다. -
postHandle()handler가 정상 동작을 한 뒤, View가 생성되기 이전에 실행된다.인자로 받은
ModelAndView를 통해 View에 전달되는 데이터를 조작할 수 있다. -
afterCompletion모든 작업이 완료된 후에 실행 된다.
ex) 구현 예시
public class FirstInterceptor implements HandlerInterceptor {


    private final Logger log = LoggerFactory.getLogger(this.getClass());

    @Override
    public boolean preHandle(final HttpServletRequest request, final HttpServletResponse response, final Object handler)
            throws Exception {
        final HandlerMethod handlerMethod = (HandlerMethod) handler; // handler 정보

        log.warn("Request URI : {}", request.getRequestURI());
        log.warn("Handler method name : {}", handlerMethod.getMethod().getName());

        return HandlerInterceptor.super.preHandle(request, response, handler);
    }

    @Override
    public void postHandle(final HttpServletRequest request, final HttpServletResponse response, final Object handler,
                           final ModelAndView modelAndView) throws Exception {
        log.warn("Response view name : {}", modelAndView.getViewName());

        HandlerInterceptor.super.postHandle(request, response, handler, modelAndView);
    }
}
Interceptor 등록
@Configuration
public class WebMvcConfiguration implements WebMvcConfigurer {

    @Override
    public void addInterceptors(InterceptorRegistry registry) {
        registry.addInterceptor(new FirstInterceptor())
                .addPathPatterns("/**");
    }
}
Filter vs Interceptor
두 기능 모두 요청 전/후 에서 공통적으로 특정 로직을 수행 할 수 있다. 정해진 용례는 없지만 앞서 살펴본 각각의 특징들을 이해하고 공통 관심사들을 적절하게 Filter, 혹은 Interceptor에 구현하면 좋을 것 같다.