
이번에는 Egg Timer 앱을 만들어보자. Egg Timer는 계란프라이의 익는 정도를 soft, medium, hard로 구분하여 남은 시간을 볼 수 있는 타이머이다.
Label text 크기 조정
- Label Line을 0으로 세팅한다
: 기기의 크기에 따라 text줄이 자동으로 세팅된다.
[iPhone 11의 경우]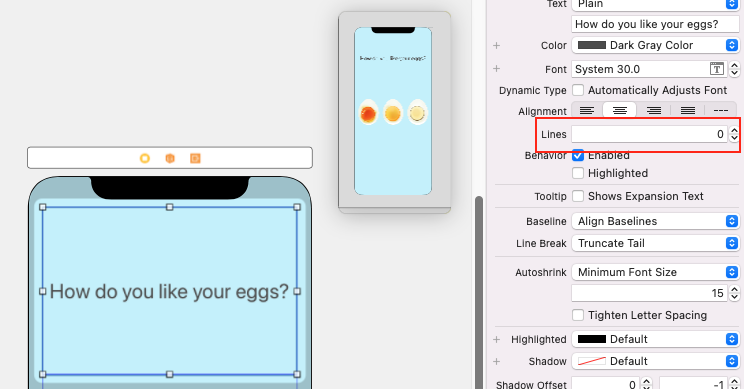 [iPhone13mini의 경우]
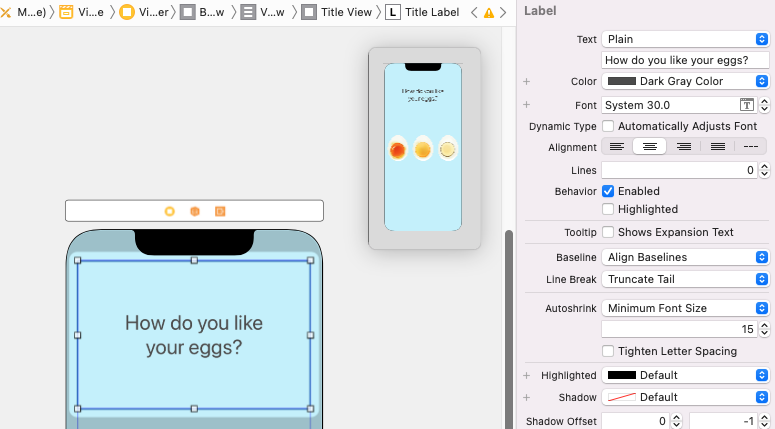
:Autoshirink에서Minimum Font Size를 선택하면 글자가 늘어났을 때 얼마나 작아질지 최저 텍스트 크기를 설정할 수 있다. (현재는 15point로 설정되어있다)
soft, medium, hard egg의 IBAction Button 만들기
- 원하는 객체를 선택한 후
ctrl을 누른 채로 마우스로 드래그 하여ViewController클래스 안에 연결해준다. ( 객체를 선택할 때 storyboard의 객체에다가 연결하기보다는 View Controller 에서 Button에 직접 drag & drop 해주는 것이 더 정확하다!)
Connection:Action,Type:UIButton으로 선택하고 함수 이름을 설정한다.
- 나머지 객체도 동일한 IBAction 함수와 연결해준다.
  import UIKit

  class ViewController: UIViewController {
      @IBAction func harnessSelected(_ sender: UIButton) {
      }
  }
계란이 익는 Timer 설정하기
softTime,mediumTime,hardTime딕셔너리로 선언하고 초기화해준다.
2. switch or if 문 이용해서 계란 버튼 클릭하는 경우 해당하는 굽기를 출력하기
//switch 사용하는 경우
        let hardness = sender.currentTitle

        switch hardness{
        // 조건이 5개 이상인 경우 If-else 구문보다 switch가 실용적임
        // C에서의 switch와 다른 점은= :
        // break 없어도 됨 + 조건 만족하는 case 찾으면 이후의 case 검사하지 않고 그냥 끝난다!
        // a...b : Closed Range
        // a..<b : Half Open Range
        // ...b : One Sided Range

            case "Soft":
                print(softTime)

            case "Medium":
                print(mediumTime)

            case "Hard":
                print(hardTime)

            default: // 매치되는 case가 없을 때 실행
                print("Error")
        }
3. Timer 설정하여 남은 시간을 초 단위로 보여주기
import UIKit

class ViewController: UIViewController {


    let eggTimes = ["Soft": 300, "Medium":420, "Hard": 720]
    // 각 굽기정도 seconds 초기화

    var secondsRemaining = 60


    @IBAction func harnessSelected(_ sender: UIButton) {

        let hardness = sender.currentTitle!
        // Soft, Medium, Hard
        // 모든 버튼들이 IBAction에 연결되어있다고 알려주는 Optional
        // It won't fail or crash !!

        secondsRemaining = eggTimes[hardness]!

        Timer.scheduledTimer(timeInterval: 1.0, target: self, selector: #selector(updateTimer), userInfo: nil, repeats: true)
    }

    @objc func updateTimer() {
        // @objc 추가해주기
        if secondsRemaining > 0 {
            print("\(secondsRemaining) seconds.")
            secondsRemaining -= 1
        } // 타이머가 0이될때까지 줄어든다
}- 빌드해보면 각 버튼을 눌렀을 때 기다려야 하는 시간이 1초씩 줄어들면서 콘솔창에 순서대로 뜨게 된다.
- 그러나 soft 버튼 눌렀다가 다시 medium 버튼을 누르는 등 다른 버튼을 도중에 누르게 되면 타이머가 더 빨리 간다. 이는 멈추는 함수가 없기 때문. 이를 해결하기 위해 코드를 다음과 같이 수정한다.
import UIKit

class ViewController: UIViewController {

    let eggTimes = ["Soft": 300, "Medium":420, "Hard": 720]

    var secondsRemaining = 60

    var timer = Timer()

    @IBAction func harnessSelected(_ sender: UIButton) {

        timer.invalidate()
        // 타미어가 이미 실행되고 있었다면 중단시키는 함수
        // Stops the timer from ever firing again and requests its removal from its run loop.

        let hardness = sender.currentTitle!

        secondsRemaining = eggTimes[hardness]!

        timer = Timer.scheduledTimer(timeInterval: 1.0, target: self, selector: #selector(updateTimer), userInfo: nil, repeats: true)
    }

    @objc func updateTimer() {
        if secondsRemaining > 0 {
            print("\(secondsRemaining) seconds.")
            secondsRemaining -= 1
        }
    }
}
타이머가 끝났을 때 레이블 텍스트 변경하기
- title을 ViewController로 IBOutlet 연결
@IBOutlet weak var titleLabel: UILabel!updateTimer()에 secondsRemaining 이 0이 되는 경우 레이블이 바뀌도록 설정해준다.
    @objc func updateTimer() {
        if secondsRemaining > 0 {
            print("\(secondsRemaining) seconds.")
            secondsRemaining -= 1
        } else {
            timer.invalidate() // 타이머를 멈춘다
            titleLabel.text = "Done" // Label의 text를 변경한다.
        }
    }