
안드로이드 어플리케이션에서 화면 구성은 자바와 마찬가지로 컴포넌트를 기반으로 합니다
화면에 내용을 표시하려면 뷰 클래스를 이용해 구성해야한다
액티비티, 서비스, 브로드캐스트, 컨텐츠 프로바이더를 적절히 조합해서 만듭니다!
뷰 클래스의 기본 구조
TextView, ImageView, Button, EditText 등의 뷰 클래스를 제공함
화면 구성때 사용하는 모든 클래스는 View클래스의 하위 클래스이다!
ViewGroup:
View의 하위 클래스이지만 자체 UI는 없어서 다른 뷰 여러개를 묶어서 제어할 목적으로 사용합니다!
ex) LinearLayout, ConstraintLayout 등
뷰의 경우 이렇게 뷰 클래스를 쌓아가는 뷰 계층 구조가 됩니다
이를 컴포지트 패턴 혹은 문서 객체 패턴이라고 합니다!
findById() 보다 뷰 바인딩을 사용하자!
Java로 할때 findById()로 각각의 xml파일의 객체를 불러와서 사용했습니다
하지만 매번 불러와야했기에 이것보다 편한 방법이 있지 않을까?
그리고 구글이라면 만들지 않았을까?
하던 중 viewBinding이 있다는 것을 알았습니다
뷰 바인딩 사용법 및 예시
- build.gradle에 미리 viewBinding을 사용한다는 말을 해줘야합니다
android {
	...
    viewBinding {
    	enabled = true
    }
}
설명
- 즉 android영역에 buildFeatures를 선언합니다
- 이렇게 되면 레이아웃 xml파일에 등록된 뷰 객체를 포함하는 클래스가 자동으로 만들어집니다!
- findById를 하지 않아도 자동으로 만들어진다
- XML파일명을 따릅니다 + 뒤에 Binding 글자 붙이기 -> item_main.xml -> ItemMainBinding
- 예시
class MainActivity: AppCompactActivity() {
	override fun onCreate(savedInstanceState: Bundle?) {
    	super.onCreate(savedInstanceState)
    }
    // 바인딩 객체 획득
    val binding = ActivityMainBinding.inflate(layoutInflater)
    // 뷰 객체 이용
    setContentView(binding.root)
    // 뷰 객체 이용
    binding.visibleBtn.setOnclickListener {
    	binding.targetView.visibility = View.VISIBLE
    }
}
만약에 이 hello_people.xml파일은 바인딩 하고 싶지 않다면?
그때는 hello_people.xml 파일의 루트 태그에 아래 코드를 적어주면 됩니다
tools: viewBindingIgnore="true" 레이아웃으로 화면 만들기 - 실습
여기서 프로젝트를 새로 만드는게 아니라 new Module로 만들자!!
res/values/string.xml
<resources>
	<string name="app_name">Ch6_view</string>
    <string name="main_desc">
    	회원님의 소중한 정보 보호를 위해, 카카오 계정의 현재 비밀번호를 확인해주세요
    </string>
    <string name="password_txt">비밀번호가 기억나지 않으세요?</string>
</resources>
res/layout/activity_main.xml
<?xml version="1.0" encoding="utf-8"?>
<LinearLayout xmlns:android="http://schemas.android.com/apk/res/android"
    xmlns:app="http://schemas.android.com/apk/res-auto"
    xmlns:tools="http://schemas.android.com/tools"
    android:orientation="vertical"
    android:layout_width="match_parent"
    android:layout_height="match_parent"
    android:padding="16dp"

    tools:context=".MainActivity">

    <TextView
        android:layout_width="match_parent"
        android:layout_height="wrap_content"
        android:textSize="17dp"
        android:text="@string/main_desc"
         />
    <TextView
        android:layout_width="match_parent"
        android:layout_height="wrap_content"
        android:text="kkang104@gmail.com"
        android:textColor="#CFCFCE"
        android:layout_marginTop="10dp"
        />
    <View
        android:layout_width="match_parent"
        android:layout_height="1dp"
        android:background="#D4D4D3"
        android:layout_marginTop="10dp"/>
    <EditText
        android:layout_width="match_parent"
        android:layout_height="wrap_content"
        android:hint="비밀번호"
        android:inputType="textPassword"/>
    <TextView
        android:layout_width="match_parent"
        android:layout_height="wrap_content"
        android:text="@string/password_txt"
        android:layout_marginTop="10dp"/>

    <Button
        android:layout_width="match_parent"
        android:layout_height="wrap_content"
        android:text="확인"
        android:layout_marginTop="16dp"/>
</LinearLayout>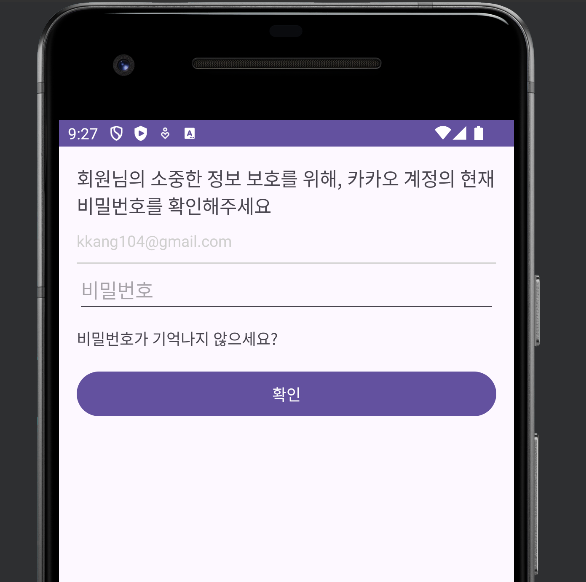
피드백
자바에서는 사용안하던 뷰 바인딩이 있는걸 보면서 진짜 반복적인 일은 최대한 피하는게 코더의 기본 자세라는걸 다시 한번 생각했습니다
뷰 또한 중요 문서는 string.xml에 넣어서 관리하자!