서버를 공부하다가 간단하게 화면 구현해보고 싶어서 바로 생활코딩을 들어가서 찾아봤다.
너무나 감사하게도 2022년 React 기초를 올려줘서 잠시 잊고 있었던 React에 대한 감을 완벽히 찾는데 도움을 크게 받았다 ㅎㅎ (역시 생활코딩이다!)
차고로 udemy 강의를 보고 만든 웹은 내일 올려보겠다!!
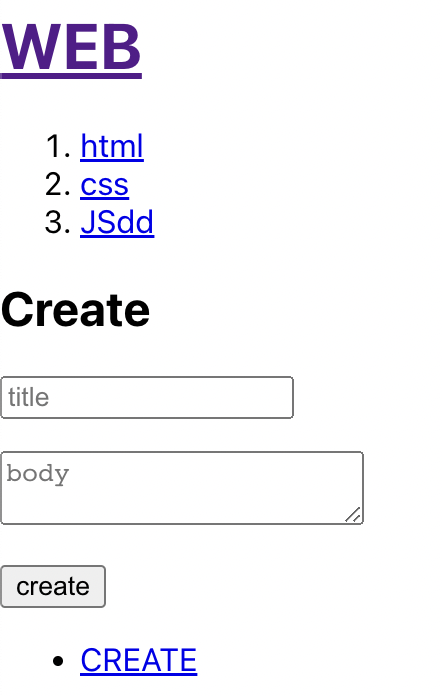
화면은 단순해 보일리지라도 안에 중요 핵심은 꽉 채운 웹페이지다!!
이것도 스스로 못 만든다면 그건 리액트를 아는게 절대 아니다!!
코드 및 화면 설명
컴포넌트의 정의, 그리고 useSate와 props를 이해할 수 있었다.
function App() {
const [mode,setMode] = useState('WELCOME') //배열을 리턴하고 0번째는 값 1번째는 그상태변경함수!
const [id, setId] = useState(null)
const [nextId, setNextId] = useState(4)
const [topics,setTopics] = useState([
{id: 1, title:'html', body:'html is ~~'},
{id: 2, title:'css', body:'css is ~~'},
{id: 3, title:'JSdd', body:'JS is ~~'},
])
let contextControl = null;
let content = null
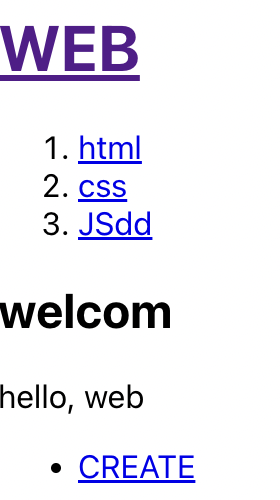
if(mode === 'WELCOME') {
content = <Article title="welcom" body="hello, web"></Article>
} else if (mode === 'READ') {
let title , body = null
for(let i =0; i<topics.length; i++){
if(topics[i].id === id) {
title = topics[i].title
body = topics[i].body
}
}
content = <Article title= {title} body={body}></Article>
contextControl = <>
<li><a href={'/update/'+ id } onClick={(e)=> {
e.preventDefault()
setMode('UPDATE')
}}>Update</a></li>
<li><input type="button" value="Delete" onClick={()=>{
const newTopics = []
for(let i =0; i<topics.length; i++) {
if(topics[i].id !== id) {
newTopics.push(topics[i])
}
}
setTopics(newTopics)
setMode('WELCOME')
}}></input></li>
</>
}
else if(mode === 'CREATE') {
content = <Create onCreate = {(title,body)=> {
const newTopic = {id: nextId, title: title, body: body}
const newTopics = [...topics]
newTopics.push(newTopic)
setTopics(newTopics)
setMode('READ')
setId(nextId)
setNextId(nextId + 1)
}}></Create>
} else if(mode === 'UPDATE') {
let title , body = null
for(let i =0; i<topics.length; i++){
if(topics[i].id === id) {
title = topics[i].title
body = topics[i].body
}
}
content = <Update title={title} body={body} onUpdate={(title,body)=> {
const newTopics = [...topics]
const updateTopic = {id:id, title:title, body:body }
for(let i =0; i<newTopics.length; i++) {
if(newTopics[i].id === id) {
newTopics[i] = updateTopic
break
}
}
setTopics(newTopics)
setMode('READ')
}}></Update>
}
이 웹페이지는 Welocme페이지, Read페이지, Create페이지, Update페이지가 있다.
Delete의 경우 그냥 Read페이지에서 버튼만 눌러도 삭제할 수 있게 해놨다
추가로 a태그에 대해서 event.preventDefault()를 해놔서 이동은 하지 않는다,,ㅜ
-
뷰를 setMode('WELCOME'),setMode('READ')등을 써서 바꿔줬다.
-
id값으로 무엇을 READ하고 id에 관한 title과 body를 READ페이지에 보여주게 했다.
create할때 마다 id값이 올라가야하는데 그건 nextId를 이용해서 +해줬다
3. delete의 경우 id에 맞지 않는 배열 애들을 전부 다른 배열에 저장하고 그 다른 배열을 setTopics()를 통해 저장했다
이해한 내용 및 더 찾아보고 공부한 내용
[...topics] 를 쓰면 값을 복사할 수 있다!
잊고있었다가 보고 바로 깨달은 녀석이다!ㅋㅋ ->
const newTopics = [...topics]하게 되면 topics의 모든 객체의 값을 가져온다!
props에서 데이터 및 변수 전달할 때는 {}감싸기, 값은 ''안에 적기!
let title , body = null
    for(let i =0; i<topics.length; i++){
      if(topics[i].id === id) {
         title = topics[i].title
         body = topics[i].body
      }
    }
content = <Article title={title} body{body} > </Article>
이걸 보면 title이라는 변수를 전달할때는 {}감싸서 외부로 전달해줬다!
props가 무조건 ''로 내보내는게 아니라는 걸 다시 한번 명심해야겠다
셀프 피드백
다시 안보고 만드는 데 성공하면서 예전에 배웠던
리액트 지식을 다시 한번 상기할 수 있었다.
블록체인을 위한 코드를 구현할 때 리액트로 구현하는 프로젝트가 대부분이라서
계속 기억하고 스스로 더 많은 웹사이트를 만들어보면서 리액트를 나의 기술 로 만들어봐야겠다