오늘은 토요일이고 부모님집에 와서 간단하게 페이지 만들기와 메타코드 영상을 보며 SQL 문법에 대한 강의를 봤다
꾸준히 하는게 잘하는 것보다 중요하고 그 꾸준함에서 하나라도 성장하자!
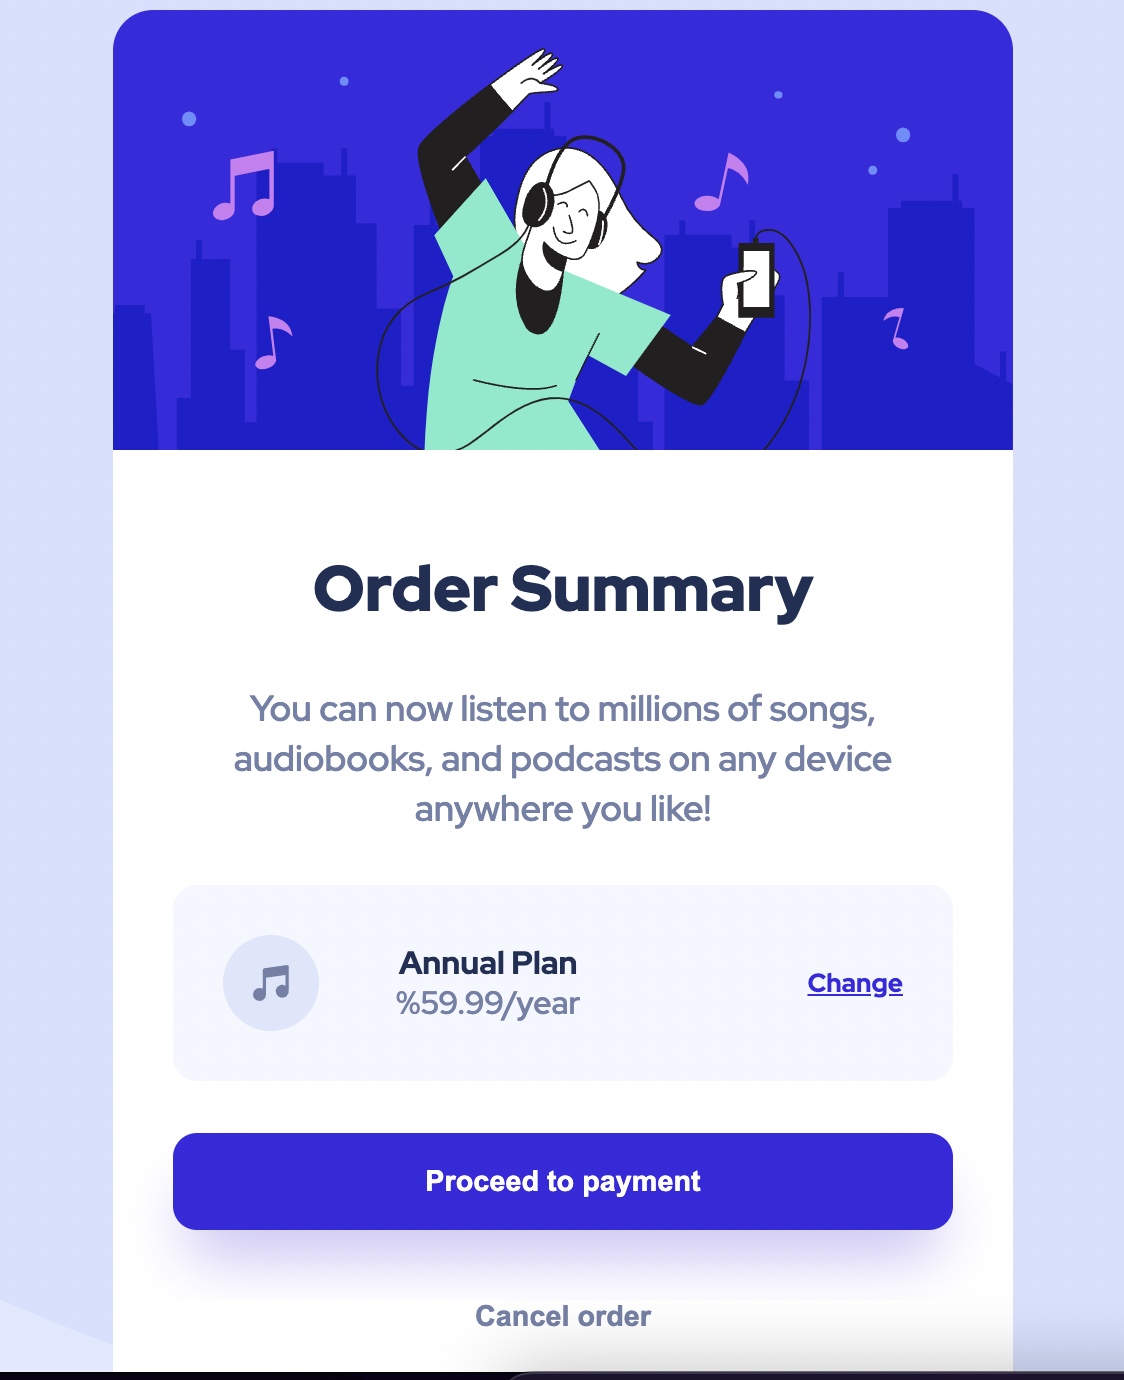
OrderPage 만들기 좌충우돌
간단한 html과 css만 적었지만 그럼에도 틀을 보고 칸 나누기와 스타일 정하는 방식을 좀 더 자주 연습해봐야겠다는 생각이 들었다
HTML
1. div로 크게 Order Summary를 위한 칸을 나누었다
2. 그리고 이미지와 아래 부분을 나누었다
3. h1으로 제목을 적고 p태그로 아래 간단히 설명을 적었다
4. 그 아래 부분은 뮤직 아이콘과 가격 그리고 change를 같은 칸에 적기 위해 div를 하나 추가했다.
5. 그 안에서도 AnnualPlan과 $59.99를 같이적기 위해 작은 div를 안엔 넣었다
6. 그 아래는 Proceed와 Cancel 버튼을 각각 만들어서 놔뒀다
<!DOCTYPE html>
<html lang="en">
<head>
<meta charset="UTF-8">
<meta http-equiv="X-UA-Compatible" content="IE=edge">
<meta name="viewport" content="width=device-width, initial-scale=1.0">
<title>Order Summary Component</title>
<link rel="stylesheet" href="./style.css">
</head>
<body>
<div class="card">
<img class="hero-image" src="./images/illustration-hero.svg">
<div class="container">
<h2 class="title">Order Summary</h2>
<p class="order-description">You can now listen to millions of songs, audiobooks, and podcasts on any
device anywhere you like!
</p>
<div class="plan-container">
<img src="./images/icon-music.svg" alt="">
<div class="plan-description">
<strong>Annual Plan</strong>
<p>%59.99/year</p>
</div>
<a href="#">Change</a>
</div>
<button class="proceed-button">Proceed to payment</button>
<button class="cancel-button">Cancel order</button>
</div>
</div>
</body>
</html>CSS
솔직히 html적으로 칸을 나누는건 바로 이해하고 어느정도 비슷하게 나누었지만
css 스타일은 계속 복습해서 눈에 익혀야겠다!
1. googlefont를 원하는걸 한개 import 해왔다 (body에서 font-family에 적음)
2. *로 대표적인 기본값으로 설정 -> 모든 브라우저 동일 선상에서 시작하게 하기 위해서
3. :root 라는 가상 클래스를 사용해서 css파일에서 사용할 전역변수를 설정했다
4. body에서 뒤에 배경 이미지 설정 및 반복 안하기, font 크기와 속성을 정의 했다.
5.  그 아래는 클래스들을 스타일에 맞게 설정 했다
가상 클래스
CSS 의사 클래스(가상 클래스)는 선택자에 추가하는 키워드로,
선택한 요소가 특별한 상태여야 만족할 수 있습니다.

예를 들어 :hover를 사용하면 포인터를 올렸을 때에만 글씨 색을 바꾸고 싶을 때 사용할 수 있습니다.
:root는 전역 CSS 변수 선언에 유용하게 사용할 수 있습니다.
root에 적힌 스타일 변수는 어디서나 사용가능이어서! 많이 여기에 선언하고 사용!!
--로 속성 이름 적어주고 : 뒤에 값 적어주면 변수가 완성이다!
var로 변수를 선언하고 그 안에 속성 값을 적어준다!
HSL이란
HSL 색상값에서 HSL은 각각 색상(Hue), 채도(Saturation), 명도(Lightness)를 의미합니다.
색상 값이 0 또는 360이면 빨간색(red)이 되며, 120이면 녹색(green), 240이면 파란색(blue)이 됩니다.
채도는 0%부터 100% 사이의 값을 가지며, 색상의 연하고 짙은 정도를 나타냅니다.
채도 값이 0%면 회색이 되고, 100%면 원래 색상이 됩니다.
명도는 0%부터 100% 사이의 값을 가지며, 색상의 밝고 어두운 정도를 나타냅니다.
명도 값이 0%면 검정색이 되고, 50%면 원래 색상, 100%면 흰색이 됩니다.
@import url("https://fonts.googleapis.com/css2?family=Red+Hat+Display:wght@500;700;900&display=swap");

* {
  margin: 0;
  padding: 0;
  box-sizing: border-box;
}

:root {
  --pale-blue: hsl(225, 100%, 94%);
  --very-pale-blue: hsl(225, 100%, 98%);
  --desaturated-blue: hsl(224, 23%, 55%);
  --dark-blue: hsl(223, 47%, 23%);
  --bright-blue: hsl(245, 75%, 52%);
  --bright-blue-hover: hsl(244, 83%, 68%);
}

body {
  background-image: url(./images/pattern-background-desktop.svg);
  background-repeat: no-repeat;
  background-size: cover;
  background-color: var(--pale-blue);
  font-size: 16px;
  font-family: "Red Hat Display", sans-serif;
}

.card {
  width: 450px;
  background-color: white;
  color: var(--desaturated-blue);
  border-radius: 20px;
  margin: 50px auto;
  overflow: hidden;
}

.title {
  color: var(--dark-blue);
  font-weight: 900;
  font-size: 32px;
}

.hero-image {
  width: 100%;
}

.container {
  display: flex;
  flex-direction: column;
  justify-content: center;
  text-align: center;
  padding: 30px;
  font-size: 18px;
}

.container > * {
  margin: 13px 0;
}

.container strong {
  color: var(--dark-blue);
}

.order-description {
  line-height: 25px;
}

.plan-container {
  font-size: 16px;
  background-color: var(--very-pale-blue);
  padding: 25px;
  border-radius: 12px;
  display: flex;
  flex-direction: row;
  justify-content: space-between;
  align-items: center;
}

.plan-container a {
  color: var(--bright-blue);
  font-size: 13px;
  font-weight: 700;
}

.plan-container a:hover {
  color: var(--bright-blue-hover);
  text-decoration: none;
}

.plan-description {
  margin-right: 75px;
  line-height: 20px;
}

button {
  width: 100%;
  border: none;
  font-weight: 700;
  font-size: 0.9rem;
  border-radius: 12px;
  cursor: pointer;
}

.cancel-button {
  background-color: white;
  color: var(--desaturated-blue);
  border: none;
  margin-top: 22px;
}

.cancel-button:hover {
  color: black;
}

.proceed-button {
  background-color: var(--bright-blue);
  padding: 1rem 0;
  color: white;
  box-shadow: 0 20px 30px -8px rgb(197 189 245);
}

.proceed-button:hover {
  background-color: var(--bright-blue-hover);
}
셀프 피드백
생각보다 길어져서 SQL은 내일 2차 수업듣고 같이 정리해야겠다 ㅋㅋ
위에서도 적었지만 꾸준히 하는게 중요하다
그리고 엔지니어로 바로 가는건 확률이 적기 때문에 많은 경우의 수를 놔두고
내가 선택할 경우의 수를 늘려놓자!
잘하고있다