
사용하는 이유
여러가지 전역 상태관리 라이브러리 중에 하나인 zustand 사용 해보려고 한다.
일단 곰돌이 이미지 로고가 귀엽다.
설치 방법
yarn add zustand or npm i zustand 설치
코드 예제
import create from 'zustand'
export const useBearStore = create((set: any) => ({
bears: 10,
increasePopulation: () => set((state: any) => ({ bears: state.bears + 1 })),
removeAllBears: () => set({ bears: 0 }),
}))
나는 Next.ts 환경에서 테스트 코드를 작성했다.
일단 create zustand 에서 import 불러온다 Ts 환경이라서 type 명시해주어야 하는데 일단 create 인자 type any 설정했다 .......(추후 변경하겠음)
import Head from 'next/head'
import Image from 'next/image'

import styles from '../styles/Home.module.css'
import create from 'zustand'
import { useBearStore } from '../store/state'

export default function Home() {
  const test = useBearStore((state) => state.bears)
  const increasePopulation = useBearStore((state) => state.increasePopulation)
  return (
    <div className={styles.container}>
      <Head>
        <title>Create Next App</title>
        <meta name="description" content="Generated by create next app" />
        <link rel="icon" href="/favicon.ico" />
      </Head>
      <h1>{test}</h1>
      <button onClick={increasePopulation}></button>
    </div>
  )
}
Compare 비교하기
const treats = useBearStore(
  (state) => state.treats,
  (oldTreats, newTreats) => compare(oldTreats, newTreats)
)
두번쨰 인자를 이용하면 비교를 하여 내가 원한떄만 동작할수 있게 셋팅이 가능하다
키워드 Compare 공식문서 확인 해보자.
배열 상태값 저장 가능하다
import React from 'react'
import create from 'zustand'

// Create 상태 변수를 만들어 셋팅한다
export const useStore = create((set) => ({
  textState: '',
  setTextState: (text: string) => set(() => ({ textState: text })),
}))

const Input = () => {
  // 상태 변수
  const [text, setText] = useStore((state: any) => [
    state.textState,
    state.setTextState,
  ])
  // onChange input Value 값
  const onChangeHandler = (e: any) => {
    setText(e.target.value)
  }

  return (
    <div>
      <input type="text" value={text} onChange={onChangeHandler} />
      <h1>인풋 값{text}</h1>
    </div>
  )
}

export default Input
메인화면 Input component 불러오기 생략
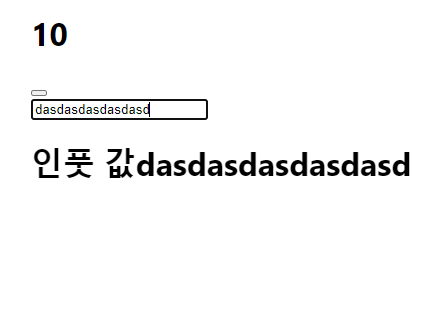
인풋값을 저장해서 사용 가능 하다.

주니어 개발자