1. 오디오
- 스마트폰에서 가장 많이 사용하는 기능 중 하나가 MP3 플레이어일 것입니다.
- 멀티미디어를 동작시키기 위해 제공되는 MediaPlayer 클래슨느 음악과 동영상을 재생해줍니다.
- 사용법이 간단하여 어렵지 않게 오디오 재생 기능을 구현할 수 있습니다.
- MediaPlayer의 play( ), pauser( ), stop( ) 메서드는 각각 음악을 시작, 일시 정지, 정지하는 기능을 합니다.
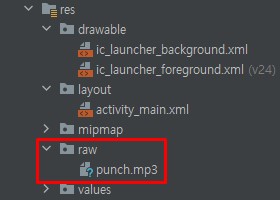
- 예제를 진행하기 전에 [res]에 raw 폴더를 만들고 MP3 파일을 복사해 놓습니다.
예제 13-1 간단한 음악 재생의 XML 코드
<androidx.appcompat.widget.LinearLayoutCompat
    xmlns:android="http://schemas.android.com/apk/res/android"
    xmlns:tools="http://schemas.android.com/tools"
    android:layout_width="match_parent"
    android:layout_height="match_parent"
    android:orientation="vertical"
    android:padding="10dp"
    tools:context=".MainActivity">

    <Switch
        android:id="@+id/switch1"
        android:layout_width="wrap_content"
        android:layout_height="wrap_content"
        android:text="음악 듣기"/>

</androidx.appcompat.widget.LinearLayoutCompat>
예제 13-2 간단한 음악 재생의 Java 코드
public class MainActivity extends AppCompatActivity {
private MediaPlayer mediaPlayer;
private Switch switch1;
@Override
protected void onCreate(Bundle savedInstanceState) {
super.onCreate(savedInstanceState);
setContentView(R.layout.activity_main);
init();
initLr();
}
public void init(){
mediaPlayer = MediaPlayer.create(this, R.raw.punch);
switch1 = findViewById(R.id.switch1);
}
public void initLr(){
switch1.setOnClickListener(v -> {
if(switch1.isChecked() == true) {
mediaPlayer.start();
} else {
mediaPlayer.stop();
}
});
}
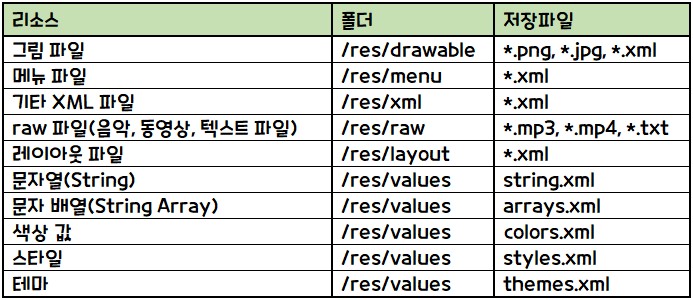
}리소스 파일과 저장 폴더
- 아래는 응용프로그램을 제작할 때 사용하는 다양한 리소스 파일이 저장되는 위치를 정리한 것입니다.
실습 13-1 간단 MP3 플레이어 앱 만들기
Manifest에 추가
<uses-permission android:name="android.permission.WRITE_EXTERNAL_STORAGE" />예제 13-3 activity_main.xml 코드
<androidx.appcompat.widget.LinearLayoutCompat
    xmlns:android="http://schemas.android.com/apk/res/android"
    xmlns:tools="http://schemas.android.com/tools"
    android:layout_width="match_parent"
    android:layout_height="match_parent"
    android:orientation="vertical"
    tools:context=".MainActivity">

    <androidx.appcompat.widget.LinearLayoutCompat
        android:layout_width="match_parent"
        android:layout_height="0dp"
        android:layout_weight="80"
        android:orientation="horizontal" >
        <ListView
            android:id="@+id/lvMP3"
            android:layout_width="match_parent"
            android:layout_height="wrap_content"/>

    </androidx.appcompat.widget.LinearLayoutCompat>

    <androidx.appcompat.widget.LinearLayoutCompat
        android:layout_width="match_parent"
        android:layout_height="0dp"
        android:layout_weight="10"
        android:orientation="horizontal"
        android:padding="10dp">
        <androidx.appcompat.widget.AppCompatButton
            android:id="@+id/btnPlay"
            android:layout_width="0dp"
            android:layout_height="match_parent"
            android:layout_weight="50"
            android:text="듣기"
            android:textSize="18dp"
            android:textStyle="bold"/>
        <androidx.appcompat.widget.AppCompatButton
            android:id="@+id/btnPause"
            android:layout_width="0dp"
            android:layout_height="match_parent"
            android:layout_weight="50"
            android:text="일시 정지"
            android:textSize="18dp"
            android:textStyle="bold" />
        <androidx.appcompat.widget.AppCompatButton
            android:id="@+id/btnStop"
            android:layout_width="0dp"
            android:layout_height="match_parent"
            android:layout_weight="50"
            android:text="중지"
            android:textSize="18dp"
            android:textStyle="bold" />

    </androidx.appcompat.widget.LinearLayoutCompat>

    <androidx.appcompat.widget.LinearLayoutCompat
        android:layout_width="match_parent"
        android:layout_height="0dp"
        android:layout_weight="10"
        android:padding="10dp"
        android:orientation="horizontal" >
        <TextView
            android:id="@+id/tvMP3"
            android:layout_width="wrap_content"
            android:layout_height="match_parent"
            android:gravity="center"
            android:text="실행중인 음악 : "
            android:textSize="18dp"
            android:textStyle="bold"
            android:textColor="@android:color/black"/>
        <ProgressBar
            android:id="@+id/pbMP3"
            android:layout_width="wrap_content"
            android:layout_height="match_parent"
            android:visibility="invisible" />

    </androidx.appcompat.widget.LinearLayoutCompat>

</androidx.appcompat.widget.LinearLayoutCompat>
예제 13-4, 5, 6 MainActivity.java 코드
public class MainActivity extends AppCompatActivity {
// 전역변수 선언
private ListView lvMP3;
private Button btnPlay, btnPause, btnStop;
private TextView tvMP3;
private ProgressBar pbMP3;
private ArrayList<String> mp3List;
private String selectedMP3, fileName, extName;
private String mp3Path = Environment.getExternalStorageDirectory().getPath() + "/";
private MediaPlayer mediaPlayer;
// 일시정지할 경우 위치를 기억하기 위한 변수 선언
private int position = 0;
@Override
protected void onCreate(Bundle savedInstanceState) {
super.onCreate(savedInstanceState);
setContentView(R.layout.activity_main);
setTitle("Mini MP3 Player");
ActivityCompat.requestPermissions(this,
new String[] {Manifest.permission.WRITE_EXTERNAL_STORAGE}, MODE_PRIVATE);
// 리스트뷰에 출력할 ArrayList<String> 형 변수를 생성함
mp3List = new ArrayList<String>();
File[] listFiles = new File(mp3Path).listFiles();
// listFiles 에 들어 있는 파일 또는 폴더를 하나씩 file 변수에 넣고 for 문을 실행함
for (File file : listFiles) {
// file 변수에서 파일 이름과 확장명을 추출함
fileName = file.getName();
extName = fileName.substring(fileName.length() - 3);
// 확장명이 .mp3라면 준비한 mp3List에 추가함
if(extName.equals((String) "mp3")) {
mp3List.add(fileName);
}
}
init();
initData();
initLr();
}
public void init(){
lvMP3 = findViewById(R.id.lvMP3);
btnPlay = findViewById(R.id.btnPlay);
btnPause = findViewById(R.id.btnPause);
btnStop = findViewById(R.id.btnStop);
tvMP3 = findViewById(R.id.tvMP3);
pbMP3 = findViewById(R.id.pbMP3);
}
public void initData() {
// 리스트뷰에 mp3List 배열의 내용을 출력함
ArrayAdapter<String> adapter = new ArrayAdapter<String>(this,
android.R.layout.simple_list_item_single_choice, mp3List);
lvMP3.setChoiceMode(ListView.CHOICE_MODE_SINGLE);
lvMP3.setAdapter(adapter);
lvMP3.setItemChecked(0, true);
}
public void initLr(){
// MP3 파일 목록이 출력된 리스트뷰의 각 항목을 클릭할 때마다 파일 이름이 selectedMP3 변수에 저장됨
lvMP3.setOnItemClickListener(new AdapterView.OnItemClickListener() {
@Override
public void onItemClick(AdapterView<?> adapterView, View view, int i, long l) {
selectedMP3 = mp3List.get(i);
}
});
selectedMP3 = mp3List.get(0);
// 듣기를 클릭했을 때 동작하는 부분
btnPlay.setOnClickListener(v -> {
try {
mediaPlayer = new MediaPlayer();
mediaPlayer.setDataSource(mp3Path + selectedMP3);
mediaPlayer.prepare();
mediaPlayer.start();
btnPlay.setClickable(false);
btnPause.setClickable(true);
btnStop.setClickable(true);
tvMP3.setText("실행중인 음악 : " + selectedMP3);
pbMP3.setVisibility(View.VISIBLE);
} catch (IOException e) {
e.printStackTrace();
}
});
// 일시정지를 클릭했을 때 동작하는 부분
btnPause.setOnClickListener(v -> {
// mediaPlayer 가 재생중일 때 작동
if(mediaPlayer.isPlaying()){
mediaPlayer.pause();
// 음악파일에서 현재 재생 위치 기억
position = mediaPlayer.getCurrentPosition();
btnPause.setText("이어듣기");
btnPause.setClickable(true);
btnStop.setClickable(true);
pbMP3.setVisibility(View.INVISIBLE);
} else {
// 기억해둔 재생위치부터 재생
mediaPlayer.seekTo(position);
mediaPlayer.start();
btnPause.setText("일시 정지");
pbMP3.setVisibility(View.VISIBLE);
}
});
// 중지를 클릭했을 때 동작하는 부분
btnStop.setOnClickListener(v -> {
mediaPlayer.stop();
mediaPlayer.reset();
btnPlay.setClickable(true);
btnPause.setClickable(false);
btnStop.setClickable(false);
tvMP3.setText("실행중인 음악 : ");
pbMP3.setVisibility(View.INVISIBLE);
});
// MediaPlayer 가 시작되지 않은 상태에서 <중지>를 클릭했을 때 발생하는 오류를 방지하기 위함
btnStop.setClickable(false);
}
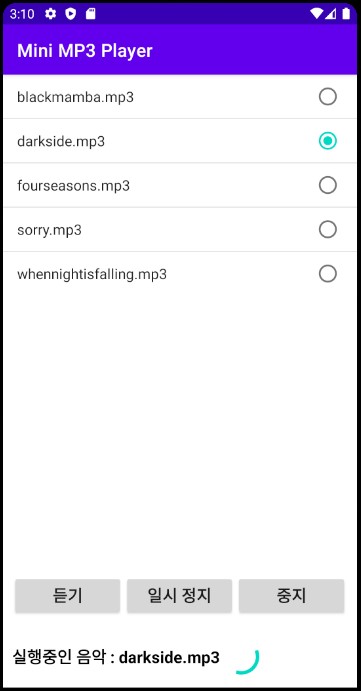
}실습 13-1 결과
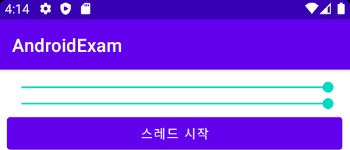
2. 스레드
2-1 프로그레스바와 시크바
- 프로그레스바는 작업의 진행 상태를 확인할 때, 시크바는 음악이나 동영상 재생의 위치를 지정할 때 많이 활용됩니다.
예제 13-7 프로그레스바 / 시크바의 XML 코드
<androidx.appcompat.widget.LinearLayoutCompat
    xmlns:android="http://schemas.android.com/apk/res/android"
    xmlns:tools="http://schemas.android.com/tools"
    android:layout_width="match_parent"
    android:layout_height="match_parent"
    android:orientation="vertical"
    android:padding="10dp"
    tools:context=".MainActivity">

    <ProgressBar
        android:id="@+id/progressBar"
        android:layout_width="match_parent"
        android:layout_height="wrap_content"
        style="?android:attr/progressBarStyleHorizontal"
        android:max="100"
        android:progress="20" />
    <Button
        android:id="@+id/btnInc"
        android:layout_width="match_parent"
        android:layout_height="wrap_content"
        android:text="10씩 증가" />
    <Button
        android:id="@+id/btnDec"
        android:layout_width="match_parent"
        android:layout_height="wrap_content"
        android:text="10씩 감소" />

    <TextView
        android:id="@+id/tvSeek"
        android:layout_width="match_parent"
        android:layout_height="wrap_content"/>
    <SeekBar
        android:id="@+id/seekBar"
        android:layout_width="match_parent"
        android:layout_height="wrap_content" />

</androidx.appcompat.widget.LinearLayoutCompat>
예제 13-8 프로그레스바 / 시크바의 Java 코드
public class MainActivity extends AppCompatActivity {

    private ProgressBar progressBar;
    private Button btnInc, btnDec;
    private TextView tvSeek;
    private SeekBar seekBar;

    @Override
    protected void onCreate(Bundle savedInstanceState) {
        super.onCreate(savedInstanceState);
        setContentView(R.layout.activity_main);

        init();
        initLr();
    }

    public void init(){
        progressBar = findViewById(R.id.progressBar);
        btnInc = findViewById(R.id.btnInc);
        btnDec = findViewById(R.id.btnDec);
        tvSeek = findViewById(R.id.tvSeek);
        seekBar = findViewById(R.id.seekBar);
    }

    public void initLr(){
        btnInc.setOnClickListener(v -> {
            progressBar.incrementProgressBy(10);
        });

        btnDec.setOnClickListener(v -> {
            progressBar.incrementProgressBy(-10);
        });

        seekBar.setOnSeekBarChangeListener(new SeekBar.OnSeekBarChangeListener() {
            @Override
            public void onProgressChanged(SeekBar seekBar, int progress, boolean fromUser) {
                tvSeek.setText("진행률 : " + progress + "% ");
            }

            @Override
            public void onStartTrackingTouch(SeekBar seekBar) {

            }

            @Override
            public void onStopTrackingTouch(SeekBar seekBar) {

            }
        });
    }
}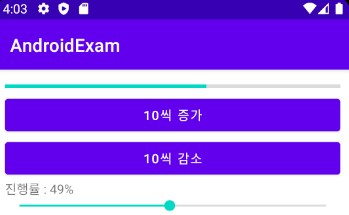
- 위 예제에서 버튼을 클릭하여 프로그레스바를 강제로 증가 • 감소시켰습니다.
- 프로그레바의 일반 용도는 다른 작업(예를 들면 음악이 나오는 작업)을 하면서 프로그레스바가 자연스럽게 진행되도록 하는 것입니다.
- 2개의 작업(음악 재생과 프로그레스바)이 동시에 진행되게 하려면 스레드가 필요합니다.
2-2 스레드의 기본
- 스레드(thread)는 여러 작업을 동시에 수행하기 위해사용하는 개념으로 멀티스레드(multi thread)라고도 부릅니다.
- 경량 프로세스라고도 하는데 이는 스레드가 프로세스(전체 프로그램 동작) 안에서 동작하는 작은 단위이기 때문입니다.
- 아래 그림은 일반적인 함수 처리 방식과 스레드의 차이를 보여줍니다.
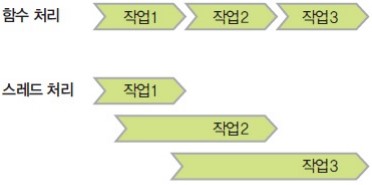
- 함수는 하나의 작업이 끝나야 다음 작업이 진행되지만, 스레드는 하나의 작업이 끝나기 전에 다른 작업을 동시에 진행시킬 수 있습니다.
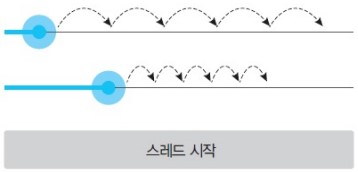
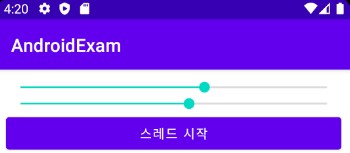
- 위 그림과 같이 <스레드 시작>을 클릭하면 첫 번째 프로그레스바는 처음에 전체 길이 100 중에서 10 정도에 위치하고, 한 번에 건너 뛰는 폭이 2입니다.
- 두 번째는 프로그레스바는 처음에 전체 길이 100중에서 30 정도에 위치하고, 한 번에 건너뛰는 폭이 1입니다.
- 이 두가지 프로그레스바를 동시에 진행시킨다고 가정했을 때 시작은 두 번째 프로그레스바가 빠르지만 첫 번째 프로그레스바가 끝에 먼저 도달할 것입니다.
예제 13-9 스레드 기본 예제의 XML 코드
<androidx.appcompat.widget.LinearLayoutCompat
xmlns:android="http://schemas.android.com/apk/res/android"
xmlns:tools="http://schemas.android.com/tools"
android:layout_width="match_parent"
android:layout_height="match_parent"
android:orientation="vertical"
android:padding="10dp"
tools:context=".MainActivity">
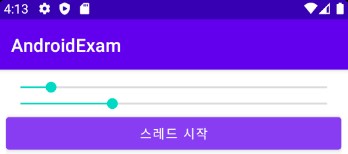
<SeekBar
android:id="@+id/pb1"
android:layout_width="match_parent"
android:layout_height="wrap_content"
android:max="100"
android:progress="10"/>
<SeekBar
android:id="@+id/pb2"
android:layout_width="match_parent"
android:layout_height="wrap_content"
android:max="100"
android:progress="30" />
<Button
android:id="@+id/btn"
android:layout_width="match_parent"
android:layout_height="wrap_content"
android:text="스레드 시작" />
</androidx.appcompat.widget.LinearLayoutCompat>예제 13-10 스레드 기본 예제의 Java 코드 - 동작하지 않음
public class MainActivity extends AppCompatActivity {

    private Button btn;
    private SeekBar pb1, pb2;

    @Override
    protected void onCreate(Bundle savedInstanceState) {
        super.onCreate(savedInstanceState);
        setContentView(R.layout.activity_main);

        init();
        initLr();
    }

    public void init(){
        pb1 = findViewById(R.id.pb1);
        pb2 = findViewById(R.id.pb2);
        btn = findViewById(R.id.btn);
    }

    public void initLr(){
        btn.setOnClickListener(v -> {
            for(int i = 0; i < 100; i++){
                pb1.setProgress(pb1.getProgress() + 2);
                pb2.setProgress(pb2.getProgress() + 1);
                SystemClock.sleep(100);
            }
        });
    }
}
- 위 코드를 실행하고 버튼을 클릭하면 버튼이 눌린 상태에서 한동안 동작하지 않다가 한꺼번에 두 프로그레스바가 모두 끝에 도달합니다.
- 두 작업이 동시에 실행되지 않는데 이 문제를 해결하려면 스레드를 사용해야 합니다.
- 아래는 기본적 스레드를 사용하는 형식입니다.
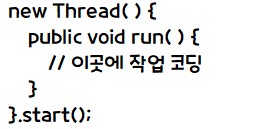
예제 13-11 스레드 기본 예제의 Java 코드 - 동작함
public class MainActivity extends AppCompatActivity {

    private Button btn;
    private SeekBar pb1, pb2;

    @Override
    protected void onCreate(Bundle savedInstanceState) {
        super.onCreate(savedInstanceState);
        setContentView(R.layout.activity_main);

        init();
        initLr();
    }

    public void init(){
        pb1 = findViewById(R.id.pb1);
        pb2 = findViewById(R.id.pb2);
        btn = findViewById(R.id.btn);
    }

    public void initLr(){
        btn.setOnClickListener(v -> {
            new Thread() {
                public void run() {
                    for(int i = pb1.getProgress(); i < 100; i = i + 2){
                        pb1.setProgress(pb1.getProgress() + 2);
                        SystemClock.sleep(100);
                    }
                }
            }.start();

            new Thread() {
                public void run() {
                    for(int i = pb2.getProgress(); i < 100; i++){
                        pb2.setProgress(pb2.getProgress() + 1);
                        SystemClock.sleep(100);
                    }
                }
            }.start();
        });
    }
}
- 위와 같이 스레드를 생성하면 두 프로그레스바가 동시에 동작합니다.
2-3 UI 스레드
- UI(User Interface) 스레드는 화면의 위젯을 변경할 때 사용합니다.
- 일반적인 스레드는 스레드 안에서 필요한 내용을 계산하는 것만 가능하며 화면의 다른 위젯을 변경할 수 없습니다.
예제 13-12 UI 스레드의 XML 코드
<androidx.appcompat.widget.LinearLayoutCompat
    xmlns:android="http://schemas.android.com/apk/res/android"
    xmlns:tools="http://schemas.android.com/tools"
    android:layout_width="match_parent"
    android:layout_height="match_parent"
    android:orientation="vertical"
    android:padding="10dp"
    tools:context=".MainActivity">

    <TextView
        android:id="@+id/tv1"
        android:layout_width="match_parent"
        android:layout_height="wrap_content"
        android:text="1번 진행률 : "
        android:textColor="@android:color/black"
        android:textSize="24dp"
        android:textStyle="bold"
        android:gravity="center" />
    <SeekBar
        android:id="@+id/pb1"
        android:layout_width="match_parent"
        android:layout_height="wrap_content"
        android:max="100"
        android:progress="10"/>
    <TextView
        android:id="@+id/tv2"
        android:layout_width="match_parent"
        android:layout_height="wrap_content"
        android:text="2번 진행률 : "
        android:textColor="@android:color/black"
        android:textSize="24dp"
        android:textStyle="bold"
        android:gravity="center" />
    <SeekBar
        android:id="@+id/pb2"
        android:layout_width="match_parent"
        android:layout_height="wrap_content"
        android:max="100"
        android:progress="30" />
    <Button
        android:id="@+id/btn"
        android:layout_width="match_parent"
        android:layout_height="wrap_content"
        android:text="스레드 시작" />

</androidx.appcompat.widget.LinearLayoutCompat>
예제 13-13 UI 스레드의 Java 코드 - 동작하지 않음
    public void initLr(){
        btn.setOnClickListener(v -> {
            new Thread() {
                public void run() {
                    for(int i = pb1.getProgress(); i < 100; i = i + 2){
                        pb1.setProgress(pb1.getProgress() + 2);
                        tv1.setText("1번 진행률 : " + pb1.getProgress() + "%");
                        SystemClock.sleep(100);
                    }
                }
            }.start();

            new Thread() {
                public void run() {
                    for(int i = pb2.getProgress(); i < 100; i++){
                        pb2.setProgress(pb2.getProgress() + 1);
                        tv2.setText("2번 진행률 : " + pb2.getProgress() + "%");
                        SystemClock.sleep(100);
                    }
                }
            }.start();
        });
    }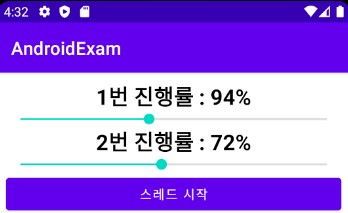
- 위 예제를 실행하면 실행 오류가 발생합니다.
- 스레드 내부에서 위젯의 글자를 변경하려고 시도했기 때문입니다.
- 위젯을 변경하는 부분을 runOnUiThread({ })안에 넣어야 합니다.
- 형식은 아래와 같습니다.
예제 13-14 UI 스레드의 Java 코드 - 동작함
public class MainActivity extends AppCompatActivity {

    private Button btn;
    private SeekBar pb1, pb2;
    private TextView tv1, tv2;

    @Override
    protected void onCreate(Bundle savedInstanceState) {
        super.onCreate(savedInstanceState);
        setContentView(R.layout.activity_main);

        init();
        initLr();
    }

    public void init(){
        pb1 = findViewById(R.id.pb1);
        pb2 = findViewById(R.id.pb2);
        tv1 = findViewById(R.id.tv1);
        tv2 = findViewById(R.id.tv2);
        btn = findViewById(R.id.btn);
    }

    public void initLr(){
        btn.setOnClickListener(v -> {
            new Thread() {
                public void run() {
                    for(int i = pb1.getProgress(); i < 100; i = i + 2){
                        runOnUiThread(new Runnable() {
                            @Override
                            public void run() {
                                pb1.setProgress(pb1.getProgress() + 2);
                                tv1.setText("1번 진행률 : " + pb1.getProgress() + "%");
                            }
                        });
                        SystemClock.sleep(100);
                    }
                }
            }.start();

            new Thread() {
                public void run() {
                    for(int i = pb2.getProgress(); i < 100; i++){
                        runOnUiThread(new Runnable() {
                            @Override
                            public void run() {
                                pb2.setProgress(pb2.getProgress() + 1);
                                tv2.setText("2번 진행률 : " + pb2.getProgress() + "%");
                            }
                        });
                        SystemClock.sleep(100);
                    }
                }
            }.start();
        });
    }
}
2-4 스레드의 응용
예제 13-15 스레드 응용 예제의 XML 코드
<androidx.appcompat.widget.LinearLayoutCompat
    xmlns:android="http://schemas.android.com/apk/res/android"
    xmlns:tools="http://schemas.android.com/tools"
    android:layout_width="match_parent"
    android:layout_height="match_parent"
    android:orientation="vertical"
    tools:context=".MainActivity">

    <androidx.appcompat.widget.LinearLayoutCompat
        android:layout_width="match_parent"
        android:layout_height="0dp"
        android:layout_weight="80"
        android:orientation="horizontal" >
        <ListView
            android:id="@+id/lvMP3"
            android:layout_width="match_parent"
            android:layout_height="wrap_content"/>

    </androidx.appcompat.widget.LinearLayoutCompat>

    <androidx.appcompat.widget.LinearLayoutCompat
        android:layout_width="match_parent"
        android:layout_height="0dp"
        android:layout_weight="10"
        android:orientation="horizontal"
        android:padding="10dp">
        <androidx.appcompat.widget.AppCompatButton
            android:id="@+id/btnPlay"
            android:layout_width="0dp"
            android:layout_height="match_parent"
            android:layout_weight="50"
            android:text="듣기"
            android:textSize="18dp"
            android:textStyle="bold"/>
        <androidx.appcompat.widget.AppCompatButton
            android:id="@+id/btnPause"
            android:layout_width="0dp"
            android:layout_height="match_parent"
            android:layout_weight="50"
            android:text="일시 정지"
            android:textSize="18dp"
            android:textStyle="bold" />
        <androidx.appcompat.widget.AppCompatButton
            android:id="@+id/btnStop"
            android:layout_width="0dp"
            android:layout_height="match_parent"
            android:layout_weight="50"
            android:text="중지"
            android:textSize="18dp"
            android:textStyle="bold" />

    </androidx.appcompat.widget.LinearLayoutCompat>

    <androidx.appcompat.widget.LinearLayoutCompat
        android:layout_width="match_parent"
        android:layout_height="0dp"
        android:layout_weight="20"
        android:padding="10dp"
        android:orientation="vertical" >
        <TextView
            android:id="@+id/tvMP3"
            android:layout_width="wrap_content"
            android:layout_height="wrap_content"
            android:gravity="center"
            android:text="실행중인 음악 : "
            android:textSize="18dp"
            android:textStyle="bold"
            android:textColor="@android:color/black"
            android:layout_marginBottom="10dp"/>
        <TextView
            android:id="@+id/tvTime"
            android:layout_width="wrap_content"
            android:layout_height="wrap_content"
            android:gravity="center"
            android:text="진행시간 : "
            android:textSize="18dp"
            android:textStyle="bold"
            android:textColor="@android:color/black"
            android:layout_marginBottom="10dp"/>
        <ProgressBar
            android:id="@+id/pbMP3"
            android:layout_width="match_parent"
            android:layout_height="wrap_content"
            style="?android:attr/progressBarStyleHorizontal"
            android:visibility="invisible" />

    </androidx.appcompat.widget.LinearLayoutCompat>

</androidx.appcompat.widget.LinearLayoutCompat>
예제 13-16 스레드 응용 예제의 Java 코드
public class MainActivity extends AppCompatActivity {

    // 전역변수 선언
    private ListView lvMP3;
    private Button btnPlay, btnPause, btnStop;
    private TextView tvMP3, tvTime;
    private ProgressBar pbMP3;

    private ArrayList<String> mp3List;
    private String selectedMP3, fileName, extName;
    private String mp3Path = Environment.getExternalStorageDirectory().getPath() + "/";
    private MediaPlayer mediaPlayer;

    // 일시정지할 경우 위치를 기억하기 위한 변수 선언
    private int position = 0;

    private SimpleDateFormat timeFormat = new SimpleDateFormat("mm:ss");

    @Override
    protected void onCreate(Bundle savedInstanceState) {
        super.onCreate(savedInstanceState);
        setContentView(R.layout.activity_main);
        setTitle("Mini MP3 Player");

        ActivityCompat.requestPermissions(this, new String[] {Manifest.permission.WRITE_EXTERNAL_STORAGE}, MODE_PRIVATE);

        // 리스트뷰에 출력할 ArrayList<String> 형 변수를 생성함
        mp3List = new ArrayList<String>();

        File[] listFiles = new File(mp3Path).listFiles();
        // listFiles 에 들어 있는 파일 또는 폴더를 하나씩 file 변수에 넣고 for 문을 실행함
        for (File file : listFiles) {
            // file 변수에서 파일 이름과 확장명을 추출함
            fileName = file.getName();
            extName = fileName.substring(fileName.length() - 3);
            // 확장명이 .mp3라면 준비한 mp3List에 추가함
            if(extName.equals((String) "mp3")) {
                mp3List.add(fileName);
            }
        }

        init();
        initData();
        initLr();
    }

    public void init(){
        lvMP3 = findViewById(R.id.lvMP3);
        btnPlay = findViewById(R.id.btnPlay);
        btnPause = findViewById(R.id.btnPause);
        btnStop = findViewById(R.id.btnStop);
        tvMP3 = findViewById(R.id.tvMP3);
        tvTime = findViewById(R.id.tvTime);
        pbMP3 = findViewById(R.id.pbMP3);
    }

    public void initData() {
        // 리스트뷰에 mp3List 배열의 내용을 출력함
        ArrayAdapter<String> adapter = new ArrayAdapter<String>(this, android.R.layout.simple_list_item_single_choice, mp3List);
        lvMP3.setChoiceMode(ListView.CHOICE_MODE_SINGLE);
        lvMP3.setAdapter(adapter);
        lvMP3.setItemChecked(0, true);
    }

    public void initLr(){
        // MP3 파일 목록이 출력된 리스트뷰의 각 항목을 클릭할 때마다 파일 이름이 selectedMP3 변수에 저장됨
        lvMP3.setOnItemClickListener(new AdapterView.OnItemClickListener() {
            @Override
            public void onItemClick(AdapterView<?> adapterView, View view, int i, long l) {
                selectedMP3 = mp3List.get(i);
            }
        });
        selectedMP3 = mp3List.get(0);

        // 듣기를 클릭했을 때 동작하는 부분
        btnPlay.setOnClickListener(v -> {
            try {
                mediaPlayer = new MediaPlayer();
                mediaPlayer.setDataSource(mp3Path + selectedMP3);
                mediaPlayer.prepare();
                mediaPlayer.start();
                btnPlay.setClickable(false);
                btnPause.setClickable(true);
                btnStop.setClickable(true);
                tvMP3.setText("실행중인 음악 : " + selectedMP3);
                pbMP3.setVisibility(View.VISIBLE);
                new Thread() {
                    public void run(){
                        if(mediaPlayer == null) {
                            return;
                        }
                        pbMP3.setMax(mediaPlayer.getDuration());
                        while (mediaPlayer.isPlaying()) {
                            runOnUiThread(new Runnable() {
                                @Override
                                public void run() {
                                    pbMP3.setProgress(mediaPlayer.getCurrentPosition());
                                    tvTime.setText("진행 시간 : " + timeFormat.format(mediaPlayer.getCurrentPosition()));
                                }
                            });
                            SystemClock.sleep(200);
                        }
                    }
                }.start();
            } catch (IOException e) {
                e.printStackTrace();
            }
        });

        // 일시정지를 클릭했을 때 동작하는 부분
        btnPause.setOnClickListener(v -> {
            // mediaPlayer 가 재생중일 때 작동
            if(mediaPlayer.isPlaying()){
                mediaPlayer.pause();
                // 음악파일에서 현재 재생 위치 기억
                position = mediaPlayer.getCurrentPosition();
                btnPause.setText("이어듣기");
                btnPause.setClickable(true);
                btnStop.setClickable(true);
                pbMP3.setVisibility(View.INVISIBLE);
            } else {
                // 기억해둔 재생위치부터 재생
                mediaPlayer.seekTo(position);
                mediaPlayer.start();
                btnPause.setText("일시 정지");
                pbMP3.setVisibility(View.VISIBLE);
                new Thread() {
                    public void run(){
                        if(mediaPlayer == null) {
                            return;
                        }
                        pbMP3.setMax(mediaPlayer.getDuration());
                        while (mediaPlayer.isPlaying()) {
                            runOnUiThread(new Runnable() {
                                @Override
                                public void run() {
                                    pbMP3.setProgress(mediaPlayer.getCurrentPosition());
                                    tvTime.setText("진행 시간 : " + timeFormat.format(mediaPlayer.getCurrentPosition()));
                                }
                            });
                            SystemClock.sleep(200);
                        }
                    }
                }.start();
            }
        });

        // 중지를 클릭했을 때 동작하는 부분
        btnStop.setOnClickListener(v -> {
            mediaPlayer.stop();
            mediaPlayer.reset();
            btnPlay.setClickable(true);
            btnPause.setClickable(false);
            btnStop.setClickable(false);
            tvMP3.setText("실행중인 음악 : ");
            pbMP3.setProgress(0);
            pbMP3.setVisibility(View.INVISIBLE);
            tvTime.setText("진행시간 : ");
        });

        // MediaPlayer 가 시작되지 않은 상태에서 <중지>를 클릭했을 때 발생하는 오류를 방지하기 위함
        btnStop.setClickable(false);
    }
}
3. 구글 지도
- 구글 지도(구글 맵)는 구글에서 오픈 API로 제공하는 전자 지도입니다.
- 일반적인 웹브라우저로 접속하여 전 세계의 지도와 위치를 확인할 수도 있고, 안드로이드 앱에 포함하여 자신에게 필요한 내용으로 프로그래밍할 수도 있습니다.
3-1 구글 지도 사용을 위한 준비
- 구글 지도를 안드로이드 앱에 포함하려면 먼저 개발에 사용할 PC별로 구글에서 제공하는 API 키를 얻어야 합니다.
실습 13-2 구글의 API 키 얻기
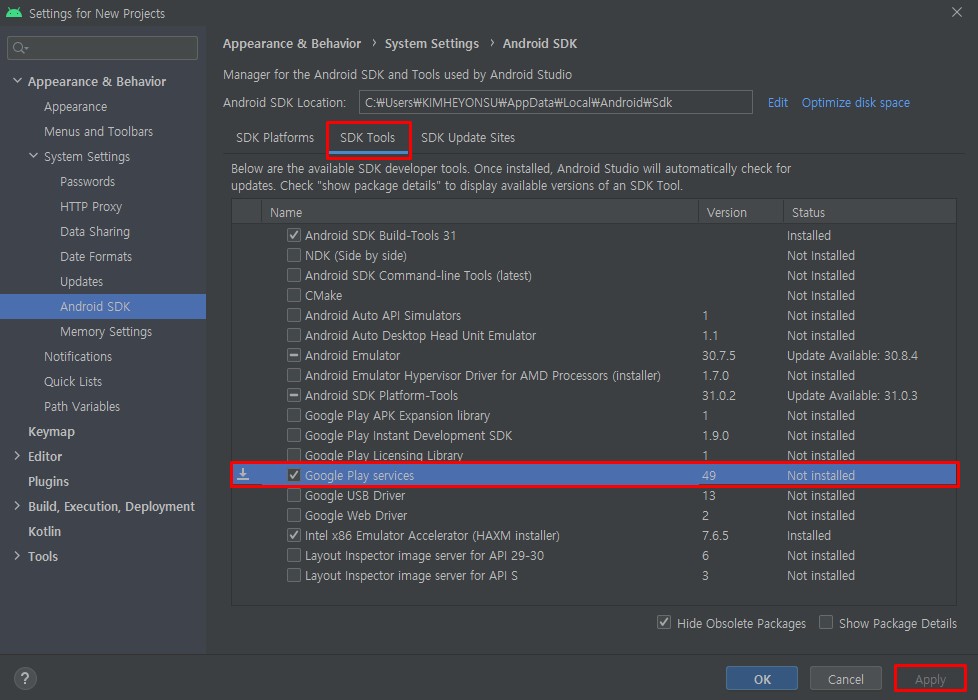
1. Google Play services 설치
- [Tools] -> [SDK Manager]를 실행합니다.
- [SDK Tools] 탭을 클릭하고 'Google Play services'를 선택해서 설치해줍니다.
SHA1 키를 알아내야 하는데 CMD에 비밀번호 입력이 안되어서 보류

Nil Desperandum <절대 절망하지 마라>