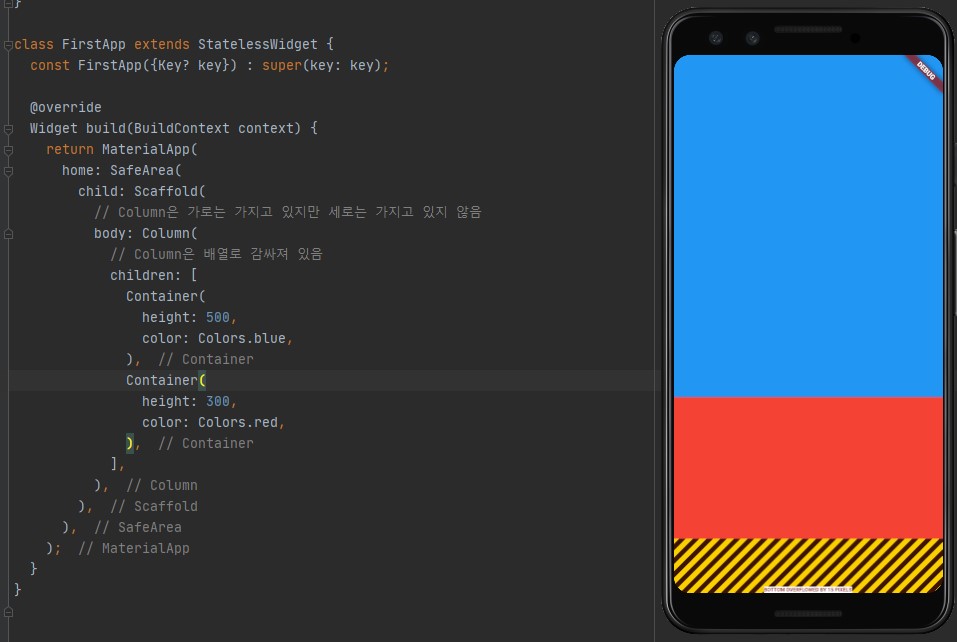
ListView
- 높이 지정을 디바이스의 크기보다 크게 지정하게 되면 아래와 같이 깨지게 됩니다.
// main 스레드는 runApp 을 실행시키고 종료됩니다.
void main() {
  // 비동기로 실행됨(이벤트 루프에 등록된다)
  runApp(FirstApp());
  // sleep(Duration(seconds: 2));
  // print("main 종료");
}

class FirstApp extends StatelessWidget {
  const FirstApp({Key? key}) : super(key: key);

  @override
  Widget build(BuildContext context) {
    return MaterialApp(
      home: SafeArea(
        child: Scaffold(
          // Column은 가로는 가지고 있지만 세로는 가지고 있지 않음
          body: Column(
            // Column은 배열로 감싸져 있음
            children: [
              Container(
                height: 500,
                color: Colors.blue,
              ),
              Container(
                height: 300,
                color: Colors.red,
              ),
            ],
          ),
        ),
      ),
    );
}- 이럴 때 Column 대신에 ListView로 바꾸면 스크롤이 달리게 되어 깨지지 않습니다.
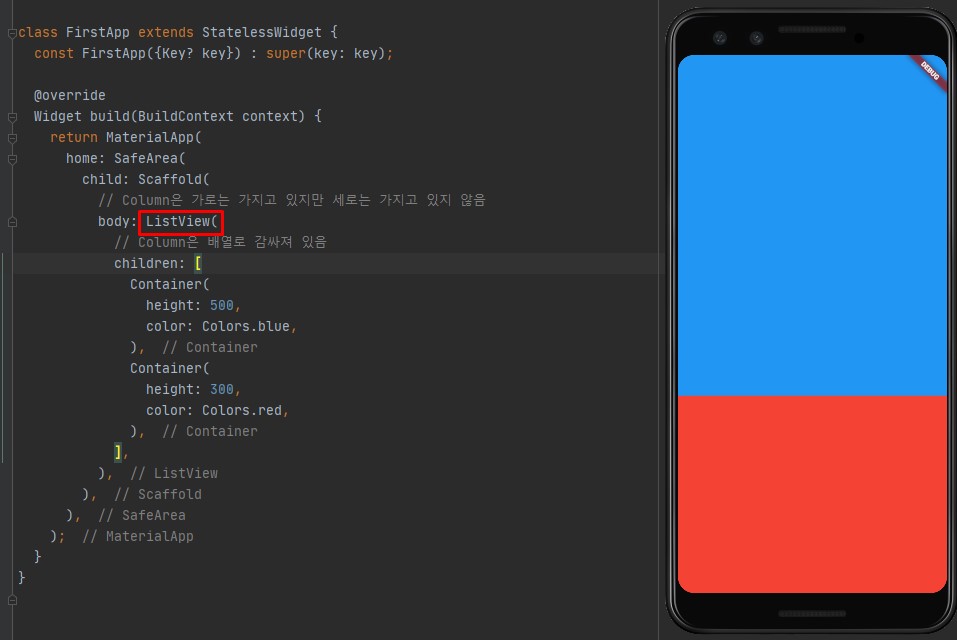
...

child: Scaffold(
 body: ListView(
   children: [

...- 일반적으로 앱에서 키보드가 올라오면 화면이 깨지게 되어있습니다.
- 키보드를 사용할때 ListView를 사용하면 화면깨짐 없이 사용할 수 있습니다.
ListView.builder
- 리스트뷰 빌더는 Container를 반복할 수 있습니다.
- Container 내부에 문자를 넣고 싶을땐 child 속성을 이용해서 Text를 넣어줍니다.
- itemCount를 이용해서 반복 횟수를 지정할 수 있습니다.
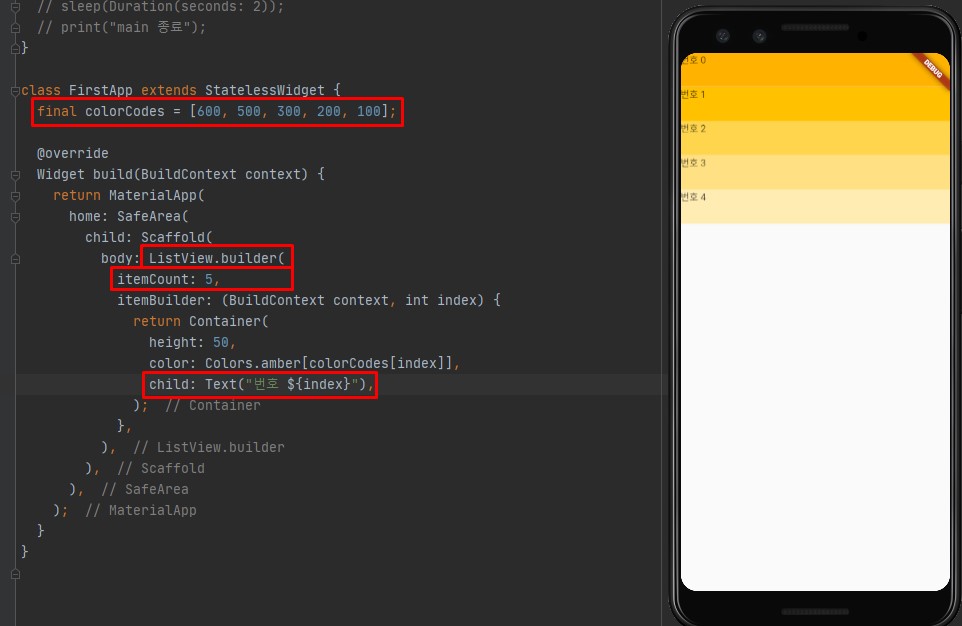
class FirstApp extends StatelessWidget {
// 배열 선언
final colorCodes = [600, 500, 300, 200, 100];
@override
Widget build(BuildContext context) {
return MaterialApp(
home: SafeArea(
child: Scaffold(
body: ListView.builder(
// itemCount를 이용해서 반복 횟수 지정가능
itemCount: 5,
itemBuilder: (BuildContext context, int index) {
return Container(
height: 50,
// 컬러에 값을 넣으면 색상의 진하기를 지정할 수 있음
color: Colors.amber[colorCodes[index]],
child: Text("번호 ${index}"),
);
},
),
),
),
);
}
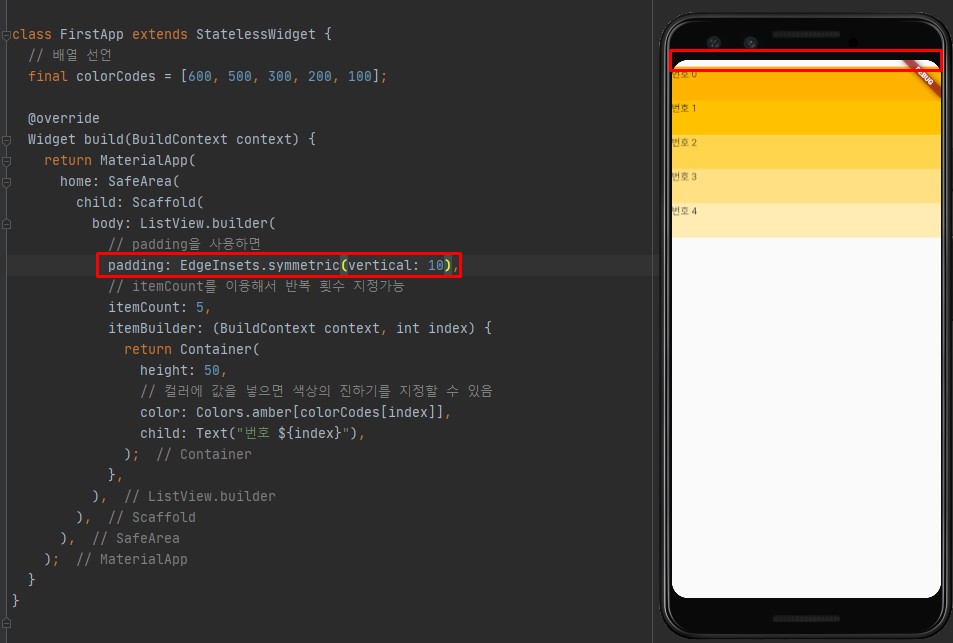
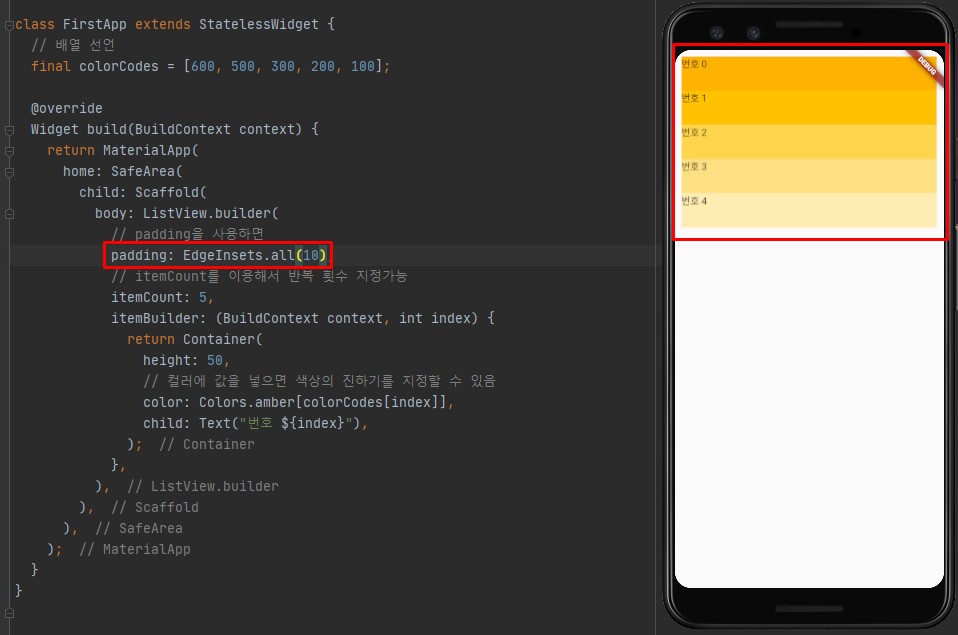
}padding
- padding과 EdgeInsets을 사용해서 간격을 띄울 수 있습니다.
- EdgeInsets.symmetric(vertical: ? ) : 상단
- padding: EdgeInsets.all(?) : 모든 방향
class FirstApp extends StatelessWidget {
  // 배열 선언
  final colorCodes = [600, 500, 300, 200, 100];

  @override
  Widget build(BuildContext context) {
    return MaterialApp(
      home: SafeArea(
        child: Scaffold(
          body: ListView.builder(
            // padding을 사용하면
            padding: EdgeInsets.all(10),
            // itemCount를 이용해서 반복 횟수 지정가능
            itemCount: 5,
            itemBuilder: (BuildContext context, int index) {
              return Container(
                height: 50,
                // 컬러에 값을 넣으면 색상의 진하기를 지정할 수 있음
                color: Colors.amber[colorCodes[index]],
                child: Text("번호 ${index}"),
              );
            },
          ),
        ),
      ),
    );
  }
}
ListView 사이 간격 주기
- ListView 사이에 간격을 주기 위해서 Column으로 전체를 잡아주고 height 값을 작게 가지는 Container를 하나 추가해줍니다.
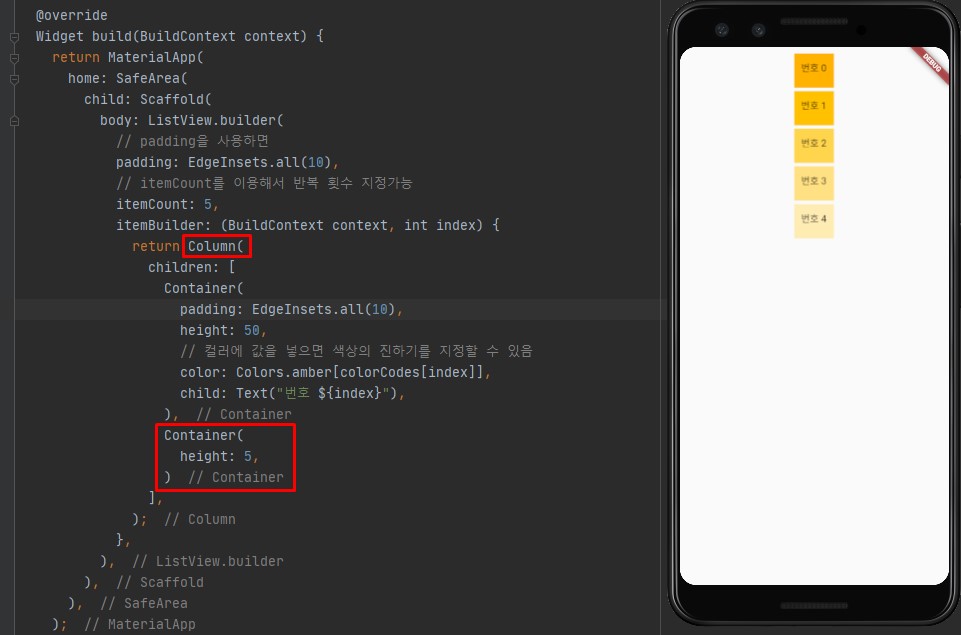
return Column(
  children: [
    Container(
      padding: EdgeInsets.all(10),
      height: 50,
      // 컬러에 값을 넣으면 색상의 진하기를 지정할 수 있음
      color: Colors.amber[colorCodes[index]],
      child: Text("번호 ${index}"),
    ),
    Container(
      height: 5,
    )
  ],
);- double.infinity를 사용하면 화면의 끝까지 다 채울 수 있습니다.
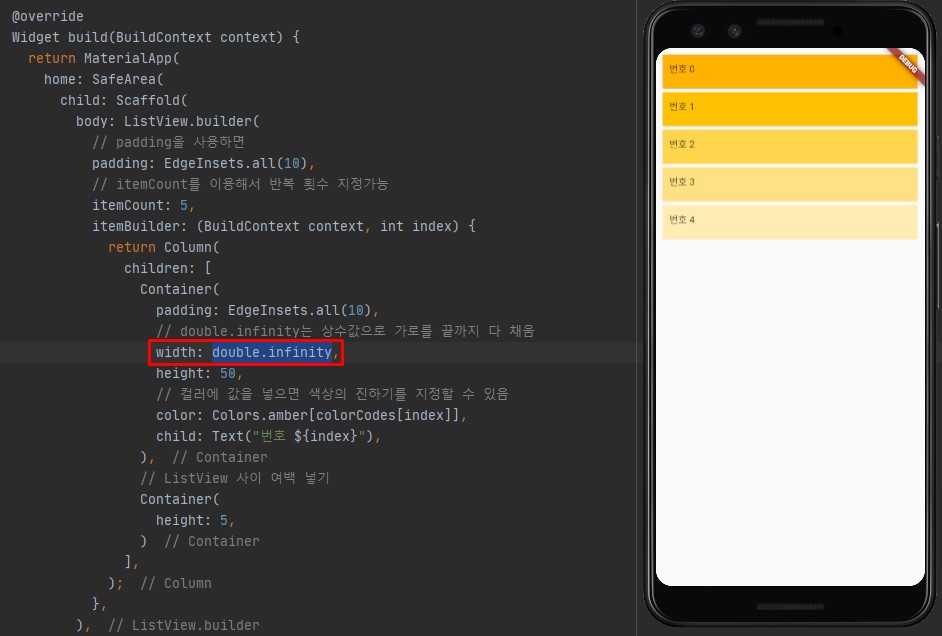
- 배열의 데이터도 뿌릴 수 있습니다.
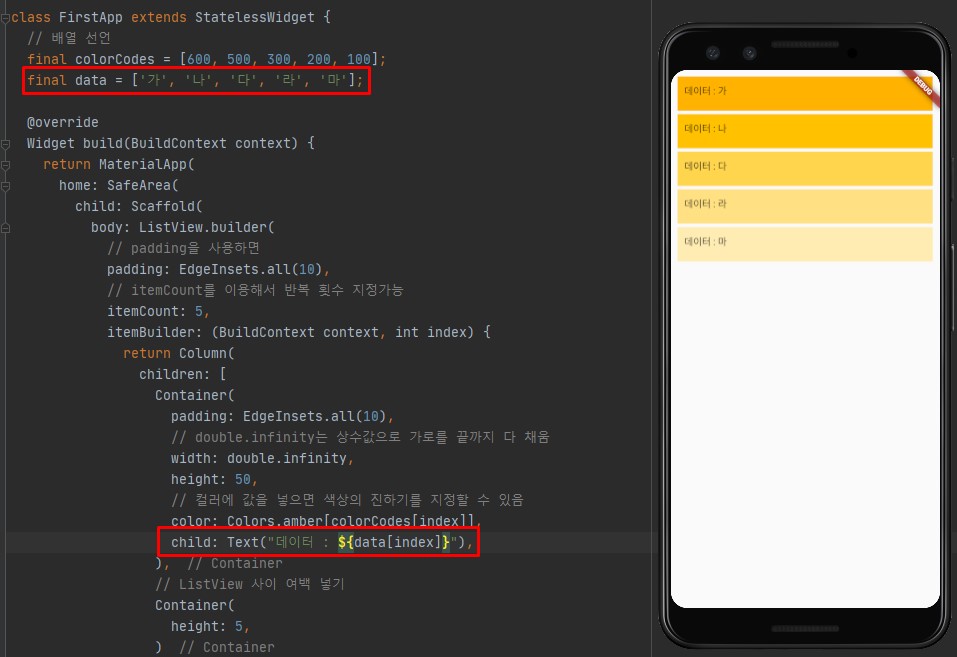
body: ListView.builder(
// padding을 사용하면
padding: EdgeInsets.all(10),
// itemCount를 이용해서 반복 횟수 지정가능
itemCount: 5,
itemBuilder: (BuildContext context, int index) {
return Column(
children: [
Container(
padding: EdgeInsets.all(10),
// double.infinity는 상수값으로 가로를 끝까지 다 채움
width: double.infinity,
height: 50,
// 컬러에 값을 넣으면 색상의 진하기를 지정할 수 있음
color: Colors.amber[colorCodes[index]],
child: Text("데이터 : ${data[index]}"),
),
// ListView 사이 여백 넣기
Container(
height: 5,
)
],
);
},
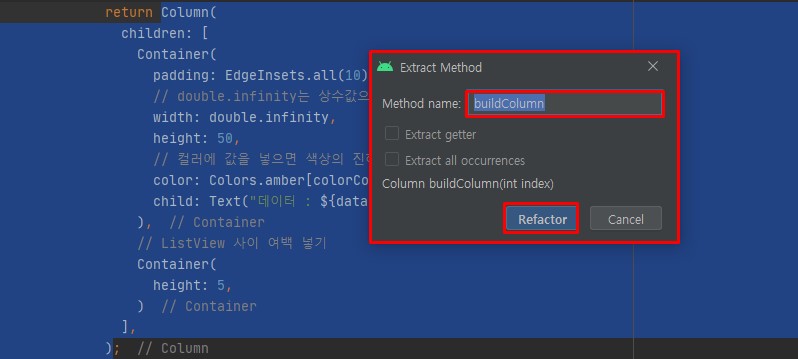
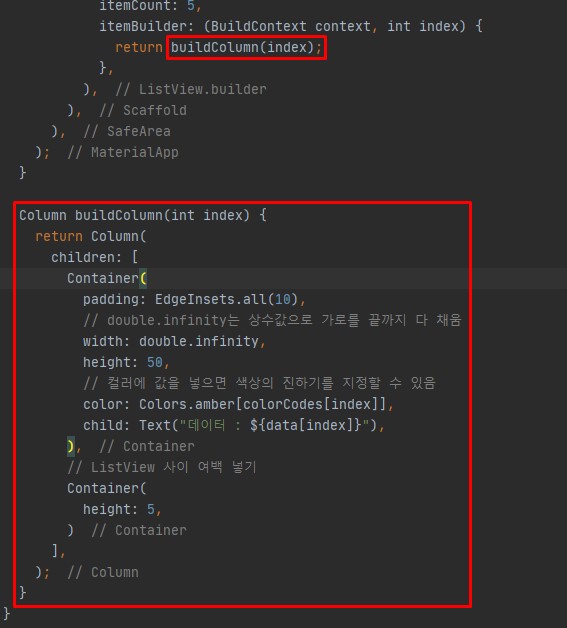
),메서드 추출하기
- 내가 추출하고 싶은 부분에서 Ctrl + Alt + M을 사용하면 메서드로 추출이 가능합니다.
- 코드를 깔끔하게 만들 수 있습니다.
ListTile
- ListTile은 return type이 ListTile입니다.
- ListTile뿐만 아니라 대부분 statelessWidget이나 statefulWidget의 자식이므로 결론적으로는 Widget의 자식입니다.
- return type으로 Widget을 사용할 수 있습니다.
  Widget buildColumn(int index) {
    return ListTile();
  }
title과 subtitle
- title과 subtitle은 아래와 같이 사용할 수 있습니다.
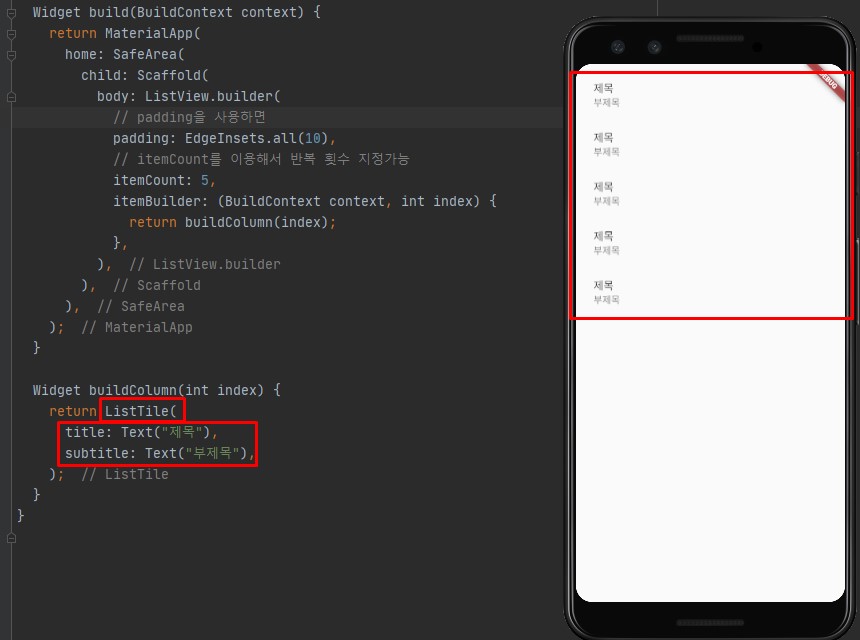
Widget buildColumn(int index) {
  return ListTile(
    title: Text("제목"),
    subtitle: Text("부제목"),
  );
}
leading
- leading에는 widget이 들어올 수 있습니다.
- 일반적으로 leading에는 사진이나 아이콘을 주로 사용합니다.
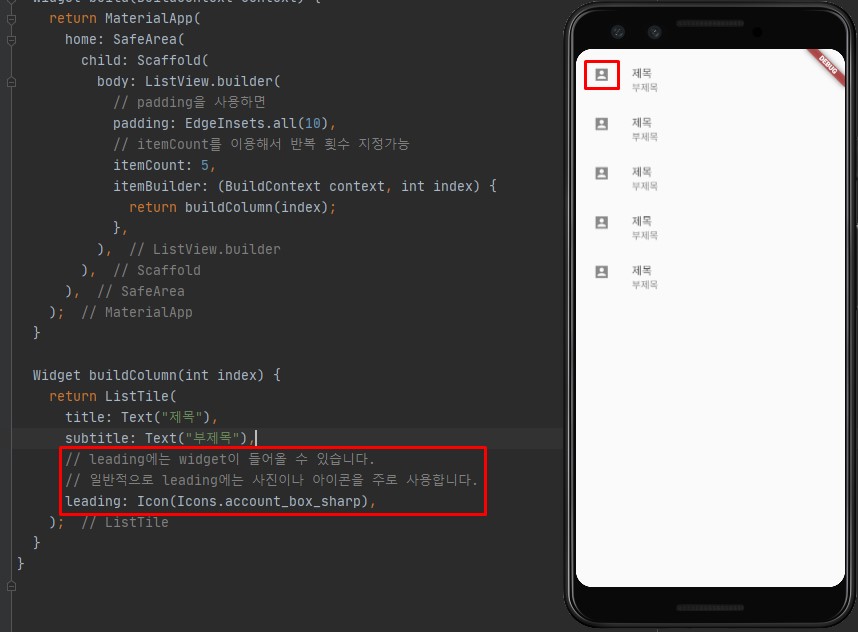
return ListTile(
  title: Text("제목"),
  subtitle: Text("부제목"),
  // leading에는 widget이 들어올 수 있습니다.
  // 일반적으로 leading에는 사진이나 아이콘을 주로 사용합니다.
  leading: Icon(Icons.account_box_sharp),
);
onTap
- onTap에는 return 값이 없는 void가 들어갑니다.
- return 값이 없는 void는 익명함수로 만들면 됩니다.
- 아래와 같이 넣고 ListView를 클릭하면 눌러짐이 출력됩니다.
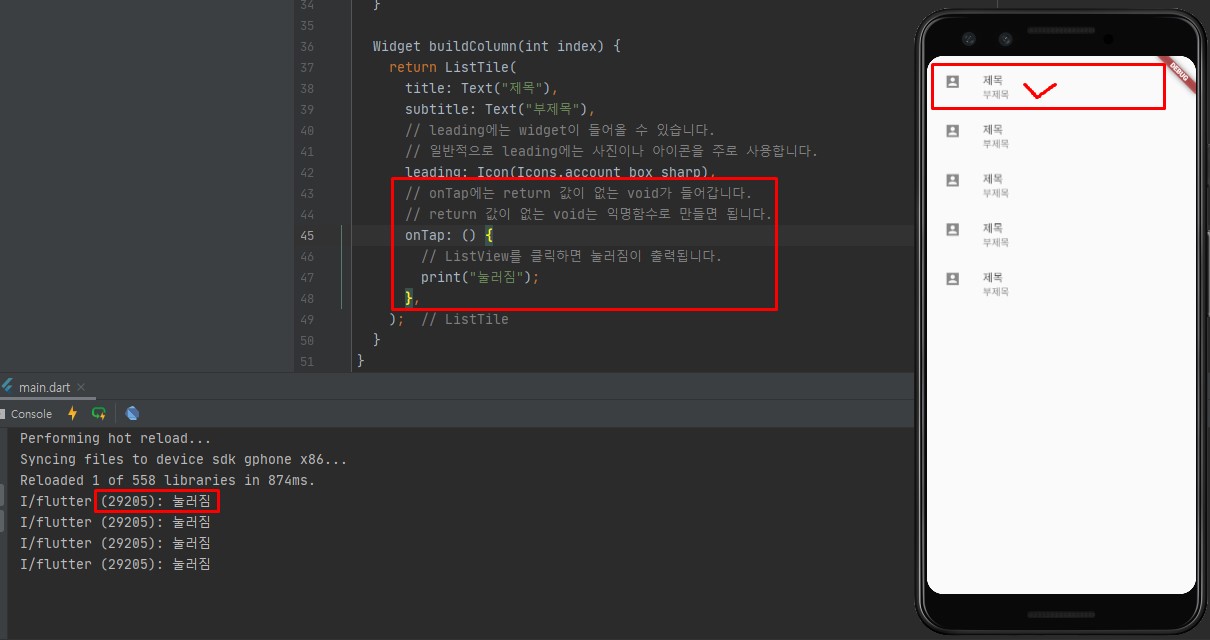
return ListTile(
  title: Text("제목"),
  subtitle: Text("부제목"),
  // leading에는 widget이 들어올 수 있습니다.
  // 일반적으로 leading에는 사진이나 아이콘을 주로 사용합니다.
  leading: Icon(Icons.account_box_sharp),
  // onTap에는 return 값이 없는 void가 들어갑니다.
  // return 값이 없는 void는 익명함수로 만들면 됩니다.
  onTap: () {
    // ListView를 클릭하면 눌러짐이 출력됩니다.
    print("눌러짐");
  },
);
구분선 만들기
- ListTile을 Column으로 감싸줍니다.
- ListTile이 끝나는 부분에 Container를 새로 넣어서 높이를 1로 하고 검정색으로 지정해주면 선처럼 보입니다.
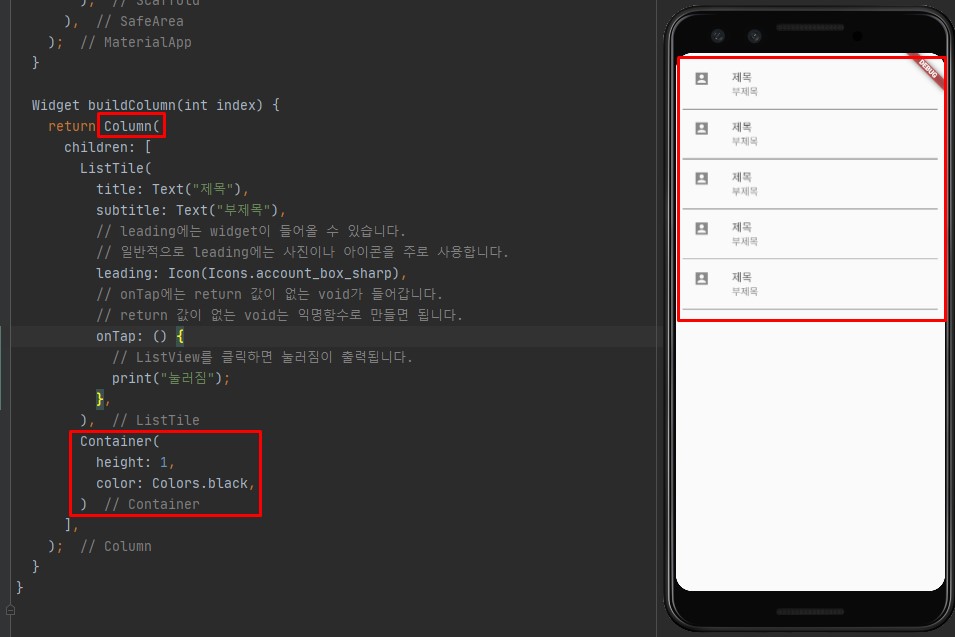
return Column(
  children: [
    ListTile(
      title: Text("제목"),
      subtitle: Text("부제목"),
      // leading에는 widget이 들어올 수 있습니다.
      // 일반적으로 leading에는 사진이나 아이콘을 주로 사용합니다.
      leading: Icon(Icons.account_box_sharp),
      // onTap에는 return 값이 없는 void가 들어갑니다.
      // return 값이 없는 void는 익명함수로 만들면 됩니다.
      onTap: () {
        // ListView를 클릭하면 눌러짐이 출력됩니다.
        print("눌러짐");
      },
    ),
    Container(
      height: 1,
      color: Colors.black,
    )
  ],
);
구분선 응용
- 아래와 같이 Row와 Container를 이용해서 나만의 구분선을 디자인할 수 있습니다.
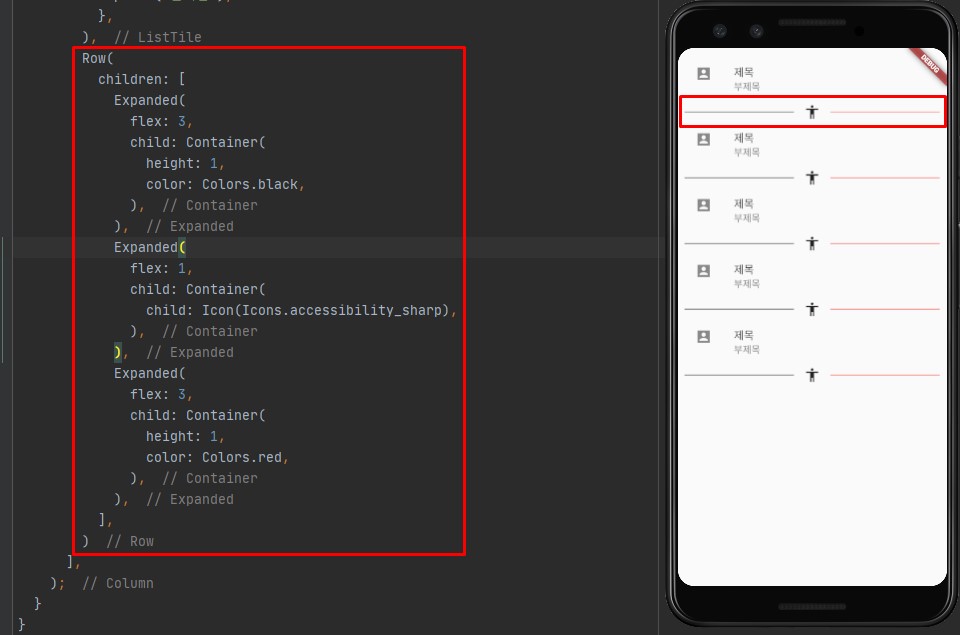
Widget buildColumn(int index) {
  return Column(
    children: [
      ListTile(
        title: Text("제목"),
        subtitle: Text("부제목"),
        // leading에는 widget이 들어올 수 있습니다.
        // 일반적으로 leading에는 사진이나 아이콘을 주로 사용합니다.
        leading: Icon(Icons.account_box_sharp),
        // onTap에는 return 값이 없는 void가 들어갑니다.
        // return 값이 없는 void는 익명함수로 만들면 됩니다.
        onTap: () {
          // ListView를 클릭하면 눌러짐이 출력됩니다.
          print("눌러짐");
        },
      ),
      Row(
        children: [
          Expanded(
            flex: 3,
            child: Container(
              height: 1,
              color: Colors.black,
            ),
          ),
          Expanded(
            flex: 1,
            child: Container(
              child: Icon(Icons.accessibility_sharp),
            ),
          ),
          Expanded(
            flex: 3,
            child: Container(
              height: 1,
              color: Colors.red,
            ),
          ),
        ],
      )
    ],
  );
}
정리(핵심)!!
- ListView는 내가 가지고 있는 자식들이 화면을 벗어날 때 사용하면 스크롤이 생깁니다.
- 데이터베이스나 API를 사용해서 데이터를 가져와서 뿌릴때, builder를 사용해서 뿌리면 됩니다.
- 메서드를 추출할 때는 Ctrl + Alt + M을 사용합니다.
- 기본적인 리스트의 형태를 표현하고 싶을때는 ListTile을 사용하는게 편합니다.
- 다른 형태로 만들고 싶으면 Column, Row, Container를 이용해서 구현하면 됩니다.
최종 코드
// ignore_for_file: prefer_const_literals_to_create_immutables, prefer_const_constructors
import 'package:flutter/material.dart';

// main 스레드는 runApp 을 실행시키고 종료됩니다.
void main() {
  // 비동기로 실행됨(이벤트 루프에 등록된다)
  runApp(FirstApp());
  // sleep(Duration(seconds: 2));
  // print("main 종료");
}

class FirstApp extends StatelessWidget {
  // 배열 선언
  final colorCodes = [600, 500, 300, 200, 100];
  final data = ['가', '나', '다', '라', '마'];

  @override
  Widget build(BuildContext context) {
    return MaterialApp(
      home: SafeArea(
        child: Scaffold(
          body: ListView.builder(
            // padding을 사용하면
            padding: EdgeInsets.all(10),
            // itemCount를 이용해서 반복 횟수 지정가능
            itemCount: 5,
            itemBuilder: (BuildContext context, int index) {
              return buildColumn(index);
            },
          ),
        ),
      ),
    );
  }

  Widget buildColumn(int index) {
    return Column(
      children: [
        ListTile(
          title: Text("제목"),
          subtitle: Text("부제목"),
          // leading에는 widget이 들어올 수 있습니다.
          // 일반적으로 leading에는 사진이나 아이콘을 주로 사용합니다.
          leading: Icon(Icons.account_box_sharp),
          // onTap에는 return 값이 없는 void가 들어갑니다.
          // return 값이 없는 void는 익명함수로 만들면 됩니다.
          onTap: () {
            // ListView를 클릭하면 눌러짐이 출력됩니다.
            print("눌러짐");
          },
        ),
        Row(
          children: [
            Expanded(
              flex: 3,
              child: Container(
                height: 1,
                color: Colors.black,
              ),
            ),
            Expanded(
              flex: 1,
              child: Container(
                child: Icon(Icons.accessibility_sharp),
              ),
            ),
            Expanded(
              flex: 3,
              child: Container(
                height: 1,
                color: Colors.red,
              ),
            ),
          ],
        )
      ],
    );
  }
}
Nil Desperandum <절대 절망하지 마라>