딥러닝 학습 Week4
컴퓨터 비전 이란?
- Computer Vision(= CV)
사람과 같이 물체를 보고 인식하는 것을 의미
컴퓨터가 물체를 인식하고 특징을 파악하기 위한 학습이 필요

컴퓨터 비전의 종류와 응용
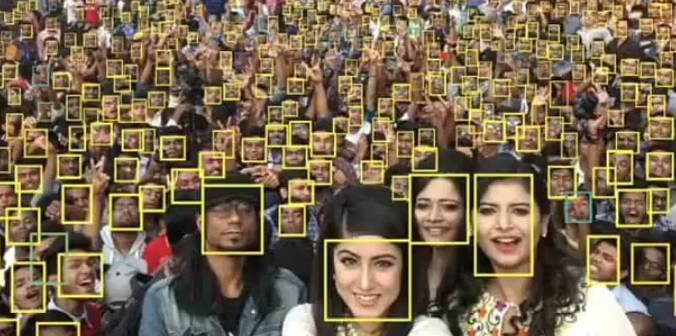
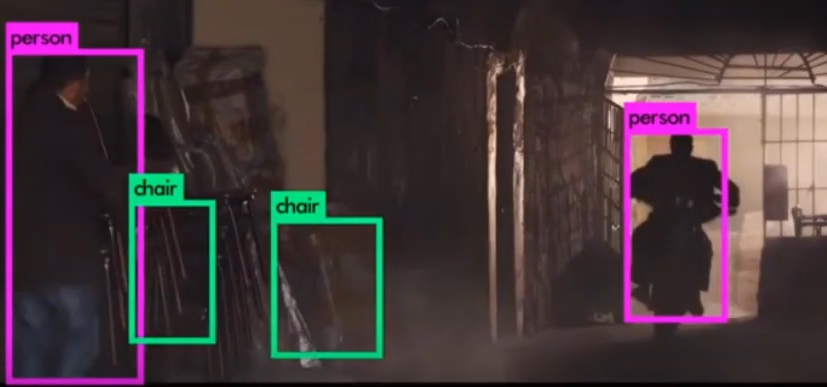
- Object Detection
사진 이미지에서 정확히 물체를 인식
- YOLO (You Only Look Once)
빠른 연산속도와 높은 정확도가 장점
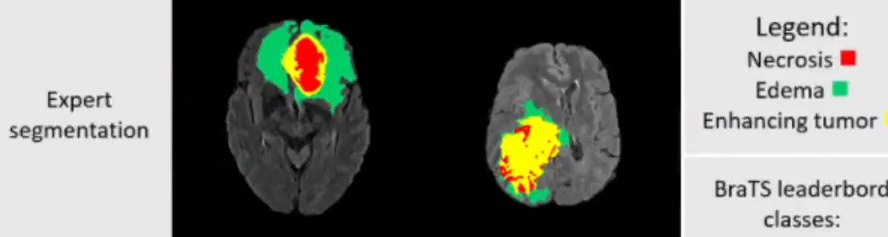
- Segmentaion
각각의 오브젝트에 속한 픽셀들을 분리
영상 의학등 다양한곳에서 활용
높은 수준의 디테일을 높일수록
성능이 정교화되며, 그에 따른 연산속도 문제가 발생할 수 있ㅇ므
- 자율주행 자동차
CV를 활용한 상용화 단계가 가장 빠른 분야
- Pose Detection
사람을 detect하고, 인체의 각 부분의 위치를 파악해 자세를 인식
- Super Resolution
우선 이미지에서 각 feature를 인식한후 고화질의 영상으로 추론
- Style Transfer
이미지에 다양한 화풍을 입힌다.
- Colorization
흑백 사진을 컬러 사진으로 변경

얼굴 인식 이미지 프로세싱(스노우앱)
- 실전 영상 처리 기술을 배운다.
- 얼굴 영역 탐지 기술 응용
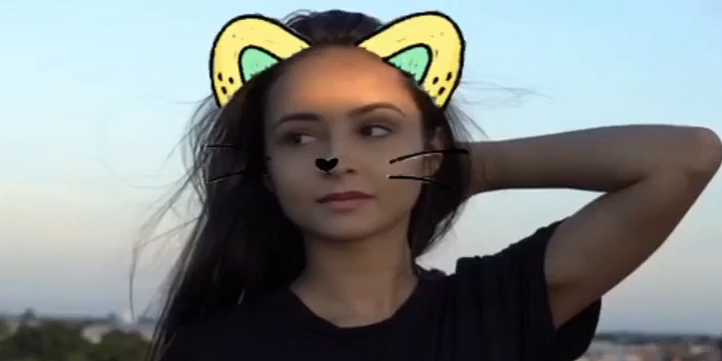
- 랜드마크 모델
입력 : 얼굴 사진
출력 : 눈의 양쪽 끝 좌표, 코의 좌표
- 얼굴의 좌표값을 추적하여 사각형 그리기
import cv2
import dlib
# dlib : OpenCV와 같이 이미지 처리를 위한 패키지
# 사용 목적 : dlib 에서 제공하는 얼굴 탐지 모델 사용
# 장점 : 속도가 빠르고 사용이 쉽다.

# 모델 로드 : 얼굴 영역을 사각형으로 탐색하는 모델
detector = dlib.get_frontal_face_detector()

# 비디오와 이미지 로드
cap = cv2.VideoCapture('videos/01.mp4')
sticker_img = cv2.imread('imgs/sticker01.png', cv2.IMREAD_UNCHANGED)
# cv2.IMREAD_UNCHANGED : 투명도가 포함된 체널 추가


while True:
    ret, img = cap.read()

    if ret == False:
        break

    # 전처리를 자동으로 해줌, 얼굴 영역의 좌표를 dets 변수에 반환.
    dets = detector(img)
    #dets의 길이 = 탐색한 얼굴의 개수
    print("number of faces detected:", len(dets))


    for det in dets:
        # print(det)
        # 출력 되는 좌표값 [(296, 77) (400, 181)]
        x1 = det.left()
        y1 = det.top()
        x2 = det.right()
        y2 = det.bottom()

        cv2.rectangle(img,pt1=(x1,y1),pt2=(x2,y2),color=(255,0,0),thickness=2)

    cv2.imshow('result', img)
    if cv2.waitKey(30) == ord('q'):
break- 랜드마크 모델 로드
# 랜드마크 모델 로드
predictor = dlib.shape_predictor('models/shape_predictor_5_face_landmarks.dat')
# shape_predictor : 랜드마크 모델을 로드하는 메서드- 랜드마크 추론
for det in dets:
        # 랜드마크 추론하기
        shape = predictor(img,det)
        # shape.parts() : 탐색한 점의 좌표값
        # [0] = 오른쪽 눈 끝
        # [1] = 오른쪽 안쪽 눈 끝
        # [2] = 왼쪽 안족 눈 끝
        # [3] = 왼쪽 눈 끝
        # [4] = 코끝
        for i, point in enumerate(shape.parts()):
            # circle의 thickness=-1  = 안쪽이 색칠
            cv2.circle(img, center=(point.x, point.y), radius=2, color=(0, 0, 255), thickness=-1)

            cv2.putText(img, text=str(i), org=(point.x, point.y), fontFace=cv2.FONT_HERSHEY_SIMPLEX, fontScale=0.8, color=(255, 255, 255), thickness=2)
안경 스티커 붙이기
- 눈의 크기에 따라 안경의 크기를 변화시켜야 한다.
import cv2
import dlib

detector = dlib.get_frontal_face_detector()

# 랜드마크 모델 로드
predictor = dlib.shape_predictor('models/shape_predictor_5_face_landmarks.dat')
# shape_predictor : 랜드마크 모델을 로드하는 메서드


cap = cv2.VideoCapture('videos/01.mp4')
sticker_img = cv2.imread('imgs/glasses.png',cv2.IMREAD_UNCHANGED)
# cv2.IMREAD_UNCHANGED : png 파일에 필요한 필수 요소

while True:
    ret, img = cap.read()

    if ret == False:
        break

    dets = detector(img)

    for det in dets:
        # 랜드마크 추론하기
        shape = predictor(img,det)
        # shape.parts() : 탐색한 점의 좌표값
        # [0] = 오른쪽 눈 끝
        # [1] = 오른쪽 안쪽 눈 끝
        # [2] = 왼쪽 안족 눈 끝
        # [3] = 왼쪽 눈 끝
        # [4] = 코끝

        # shape.parts()[0].x 오른쪽 눈 꼬리 좌표값
        # shape.parts()[2].x 왼쪽 눈 꼬리 좌표값1
        try:
            glasses_x1 = shape.parts()[2].x - 20
            glasses_x2 = shape.parts()[0].x + 20

            # 스티커 이미지의 높이,넓이,체널 구하기
            h, w, c = sticker_img.shape

            # 안경의 가로 길이
            glasses_w = glasses_x2 - glasses_x1
            # 비례식을 이용한 세로 길이 구하기
            glasses_h = int(h / w * glasses_w)

            # 안경의 중심
            center_y = (shape.parts()[0].y + shape.parts()[2].y) / 2


            glasses_y1 = int(center_y - glasses_h / 2)
            glasses_y2 = glasses_y1 + glasses_h
            overlay_img = sticker_img.copy()
            overlay_img = cv2.resize(overlay_img, dsize=(glasses_w, glasses_h))

            overlay_alpha = overlay_img[:, :, 3:4] / 255.0
            background_alpha = 1.0 - overlay_alpha

            img[glasses_y1:glasses_y2, glasses_x1:glasses_x2] = overlay_alpha * overlay_img[:, :, :3] + background_alpha * img[glasses_y1:glasses_y2, glasses_x1:glasses_x2]
        except:
            pass

    cv2.imshow('result', img)
    if cv2.waitKey(1) == ord('q'):
        break
숙제
동영상에 돼지 코 붙이기
import cv2
import dlib

detector = dlib.get_frontal_face_detector()
predictor = dlib.shape_predictor('models/shape_predictor_5_face_landmarks.dat')

cap = cv2.VideoCapture('videos/02.mp4')
sticker_img = cv2.imread('imgs/pig.png', cv2.IMREAD_UNCHANGED)

while True:
    ret, img = cap.read()

    if ret == False:
        break

    dets = detector(img)

    for det in dets:
        shape = predictor(img, det)

        try:
            # 얼굴 크기의 좌표값 구하기
            x1 = det.left()
            y1 = det.top()
            x2 = det.right()
            y2 = det.bottom()

            # 코끝의 x,y 위치 구하기
            center_x = shape.parts()[4].x
            center_y = shape.parts()[4].y

            # 스티커 이미지의 높이, 넓이, 체널 구하기
            h, w, c = sticker_img.shape

            # 스티커 이미지 사이즈 재 조정
            # x2 - x1  = 얼굴 사이즈 넓이 , result / 4  = 얼굴의 1/4 사이즈로 재조정
            nose_w = int((x2 - x1)/4)
            # 비례 법칙을 이용한 높이값 구하기
            nose_h = int(h / w * nose_w)

            # 코 이미지가 그려질 x1,y1,x2,y2 구하기
            nose_x1 = int(center_x - nose_w / 2)
            nose_x2 = nose_x1 + nose_w

            nose_y1 = int(center_y - nose_h / 2)
            nose_y2 = nose_y1 + nose_h


            overlay_img = sticker_img.copy()
            overlay_img = cv2.resize(overlay_img, dsize=(nose_w, nose_h))

            overlay_alpha = overlay_img[:, :, 3:4] / 255.0
            background_alpha = 1.0 - overlay_alpha

            img[nose_y1:nose_y2, nose_x1:nose_x2] = overlay_alpha * overlay_img[:, :, :3] + background_alpha * img[nose_y1:nose_y2, nose_x1:nose_x2]
        except:
            pass

    cv2.imshow('result', img)
    if cv2.waitKey(1) == ord('q'):
        break
더 노력하겠습니다