방명록을 DB와 연동하여 등록, 수정, 삭제할 수 있게 하기
등록
1. 데이터베이스에 다음과 같은 visitor 테이블을 만들어준다.
확인을 위해 데이터도 하나 넣어주었다. id column 에 auto_increment 는 새로운 데이터가 들어갔을 때 자동으로 1씩 늘어나게 해준다. 다만 데이터를 삭제해도 auto_increment 된 숫자는 초기화 되지 않음으로 초기화 시키고 싶으면 아래 sql문 을 실행시켜주면 된다.
ALTER TABLE 테이블명 AUTO_INCREMENT = 시작할 번호;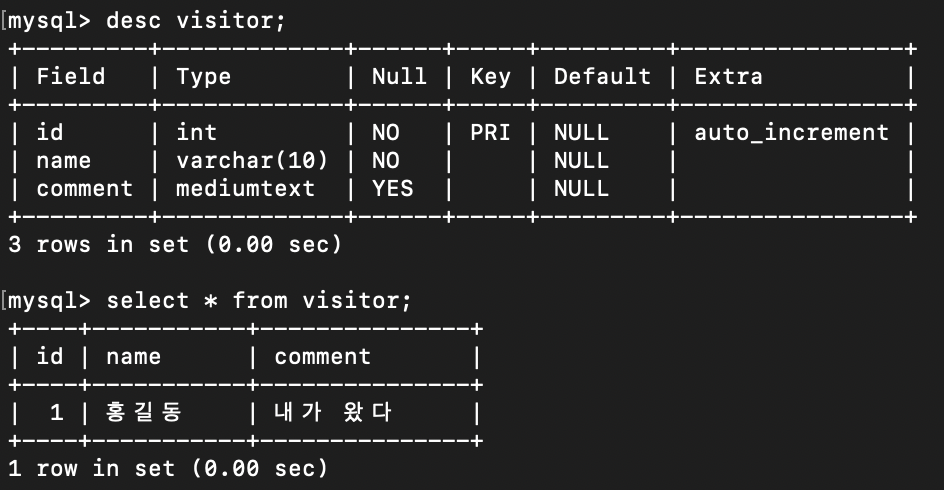
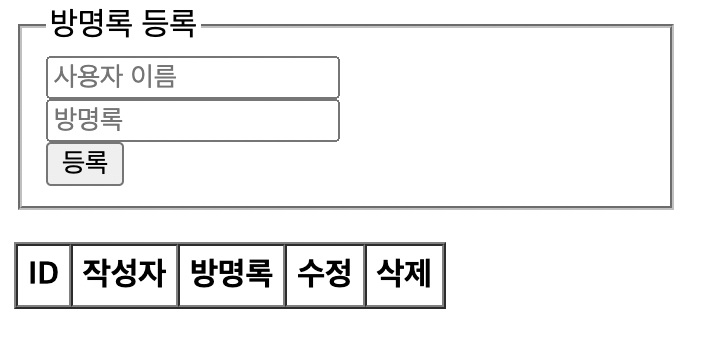
2. view 화면도 만들어주었다.
<form id="form_comment">
  <fieldset style="width: 300;">
    <legend>방명록 등록</legend>
    <input type="text" name="name" placeholder="사용자 이름"> <br>
    <input type="text" name="comment" placeholder="방명록"> <br>
    <div>
      <button type="button">등록</button>
    </div>
  </fieldset>
</form>

<table border="1" cellspacing="0" cellpadding="5">
  <tr>
    <th>ID</th>
    <th>작성자</th>
    <th>방명록</th>
    <th>수정</th>
    <th>삭제</th>
  </tr>
</table>
3. 'visitor/' 경로로 접속하면 데이터베이스에서 가져온 값을 테이블에 보이게 해준다.
index.js
// 라우터 객체를 생성해준다
const router = require("./routes");
// "/visitor" 라는 경로로 접속할 시 router = ./routes/index.js 에 선언되어 있는 대로 동작한다.
app.use("/visitor", router);
routes - index.js
// controller 객체를 생성해준다
const controller = require("../controller/VisitorController");
// "/visitor/" 경로로 접속시 controller의 index함수를 실행한다.
router.get("/", controller.index);
controller - VisitorController.js
// model 객체를 생성해준다
const Visitor = require("../model/Visitor");

exports.index = (req, res) => {
    // result로 Vitor.get_visitors의 rows가 들어온다.
    Visitor.get_visitors(function(result) {
        console.log(result);
        // index.ejs파일을 불러오고 data라는 키 값으로 result 데이터를 보내준다.
        res.render("index", {data: result});
    });
}
model - Visitor.js
// get_visitors의 cb함수로 contoller.index함수에서 보낸 function(result)가 들어온다.
// sql문의 실행 결과가 rows에 담긴다.
// cb(rows) => function(result)
// 그래서 controller.index 함수의 Visitor.get_visitors(function(result){})의 result에 rows가 들어간다.
exports.get_visitors = (cb) => {
    cnn.query('SELECT * FROM visitor', (err, rows) => {
        if (err) throw err;
        console.log(rows);
        // [ RowDataPacket {id: 1, name: '홍길동', comment: '내가 왔다'}]
        cb(rows);
    })
}
views - index.ejs
새로고침 했을 때 항상 DB로부터 데이터를 가져와서 보여주게 된다.
<!-- data[i]가 하나의 데이터 -->
<% for (let i = 0; i < data.length; i++ ) { %>
	<tr>
    	<td><%=data[i].id%></td>
        <td><%=data[i].name%></td>
        <td><%=data[i].comment%></td>
        <td><button>수정</button></td>
        <td><button>삭제</button></td>
    </tr>
<% } %>
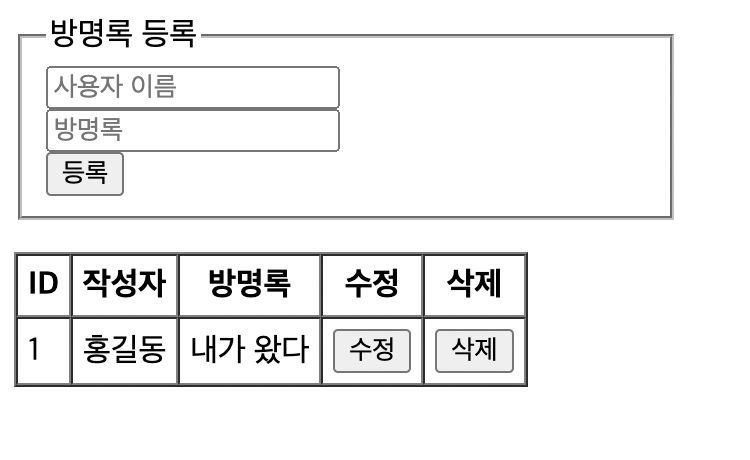
그럼 다음과 같이 테이블에 데이터베이스의 내용이 잘 들어간 것을 확인할 수 있다.
4. 내용을 입력하고 등록 버튼을 누르면 데이터베이스에 값을 저장한다.
views - index.ejs
등록 버튼을 눌렀을 때 페이지가 새로고침 되지 않고 바로 테이블에 내용이 표시되어야 하기 때문에 동적 폼 전송 방식을 이용하였다.
function writeComment() {

	let form = document.getElementById("form_comment");

	axios({
    	method: "post",
        url: "http://localhost:8080/visitor/write",
      	data: {
            // input에 작성한 값
        	name: form.name.value,
          	comment: form.comment.value
        }
    }).then((response) => {
    	console.log(response.data);
    });
}
등록 버튼에도 onclick 이벤트를 지정해주고, 타입을 버튼으로 설정해주었다.
<button type="button" onclick="writeComment();">등록</button>routes - index.js
// post 요청 : controller.post_comment 함수를 실행한다.
router.post("/write", controller.post_comment);
controller - VisitorController.js
exports.post_comment = (req, res) => {
    // {id : form.name.value, comment: form.comment.value}
    console.log(req.body);
    Visitor.insert(req.body.name, req.body.comment, function(result) {
        // result = rows.insertId
        console.log(result);
        // axios의 then 부분으로 들어간다
        res.send({id : result});
    });
}
model - Visitor.js
// name은 req.body.name, comment는 req.body.comment, cb = function(result)
exports.insert = (name, comment, cb) => {
    // name과 comment를 넣어준다 (id는 자동으로 들어감)
    let sql = "INSERT INTO visitor (name, comment) VALUES ('" + name + "', '" + comment + "')";
    cnn.query(sql, (err, rows) => {
        if (err) throw err;
        // select문과 달리 객체가 출력된다.
        console.log(rows);
        // insert했을 때 rows의 insertId는 primary key (여기서는 id이다.)
        cb(rows.insertId);
    })
}
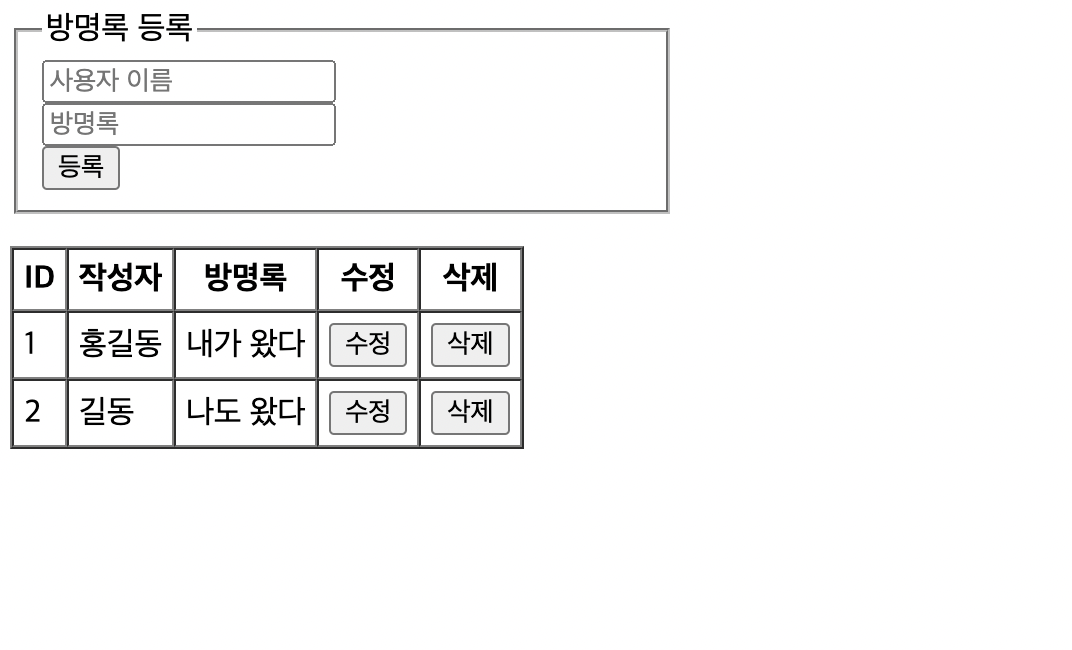
등록 버튼을 누르고 새로고침을 하면 데이터베이스에서 첫번째 데이터와 방금 INSERT 한 두번째 데이터를 함께 가져오는 것을 확인할 수 있다.
5. 동적 폼 전송을 이용하여 새로고침 하지 않아도 방명록에 등록되게 하기.
views - index.ejs
controller.post_comment() 에서 res.send({id : result}) 로 DB에 INSERT 하면서 받은 rows.insertId 값을 axios 의 then 으로 보내줬기 때문에 쉽게 해결할 수 있다.
function writeComment() {

	let form = document.getElementById("form_comment");

    axios({
        method: "post",
        url: "http://localhost:8080/visitor/write",
        data: {
      	    name: form.name.value,
            comment: form.comment.value
        }
    }).then((response) => {
        return response.data;
    }).then((data) => {
        // data = { id : rows.insertId}
        console.log(data);
        let html = "<tr><td>" + data.id + "</td><td>" + form.name.value + "</td><td>" + form.comment.value + "</td><td><button>수정</button></td><td><button>삭제</button></td></tr>";
        // table에 추가해준다.
        // 이 부분은 등록 버튼을 눌렀을 때 실행되는 부분이기 때문에 새로고침을 했을 때는 DB에서 가져온 내용이 테이블에 보인다.
        $("table").append(html);
    })
}
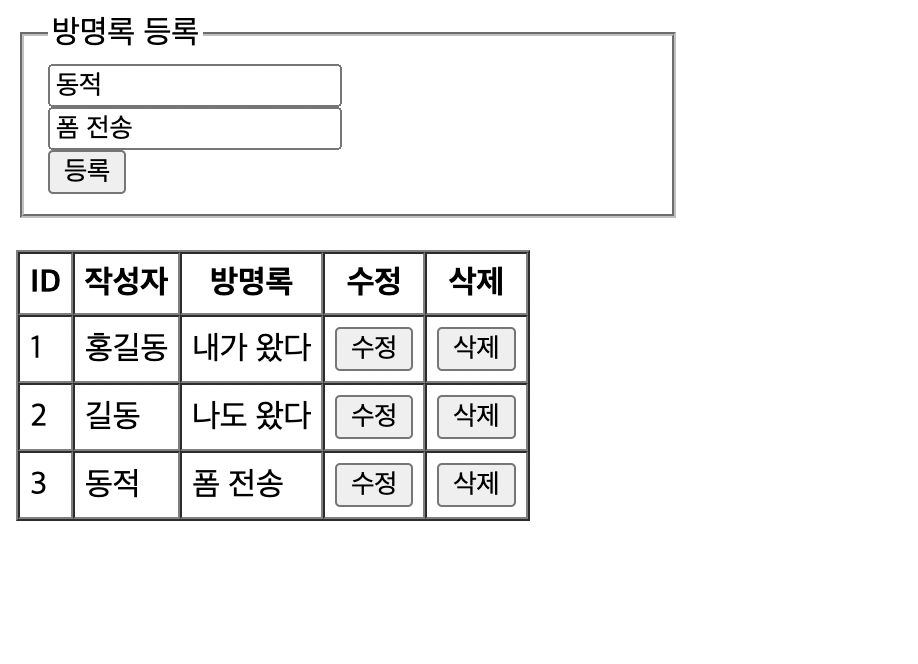
새로고침을 하지 않아도 방명록에 등록이 잘 된 것을 볼 수 있다.
수정
1. 수정 버튼을 클릭하면 방명록에 내용이 불러올 수 있게 해준다.
먼저, 수정 버튼에 onclick 이벤트를 추가해주었다. (이후에 쓸 삭제 버튼에도 미리 이벤트 함수를 지정해주었다.) 그리고, id 값을 이용해야하기 때문에 parameter 로는 id 를 보내주었다.
나는 처음에 버튼에 클래스를 지정해주고, 해당 클래스가 있는 버튼을 클릭하면 클릭한 요소를 불러올 수 있는 방식으로 구현을 했는데, 그 경우 등록된 방명록을 바로 수정하려고 하면 온클릭 이벤트 함수는 그 전에 이미 선언이 되어서 적용이 안되는 문제점이 발생했다. -> head부분에 script를 사용할 때 발생하는 문제점
등록 버튼을 누르면 동적 폼 전송을 이용해 테이블에 바로 추가되는 부분
function writeComment() {

	let form = document.getElementById("form_comment");

    axios({
        method: "post",
        url: "http://localhost:8080/visitor/write",
        data: {
            name: form.name.value,
            comment: form.comment.value
                    }
    }).then((response) => {
        return response.data;
    }).then((data) => {
        let html = "<tr><td>" + data.id + "</td><td>" + form.name.value + "</td><td>" + form.comment.value +
                   "</td><td><button onclick='editComment(" + data.id + ")'>수정</button></td>" +
                   "<td><button onclick='deleteComment(" + data.id + ")'>삭제</button></td>";
        $("table").append(html);
    })
}
새로 고침을 했을 때 DB에서 데이터를 불러와 보이게 하는 부분
<% for (let i = 0; i < data.length; i++ ) { %>
	<tr>
        <td><%=data[i].id%></td>
        <td><%=data[i].name%></td>
        <td><%=data[i].comment%></td>
        <td><button type="button" onclick="editComment('<%=data[i].id%>');">수정</button></td>
        <td><button type="button" onclick="deleteComment('<%=data[i].id%>')">삭제</button></td>
    </tr>
<% } %>
views - index.ejs
function editComment( id ) {
    axios({
      method: 'get',
      // req.query로 id: id를 보낸다
      url: 'http://localhost:8080/visitor/get?id=' + id
    })
      .then((response) => { return response.data; })
      .then((data) => {
      console.log(data);
    });
}
routes - index.js
// get으로 보냈으니까 get으로 받는다
router.get("/get", controller.get_visitor);
controller - VisitorController.js
exports.get_visitor = (req, res) => {
    // model
    Visitor.get_visitor(req.query.id, function(result) {
        // result = rows
        console.log(result);
        // [{}] 형식으로 되어있기 때문에 [0]인덱스는 {}만 남게 된다.
        res.send({data : result[0]});
    });
}
model - Visitor.js
exports.get_visitor = (id, cb) => {
    // id가 일치하는 정보를 가져온다 (하나만 존재함)
    cnn.query(`SELECT * FROM visitor WHERE id = ${id} LIMIT 1`, (err, rows) => {
        if (err) throw err;
        cb(rows);
    })
}
views - index.ejs
function editComment( id ) {
    axios({
      method: 'get',
      url: 'http://localhost:8080/visitor/get?id=' + id
    })
      .then((response) => { return response.data; })
      .then((data) => {
      	  // data = data: {id: , name: , comment: }
          let form = document.getElementById("form_comment");
          // input창에 값 넣어주기
          form.name.value = data.data.name;
          form.comment.value = data.data.comment;
		  // 등록 버튼을 수정 & 취소 버튼으로 바꿔주기
          let html = "<button type='button' onclick='editDo(" + id + ");'>수정</button>" +
              "<button type='button' onclick='editCancel();'>취소</button>";
          $("form div").html(html);
    });
}
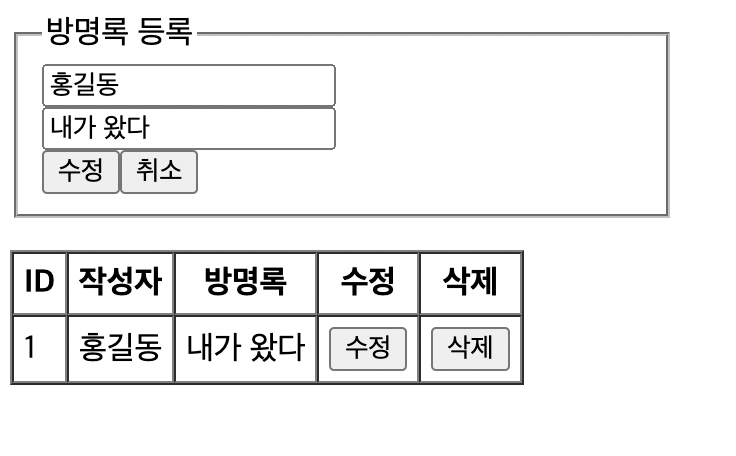
그럼 수정 버튼을 눌렀을 때 내용이 input창에 표시되고 등록 버튼 대신 수정과 취소 버튼이 생긴 것을 확인할 수 있다.
2. input창에 입력한 내용으로 수정해주기.
위에서 수정 버튼을 만들 때 onclick 이벤트로 editDo(id) 함수를 지정해주었다.
views - index.ejs
function editDo(id) {

    let form = document.getElementById("form_comment");

    axios({
      // 수정할 때 쓰는 method
      method: "patch",
      url: "http://localhost:8080/visitor/edit",
      // patch도 data로 데이터를 보낸다
      data: {
        id : id,
        name: form.name.value,
        comment: form.comment.value
      }
    }).then((response) => {
      return response.data;
    }).then((data) => {
      alert(data);
  })
routes - index.js
router.patch("/edit", controller.patch_comment);controller - VisitorController.js
exports.patch_comment = (req, res) => {
    // id = req.body.id, name = req.body.name ...
    const {id, name, comment} = req.body;
    Visitor.update(id, name, comment, function(result) {
        console.log(result);
        res.send("수정 성공");
    });
}
model - Visitor.js
exports.update = (id, name, comment, cb) => {
    // DB에 업데이트 해주기
    let sql = `UPDATE visitor SET name = '${name}', comment = '${comment}' WHERE id = ${id}`;
    cnn.query(sql, (err, rows) => {
        if (err) throw err;
        cb( rows );
    })
}
views - index.ejs
function editDo(id) {

    let form = document.getElementById("form_comment");

    axios({
      method: "patch",
      url: "http://localhost:8080/visitor/edit",
      data: {
        id : id,
        name: form.name.value,
        comment: form.comment.value
      }
    }).then((response) => {
      return response.data;
    }).then((data) => {
      // "수정 성공"
      alert(data);

      // id로 tr을 가져오기 위해 테이블에 tr을 추가할 때 tr_id로 id를 지정해주었다.
      let tr = document.getElementById("tr_" + id);
      // tr의 자식요소 가져오기
      let children = tr.children;

      // input창 내용으로 테이블 내용 바꿔주기
      $(children[1]).text(form.name.value);
      $(children[2]).text(form.comment.value);

      // input창 비우기
      form.name.value = "";
      form.comment.value = "";

      // 수정 & 취소 버튼을 다시 등록 버튼으로 바꿔주기
      let html = "<button type='button' onclick='writeComment();'>등록</button>";
      $("form div").html(html);
    })
}
새로고침 했을 때 DB에서 데이터를 테이블로 가져올 때 tr 에 아이디 지정해준 부분
<% for (let i = 0; i < data.length; i++ ) { %>
    <tr id="tr_<%=data[i].id%>">
        <td><%=data[i].id%></td>
        <td><%=data[i].name%></td>
        <td><%=data[i].comment%></td>
        <td><button type="button" onclick="editComment('<%=data[i].id%>');">수정</button></td>
        <td><button type="button" onclick="deleteComment('<%=data[i].id%>')">삭제</button></td>
    </tr>
<% } %>
동적 폼 전송으로 바로 테이블에 등록할 때 tr 아이디 지정해준 부분
function writeComment() {

    let form = document.getElementById("form_comment");

    axios({
      	method: "post",
      	url: "http://localhost:8080/visitor/write",
      	data: {
        name: form.name.value,
        comment: form.comment.value
      	}
    }).then((response) => {
      	return response.data;
    }).then((data) => {
      	let html = "<tr id='tr_" + data.id + "'><td>" + data.id + "</td><td>" + form.name.value + "</td><td>" + form.comment.value +
         		   "</td><td><button onclick='editComment(" + data.id + ")'>수정</button></td>" +
         		   "<td><button onclick='deleteComment(" + data.id + ")'>삭제</button></td>";
     	$("table").append(html);
    })
}
그럼 DB에 업데이트를 해주었기 때문에 새로고침을 했을 때는 당연히 수정된 새로운 값이 들어오고, axios에서도 처리를 해주었기 때문에 동적으로도 수정이 잘 되는 것을 확인할 수 있다.
3. 취소 기능 만들기
이제 테이블의 수정 버튼을 눌렀을 때 나타나는 취소 버튼의 기능을 만들어줄 것이다. 취소 버튼에는 onclick 이벤트로 editCancel() 함수를 이미 지정해주었다.
let html = "<button type='button' onclick='editDo(" + id + ");'>수정</button>" +
              "<button type='button' onclick='editCancel();'>취소</button>";
$("form div").html(html);
input 창을 모두 비워주고, 등록 버튼을 다시 나타나게 하였다.
function editCancel() {

    let form = document.getElementById("form_comment");

    // 폼 초기화
    form.reset();

    let html = '<button type="button">등록</button>';
    $("form div").html(html);
}
삭제
1. 삭제 버튼을 누르면 DB와 테이블에서 삭제되게 하기.
views - index.ejs
삭제 버튼에 onclick 이벤트로 지정해 준 deleteComment(id)이다. 이 부분에서는 동적으로 테이블에서 바로 데이터가 삭제될 수 있게 해준다.
function deleteComment(id) {
    axios({
      // delete할 때 사용하는 method
      method: "delete",
      url: "http://localhost:8080/visitor/delete",
      // sql문에서 delete from table where id = id를 사용하기 위해 id만 데이터로 보내주었다.
      data: { id : id }
    }).then((response) => {
      return response.data;
    }).then((data) => {
      // controller에서 res.send("삭제 성공")을 보내주었다.
      alert(data);
      // tr에 아이디를 설정해주었기 때문에 함수에 parameter로 넣어준 id를 이용해 테이블에서 쉽게 삭제할 수 있다.
      $("#tr_" + id).remove();
    })
}
routes - index.js
router.delete("/delete", controller.delete_comment);controller - VisitorController.js
exports.delete_comment = (req, res) => {
    Visitor.delete(req.body.id, function(result) {
        console.log(result);
        res.send("삭제 성공");
    });
}
model - Visitor.js
데이터베이스에서도 삭제 시켜주었기 때문에, 새로고침했을 때도 데이터가 보이지 않게 된다.
exports.delete = (id, cb) => {
    // id가 일치하는 데이터를 삭제시키는 sql문
    cnn.query(`DELETE from visitor WHERE id = ${id}`, (err, rows) => {
        if (err) throw err;
        cb( rows );
    })
}
완성 코드 👈🏻 깃허브