83일차 내용 정리
jjwt : java json web token
- JwtUtil 클래스에
createToken메소드- userName 과 추가 정보(Claims) 를 전달하면 해당 정보를 token 에
저장하고 만들어진 token 문자열을 리턴하는 메소드
- userName 과 추가 정보(Claims) 를 전달하면 해당 정보를 token 에
private String createToken(Map<String, Object> claims, String subject) {
	return Jwts.builder()
		.setClaims(claims) // 추가 정보
		.setSubject(subject) // 주요 정보(주로 userName)
		.setIssuer("your-issuer") // 추가된 issuer(발급한 서비스명)
		.setIssuedAt(new Date(System.currentTimeMillis())) // 발급 시간
		.setExpiration(new Date(System.currentTimeMillis() + expiration)) // 파기되는 시간
		.signWith(getSigningKey()) // HS256 알고리즘으로 서명
		.compact();
}- 180000 = 180초
jwt.expiration = 1800000JwtFilter 동작 흐름
						    Spring Boot
           ---------------------------------------------
request ➝ | JwtFilter ➝ Spring Security ➝ Controller |
           ---------------------------------------------
➜ 토큰이 있다면 토큰을 검증해 일회성 로그인을 해주어야 뒤에 흐름이 진행 가능
- UserController
authentication코드에 내부적으로CustomUserDetailService객체가 활용된다
authentication = authManager.authenticate(authToken);토큰
- App.jsx 에
exp코드 추가- token 만료 시간을 얻어내서 ms 단위로 변경
const exp = decoded.exp*1000;- 현재 시간 & 남은 시간 얻어내기
// 현재 시간 얻어내기 (ms)
const now = Date.now();

// 남은 시간
const remainTime = exp - now;setTimeout함수 추가- 남은 시간이 경과하면 실행할 함수 등록
const logoutTimer = setTimeout(()=>{
	// 로그아웃 처리를 한다
	delete localStorage.token;
	dispatch({type:"USER_INFO", payload:null});
	alert("토큰이 만료되어 자동 로그아웃 되었습니다");
	navigate("/");
}, remainTime);navigate함수 추가
const navigate = useNavigate();- LoginModal.jsx 에 해당 코드들을 추가
const token = res.data;
if (token) {
    // 앞의 7 자리 문자열 "Bearer" 를 제외한 위의 문자열을 디코딩한다
    const decoded = jwtDecode(token.substring(7));
    // token 만료 시간을 얻어내서 ms 단위로 변경한다
    const exp = decoded.exp * 1000;
    // 현재 시간 얻어내기 (ms)
    const now = Date.now();
    // 남은 시간
    const remainTime = exp - now;
    // 남은 시간이 경과하면 실행할 함수 등록
    const logoutTimer = setTimeout(() => {
        // 로그아웃 처리를 한다
        delete localStorage.token;
        dispatch({ type: "USER_INFO", payload: null });
        alert("토큰이 만료되어 자동 로그아웃 되었습니다");
        navigate("/");
    }, remainTime);

    api.get("/v1/ping")
        .then(res => {
            // 여기가 실행되면 사용 가능한 토큰
            // 발행할 action
            const action = {
                type: "USER_INFO",
                payload: {
                    userName: decoded.sub,
                    role: decoded.role
                }
            };
            //액션 발행하기
            dispatch(action);
        })
        .catch(err => {
            // 여기가 실행되면 사용 불가능한 토큰
            delete localStorage.token;
        });
}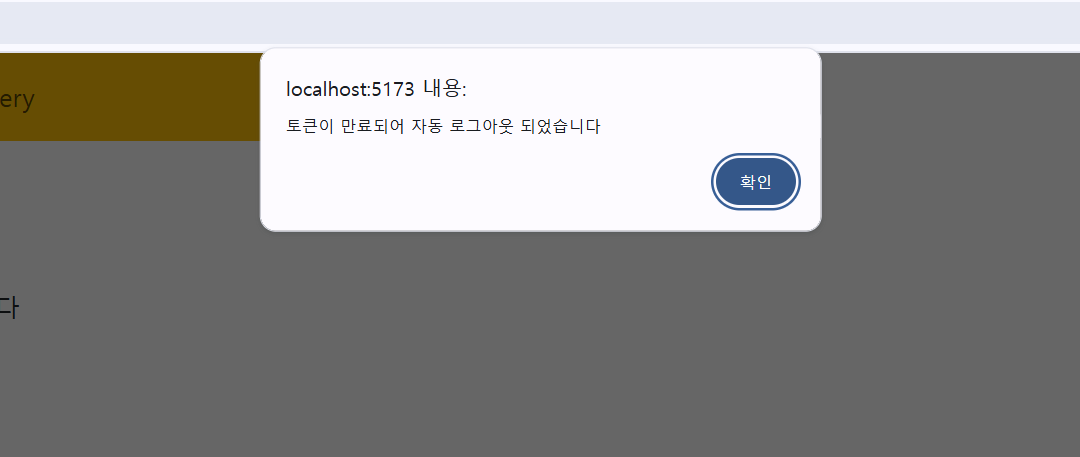
➜ 해당 Alert 창이 2번 뜨는 이유
main.jsx 에 `<StrictMode>` 코드
- 개발환경에서는 <StrictMode> 에서 실행이 되는데 StricMode 는 동작을 엄격하게 검사하기 위해 `Component` 가 2번씩 초기화 된다
결과적으로 `useEffect()` 함수가 두 번 호출된다
개발이 끝난 후 실제 build 하면 Component 는 1번씩만 초기화된다- main.jsx 에
initState함수에 코드 추가
logoutTimer:null- handlers 함수 안에
LOGOUT_TIMER객체 추가
LOGOUT_TIMER:(state, action) => ({
	...state,
    logoutTimer:action.payload
})- App.jsx 에
useEffect함수와 LoginModal.jsx 에handleLogin함수에dispatch함수 추가- logoutTimer 아이디를 redux store 에 저장한다
dispatch({
	type:"LOGOUT_TIMER",
	payload:logoutTimer
});- BsNavBar.jsx 에
useSelecto추가
const logoutTimer = useSelector(state => state.logoutTimer);handleLogout함수 안에 타이머 해제 & 초기화 코드 추가
// 로그아웃 타이머 해제
 clearTimeout(logoutTimer);
// store 에도 로그아웃 타이머 초기화
dispatch({type:"LOGOUT_TIMER", payload:null});
사용자
Sprin08 프로젝트의 resources 폴더 안에 mapper 폴더를 복사해 Spring10 프로젝트에 붙여넣기
- UserMapper.xml
<mapper namespace="user">
	<!-- 자주 사용하는 칼럼의 이름을 미리 정의해 놓고 참조해서 사용하기 -->
	<sql id="columnName">
		num, userName, password, email, profileImage, role, updatedAt, createdAt
	</sql>

	<update id="update" parameterType="com.example.spring10.dto.UserDto">
		UPDATE users
		SET email=#{email}, updatedAt=SYSDATE
		<if test="profileImage != null">, profileImage=#{profileImage}</if>
		WHERE userName=#{userName}
	</update>

	<update id="updatePassword" parameterType="com.example.spring10.dto.UserDto">
		UPDATE users
		SET password=#{password}
		WHERE userName=#{userName}
	</update>

	<insert id="insert" parameterType="com.example.spring10.dto.UserDto">
		INSERT INTO users
		(num, userName, password, email)
		VALUES(users_seq.NEXTVAL, #{userName}, #{password}, #{email})
	</insert>

	<select id="getByNum" parameterType="long" resultType="com.example.spring10.dto.UserDto">
		SELECT <include refid="columnName"/>
		FROM users
		WHERE num=#{num}
	</select>

	<select id="getByUserName" parameterType="string" resultType="com.example.spring10.dto.UserDto">
		SELECT <include refid="columnName"/>
		FROM users
		WHERE userName=#{userName}
	</select>
</mapper>
spring10.repository 패키지 생성 후 UserDao & UserDaoImpl 붙여넣기
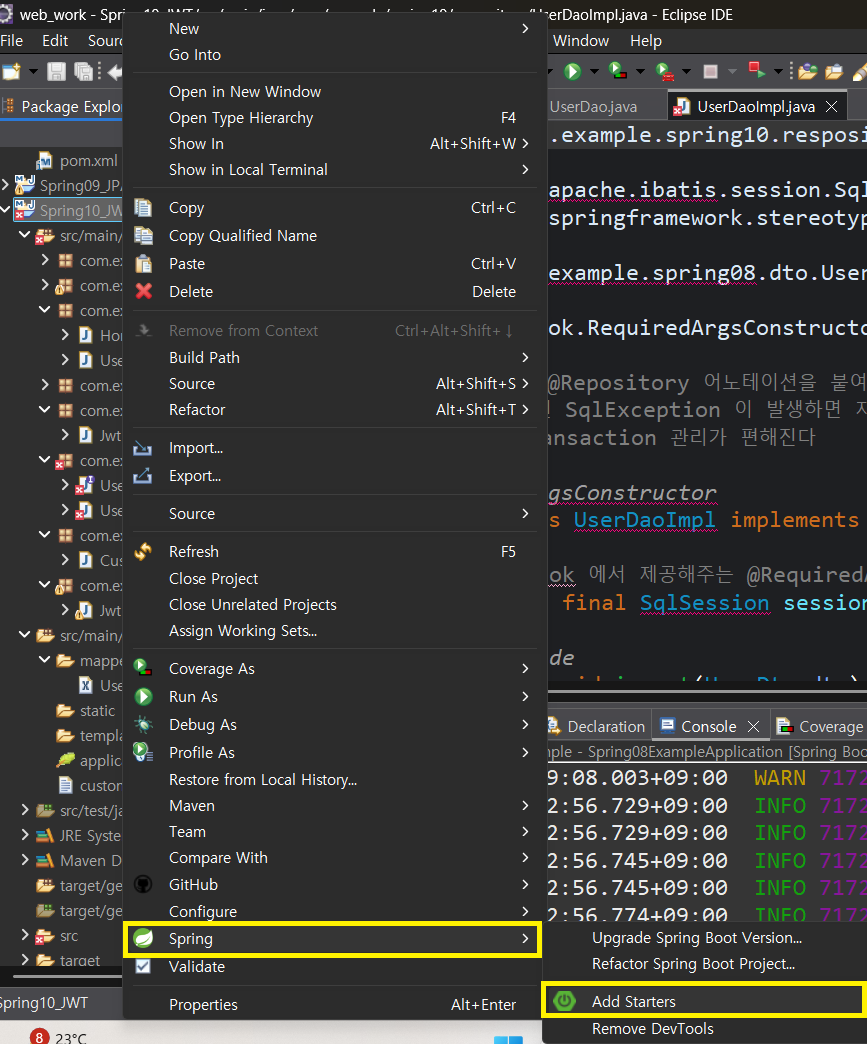
- Spring ➜ Add Starters
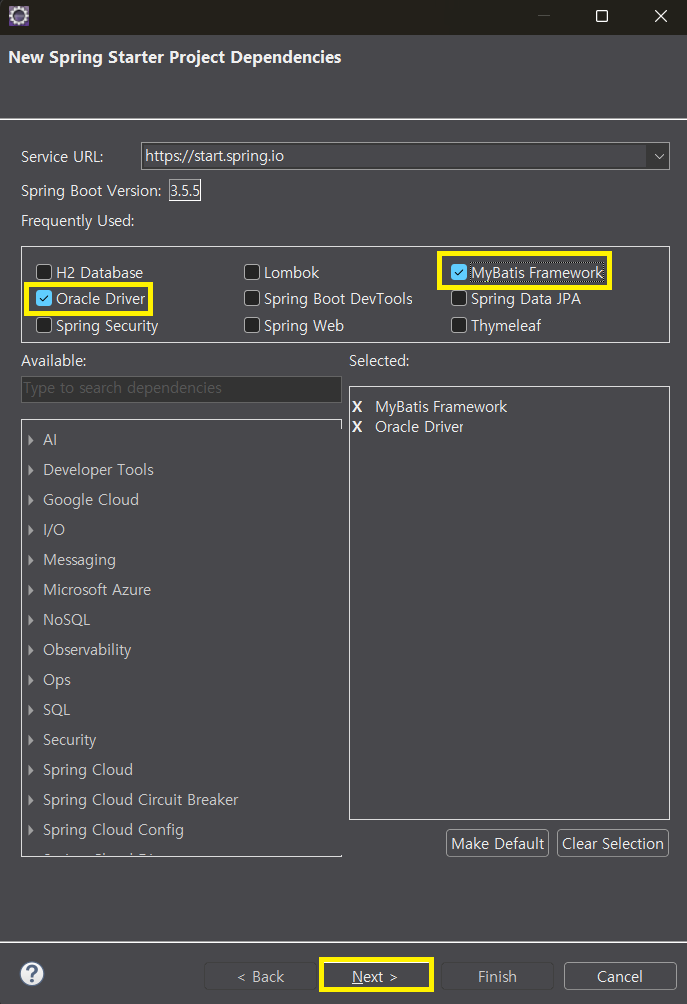
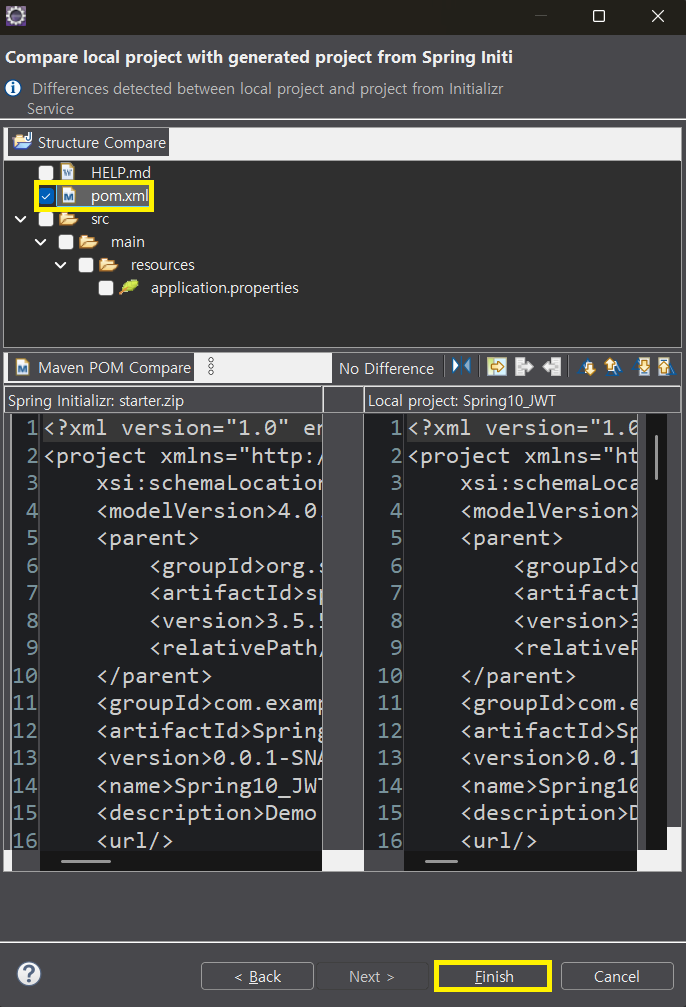
- Oracle Driver + MyBatis Framework ➜ Next
- UserDao 인터페이스
public interface UserDao {
	public void insert(UserDto dto);
	public int update(UserDto dto);
	public int updatePassword(UserDto dto);
	public UserDto getByNum(long num);
	public UserDto getByUserName(String userName);
}- UserDaoImpl 클래스
@Repository
@RequiredArgsConstructor
public class UserDaoImpl implements UserDao{

	// lombok 에서 제공해주는 @RequiredArgsConstructor 어노테이션을 이용해서 의존 객체를 생성자로 주입받도록 한다
	private final SqlSession session;

	@Override
	public void insert(UserDto dto) {
		session.insert("user.insert", dto);
	}

	@Override
	public int update(UserDto dto) {
		return session.update("user.update", dto);
	}

	@Override
	public int updatePassword(UserDto dto) {
		return session.update("user.updatePassword", dto);
	}

	@Override
	public UserDto getByNum(long num) {
		UserDto dto = session.selectOne("user.getByNum", num);
		return dto;
	}

	@Override
	public UserDto getByUserName(String userName) {
		UserDto dto = session.selectOne("user.getByUserName", userName);
		return dto;
	}
}- dto 패키지에 PwdChangeRequest 클래스
@Data
public class PwdChangeRequest {
	private String userName;
	private String password;
	private String newPassword;
}- service 패키지에 UserService 인터페이스 생성
public interface UserService {
	public void createUser(UserDto dto);
	public UserDto getUser(String userName);
	public void updatePassword(PwdChangeRequest pcr);
	public Map<String, Object> canUseId(String id);
	public void updateUser(UserDto dto);
}- service 패키지에 UserServiceImpl 클래스 생성
@Service
@RequiredArgsConstructor
public class UserServiceImpl implements UserService{

	private final UserDao dao;

	// 비밀번호를 암호화 하기 위한 객체도 spring bean container 로 주입 받는다
	private final PasswordEncoder encoder;

	// 업로드된 이미지를 저장할 위치 얻어내기
	@Value("${file.location}")
	private String fileLocation;

	// 사용자를 추가하는 메소드
	@Override
	public void createUser(UserDto dto) {
		// 날 것의 비밀번호를 암호화해서
		String encodedPwd = encoder.encode(dto.getPassword());
		// dto 에 다시 담는다
		dto.setPassword(encodedPwd);
		// DB 에 저장
		dao.insert(dto);
	}

	@Override
	public UserDto getUser(String userName) {

		return dao.getByUserName(userName);
	}

	@Override
	public void updatePassword(PwdChangeRequest pcr) {
		// 로그인된 userName
		String userName = SecurityContextHolder.getContext().getAuthentication().getName();
		// DB 에 저장된 암호화된 비밀번호를 읽어온다
		UserDto dto = dao.getByUserName(userName);
		String encodedPwd = dao.getByUserName(userName).getPassword();
		// 암호화된 비밀번호와 입력한 비밀번호를 비교해서 일치하는지 확인
		boolean isValid = BCrypt.checkpw(pcr.getPassword(), encodedPwd);
		// 만일 일치하지 않으면 에외 발생시키기
		if(!isValid) {
			// throw new PasswordException("기존 비밀번호가 일치하지 않습니다");
		}
		// 일치하면 새 비밀번호를 암호화해서 UserDto 객체에 담은 다음 DB 에 수정 반영
		dto.setPassword(encoder.encode(pcr.getNewPassword()));
		dao.updatePassword(dto);
	}

	@Override
	public Map<String, Object> canUseId(String id) {
		// id 를 이용해서 DB 에 해당하는 아이디로 가입된 정보가 있는지 읽어와 본다 (없으면 null)
		UserDto dto = dao.getByUserName(id);
		// id 가 사용 가능한지 여부 (dto 가 null 이면 사용가능한 아이디)
		boolean canUse = dto == null ? true : false;
		// Map 에 담아서 리턴한다
		return Map.of("canUse", canUse);
	}

	@Override
	public void updateUser(UserDto dto) {
		// 업로드된 이미지가 있는지 읽어와 본다
		MultipartFile image = dto.getProfileFile();
		// 만일 업로드된 이미지가 있다면
		if(!image.isEmpty()) {
			// 원본 파일명
			String orgFileName = image.getOriginalFilename();
			// 이미지의 확장자를 유지하기 위해 뒤에 원본 파일명을 추가
			String saveFileName = UUID.randomUUID().toString() + orgFileName;
			// 저장할 파일의 전체 경로 구성하기
			String filePath = fileLocation + File.separator + saveFileName;
			try {
				// 업로드된 파일을 저장할 파일 객체 생성
				File saveFile = new File(filePath);
				image.transferTo(saveFile);
			} catch(Exception e) {
				e.printStackTrace();
			}
			// UserDto 에 저장된 이미지의 이름을 넣어준다
			dto.setProfileImage(saveFileName);
		}
		// UserDao 객체를 이용해서 수정 반영 (dto 의 profileImage 는 null 일 수도 있다)
		dao.update(dto);
	}
}- application.properties 에 DB & mybatis 설정 코드 추가
# oracle DataSource Setting ( Connection Pool )
spring.datasource.driver-class-name=oracle.jdbc.driver.OracleDriver
spring.datasource.url=jdbc:oracle:thin:@localhost:1521:xe
spring.datasource.username=scott
spring.datasource.password=TIGER

# mybatis 에서 사용하는 xml 문서가 어디에 있는지 알려주기
# classpath: 은  resources 폴더를 가리킨다
mybatis.mapper-locations=classpath:mapper/*.xml
# type 에 별칭을 붙인 클래스를 찾아서 로딩하기 위해
mybatis.type-aliases-package=com.example.spring10.**- custom.properties 에 파일 저장 위치 코드 추가
# file save location
file.location=C:/playground/upload- UserController 에
@RequiredArgsConstructor어노테이션 추가 및
이전 코드를final메소드로 수정
@RequiredArgsConstructor// 의존 객체 생성자 주입
public final JwtUtil jwtUtil;
public final AuthenticationManager authManager;
public final UserService userService;- UserController 에
user메소드 생성
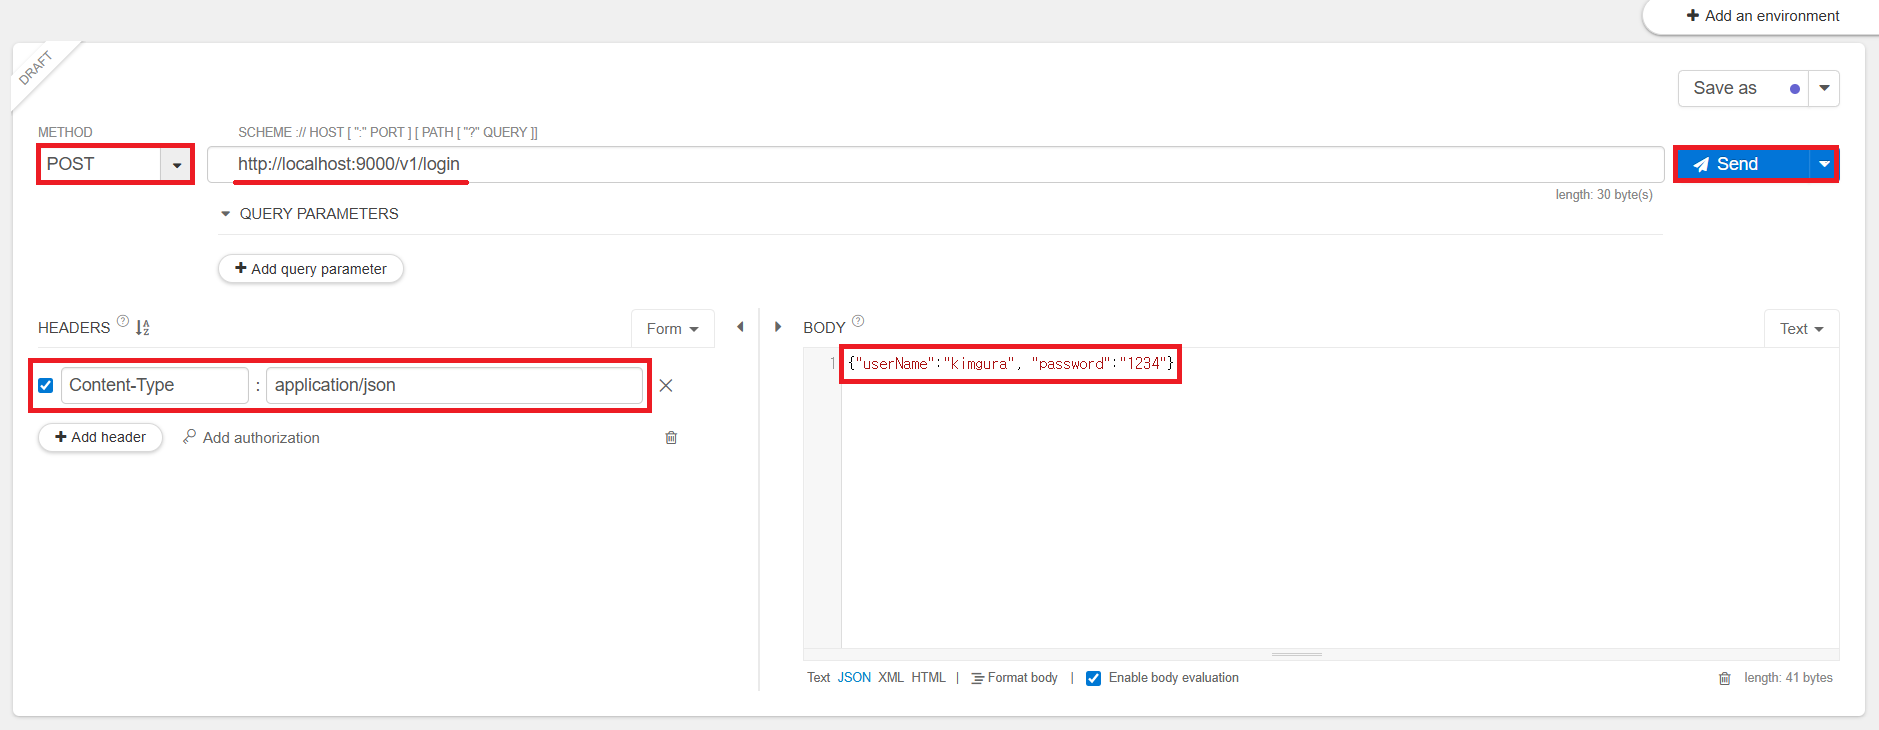
@GetMapping("/user")
public UserDto user() {
	// spring security context 로 부터 로그인된 userName 을 얻어낸다
	String userName = SecurityContextHolder.getContext().getAuthentication().getName();
	return userService.getUser(userName);
}
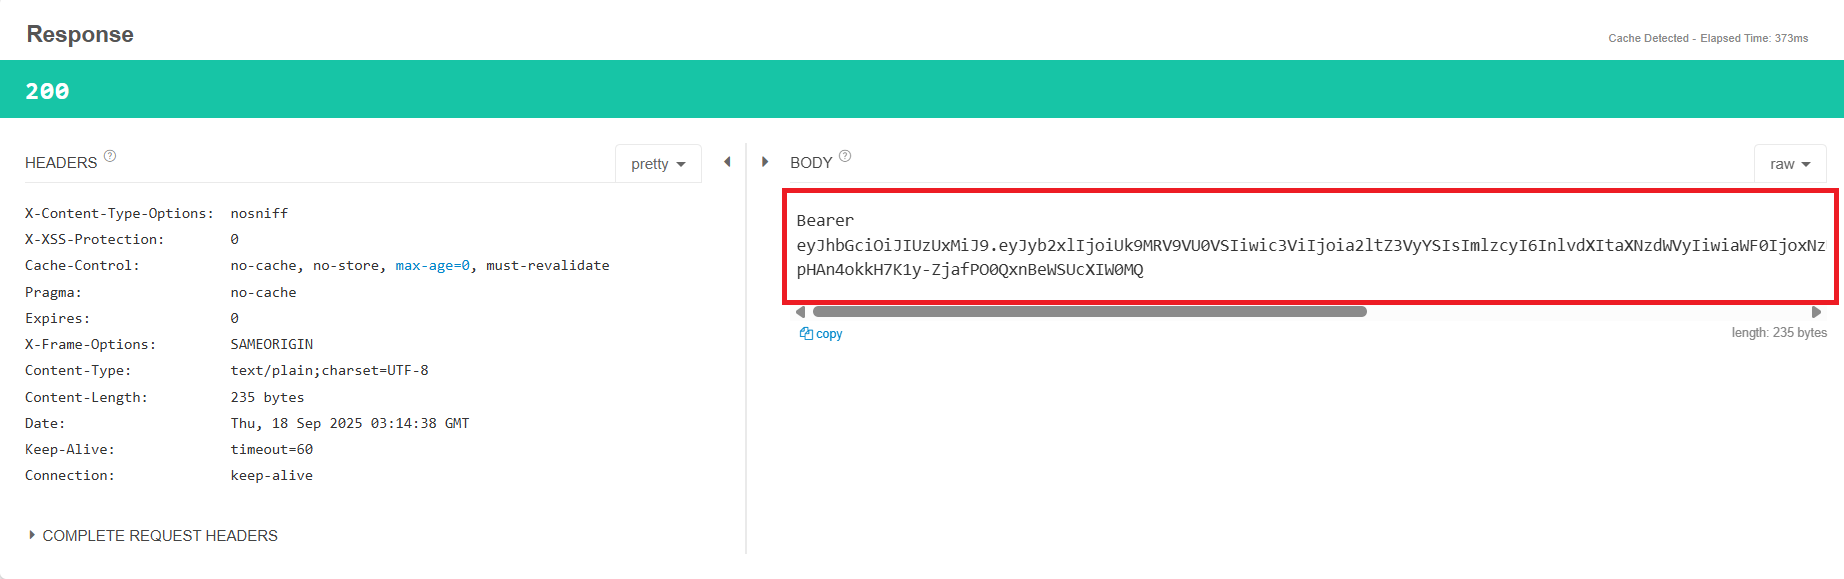
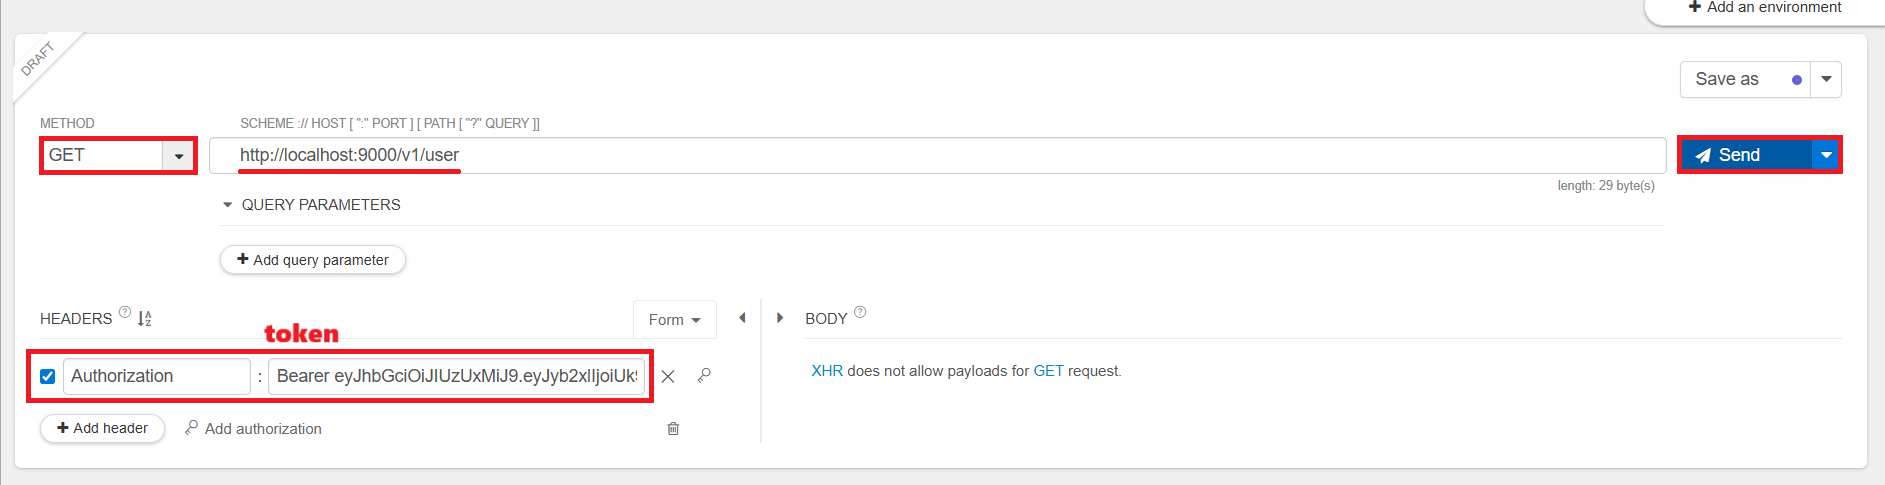
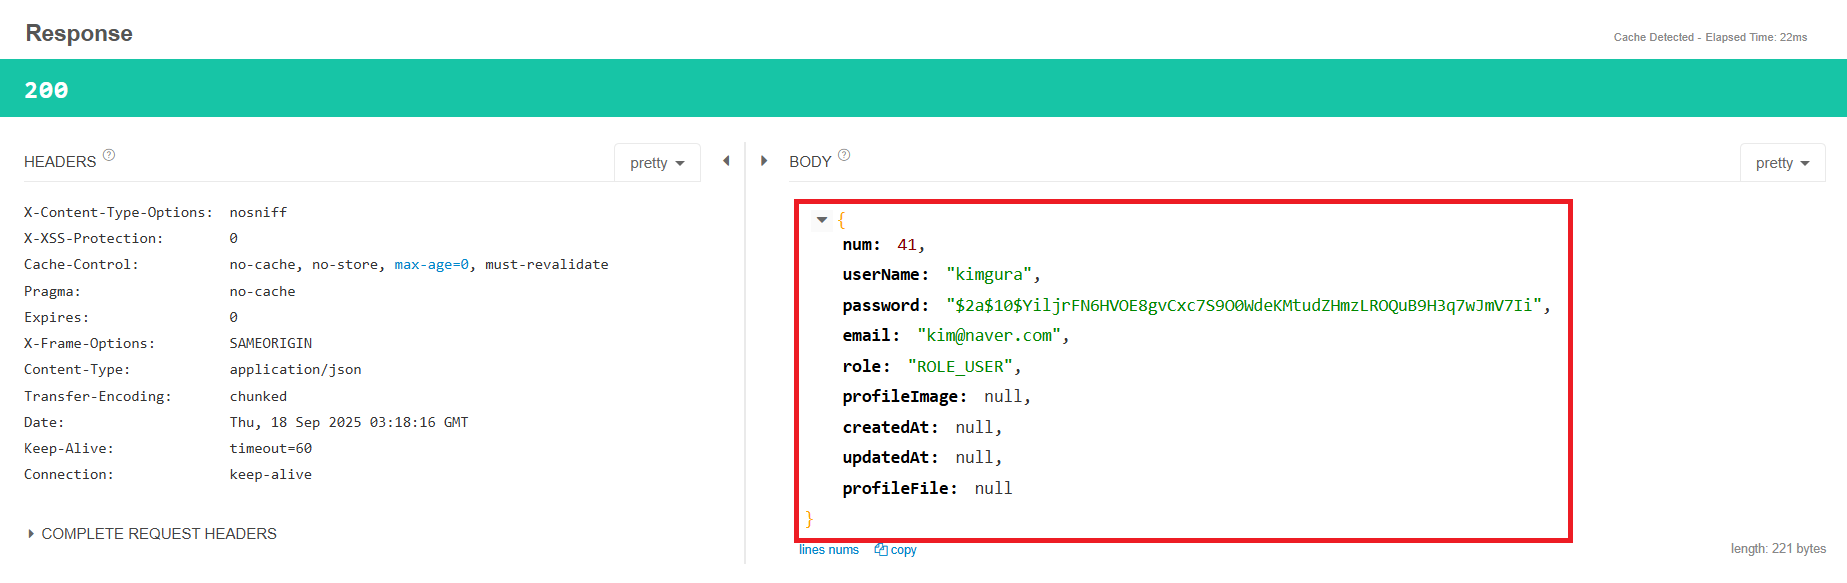
- CustomUserDetailsService 에 생성자 추가
@RequiredArgsConstructorUserDto dto = dao.getByUserName(username);- CustomUserDetailsService 에 실제 DB 로 이용하기 위한 코드 수정
public class CustomUserDetailsService implements UserDetailsService{

	private final UserDao dao;

	// userName 을 전달하면 해당 user 의 자세한 정보를 리턴하는 메소드
	@Override
	public UserDetails loadUserByUsername(String username) throws UsernameNotFoundException {

		UserDto dto = dao.getByUserName(username);

		// 권한 목록을 List 에 담아서  (지금은 1개 이지만)
		List<GrantedAuthority> authList = new ArrayList<>();
		// Role 을 포함한 authoryty 객체를 생성해서 authList 에 추가
		authList.add(new SimpleGrantedAuthority(dto.getRole()));

		// UserDetails 객체를 생성해서
		UserDetails ud = new User(dto.getUserName(), dto.getPassword(), authList);
		// 리턴해준다
		return ud;
	}
}- ImageController 클래스
@Controller
public class ImageController {

	@Value("${file.location}")
	private String fileLocation;

	/*
	 * "/upload/xxx.jpg"
	 * "/upload/yyy.png"
	 * "/upload/zzz.gif"
	 * 패턴의 요청이 오면 실제 해당 이미지를 읽어와서 실제 이미지 데이터를 응답하는 컨트롤러 메소드 만들기
	 * */
	@GetMapping("/upload/{saveFileName}")
	public ResponseEntity<InputStreamResource> image(@PathVariable("saveFileName") String name) throws IOException{
		/*
		 * {saveFileName} 경로 변수에 담긴 내용을 추출해서 String name 매개변수에 담는 기능을 수행하는
		 * @PathVariable 어노테이션
		 * */
		// 이미지의 이름을 이용해서 응답할 이미지가 어디에 있는지 전체 경로를 구성한다.
		String filePath = fileLocation + File.separator + name;
		// File 객체 생성
		File file = new File(filePath);
		// 파일이 존재하지 않으면 예외 발생
		if(!file.exists()) {
			throw new RuntimeException("file not found!");
		}
		// mime type 알아내기
		String mimeType = Files.probeContentType(file.toPath());
		// InputStremResource 객체 얻어내기
		InputStreamResource isr = new InputStreamResource(new FileInputStream(file));

		// 이미지 데이터를 응답하는 ResponseEntity 객체를 구성해서 리턴해 준다.
		return ResponseEntity.ok()
				.contentType(MediaType.parseMediaType(mimeType))
				.contentLength(file.length())
				.body(isr);
	}
}- UserDto 에 날짜 관련 메소드를
LocalDateTime로 data type 변경 후@JsonFormat어노테이션 추가
@JsonFormat(shape = JsonFormat.Shape.STRING, pattern = "yyyy년 MM월 dd일 HH:mm")
private LocalDateTime createdAt;
@JsonFormat(shape = JsonFormat.Shape.STRING, pattern = "yyyy년 MM월 dd일 HH:mm")
private LocalDateTime updatedAt;- SecurityConfig 에 화이트 리스트 추가
String[] whiteList = {"/swagger-ui/**", "/v3/api-docs/**", "/v1/notice", "/upload/**"};회원 정보 페이지
- pages 폴더 안에 UserDetail.jsx 생성
function UserDetail() {
    return <>
        <table className="table table-striped">
            <tr>
                <th>아이디</th>
                <td></td>
            </tr>
            <tr>
                <th>비밀번호</th>
                <tr></tr>
            </tr>
            <tr>
                <th>프로필 이미지</th>
                <td></td>
            </tr>
            <tr>
                <th>최종 수정 날짜</th>
                <td></td>
            </tr>
            <tr>
                <th>가입 날짜</th>
                <td></td>
            </tr>
        </table>
    </>
}- components 폴더 안에 ProtectedRoute.jsx 생성
function ProtectedRoute({children}) {
    //로그인 여부를 알기위해 userInfo 를 얻어낸다.
    const userInfo = useSelector(state=>state.userInfo);
    //현재 경로를 알아내기 위해
    const location=useLocation();
    //action 을 발행하기 위해
    const dispatch=useDispatch();
    //만일 로그인 상태가 아니라면
    if(!userInfo){
        //원래 가려던 목적지 정보와 query 파라미터 정보를 읽어내서
        const url = location.pathname + location.search;
        //테스트로 출력해보기
        console.log(url);
        const payload={
            show:true,
            title:"해당 페이지는 로그인이 필요 합니다!"
        }
        //로그인창을 띄우는 action 을 발행하면서 payload 를 전달한다.
        dispatch({type:"LOGIN_MODAL", payload});
        // return null 하면  currentRoute 에 빈 페이지가 출력된다.
        return null;
    }

    // 여기서 children 은 <ProtectedRoute> 컴포넌트의 자식 컴포넌트를 가리킨다
    return children;
}- App.jsx 에
UserDetail라우트 경로 추가
{path:"/user", element:<ProtectedRoute><UserDetail/></ProtectedRoute>}- BsNavBar.jsx 에 Nav.Link 요소에
as추가
<Nav.Link as={NavLink} to="/user">{userInfo.userName}</Nav.Link>- UserDetail.jsx 에
useState함수 추가- 사용자 정보를 상태값으로 관리
const [dto, setDto] = useState({});- UserDetail.jsx 에
useEffect함수 추가
useEffect(()=>{
	// api 에서 사용자 정보를 받아와서 상태값에 넣어준다
	api.get("/v1/user")
	.then(res =>setDto(res.data))
	.catch(err => console.log(err));
}, []);
boostrap icons 다운로드
npm i bootstrap-icons- App.jsx 에
bootstrap-iconsimport- bootstrap icon 을 사용하기 위한 import
import 'bootstrap-icons/font/bootstrap-icons.css'- table 에 속성값 추가
<table className="table table-striped">
    <tbody>
        <tr>
            <th>아이디</th>
            <td>{dto.userName}</td>
        </tr>
        <tr>
            <th>비밀번호</th>
            <td>
                <NavLink to="/user/pwd-edit">수정</NavLink>
            </td>
        </tr>
        <tr>
            <th>이메일</th>
            <td>{dto.email}</td>
        </tr>
        <tr>
            <th>프로필 이미지</th>
            <td>
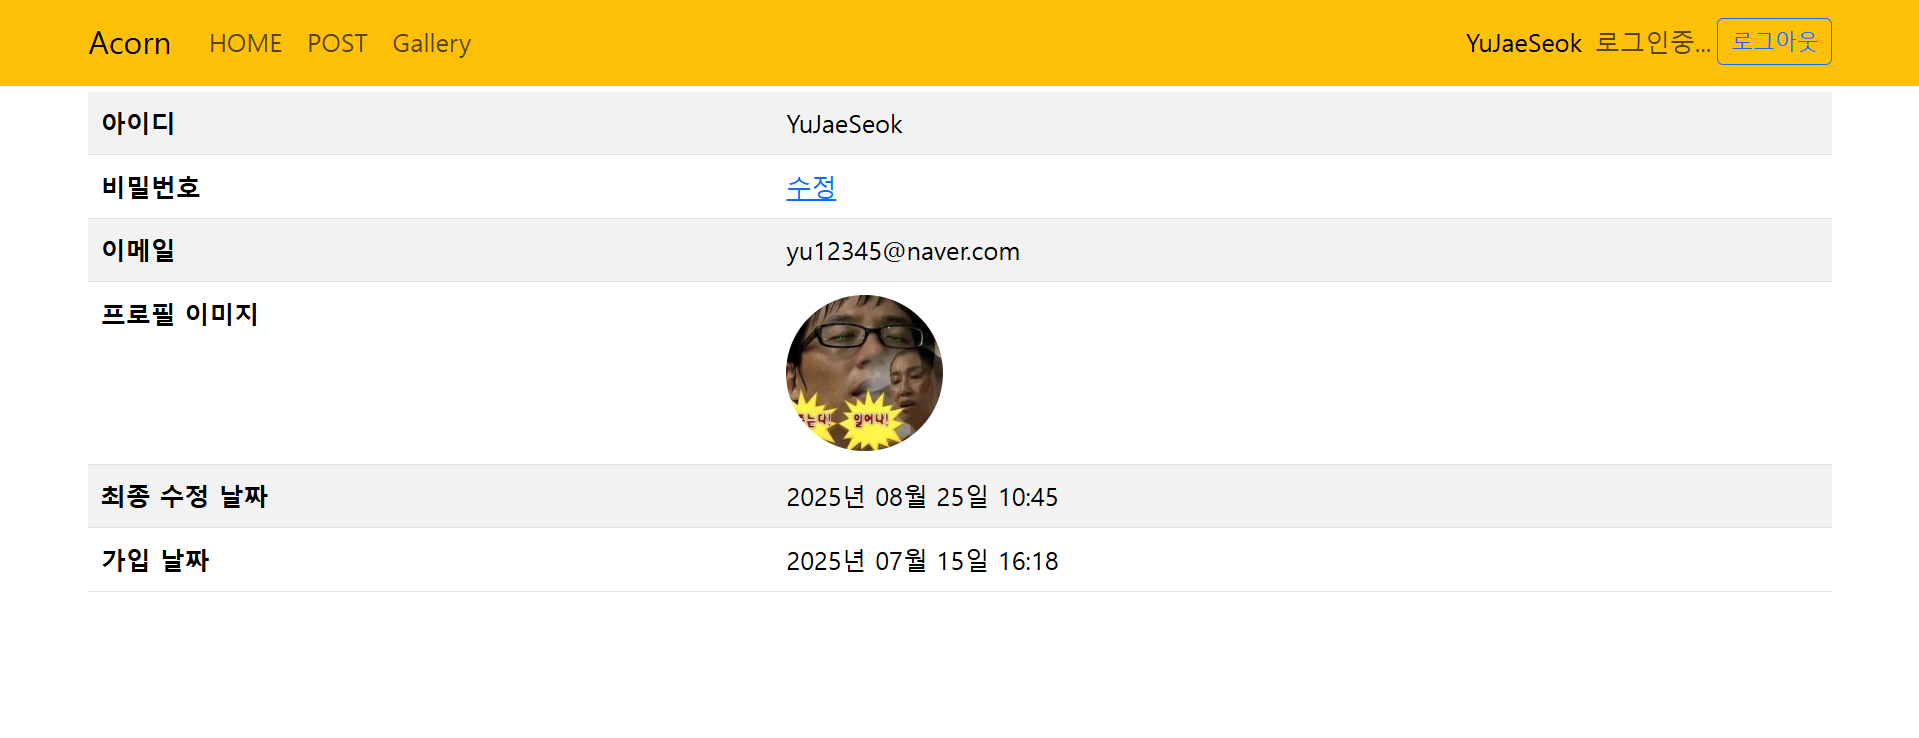
                {dto.profileImage ?
                    <img src={`/upload/${dto.profileImage}`} alt="프로필 이미지"
                        style={{width:"100px", height:"100px", borderRadius:"50%"}}/>
                    :
                    /*
                        npm install bootstrap-icons 해서 설치한 다음
                        아래와 같이 import 해야 사용 가능
                        import 'bootstrap-icons/font/bootstrap-icons.css'
                    */
                    <i className="bi bi-person-circle" style={{fontSize:"100px"}}></i>
                }
            </td>
        </tr>
        <tr>
            <th>최종 수정 날짜</th>
            <td>{dto.updatedAt}</td>
        </tr>
        <tr>
            <th>가입 날짜</th>
            <td>{dto.createdAt}</td>
        </tr>
    </tbody>
</table>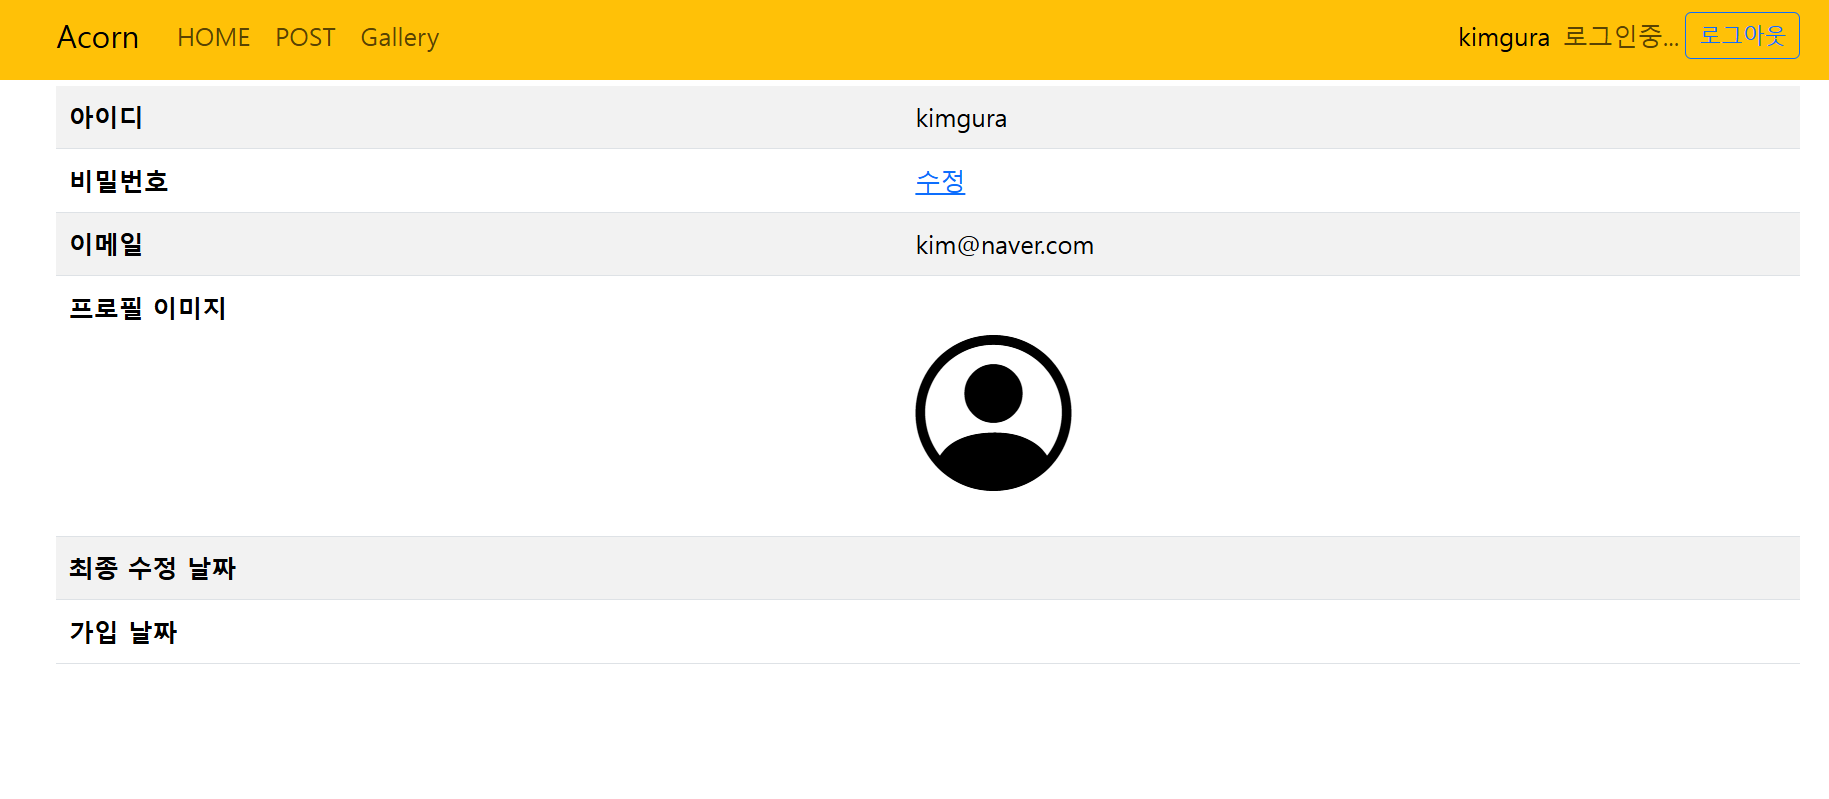
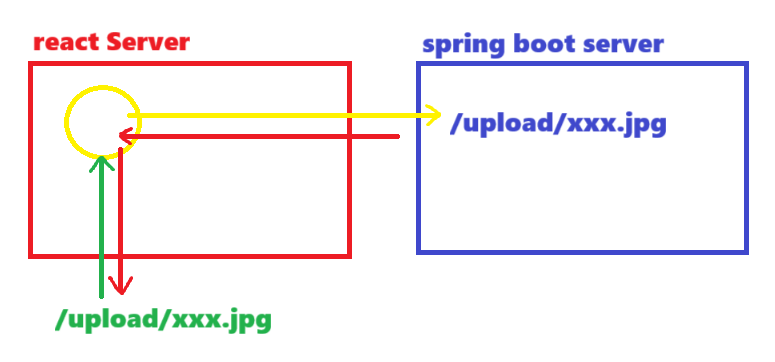
- vite.config 에 proxy 정보 추가
- upload 된 이미지를 로딩하기 위한 프록시
'/upload':{
	target:'http://localhost:9000',
	changeOrigin:true
}
- table 안에
colgroup코드 추가- 테이블 폭은 3 대 9 로 설정
<colgroup>
	<col className="col-3"/>
	<col className="col-9"/>
</colgroup>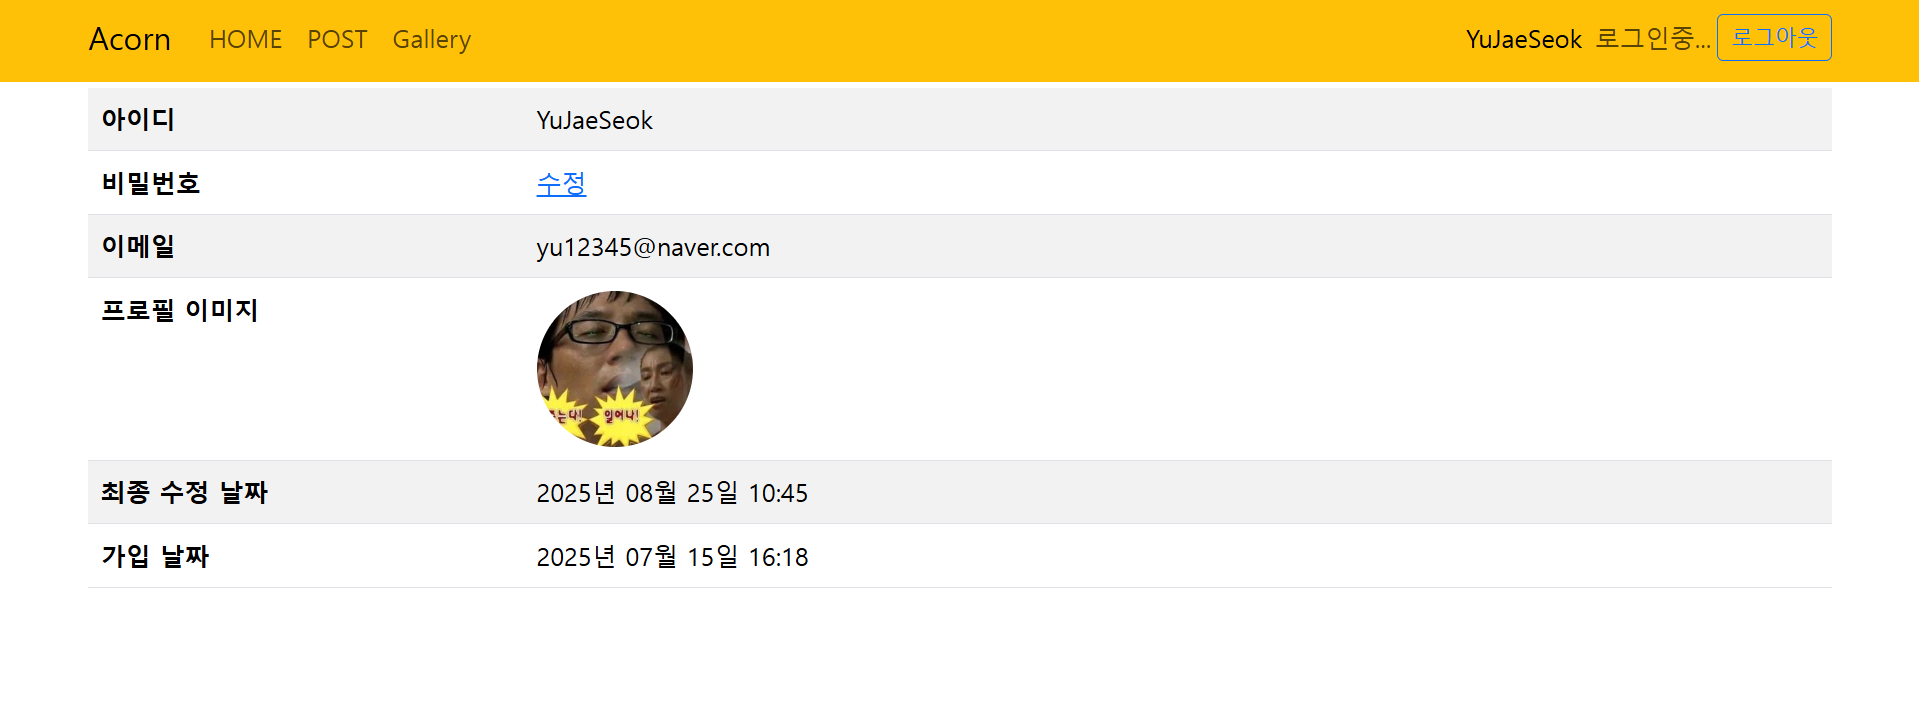
회원 비밀번호 수정
첫번째 방법
- pages 폴더 안에 UserPwdUpdateForm.jsx 생성
function UserPwdUpdateForm() {

    return <>
        <h1>비밀번호 수정 양식</h1>
        <p className="alert alert-danger"></p>

        <form action="">
            <div className="mb-2">
                <label className="form-label" for="password">기존 비밀번호</label>
				<input className="form-control" type="password" name="password" id="password"/>
            </div>
            <div className="mb-2">
                <label className="form-label" for="newPassword">새 비밀번호</label>
				<input className="form-control" type="password" name="newPassword" id="newPassword"/>
            </div>
            <div className="mb-2">
                <label className="form-label" for="newPassword2">새 비밀번호 확인</label>
				<input className="form-control" type="password" id="newPassword2"/>
			</div>
            <button className="btn btn-sm btn-success" type="submit">수정</button>
        </form>
    </>
}- index.jsx 에
UserPwdUpdateForm라우트 경로 추가
{path:"/user/pwd-edit", element:<ProtectedRoute><UserPwdUpdateForm/></ProtectedRoute>}- UserPwdUpdateForm.jsx 에
useRef추가- input 요소의 참조값을 얻어오기 위한 hook
const pwdRef = useRef();
const newPwdRef = useRef();
const newPwdRef2 = useRef();- form 요소에
onSubmit이벤트 추가
<form onSubmit={handleSubmit} action="/v1/user/password" >handleSubmit함수 추가
const handleSubmit = (e) => {
	e.preventDefault();
};- label 요소의 for 을
htmlFor로 수정 후 input 요소에ref추가- pwdRef.current.value
pwdRef.current=document.querySelector("#password")
<div className="mb-2">
	<label className="form-label" htmlFor="password">기존 비밀번호</label>
	<input ref={pwdRef} className="form-control" type="password" name="password" id="password"/>
</div>
<div className="mb-2">
	<label className="form-label" htmlFor="newPassword">새 비밀번호</label>
	<input ref={newPwdRef} className="form-control" type="password" name="newPassword" id="newPassword"/>
</div>
<div className="mb-2">
	<label className="form-label" htmlFor="newPassword2">새 비밀번호 확인</label>
	<input ref={newPwdRef2} className="form-control" type="password" id="newPassword2"/>
</div>handleSubmit함수 안에 비밀번호 코드 추가
// 기존 비밀번호    pwdRef.current 은 비밀번호 입력 input 요소의 참조값
const pwd = pwdRef.current.value;
// 새 비밀번호
const newPwd = newPwdRef.current.value;
// 새 비밀번호 확인
const newPwd2 = newPwdRef2.current.value;handleSubmit함수 안에if 문, else if 문&api코드 추가
if(pwd.trim() == ""){ // 문자열에서 공백제거(좌우 공백)해서 비교
    alert("기존 비밀번호를 입력하세요");
    return;
} else if(newPwd.trim() == ""){
    alert("새 비밀번호를 입력하세요");
    return;
} else if(newPwd.trim() != newPwd2.trim()){
    alert("새 비밀번호를 확인란과 동일하게 입력하세요");
    return;
}
// e.target 은 form 요소, e.target.action 은 form 요소의 action 속성값
api.patch(e.target.action, {
    password:pwd,
    newPassword:newPwd
})
.then(res => {})
.catch(err => {});
두번째 방법
- UserPwdUpdateForm.jsx
function UserPwdUpdateForm() {

    return <>
        <h1>비밀번호 수정 양식</h1>
        <p className="alert alert-danger"></p>

        <form action="/v1/user/password" >
            <div className="mb-2">
                <label className="form-label" htmlFor="password">기존 비밀번호</label>
				<input className="form-control" type="password" name="password" id="password"/>
            </div>
            <div className="mb-2">
                <label className="form-label" htmlFor="newPassword">새 비밀번호</label>
				<input className="form-control" type="password" name="newPassword" id="newPassword"/>
            </div>
            <div className="mb-2">
                <label className="form-label" htmlFor="newPassword2">새 비밀번호 확인</label>
				<input className="form-control" type="password" name="newPassword2" id="newPassword2"/>
			</div>
            <button className="btn btn-sm btn-success" type="submit">수정</button>
        </form>
    </>
}handleSubmit함수 추가
const handleSubmit = (e)=>{
        e.preventDefault();
};- form 요소에
onSubmit이벤트 추가
<form onSubmit={handleSubmit} action="/v1/user/password" >useState함수 추가- 폼에 입력한 내용을 하나의 state 로 관리
const [state, setState] = useState({
	password:"",
	newPassword:"",
	newPassword2:""
});handleChange함수 추가- input 요소에 change 이벤트가 발생했을 때 실행할 함수
const handleChange = (e) => {
	// 입력한 내용을 바로 state 에 반영
	setState({
		...state,
		[e.target.name]:e.target.value
	});
};- input 요소에
onChange이벤트 및value속성 추가
<input onChange={handleChange} value={state.password} className="form-control" type="password" name="password" id="password"/>

<input onChange={handleChange} value={state.newPassword} className="form-control" type="password" name="newPassword" id="newPassword"/>

<input onChange={handleChange} value={state.newPassword2} className="form-control" type="password" name="newPassword2" id="newPassword2"/>- div 요소 추가
<div className="invalid-feedback">비밀번호를 입력하세요</div>useState함수 추가- 폼 입력란의 유효성 여부를 상태값으로 관리
const [valid, setValid] = useState({
	password:false,
	newPassword:false,
  	newPassword2:false
});useEffect함수 추가
useEffect(() => {
	// 유효성 여부를 바로 state 에 반영
	setValid({
		password:state.password.length >= 1,
		newPassword:state.newPassword === state.newPassword2
	});
}, [state]);
-> 하나 누르면 연두색으로 바뀌는 거 확인

학원 공부 내용 정리