9일차 내용정리
8일차 내용 복습
Data type
number type
원하는 숫자를 작성하는 것 만으로 생성 가능
let num1 = 10;
let num2 = 10.1;
String type
single 따옴표, double 따옴표, backtick으로 감싸서 string type 데이터 생성 가능
let myName = '유재석';
let yourName = "박명수";
let ourName = `정준하`;
Boolean type
true, false 를 직접 작성하거나, 비교연산이나 논리연산 등의 결과로 생성 가능, 대화식으로 변수명 지정
let isRun = true;
let isWait = false;
let isEqual = 10 == 10;
let isGreater = 20 > 30;
plain object type
순서가 중요하지 않은 데이터를 key-value 쌍의 묶음으로 관리할 때 사용
key는 객체 내에서 유일해야 하며, 중복된 key는 허용하지 않는다.
객체는 메모리의 heap 영역에 생성 (ex. 사물함)
heap 영역에 객체 저장, 변수에는 해당 heap의 주소값을 저장
let obj = {key:value, key2:value, ...};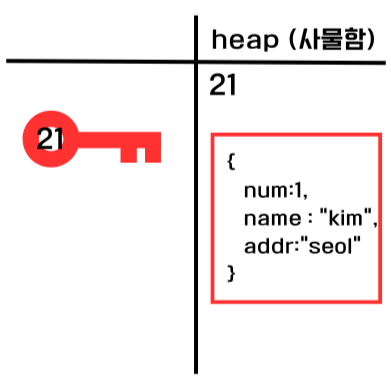
		 대입연산자 (우측에 있는 값을 좌측에 대입)
let mem1 = {num:1, name:"kim", addr:"seoul"};
let mem2 = {
	num:2,
    name:"park",
    addr:"pusan"
};
let mem3 = {};
<{}안에 데이터가 없으면 추가, 있다면 덮어쓰는 방법>
mem3.num = 3;
mem3.name = "oh";
mem3.addr = "inchon";
array type
순서가 중요한 데이터를 index로 관리하고자 할 때 사용
heap 영역에 객체 저장, 변수에는 해당 heap의 주소값을 저장
let arr = [];function type
특정 시점에 호출(call)해 일괄 실행
heap 영역에 함수 저장, 변수에는 해당 heap의 주소값을 저장
let func = function(){};
let func = () => {};
object, array, function type
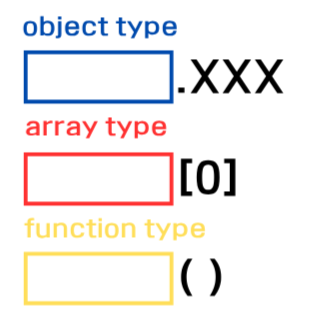
let a = 10;              -> number type
let b = a                -> number type

let c = getGreeting;     -> function type
let d = getGreeting();   -> string type

let e = getSum;          -> function type
let f = getSum(10,20)    -> number type
undefined type
변수는 선언되었지만 아직 값이 할당되지 않은 상태를 나타내는 특별한 데이터 타입
9일차 새로운 내용 시작
웹 브라우저는 로딩이 시작되면 HTML 태그 하나하나를 각각 다른 객체로 생성성하고 해당 객체들은 메모리의 heap 영역에 따로 저장
해당 key는 object의 참조값
<body>
  	<h1>
    <div>
    <input>
    <table>
    <ul>
    <img>
      .
      .
      .
자주 사용할 document의 함수
| document | 설명 |
|---|---|
| querySelector | ui를 제어할 수 있는 값을 return 찾고 싶은 요소 중 오직 하나를 찾게 하는 명령어 |
| querySelectorAll | ui를 제어할 수 있는 값을 return 찾고 싶은 여러 개의 요소를 찾게 하는 명령어 |
| createElement | 페이지 로딩 시점에 없는 요소를 생성 |
| addEventListener | 이벤트를 등록하고 예약하는 함수 ex)버튼에 click할 때 어떤 동작을 할 것인가? |
document 함수 코드 예제
<p>p1</p>
<p>p2</p>
<p onclick="change3()">p3</p>
<p>p4</p>
<p>p5</p> <!--onclick : button을 "click"할 때마다 실행되는 javascript 영역-->
<button onclick="change()">변경하기</button>
<button onclick="change2()">변경하기2</button>
<button onclick="change3()">변경하기3</button>

<!--document.querySelector("p") 소괄호 안에 요소명을 작성
	첫번째 p요소의 참조값(사물함 번호)가 return-->

<script>
	// 페이지 로딩 시점에 바로 실행
	document.querySelector("p").innerText = "kim";
	document.querySelecorAll('p').style.color = "red";

	// 페이징 로딩 시점에 change 함수 생성, 자바스크립트 코드 두 줄이 대기
	function change() {
		document.querySelector("p").innerText = "kim";
		document.querySelector('p').style.color = "red";
	}

	// 익명의 함수를 만들어서 change2 라는 변수에 대입
	let change2 = function(){
		document.querySelector("p").innerText = "lee";
		document.querySelector('p').style.color = "yellow";
	}

	// 화살표 함수를 만들어서 change3 라는 변수에 대입
	let change3 = () => {
		document.querySelector("p").innerText = "park";
		document.querySelector("p").style.color = "blue";
	}
</script>
기본 선택자
| 종류 | 설명 |
|---|---|
| 요소명 | 태그 이름 자체를 기준으로 선택할 때 사용 |
| class | 많은 요소 중에 특정 요소들을 특정 그룹으로 묶기 위해서 부여 |
| id | 많은 요소 중에 오직 하나만 식별하기 위해 부여 |
document 함수와 기본 선택자 코드 예제
<p>p1</p>
<p class="my-class">p2</p>
<p id="one" class="my-class your-class">p3</p>
<p id="two" class="my-class your-class">p4</p>
<p>p5</p>
<button onclick="change()">변경하기</button>
<button onclick="recover()">원상복구</button>

<script>
	// 클래스명이 my-class인 모든 요소의 글자색을 red로 변경
	document.querySelectorAll(".my-class")[0].style.color = "red";
	document.querySelectorAll(".my-class")[1].style.color = "red";
	document.querySelectorAll(".my-class")[2].style.color = "red";

	// 클래스명이 your-class인 모든 요소의 배경색을 yellow로 변경
	document.querySelectorAll(".your-class")[0].style.backgroundColor = "yellow";
	document.querySelectorAll(".your-class")[1].style.backgroundColor = "yellow";

	// "변경하기" 버튼을 눌렀을 때 클래스명이 your-class인 모든 요소의 fontSize를 "20px"로 지정
	let change = () => {
		document.querySelectorAll(".your-class")[0].style.fontSize = "20px";
		document.querySelectorAll(".your-class")[1].style.fontSize = "20px";
        }

	// "원상복구" 버튼을 눌렀을 때 클래스명이 your-class인 모든 요소의 fontSize를 "16px"로 지정
	let recover = () => {
		document.querySelectorAll(".your-class")[0].style.fontSize = "16px";
		document.querySelectorAll(".your-class")[1].style.fontSize = "16px";
	}
</script>
입력값을 읽어 여러 개의 p 요소에 출력하는 예제
<input type="text" id="inputMsg">
<button onclick="send()">전송</button>
<p>...</p>
<p>...</p>
<p>...</p>

<script>
	/*
	input 요소에 문자열을 입력, 전송 버튼을 눌렀을 때
	1. 입력한 문자열을 읽어와서 msg 라는 상수에 담고
	2. msg 상수에 담긴 문자열을 모든 p 요소의 innerText로 지정
	*/

	let send = () => {
		const msg = document.querySelector("#inputMsg").value;
		document.querySelectorAll("p")[0].innerText = msg;
		document.querySelectorAll("p")[1].innerText = msg;
		document.querySelectorAll("p")[2].innerText = msg;
	}
</script>
반복문
for문
반복 작업시 사용하는 구문
입력받은 문자를 100개의 p요소에 모두 출력되도록 하는 코드 예제
<input type="text" id="inputMsg">
<button onclick="send()">전송</button>
<!--총 100개의 p문-->
<p>...</p>
<p>...</p>
<p>...</p>
<p>...</p>
    .
    .
    .
<script>
	/*첫번째 방법*/
	let send = () => {
		for(let i=0; i<100; i++){
			const msg = document.querySelector("#inputMsg").value;
			document.querySelectorAll("p")[i].innerText = msg;
            }
       }

	/*두번째 방법*/
	let send = () => {
		const msg = document.querySelector("#inputMsg").value;
		const pList = document.querySelectorAll("p");
	for(let i=0; i<pList.length; i++){
		pList[i].innerText = msg;
		}
	}
</script>
학원 공부 내용 정리