✅ 1. Jira 프로젝트 생성하기
- Jira > 프로젝트 > 프로젝트 만들기
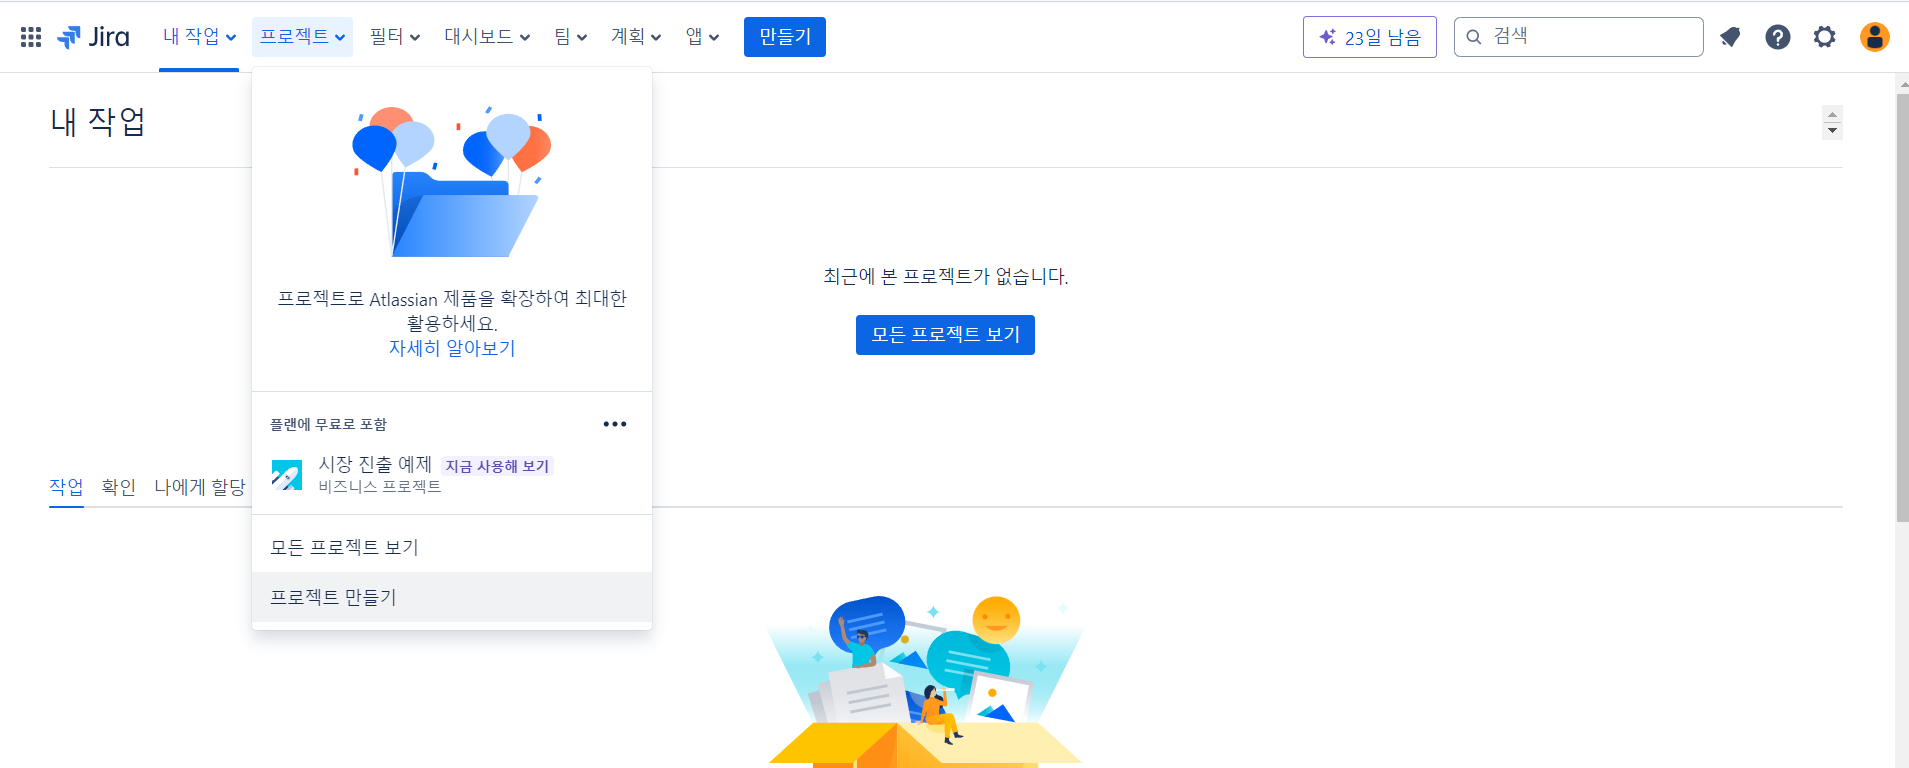
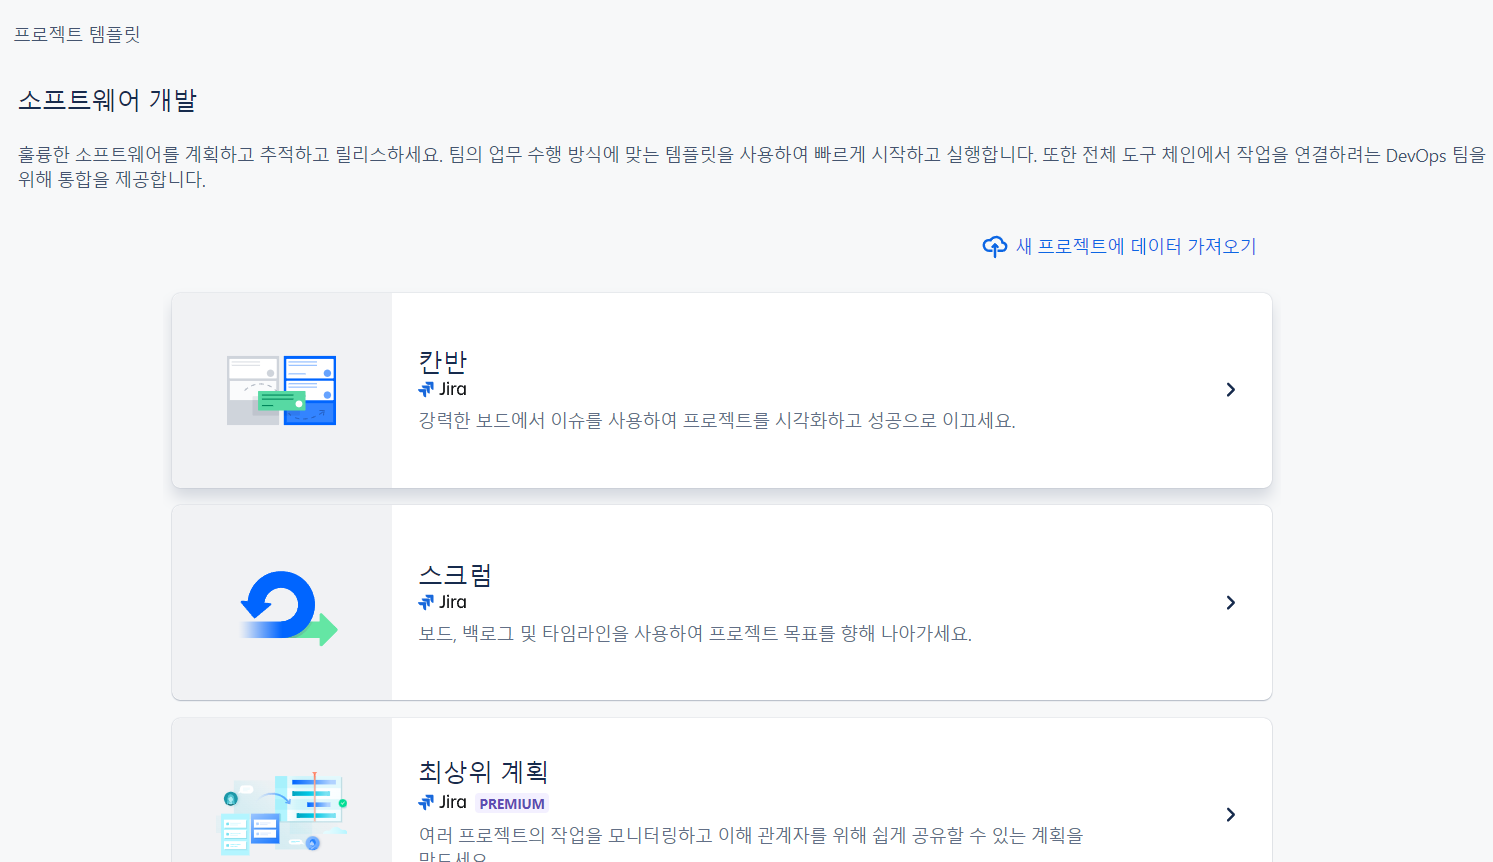
- 원하는 프로젝트 템플릿 선택
- 예시에서는 칸반 템플릿을 선택했다.
- 템플릿 사용 클릭 > 좌측 팀에서 관리하는 프로젝트 선택

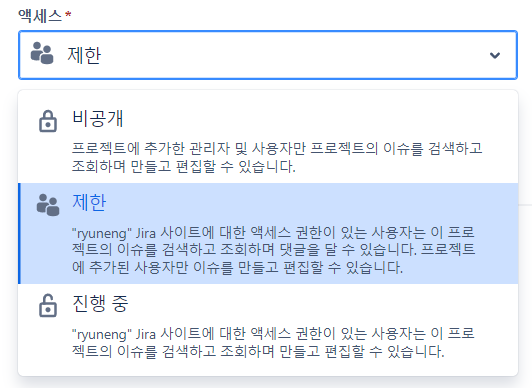
- 프로젝트 이름 입력 및 액세스 선택 후 다음 클릭
- 프로젝트 이름 : 일반적으로 팀 이름, 프로젝트 목표, 마일스톤을 작성한다.
- 액세스 : 제한은 팀원들만 사용 가능
- 키 : 프로젝트 이름을 입력하면 이름에 맞춰 적합한 키가 자동으로 입력된다.
키는 수정이 가능하지만, 예시에서는 지정해준대로 사용했다.

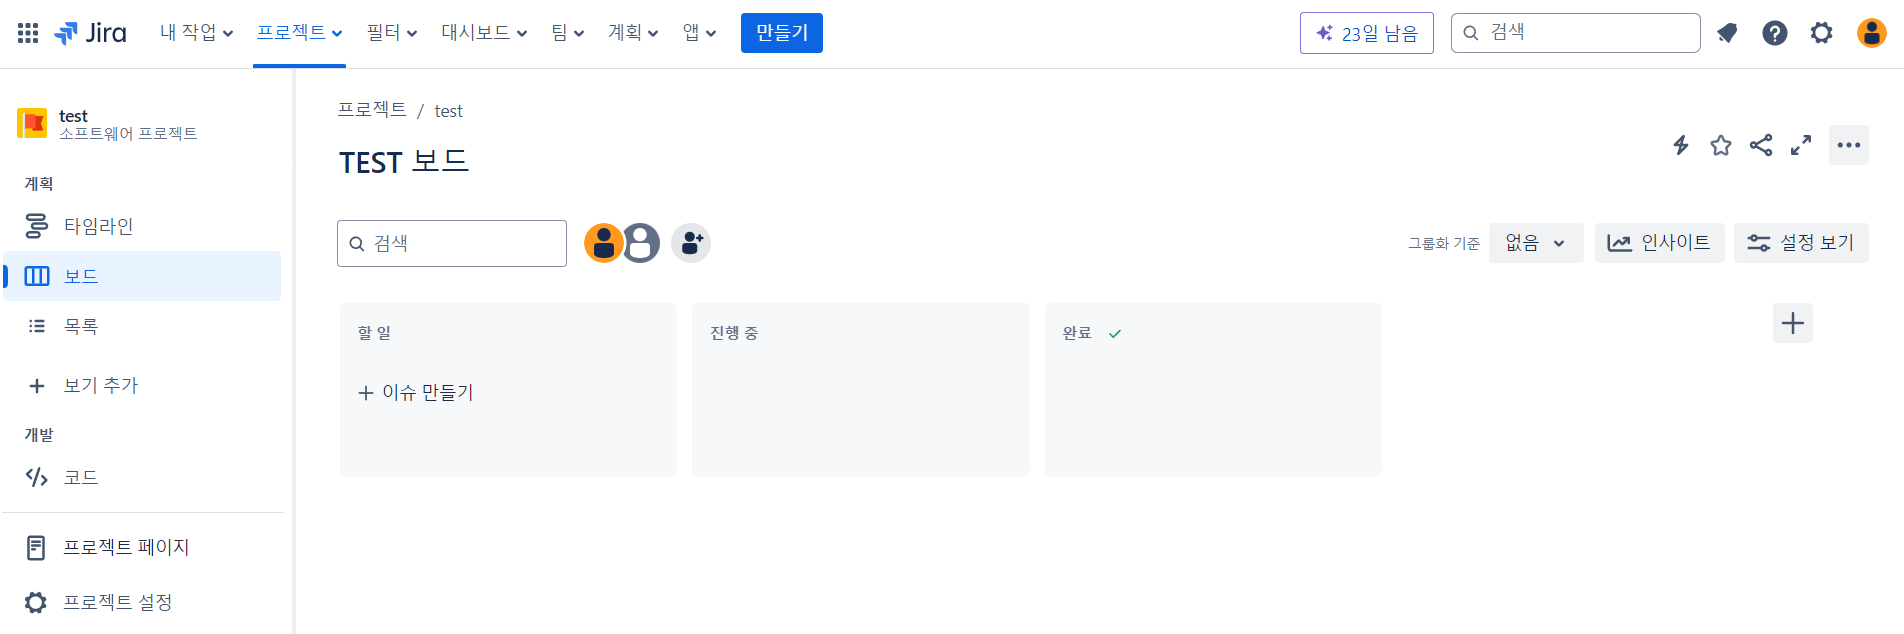
- 생성 완료
- 잘 생성된 것을 확인할 수 있다.
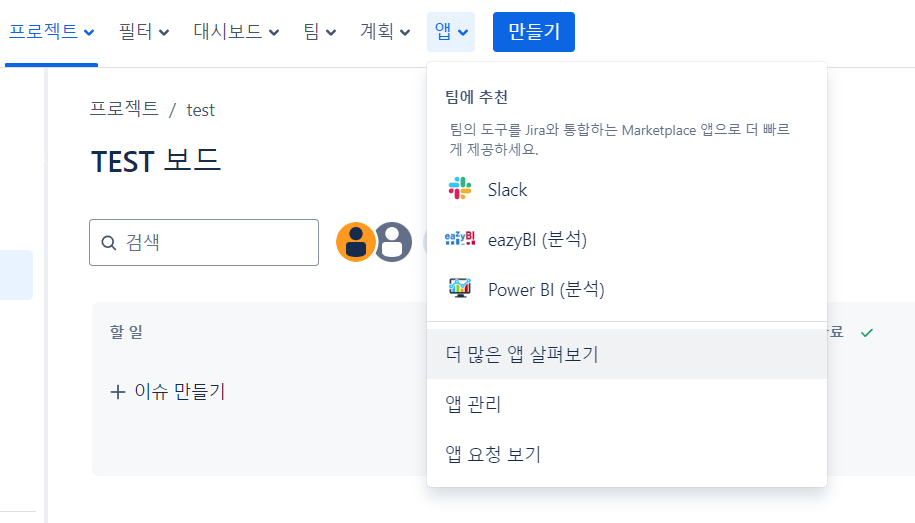
✅ 2. GitHub 앱 연결하기
- Jira > 앱 > 더 많은 앱 살펴보기
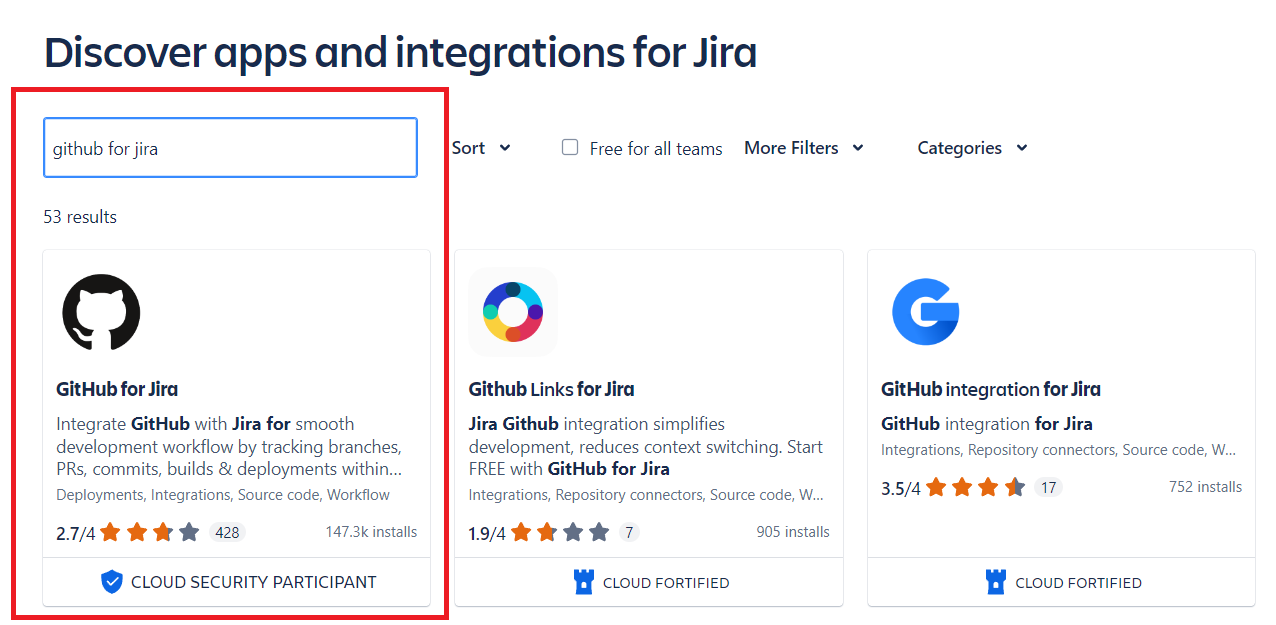
- github for jira 검색 및 선택
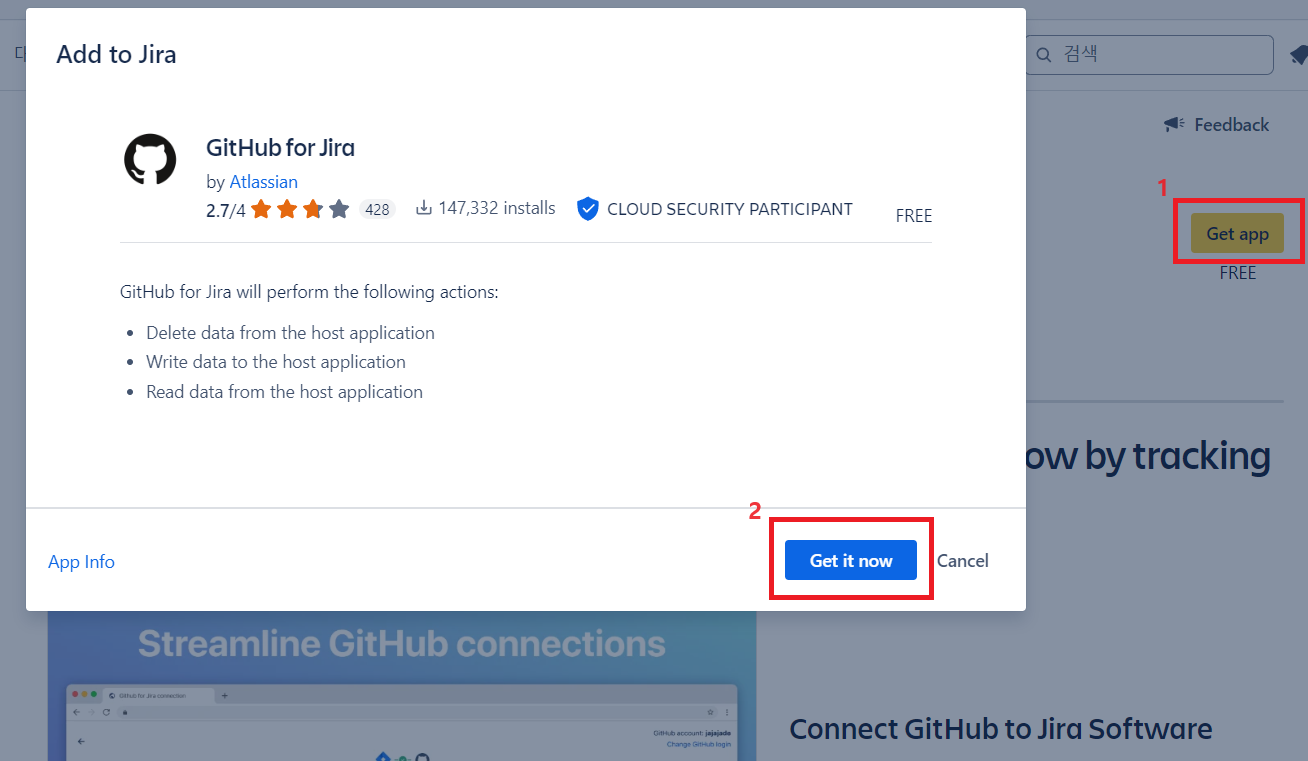
- Get app -> Get it now 클릭
- Get Started 클릭
조금 기다리면 Get app 버튼이 Get Started로 바뀐다.

- Continue 클릭

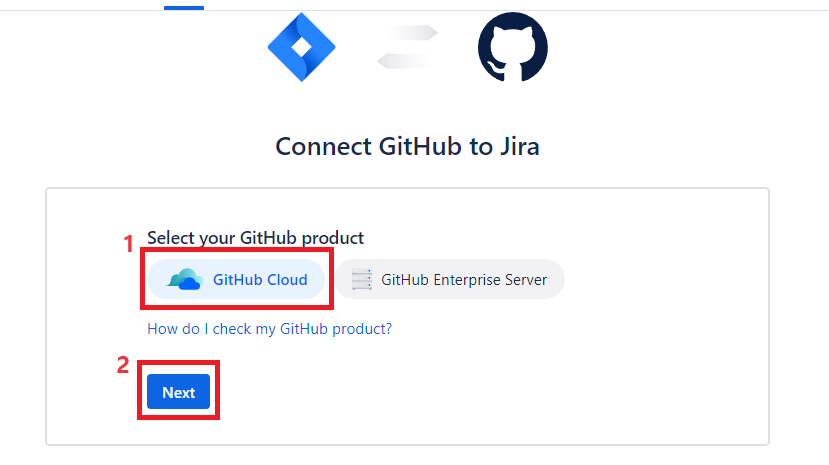
- GitHub Cloud -> Next 클릭
- 초록색 Authorize Jira 클릭

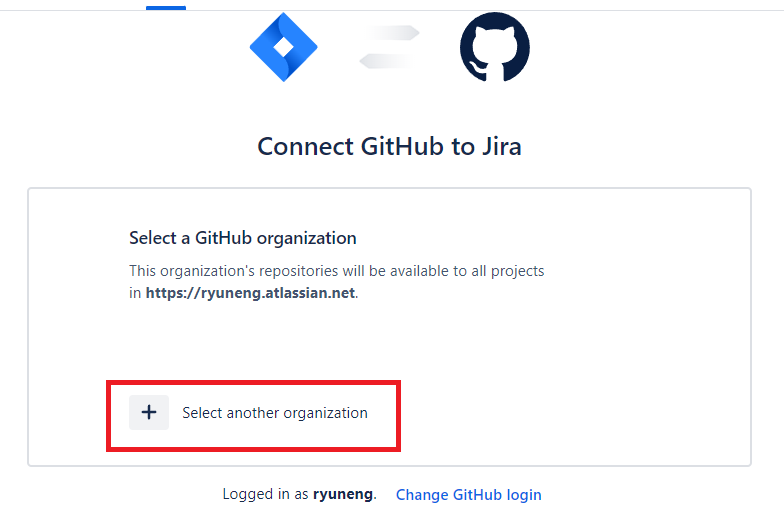
- Select another organization 클릭
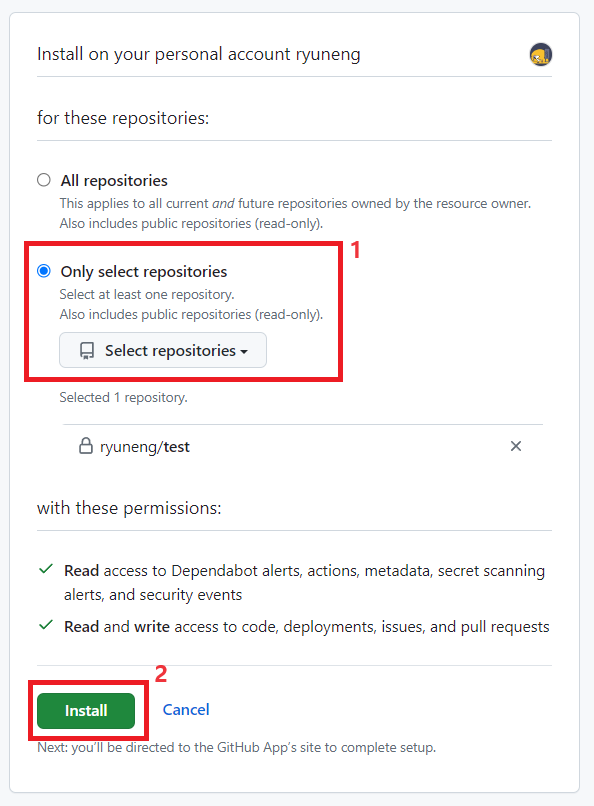
- Only select repositories를 선택하고 Select repositories 에서 원하는 Repository를 클릭한 후 install 클릭
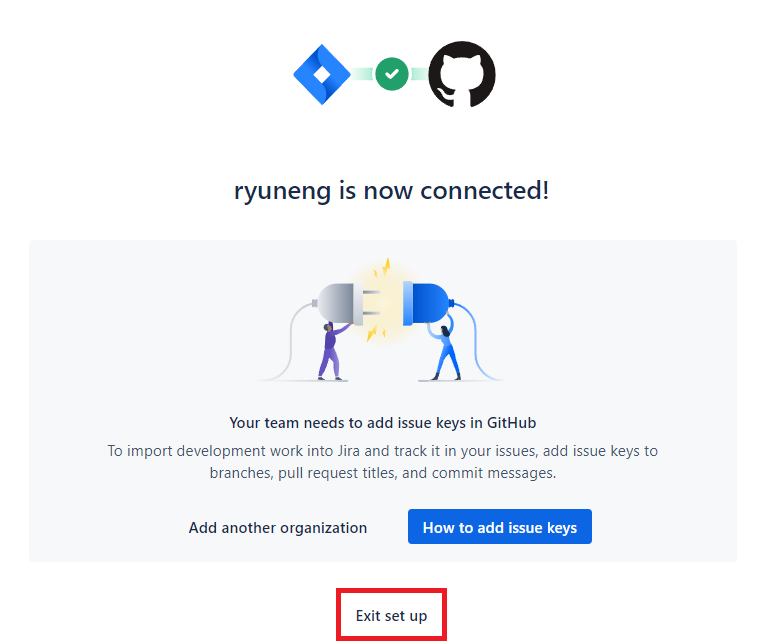
- 연결 완료 창에서 Exit set up 클릭
- 연결 완료 확인
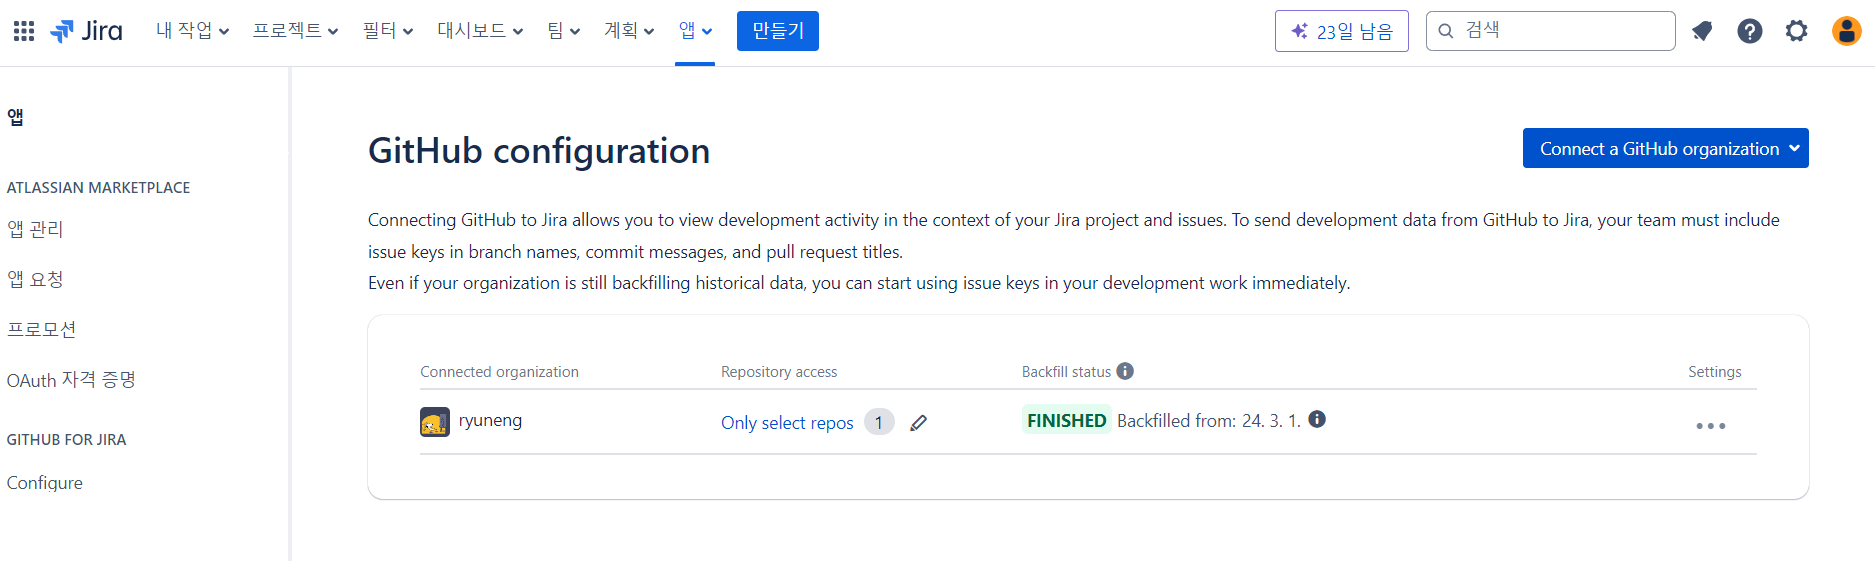
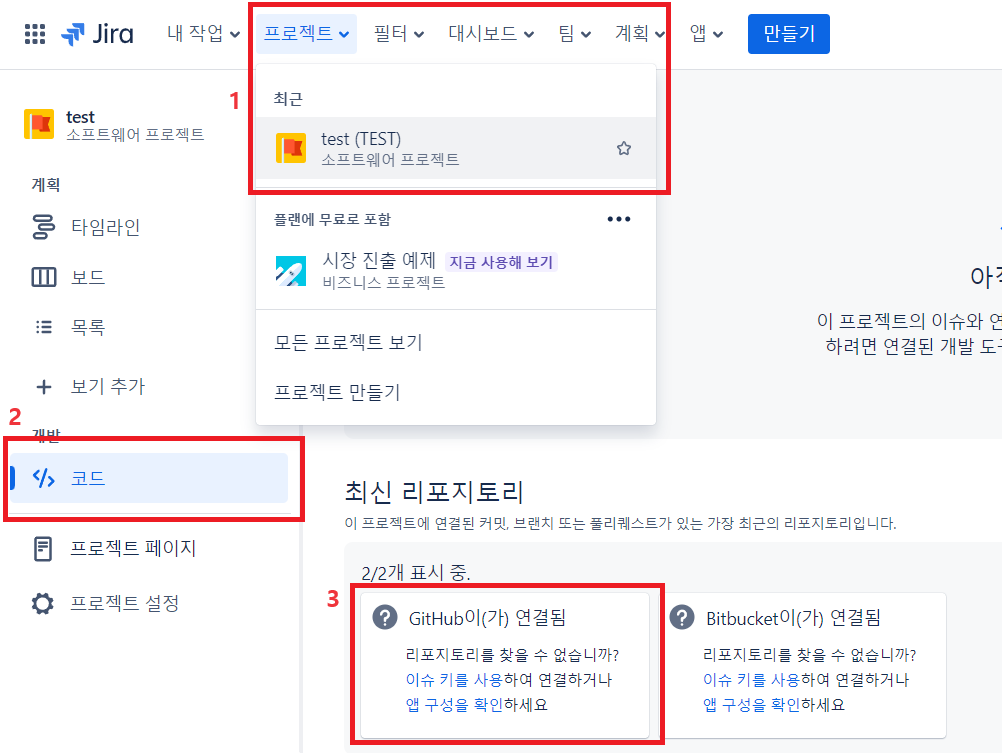
- 프로젝트 탭 > 프로젝트 선택 > 좌측 코드 클릭 > 최신 리포지토리 > GitHub 연결됨 확인
✅ 3. Jira API 토큰 생성
- 참고 URL : https://manbok2.tistory.com/86
- 아래 링크 접속 후 API 토큰 만들기 클릭
https://id.atlassian.com/manage-profile/security/api-tokens
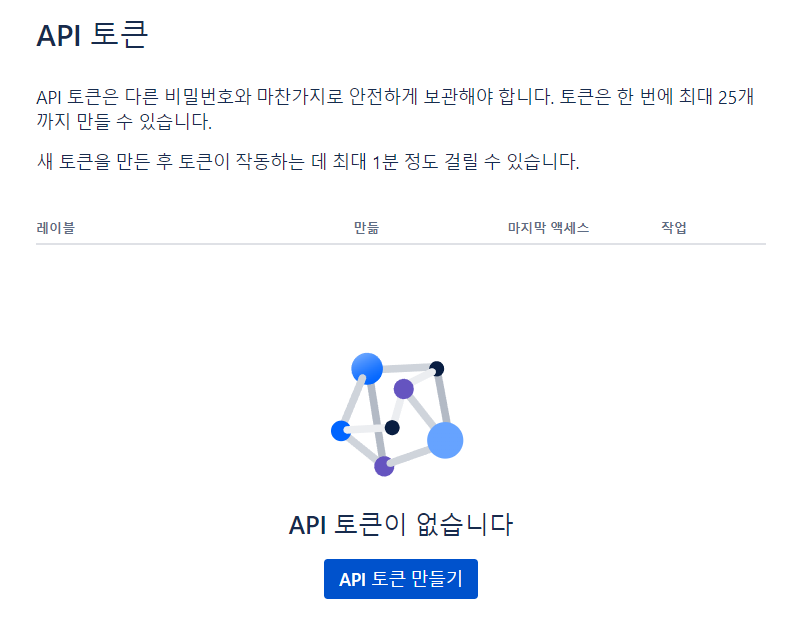
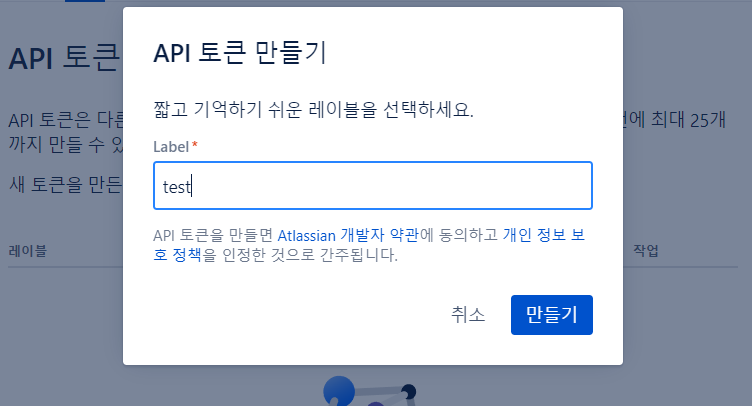
- 토큰을 식별할 Label명 입력 후 만들기 클릭
- 라벨명은 크게 상관없으니 본인이 식별 가능한 이름을 입력하면 된다.
- 새 API 토큰 복사
- API 토큰은 이 때만 확인 가능하고, 추후 확인이 불가하니 본인만의 저장소에 잘 기록해두어야 한다.
- 토큰은 노출되지 않도록 주의한다.

✅ 4. GitHub에 Jira Token 세팅하기
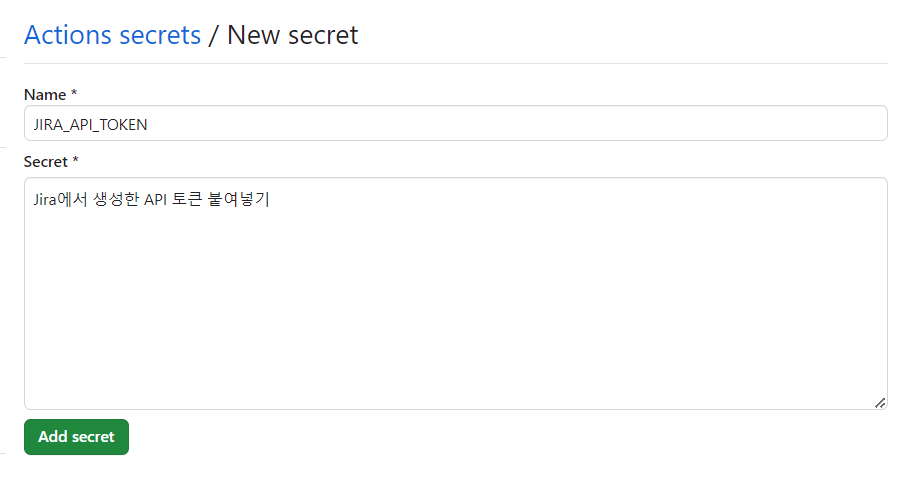
- 연결할 GitHub Repository > Settings > Secrets and variables > Actions > New repository secret 클릭

- 아래 3가지 항목을 차례대로 입력 후 Add secret을 눌러 등록한다.
| Name | Secret | |
|---|---|---|
| 1 | JIRA_API_TOKEN | Jira에서 생성한 API 토큰 붙여넣기 |
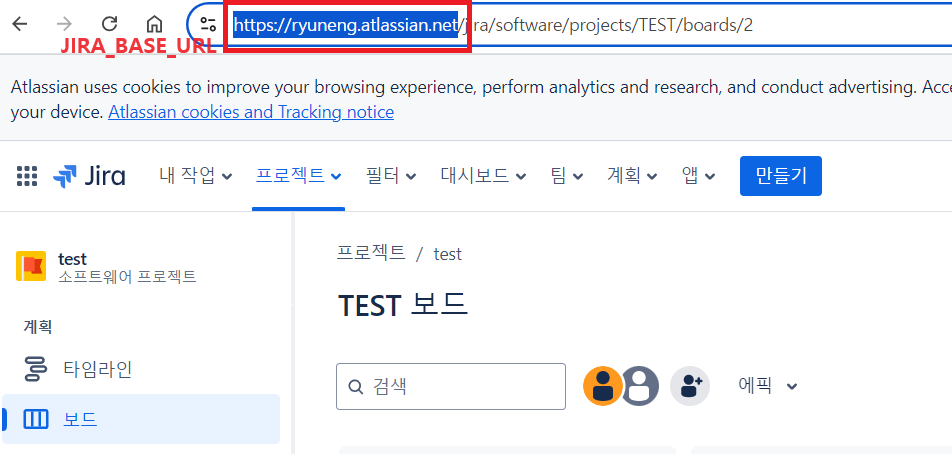
| 2 | JIRA_BASE_URL | https://{본인 Jira 이름 입력}.atlassian.net |
| 3 | JIRA_USER_EMAIL | API 토큰을 생성한 이메일 |
✅ 5. 프로젝트에 설정 yml 파일 생성하기
- .github > workflows > create-jira-issue.yml 디렉토리 및 파일 생성
- Jira와 연동할 GitHub 이슈 템플릿 경로 등을 설정하는 파일
name: Create Jira issue
on:
  issues:
    types:
      - opened
jobs:
  create-issue:
    name: Create Jira issue
    runs-on: ubuntu-latest
    steps:
      - name: Login
        uses: atlassian/gajira-login@v3
        env:
          JIRA_BASE_URL: ${{ secrets.JIRA_BASE_URL }}
          JIRA_API_TOKEN: ${{ secrets.JIRA_API_TOKEN }}
          JIRA_USER_EMAIL: ${{ secrets.JIRA_USER_EMAIL }}

      - name: Checkout main code
        uses: actions/checkout@v4
        with:
          ref: dev

      - name: Issue Parser
        uses: stefanbuck/github-issue-praser@v3
        id: issue-parser
        with:
          template-path: .github/ISSUE_TEMPLATE/issue_form.yml

      - name: Log Issue Parser
        run: |
          echo '${{ steps.issue-parser.outputs.jsonString }}'

      - name: Convert markdown to Jira Syntax
        uses: peter-evans/jira2md@v1
        id: md2jira
        with:
          input-text: |
            ### Github Issue Link
            - ${{ github.event.issue.html_url }}

            ${{ github.event.issue.body }}
          mode: md2jira

      - name: Create Issue
        id: create
        uses: atlassian/gajira-create@v3
        with:
          project: TEST
          issuetype: Sub-task
          summary: "${{ github.event.issue.title }}"
          description: "${{ steps.md2jira.outputs.output-text }}"
          fields: |
            {
              "parent": {
                "key": "${{ steps.issue-parser.outputs.issueparser_parentKey }}"
              }
            }

      - name: Log created issue
        run: echo "Jira Issue ${{ steps.issue-parser.outputs.parentKey }}/${{ steps.create.outputs.issue }} was created"

      - name: Checkout develop code
        uses: actions/checkout@v4
        with:
          ref: dev

      - name: Create branch with Ticket number
        run: |
          BRANCH_NAME="${{ steps.issue-parser.outputs.issueparser_branchPrefix }}/#${{ steps.issue-parser.outputs.issueparser_parentKey }}-${{ steps.issue-parser.outputs.issueparser_branchName }}"
          git checkout -b "$BRANCH_NAME"
          git push origin "$BRANCH_NAME"

      - name: Update issue title
        uses: actions-cool/issues-helper@v3
        with:
          actions: "update-issue"
          token: ${{ secrets.GITHUB_TOKEN }}
title: "${{ steps.create.outputs.issue }} ${{ github.event.issue.title }}"- .github > ISSUE_TEMPLATE 디렉토리 생성 및 하위에 issue_form.yml 파일 생성
- GitHub에서 이슈를 생성할 때 사용할 이슈 템플릿 파일
name: 'Test 이슈 생성'
description: 'Test Repo에 이슈를 생성하며, 생성된 이슈는 Jira와 연동됩니다.'
labels: [ order ]
title: '이슈 이름을 작성해주세요.'
body:
  - type: input
    id: parentKey
    attributes:
      label: '상위 작업 Ticket Number'
      description: '상위 작업의 Ticket Number를 기입해주세요.'
      placeholder: 'TEST-00'
    validations:
      required: true

  - type: input
    id: branchName
    attributes:
      label: '브랜치 이름 (이슈 요약)'
      description: '영문 소문자로 브랜치 이름을 지어주세요. (ex: [도메인명]-[기능])'
    validations:
      required: true

  - type: input
    id: branchPrefix
    attributes:
      label: '브랜치 전략(GitFlow)'
      description: 'feat/fix/docs/style/refactor/test/chore 중 해당 이슈와 걸맞게 작성해주세요.'
    validations:
      required: true

  - type: textarea
    id: details
    attributes:
      label: '상세 내용(Details)'
      description: '이슈 내용을 자세히 설명해주세요.'
      value: |
        - 상세 내용에 대해 작성해주세요.
    validations:
      required: true

  - type: textarea
    id: tasks
    attributes:
      label: '체크리스트(Tasks)'
      description: '해당 이슈에 대해 필요한 작업 목록을 작성해주세요.'
      value: |
        - [ ] Task1
        - [ ] Task2
    validations:
      required: true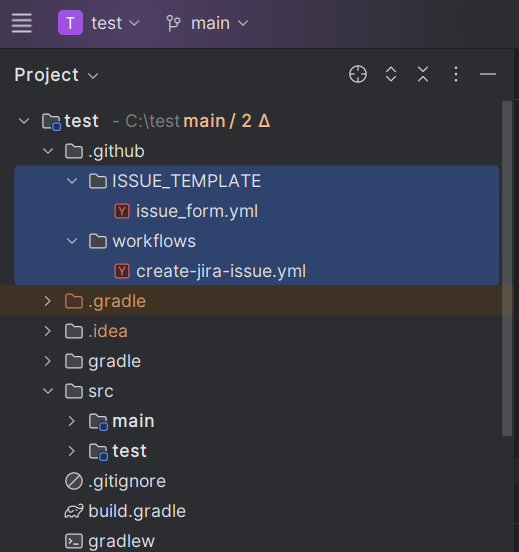
- git add & commit 후 git push
✅ 6. Jira 이슈 생성하기
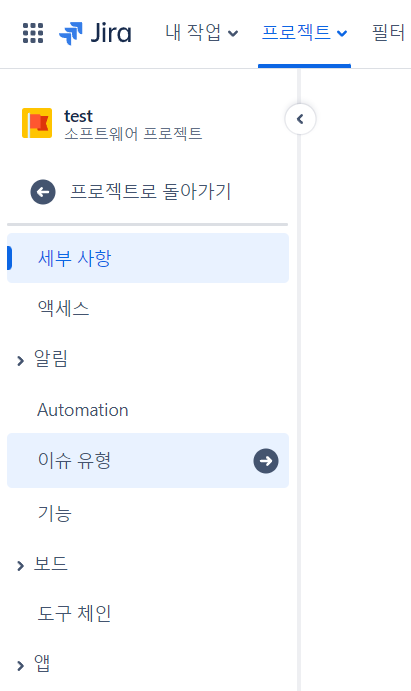
- Jira > 프로젝트 설정 클릭

- 이슈 유형 클릭
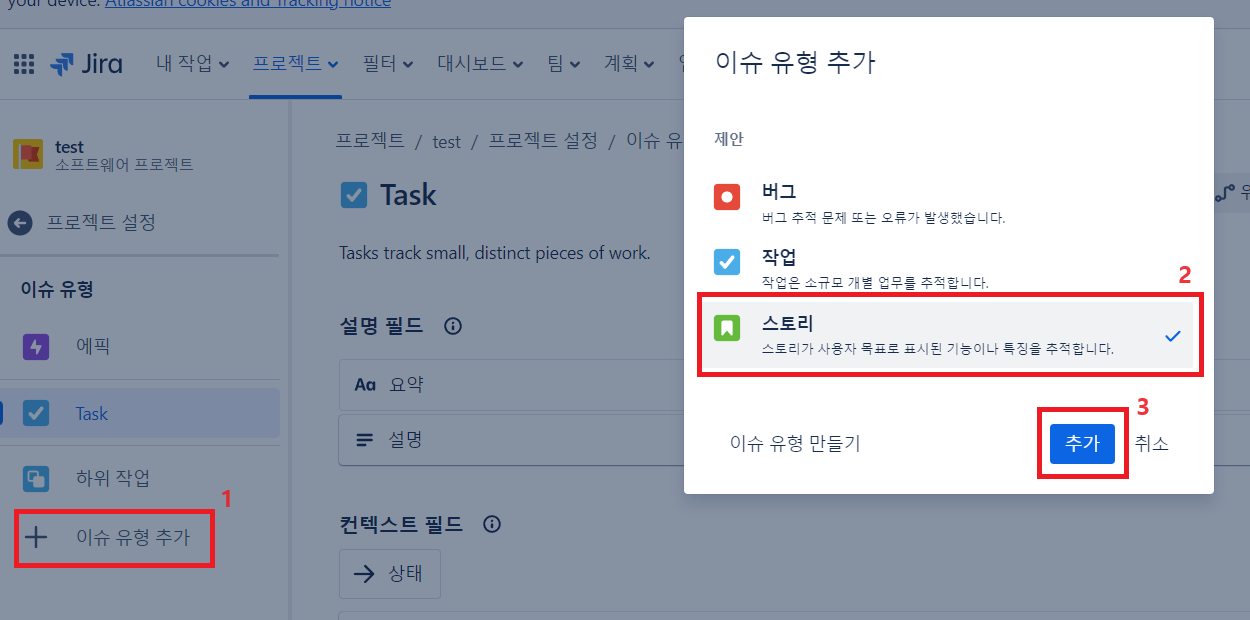
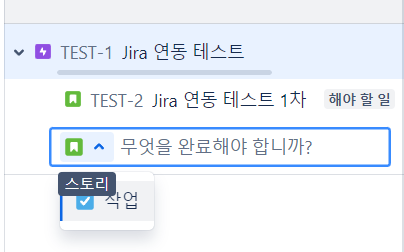
- 이슈 유형 추가 > 스토리 > 추가 차례대로 클릭
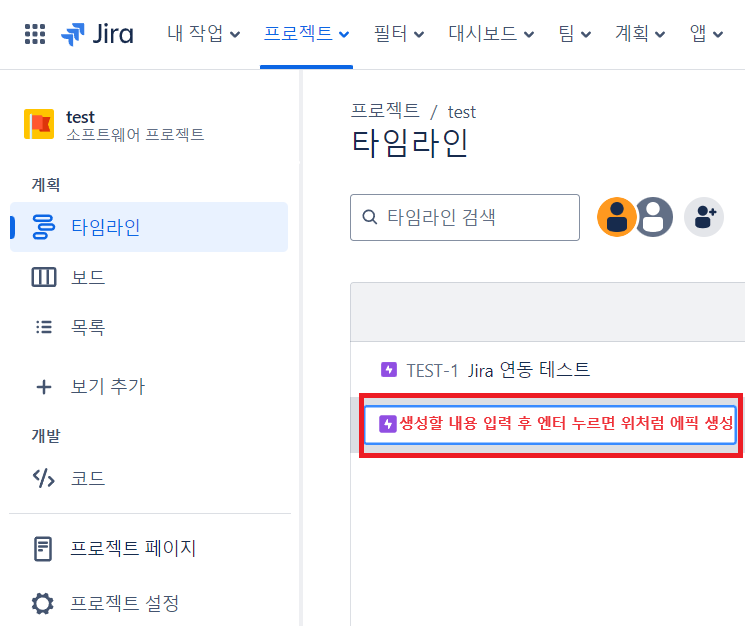
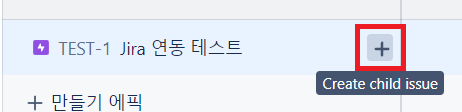
- 프로젝트 타임라인으로 돌아가서 에픽 생성
- 에픽 우측의 + 버튼 클릭 후 스토리 추가
✅ 7. GitHub 이슈 생성하기
- GitHub Repository > Issues > New issue 클릭
-
생성된 이슈 템플릿 Get started 클릭 후 양식에 맞춰 이슈 생성

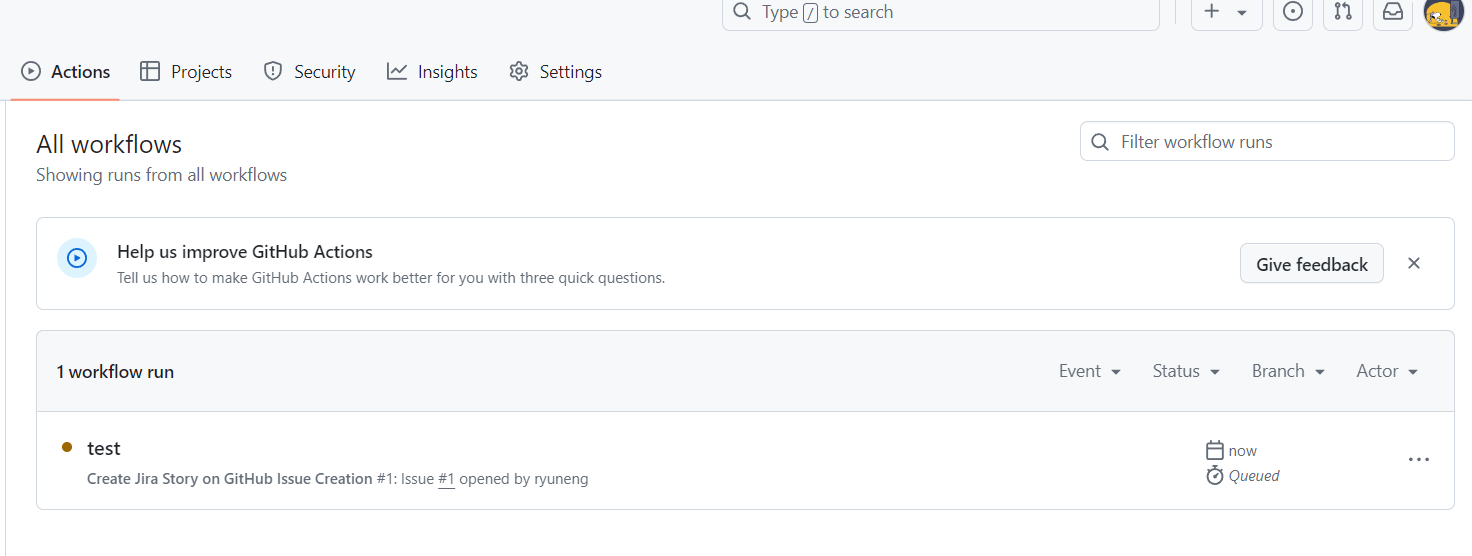
-
Actions 확인
References

학습용 커스터마이징 간단 개발자 사전