비동기 처리
지금까지 프로젝트를 해오면서 어려웠던 것들이 많이 있었지만, 개인적으로 가장 난해했다고 느낀건 axios를 통한 비동기 처리였다. 많은 개념을 너무 급하게 배워서 그런걸 지도 모르겠다.
이번 기회에 제대로 한번 익혀보자~!
비동기 처리와 Promise
비동기 처리
비동기 처리 방식(Aysnchronous Rendering)의 코드는 전체 코드가 순차적으로 실행되는 동기 방식(Synchronous Rendering)과 다르게 다른 코드들과 동기화 되어 있지 않다.
즉 렌더링을 하는 동시에 실행되어 일정 시간이 지난 후 개별적으로 끝난다.

출처 : 벨로퍼트 모던 자바스크립트
그림으로도 이해가 어렵다면, 직접 코드를 보자. 그림의 1~3번을 코드로 표현해 보았다.
// 동기 처리 방식
console.log('Hello!'); // 1

console.log('Bye!'); // 2

console.log('Hello Again!'); // 3

// Console
>> Hello!
>> Bye!
>> Hello Again!
위 코드에 대표적인 비동기 함수 setTimeout(callback, time)을 입혀보자.
지정된 시간이 지나면 콜백 함수를 호출하는 방식이다.
(콜백 함수는 어떤 함수의 인자로 호출되는 함수를 의미한다.)
console.log('Hello!'); // 1

setTimeout(() => console.log('Bye!'), 3000); // 2

console.log('Hello Again!'); // 3

// Console
>> Hello!
>> Hello Again!
// 3초 후
>> Bye!
동기 처리와는 다르게 Bye!가 3초 후에 콘솔 창에 출력이 되는 모습을 확인할 수 있다.
즉 다른 코드들과 동기화 되어 있지 않고 개별적으로 동작한다.
따라서 다른 코드들이 동작하고 있을 때 비동기 처리를 이용하여 함께 실행되게 할 수 있다.
이러한 장점 때문에 비동기 처리를 주요 사용하는 경우가 여러 개 있다.
- Ajax Web API 요청: 서버에서 데이터를 받아야 할 때, 요청을 하고 서버에서 응답을 할 때 까지 기다려야 하기 때문에 비동기 처리를 이용한다.
- 파일 읽기: 주로 서버 쪽에서 파일을 읽어야 하는 상황에는 비동기적으로 처리한다.
- 암호화/복호화: 암호화/복호화를 할 때에도 바로 처리가 되지 않고, 시간이 어느정도 걸리는 경우가 있기 때문에 비동기적으로 처리한다.
- 작업 예약: 단순히 어떤 작업을 몇초 후에 스케쥴링 해야 하는 상황에는, setTimeout 을 사용하여 비동기적으로 처리한다.
그러나 콜백 함수와 비동기 처리만 이용하는 경우 발생하는 문제점이 존재하는데...
비동기 함수를 연쇄적으로 실행하고 추가적으로 출력 값 및 에러 처리를 해야 하는 경우이다.
이해를 돕기 위해 아래 코드를 보자.
// asynchronous function
const increaseAndPrint = (n, callback) => {
  setTimeout(() => {
    const increased = n + 1; // increase n
    console.log(increased); // print
    if (callback) {
      callback(increased); // run callback if condition is true
    }
  }, 1000);
};

increaseAndPrint(0, n => {
  increaseAndPrint(n, n => {
    increaseAndPrint(n, n => {
      increaseAndPrint(n, n => {
        increaseAndPrint(n, n => {
          console.log('끝!');
        });
      });
    });
  });
}); // 1. callback
코드를 보면 알겠지만 비동기 처리를 하는 부분의 가독성이 처참한 수준이다.
이런 코드를 콜백 지옥이라고 부르고, 이러한 문제를 해결하기 위해 ES6에 Promise라는 기능이 도입된다.
이러한 콜백 지옥 코드에 Promise를 이용하고, async/await를 입히며 얼마나 깔끔해지는지에 집중해보자.
Promise
The Promise object represents the eventual completion (or failure) of an asynchronous operation and its resulting value.
MDN
Promise는 말 그대로 약속이다. 기본적으로 미래에 실행될 함수에 대한 내용을 담고 있으며, 3가지 상태가 존재한다.
A Promise is in one of these states:
- Pending: Initial state, neither fulfilled nor rejected.
- Fulfilled: Meaning that the operation was completed successfully.
- Rejected: Meaning that the operation failed.
MDN
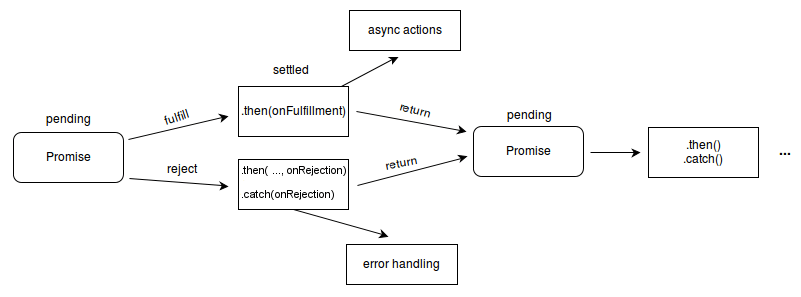
먼저 새로운 Promise가 선언되면 pending(대기) 상태가 되며, 값을 가진 fulfilled(이행) 상태가 되거나 에러를 가진 rejected(실패) 상태가 될 수 있다.
콜백 함수의 인자로 resolve와 reject를 받으며, 성공시 resolve를, 실패시 reject를 실행한다.
const myPromise = new Promise((resolve, reject) => {
  resolve();
  // or reject();
  });
선언 후 대기 상태가 되고, resolve나 reject를 실행하면 이행 상태나 실패 상태가 된다.
그러나 Promise를 사용하는 목적은 이후에 있다. 연쇄적으로 Promise를 사용해야 하는 경우 어떻게 해야 할까??
The methods promise.then(), promise.catch(), and promise.finally() are used to associate further action with a promise that becomes settled.
바로 then함수와 catch함수를 이용하는 것이다.
then함수는 promise가 fufilled(이행) 상태인 경우 접근 가능하고 resolve된 값을 result로 받아온다.
catch함수는 promise가 rejected(실패) 상태일 때 접근 가능하며 reject에서 발생한 에러를 받아온다.
const myPromise = new Promise((resolve, reject) => {
  resolve();
  // or reject();
  });
...
myPromise
  .then(res => console.log(res)) // 성공시 출력
  .catch(e => console.log(e)); // 실패시 출력
연쇄적으로 사용해야 하는 경우에는
const increase = (number) => {
  const myPromise = new Promise((resolve, reject) => {
   setTimeout(() => {
     const result = number + 10;
     if (result > 50) {
       const e = new Error("NumberBigError");
       return reject(e); // 실패시 reject 함수를 실행, rejected
     }
     resolve(result); // 성공시 resolve 함수를 실행, fufilled
   }, 3000);
  });
  return myPromise; // promise를 리턴
}


increase(0)
  .then(result => increase(result))
  .then(result => increase(result))
  .then(result => increase(result))
  .then(result => increase(result))
  .then(result => increase(result))
  .catch(error => console.log(error)); // 2. promise
위와 같이 작성한다. 콜백 함수만을 이용했을 때와 비교했을 때 가독성을 비교해보자.
async/await
Promise를 더욱 쉽게 사용할 수 있게 해주는 문법으로 ES2017에 도입되었다.
Async functions can contain zero or more await expressions.
Await expressions make promise-returning functions behave as though they're synchronous by suspending execution until the returned promise is fulfilled or rejected.
The resolved value of the promise is treated as the return value of the await expression.
MDN
비동기 처리를 사용할 함수의 앞에 async 접두어를 붙이고, HTTP와 통신하여 비동기 처리를 하는 함수 앞에 await을 붙인다. await이 붙은 함수는 반드시 Promise 객체를 리턴해야 된다.
위 코드에서 increase(0).then()... 부분을 async/await을 이용해 다시 쓰면
async function runTasks() {
  try {
    let result = await increase(0);
    result = await increase(result); // 10
    result = await increase(result); // 20
    result = await increase(result); // 30
    result = await increase(result); // 40
    result = await increase(result); // 50
  }
  catch (e) {
    console.log(e);
  }
} // 3. promise + async/await
더욱 편하게 다룰 수 있다. 에러처리는 catch()대신 try...catch... 구문을 이용한다.
References
MDN Promise 문서 : https://developer.mozilla.org/en-US/docs/Web/JavaScript/Reference/Global_Objects/Promise
https://developer.mozilla.org/en-US/docs/Web/JavaScript/Reference/Statements/async_function
벨로퍼트 Promise 강의 : https://learnjs.vlpt.us/async/01-promise.html
캡틴판교 Promise 강의 : https://joshua1988.github.io/web-development/javascript/promise-for-beginners/

유익해요~