개요
iOS 와의 협업을 위해 Spring Boot 3.x 에서 Spring Security REST API로 로그인 기능을 만들어보았다.
공부 중이므로 틀린 내용, 의견, 질문 있으시면 댓글 남겨주시면 감사하겠습니다

1. 코드 따라가보기
attemptLogin 메서드에서 사용자의 인증을 시도할 때, 주로 사용자가 제공한 이메일과 비밀번호를 기반으로 인증을 시도합니다. 여기서는 Spring Security의 AuthenticationManager와 UserDetailsService가 주요 역할을 합니다.
AuthenticationManager:
AuthenticationManager는 Spring Security에서 제공하는 인터페이스로, 실제로 인증을 수행합니다.
AuthenticationManager는 여러 AuthenticationProvider를 가질 수 있으며, 각 AuthenticationProvider는 특정 유형의 인증을 처리합니다.
UsernamePasswordAuthenticationToken:
사용자의 이메일과 비밀번호를 담은 UsernamePasswordAuthenticationToken을 생성하여 AuthenticationManager에 전달합니다.
UsernamePasswordAuthenticationToken은 Authentication의 구현체로, 사용자가 제공한 인증 정보를 담고 있습니다.
UserDetailsService:
AuthenticationManager는 내부적으로 UserDetailsService를 사용하여 사용자 정보를 가져옵니다.
UserDetailsService는 사용자 정보를 데이터베이스 또는 다른 소스에서 가져오는 역할을 합니다.
UserPrincipal:
UserDetailsService가 반환한 사용자 정보는 UserPrincipal 객체로 변환됩니다. UserPrincipal은 Spring Security의 UserDetails 인터페이스를 구현한 사용자 정보 객체입니다.
PasswordEncoder:
AuthenticationManager가 비밀번호를 확인할 때는 PasswordEncoder를 사용합니다.
주로 사용자 정보를 저장할 때 비밀번호를 암호화하여 저장하고, 로그인 시에는 사용자가 제공한 비밀번호를 암호화하여 저장된 비밀번호와 비교합니다.
성공 여부:
AuthenticationManager는 인증이 성공하면 Authentication 객체를 반환합니다. 실패하면 예외가 발생합니다.
AuthService에서는 성공한 경우 SecurityContextHolder에 인증 정보를 설정하고, 이를 기반으로 JWT 토큰을 발급합니다.
따라서, 사용자의 인증은 제공된 이메일과 비밀번호를 기반으로 AuthenticationManager가 처리하며, 성공 여부는 반환된 Authentication 객체의 존재로 판단합니다.
1. 로그인 과정 정리
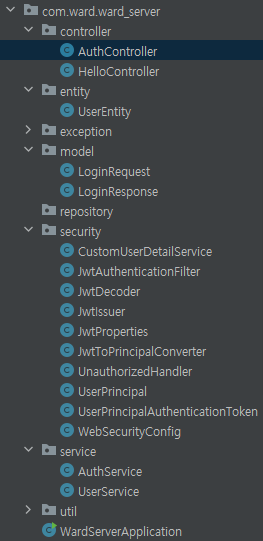
1.1. 관련 클래스
- AuthController.java
- AuthService.java
- WebSecurityConfig.java
- CustomUserDetailService.java
- UserPrincipal.java
- UserService.java
- UserEntity.java
1.2. 로그인 과정 상세 설명
1. 클라이언트가 서버로 Post, "/auth/login" 요청
- 사용자가 입력한 email,password(request) 담아서 서버에 요청
2. AuthController클래스의 login(request) 메서드
@RestController
@RequiredArgsConstructor
public class AuthController {
    private final AuthService authService;

    @PostMapping("/auth/login")
    public LoginResponse login(@RequestBody @Validated LoginRequest request){
        return authService.attemptLogin(request.getEmail(), request.getPassword());
    }
}- request에 담긴 email,password로 authService.attemptLogin() 메서드를 통해 accessToken(JWT토큰)을 갖고있는 LoginResponse를 반환한다.
3. AuthService 클래스의 public LoginResponse attemptLogin(String email, String password):
@Service
@RequiredArgsConstructor
public class AuthService {
    private final JwtIssuer jwtIssuer;
    private final AuthenticationManager authenticationManager;

    public LoginResponse attemptLogin(String email, String password) {
        var authentication = authenticationManager.authenticate( // 사용자의 인증을 시도하고, 인증이 성공하면 Authentication 객체를 반환, 이 객체에는 사용자 정보와 권한이 포함
                new UsernamePasswordAuthenticationToken(email, password)
        );
        SecurityContextHolder.getContext().setAuthentication(authentication); // 현재 사용자의 인증 정보를 설정
        var principal = (UserPrincipal) authentication.getPrincipal(); // 현재 사용자의 UserPrincipal을 가져옵니다

        var roles = principal.getAuthorities().stream()
                .map(GrantedAuthority::getAuthority)
                .toList();

        var token = jwtIssuer.issue(principal.getUserId(), principal.getEmail(), roles);
        return LoginResponse.builder()
                .accessToken(token)
                .build();
    }
}- attemptLogin() 메서드에서는 AuthenticationManager를 통해 사용자에게 입력받은 email과 password로 Authentication객체를 만든다.
- AuthenticationManager 내부에서는 UserDetailService(CustomUserDetailService) 에서 이메일을 갖고 불러온 DB의 정보를 비교하여 로그인 인증을 시도하고, 성공하면 Authentication 객체를 반환한다.
- SecurityContextHolder를 통해 SecurityContext에 Authentication을 저장하고, 이를 통해 현재 사용자의 인증 상태를 유지합니다.
- 이를 통해 JWT 토큰을 발급한다.
- LoginResponse에 담아서 return 한다.
4. AuthenticationMaganer 설명
- 사용자가 로그인 시 아이디와 비밀번호로 UsernamePasswordAuthenticationToken을 생성하여 AuthenticationManager에 제출합니다.
- AuthenticationManager는 UserDetailsService를 사용하여 사용자의 정보를 로드하고, 비밀번호를 확인하여 사용자를 인증합니다.
- 이때 입력받은 비밀번호는 passwordEncoder() 거쳐서 비교
- 인증이 성공하면, Authentication 객체에는 해당 사용자의 정보와 권한이 포함됩니다.
5. CustomUserDetailService 설명
UserEntity를 UserService의 findByEmail로 가져와서 loadUserByUserName으로 UserPrincipal로 만들어주고 반환
UserService 설명
참고