
[개념] 리덕스(Redux)란?
“app-level state” management
- 여러 컴포넌트가 공유하는 상태를 관리하기 위한 라이브러리로, 메타(페이스북)가 설계한 flux 규격에 맞추어져 있다.
- 리액트와 사용하기 위해서는 RTK(React Tool Kit)을 함께 설치해야 한다.
- 리액트 컨텍스트에 기반을 둔 라이브러리로 Provider 컴포넌트가 항상 취상위로 동작해야 한다.
(react-redux는 Provider컴포넌트를 제공한다)☝️ Flutter를 먼저 하면서 Provider, Bloc등을 사용해봤다면 이해가 빠르다
[준비과정] 프로젝트 폴더 생성, 라이브러리 세팅
- 타입스크립트 적용
- 마테리얼 아이콘 설치
- tailwind css, daisyui 설치
- redux 설치
$ npx create-react-app redux_study --template typescript
$ code .

$ npm i @fontsource/material-icons
$ npm i -D postcss autoprefixer tailwindcss @tailwindcss/line-clamp daisyui
$ npm i redux @reduxjs/toolkit react-redux- app.tsx, app.css 등 기본 세팅 초기화
- index.css에 tainwind css 적용
/* ./src/index.css */
@tailwind base;
@tailwind components;
@tailwind utilities;

.material-icons {
  font-family: 'Material Icons';
  display: inline-block;
}
// ./package.json { "name": "redux_study", "version": "0.1.0", "private": true, "dependencies": { ... "react-redux": "^8.0.5", "react-scripts": "5.0.1", "redux": "^4.2.1", "typescript": "^4.9.5", "web-vitals": "^2.1.4" }, "scripts": { ... }, "eslintConfig": { ... }, "browserslist": { ... }, "devDependencies": { "@tailwindcss/line-clamp": "^0.4.4", "autoprefixer": "^10.4.14", "daisyui": "^2.51.5", "postcss": "^8.4.21", "tailwindcss": "^3.3.1" } }
[준비과정] 구성요소 준비하기
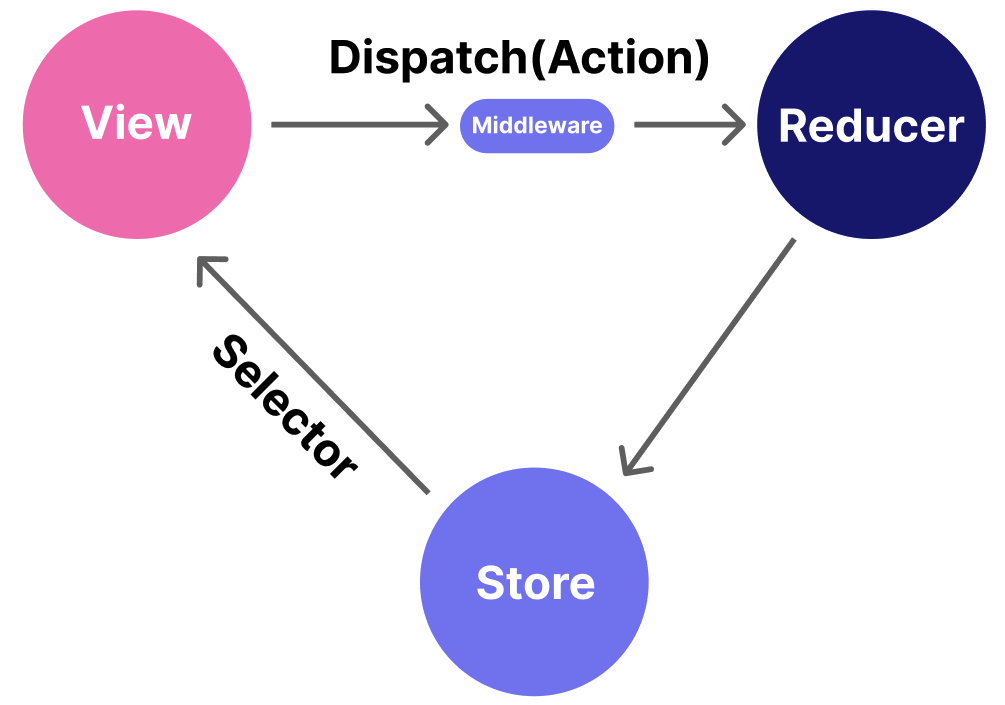
- Provider 컴포넌트를 적용한다. Provider는 필수적으로 store를 지정해줘야 한다.
store란 이름 그대로 상태 정보를 객체로 정리해서 관리한다. ConfigureStoreOptions 타입(인터페이스)이며, 파라미터로 reducer, middleware, devTools, reloadedState, enhancers 를 갖는다. 이중 리듀서 외에는 모두 옵셔널하다. 아래에서 더 디테일하게 다룰거지만 우선 redux toolkit에서 제공하는configureStore메서드를 사용하면 된다.const store = configureStore({ reducer: myReducerus });
이 다음에 리덕스의 구성요소를 하나하나 뜯어보며 새로 선언해서 구성해보자// ./src/App.tsx import {Provider as MyProvider} from 'react-redux'; // 구분하기 쉽도록 MyProvider라고 지정해두자 export default function App() { {/* myReducer는 아직 없다. 새로 선언해야 한다 */} const store = configureStore({ reducer: myReducer }); {/* 이 store는 임시, 따로 분리해서 새로 선언할 것이다 */} return ( <MyProvider store={store}> <main> {/* 여기에 컴포넌트 추가^^ */} </main> </MyProvider> ); } - store를 분리해서 따로 구현하기 전에 먼저 Reducer, type state, Action 을 만든다
1. Redux Store가 저장할 상태 정보(State), Redux Store는 내 상태 정보를 저장한다.
2. 그리고 새 상태를 반환하는 함수인 리듀서(Reducer)를 사용한다. 즉, 전역적으로 상태를 관리할 데이터 컨테이너인 store를 만들 것이며, 여기서 관리할 상태 데이터 타입을 선언하고, 상태 데이터를 새로 바꾸기 위한 리듀서를 만들어야 한다. 리듀서는 현재 state와 Action을 변수로 받아서 새로운 state를 반환한다.-
./src/store/MyState.ts
export type MyState = { today: Date; }; -
./src/store/myActions.ts
import type { Action } from "redux"; export type SetTodayAction = Action<"setToday"> & { today: Date; }; export type MyActions = SetTodayAction; -
./src/store/rootReducer.ts
import type { AppState } from "./AppState"; import type { MyActions } from "./myActions"; const initialAppState = { today: new Date(), }; export const rootReducer = ( state: AppState = initialAppState, action: MyActions ) => { switch (action.type) { // Action에 적어둔 문자열로 구분 case "setToday": { return { ...state, today: action.today }; } } return state; }; -
이제 store를 파일을 나누어서 따로 선언한다. 보통 useMemo hook을 사용한다.
// ./src/store.useStore.ts import { configureStore } from "@reduxjs/toolkit"; import { rootReducer } from "./rootReducer"; import { useMemo } from "react"; const initializeStore = () => { const store = configureStore({ reducer: rootReducer }); return store; }; export function useStore() { const store = useMemo(() => initializeStore(), []); return store; }in -
이렇게 하면 App.tsx의 프로바이더 컴포넌트에는 useStore()만 할당해주면 된다.
// ./src/App.tsx

import {Provider as MyProvider} from 'react-redux';
import { useStore } from "./store";

export default function App() {
	const store = useStore();
  return (
    <MyProvider store={store}>
      <main>
		{/* 여기에 컴포넌트 추가^^ */}
      </main>
    </MyProvider>
  );
}
-
[개념1] useSelector - 데이터 읽기
-
store에 저장된 내용을 read하기 위해서는 useSelector훅을 사용한다.
useSelector훅은 리덕스에서 자체 제공한다.const today = useSelector<MyState, Date>(state => state.today);
(현재 시간을 반환하는 useSelector hook) -
시간을 표시하기 위한 컴포넌트를 짜서 App.tsx에 적용해보자
import { useSelector } from "react-redux";
import { AppState } from "../store";
import { Div, Subtitle, Title } from "../components";

export default function ReduxClock() {
  const today = useSelector<AppState, Date>((state) => state.today);

  return (
    <Div className="flex flex-col item-center justify-center mt-16">
      <Title className="text-5xl">Redux Clock</Title>
      <Title className="mt-4 text-3xl">{today.toLocaleTimeString()}</Title>
      <Subtitle className="mt-4 text-2xl">
        {today.toLocaleDateString()}
      </Subtitle>
    </Div>
  );
}
[개념 2] dispatch - 데이터 수정
-
redux의 기본 제공 hook으로, useSelector가 state값을 read하기 위해서 사용되었다면,
이 hook은 state값을 변경하기 위해서 사용된다. -
useDispatch hook이 state를 변경할 때에는 Action이 사용된다.
Action을 리덕스 store에 전달 할 때는 reducer를 통해서 가게 되는데,
위로 가서 reducer 선언문에 보면 switch 문으로 각 action이 전달되었을 때 동작을 정의해놓았다. -
redux에서 제공해주는 useDispatch hook을 호출하면 바로 dispatch()가 사용이 가능하다.
const dispatch = useDispatch();
dispatch({ type: "$myActionType", myState: $newState });```
[적용] 컴포넌트 내에서 Redux 데이터 읽기/쓰기
  const dispatch = useDispatch();
  const user = useSelector<UserState, UserData>(({ remoteUser }) => remoteUser);

  const changeData = useCallback(() => {
    toggleLoading();
    () => dispatch(UserActions.changeData({...user, data:newData}))
    .catch(setError)
    .finally(toggleLoading);
  }, [dispatch, toggleLoading]);
    ```
Ai agent 설계를 잘 하고싶은 개발자