Search 기능
과제할 때 구글링해서 구현한 검색 기능과
수업시간에 배운 검색 기능을 따로 정리했다
과
코드
-
navigationItem에 searchController를 추가한다
override func viewDidLoad() {
    setupSearchController()
}

func setupSearchController() {
        let searchController = UISearchController(searchResultsController: nil)
        self.navigationItem.searchController = searchController

        // text가 업데이트될 때마다 불리는 메소드
        searchController.searchResultsUpdater = self
}
-
searchBar가 활성화되어 있고, searchBar에 텍스트가 쓰여있으면
기존 배열이 아닌 검색 필터가 된 배열이 테이블뷰에 나타나야 한다.
이를 판단하는 함수를 구현한다var isFiltering: Bool { let searchController = self.navigationItem.searchController let isActive = searchController?.isActive ?? false let isSearchBarHasText = searchController?.searchBar.text?.isEmpty == false return isActive && isSearchBarHasText }
2 - 1. isFiltering의 결과에 따라 다른 배열을 테이블뷰에 적용한다
- arr : 전체 배열
- filteredArr : 필터링이 된 배열
extension SearchViewController: UITableViewDelegate, UITableViewDataSource, UISearchResultsUpdating {
    func tableView(_ tableView: UITableView, cellForRowAt indexPath: IndexPath) -> UITableViewCell {
        let cell = UITableViewCell()

        if self.isFiltering {
            cell.textLabel?.text = self.filteredArr[indexPath.row]
        }
        else {
            cell.textLabel?.text = self.arr[indexPath.row]
        }

        return cell
    }

    func tableView(_ tableView: UITableView, numberOfRowsInSection section: Int) -> Int {
        if self.isFiltering {
            return self.filteredArr.count
        }
        else {
            return self.arr.count
        }
    }
}-
searchBar에 입력된 텍스트를 기반으로 검색 필터가 된 배열을 정리한다
extension SearchViewController: UITableViewDelegate, UITableViewDataSource, UISearchResultsUpdating {

    func updateSearchResults(for searchController: UISearchController) {

        // 영어 검색할 수도 있으니까 lowercased
        guard let text = searchController.searchBar.text?.lowercased() else {return}
        self.filteredArr = self.arr.filter { $0.lowercased().contains(text) }

        self.movieTableView.reloadData()
    }
}
화면
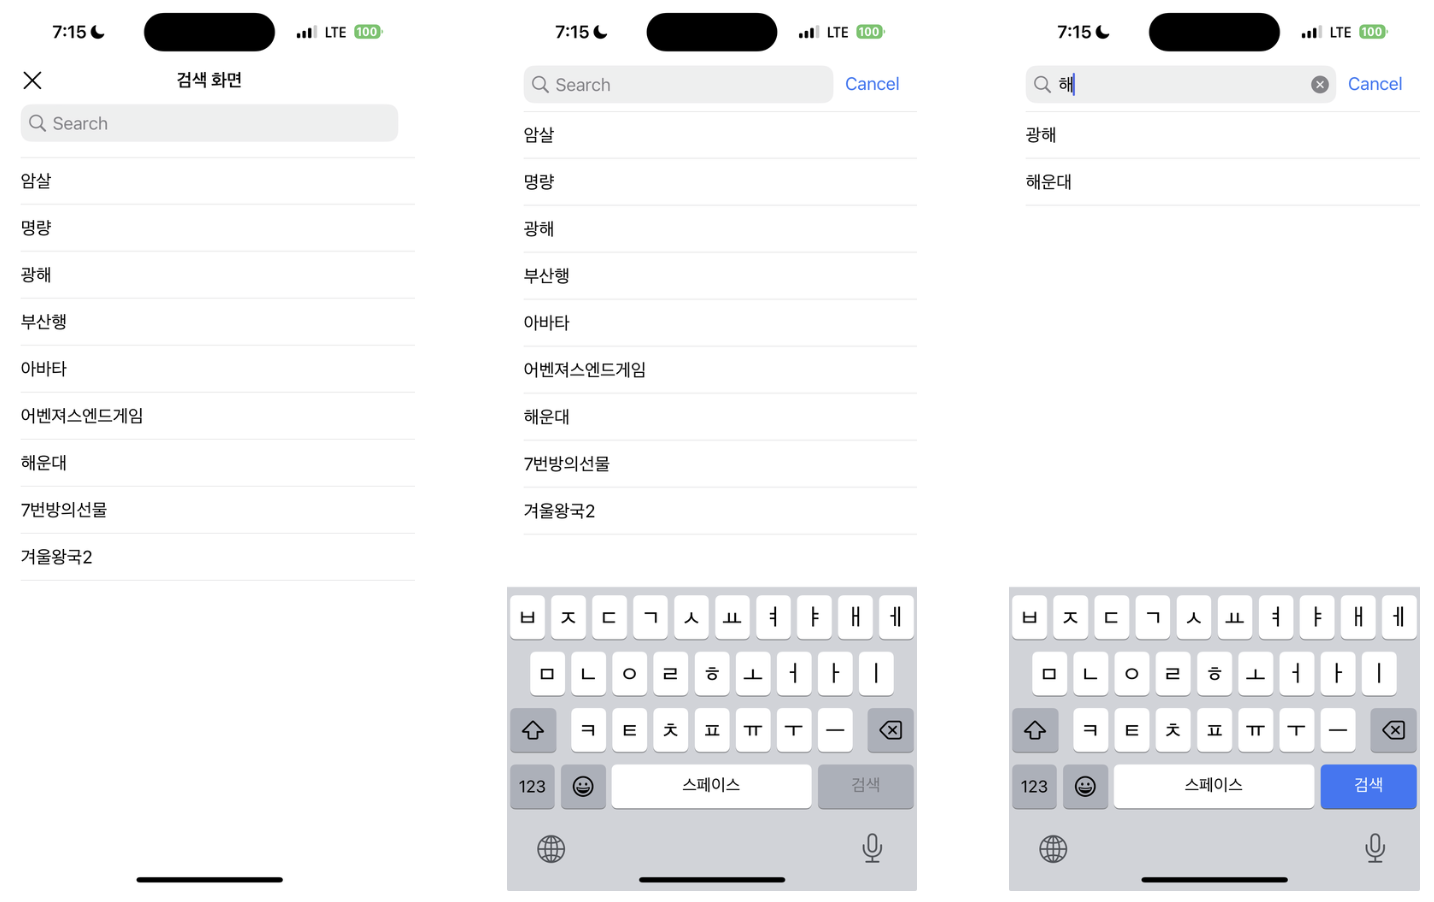
- searchBar를 누르면 위로 올라가면서 cancel 버튼이 생긴다
- 왼쪽에 돋보기랑 오른쪽에 cancel 버튼은 디폴트로 생기나보다
- 글씨 쓰면 x 버튼도 생긴다
- 네비게이션 바에 이미 객체가 있어서 그런가 searchBar가 네비게이션 바의 아래에 위치한다
- 라고 생각했는데 위에 다 없애도 밑에 있다
- 라고 생각했는데 위에 다 없애도 밑에 있다
수
- 차이점
- UICollectionViewController 에서 구현했다
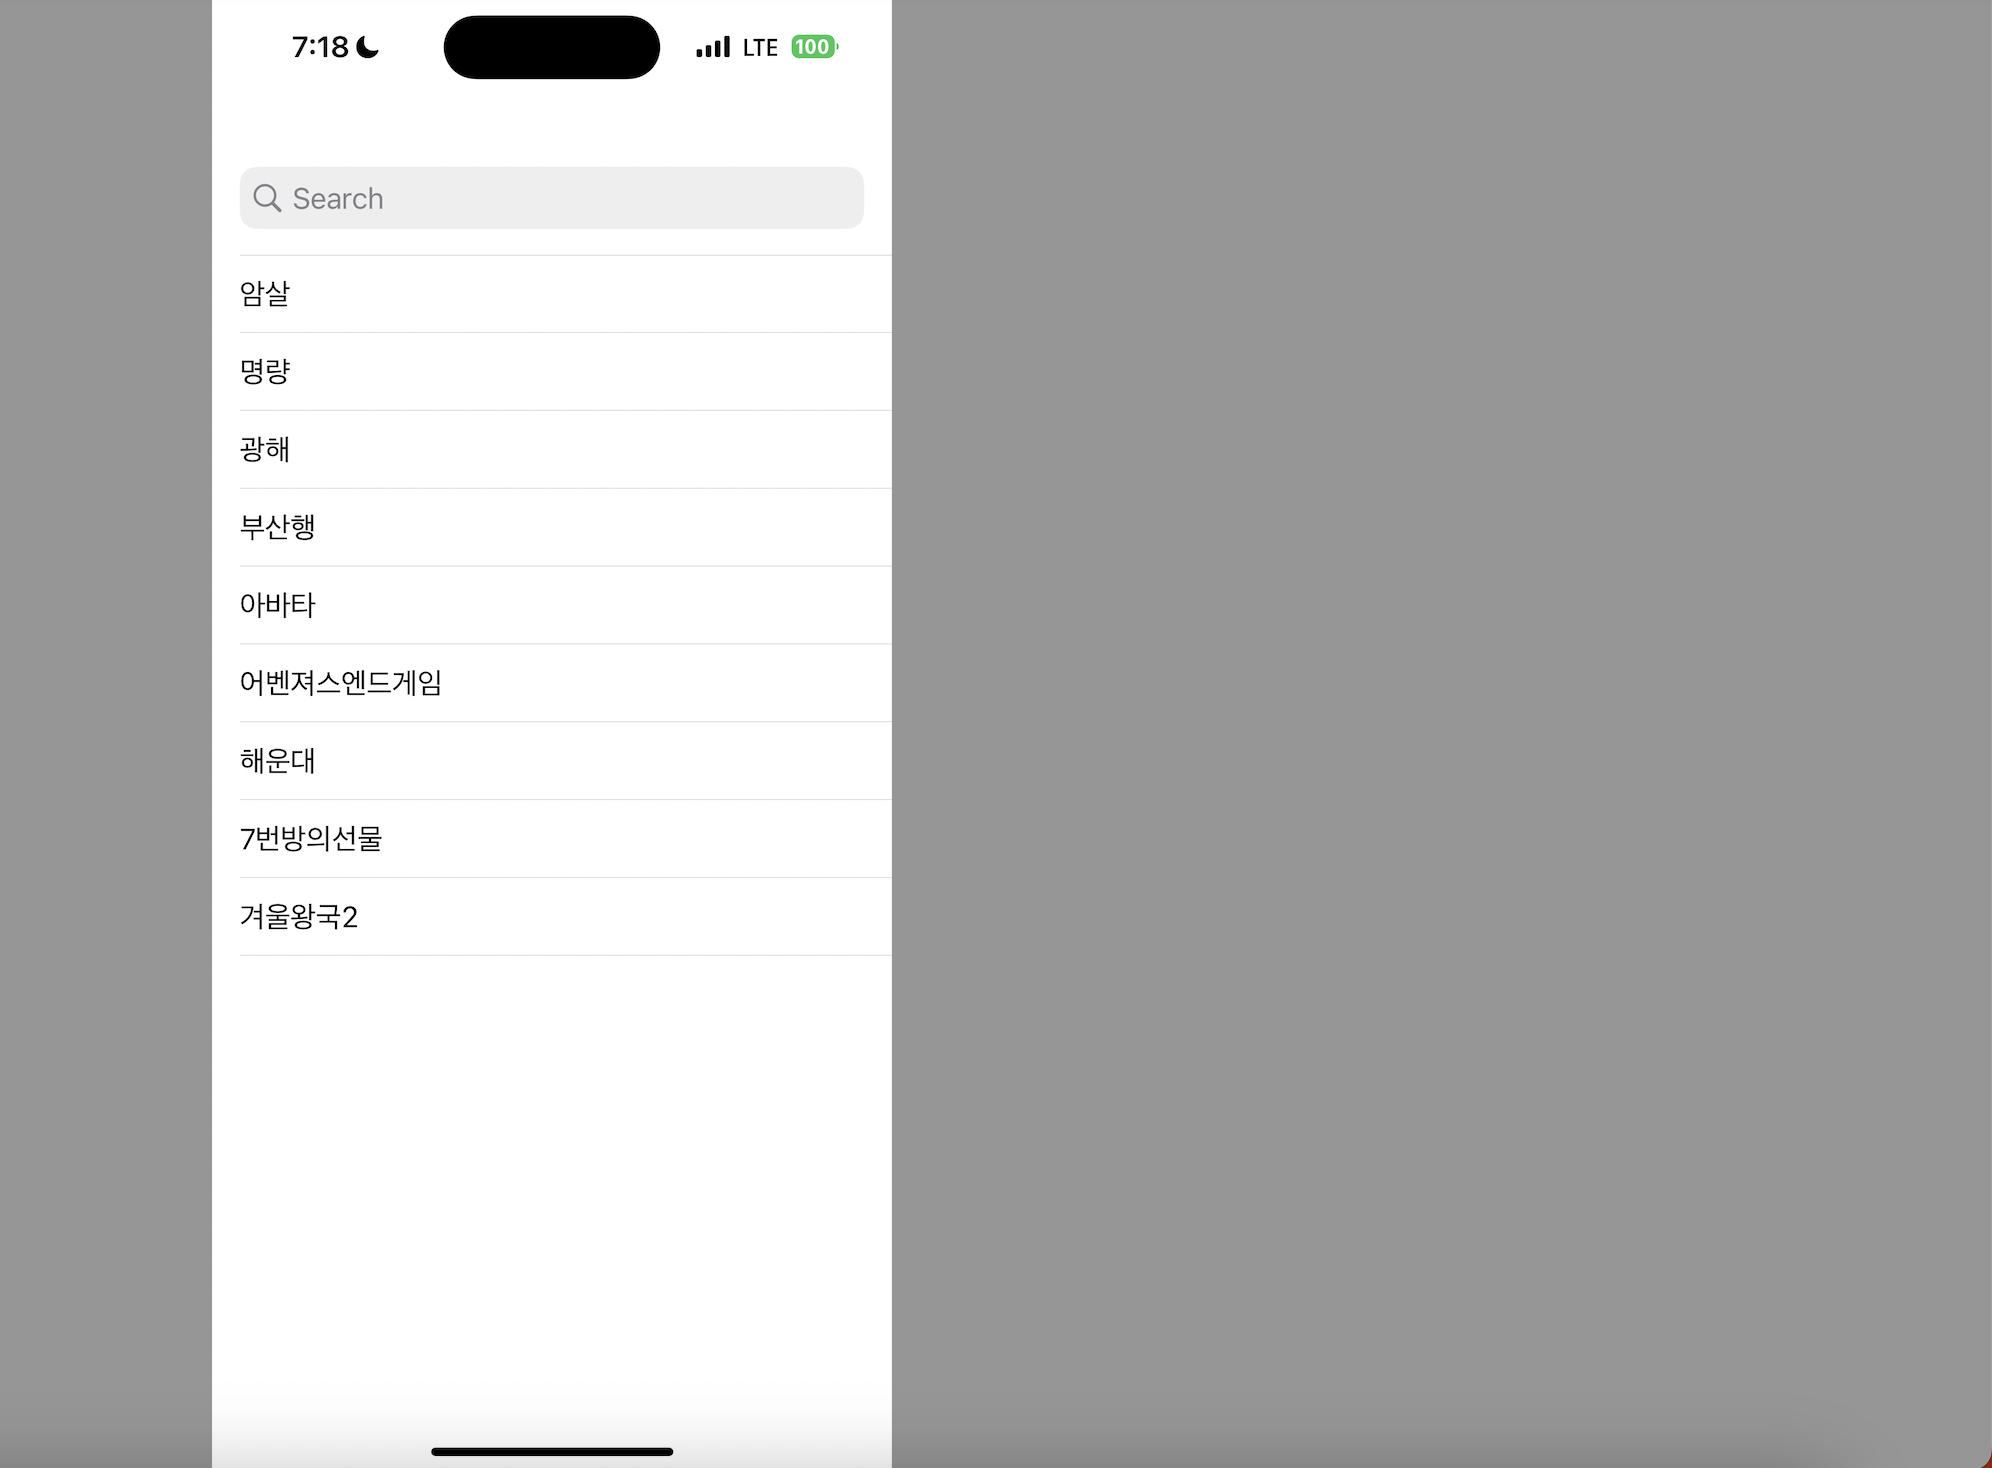
- 테이블 뷰에 무조건 searchList만 나타나게 했다.
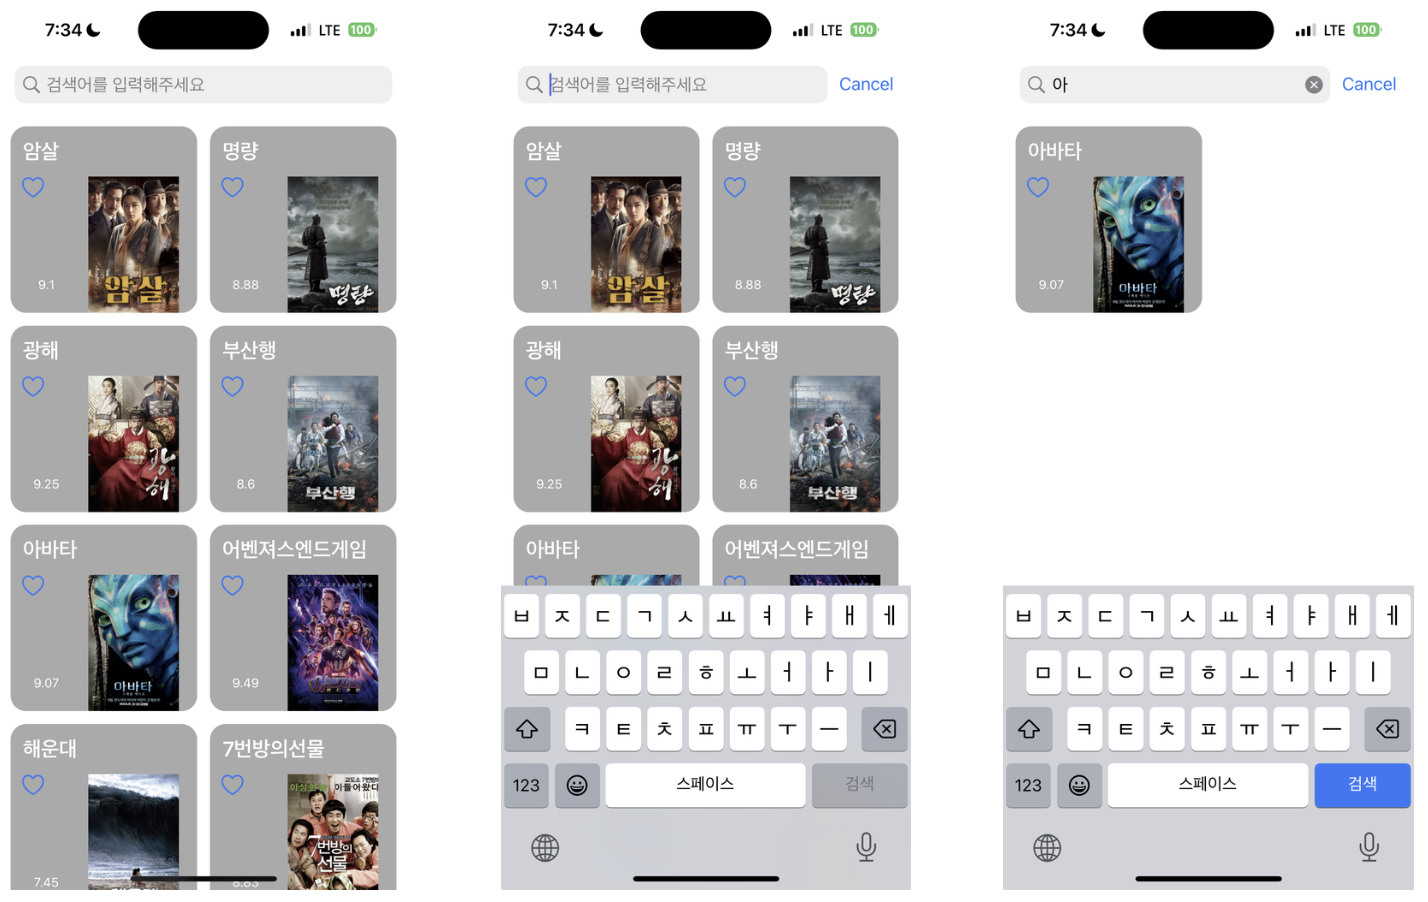
즉, 아무 입력이 없을 때는 searchList에 list를 그대로 넣어준다 UISearchBar()를 이용해서 searchBar를 생성한다 -> Delegate 채택(?)- filter 함수를 사용하지 않고, 배열을 일일히 조사해서 searchList를 업데이트한다
- cancel 버튼의 유무를 직접 설정한다
코드
class LibraryCollectionViewController: UICollectionViewController {

    let searchBar = UISearchBar()

    override func viewDidLoad() {
        super.viewDidLoad()

        // 초기 화면에 모든 영화가 다 나오게 하기
        searchList = list.movie

        configureSearchBar()
        collectionViewLayout()
    }


    func searchQuery(text: String) {

        searchList.removeAll()
        for item in list.movie {
            if item.title.contains(text) {
                searchList.append(item)
            }
        }

        // 아무것도 입력하지 않았을 때는 모든 영화가 나오게 함
        if text.count == 0 {
            searchList = list.movie
        }

        collectionView.reloadData()
    }


    func configureSearchBar() {
        searchBar.delegate = self
        searchBar.placeholder = "검색어를 입력해주세요"
        navigationItem.titleView = searchBar
    }
}


extension LibraryCollectionViewController: UISearchBarDelegate {

    func searchBarSearchButtonClicked(_ searchBar: UISearchBar) {
        guard let text = searchBar.text else { return }
        searchQuery(text: text)
    }

    func searchBar(_ searchBar: UISearchBar, textDidChange searchText: String) {
        guard let text = searchBar.text else { return }
        searchQuery(text: text)
    }

    func searchBarCancelButtonClicked(_ searchBar: UISearchBar) {

        searchBar.text = ""
        // 캔슬 버튼을 눌렀을 때도 역시 모든 영화가 나오게 한다
        searchList = list.movie
        collectionView.reloadData()
    }

    func searchBarTextDidBeginEditing(_ searchBar: UISearchBar) {
        searchBar.showsCancelButton = true
    }

    func searchBarTextDidEndEditing(_ searchBar: UISearchBar) {
        searchBar.showsCancelButton = false
    }
}
화면
기기 화면 크기
지난주
- 스토리보드 상에서 객체의 크기(width, height)를 기기 화면의 비율로 잡는다
- 객체를 땡겨서 화면 view에 얹고, equal width/height 후 multiplier로 비율을 설정한다
이번주
-
코드 상에서 바로 화면의 크기를 받아올 수 있다
print(UIScreen.main.bounds.width) print(UIScreen.main.bounds.size) print(UIScreen.main.bounds.height) // 출력 (iPhone 14 Pro) // 393.0 // (393.0, 852.0) // 852.0 -
Collection View의 셀 크기를 지정할 때 유용하게 사용했다
func configureCollectionViewLayout() {
        let layout = UICollectionViewFlowLayout()
        let spacing: CGFloat = 15
        let width = UIScreen.main.bounds.width - (spacing * 4)

        layout.scrollDirection = .vertical
        layout.itemSize = CGSize(width: width/3, height: width/3 + 20)
        layout.sectionInset = UIEdgeInsets(top: 0, left: spacing, bottom: 0, right: spacing)

        layout.minimumLineSpacing = spacing
        layout.minimumInteritemSpacing = spacing
        maincollectionView.collectionViewLayout = layout
}
셀 배경 파티
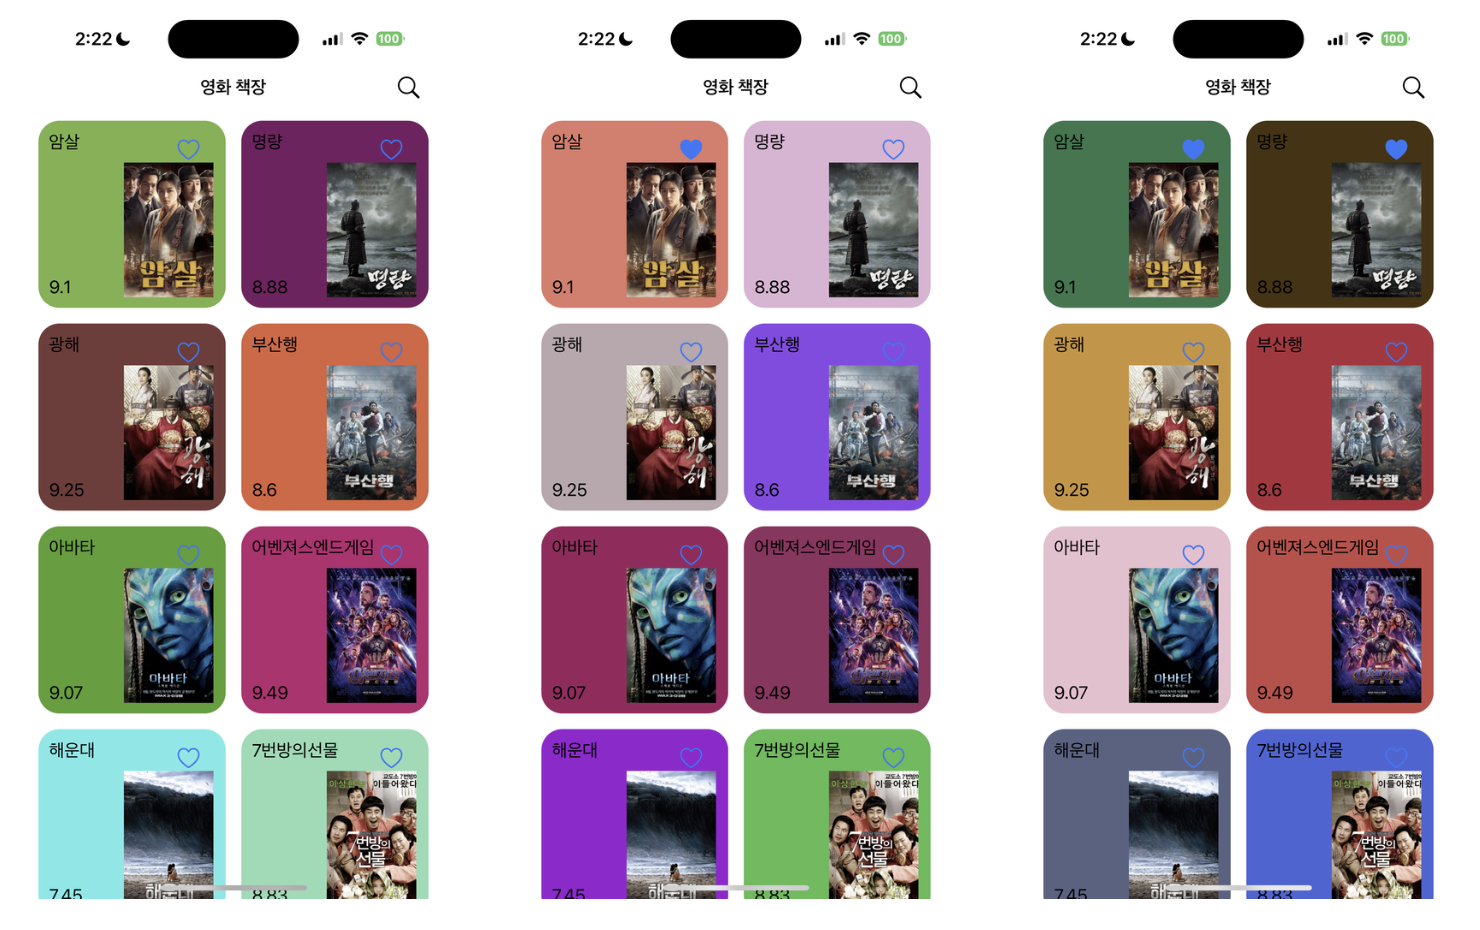
- collectionView의 각 셀의 배경색이 랜덤으로 설정되는 화면을 구현했다
문제점
- 앱을 처음 실행할 때만 색이 랜덤으로 지정되어야 한다.
- 근데 각 셀에 붙어있는 좋아요를 누를 때마다
모든 셀의 배경색이 바뀌면서 파티가 시작된다
이유
-
셀을 디자인하는 코드에서 배경 색을 랜덤으로 지정해주고 있었다.
-
좋아요 버튼을 누르면 reloadData()가 실행되기 때문에
collectionView의 모든 함수가 재실행되고
cellForItemAt도 재실행되고
그 안에 있던 designCell도 재실행되고
고 안에 있는 코드가 실행되면서 색을 다시 지정한다// MovieCollectionViewCell.swift class MovieCollectionViewCell: UICollectionViewCell { @IBOutlet var backView: UIView! func designCell(_ title: String, _ rate: String, _ like: Bool) { // 배경 색 랜덤 // drand48() : [0.0, 1.0) 사이의 값을 반환 let rRed = CGFloat(drand48()) let rGreen = CGFloat(drand48()) let rBlue = CGFloat(drand48()) let setColor = UIColor(red: rRed, green: rGreen, blue: rBlue, alpha: 1.0) backView.backgroundColor = setColor } }
해결 방법
-
셀의 정보를 저장하는 영화 struct에 배경 색을 추가한다
-
다른 요소와 마찬가지로 배경 색은 영화 struct의 인스턴스를 초기화할 때 지정한다
-
이 때, 랜덤으로 색을 반환하는 함수를 구조체의 타입 메서드로 선언한다
//  MoviInfo.swift
struct Movie {
    let title: String
    let releaseDate: String
    let runtime: Int
    let overview: String
    let rate: Double
    var like: Bool
    var backColor: UIColor
}

struct MovieInfo {

    static func randomColor() -> UIColor {
        let rRed = CGFloat(drand48())
        let rGreen = CGFloat(drand48())
        let rBlue = CGFloat(drand48())
        let setColor = UIColor(red: rRed, green: rGreen, blue: rBlue, alpha: 1.0)

        return setColor
    }

        var movie: [Movie] = [
        Movie(title: "오예", releaseDate: "20", runtime: 1, overview: "다!", rate: 9.10, like: false, backColor : MovieInfo.randomColor(),
}
셀 위에 버튼 작동
지난주
- button의 tag에 indexPath.row를 넣어주어 버튼을 구분하였다
- 근데 여러 section을 가지는 뷰에서는 tag가 중복되기 때문에 적절한 방법이 아니었다.
- 물론, 섹션 별로 tag를 구분할 수 있긴 하다
- section 0 : 1, 2, 3, 4, ...
- section 1 : 100001, 100002, 100003, 100004, ...
- section 2 : 1000000001, 1000000002, 1000000003, ...
- 약간 찝찝한 방법..
이번주
- 클로저를 이용한 콜백 함수를 선언한다
- 아직 모든 코드를 완벽하게 이해하진 못했따
-
Cell 파일 내에 클로저를 저장할 수 있는 옵셔널 저장 프로퍼티를 추가한다
//  TodoTableViewCell.swift

var specialCallBackMethod: (() -> Void)?
var doneCallBackMethod: (() -> Void)?
-
Cell 파일 내에 해당 버튼에 대한 @IBAction 함수를 생성하고,
버튼이 눌렸을 때 1에서 만든 클로저가 실행되도록 한다// TodoTableViewCell.swift @IBAction func specialButtonTapped(_ sender: UIButton) { specialCallBackMethod?() } @IBAction func doneButtonTapped(_ sender: UIButton) { doneCallBackMethod?() }
-
Controller 파일 내에서 셀의 클로저를 만들어준다(?)
//  TodoTableViewController.swift
override func tableView(_ tableView: UITableView, cellForRowAt indexPath: IndexPath) -> UITableViewCell {

    let cell = tableView.dequeueReusableCell(withIdentifier: identifier.TodoTableViewCell.rawValue) as! TodoTableViewCell

    cell.doneCallBackMethod = { [weak self] in

            if (indexPath.section == 0 && !((self?.list.specialList[indexPath.row].done)!)  ) {
                var tmp: ToDo = (self?.list.specialList[indexPath.row])!

                self?.list.specialList.remove(at: indexPath.row)

                tmp.done = true;

                self?.list.specialList.insert(tmp, at: (self?.list.specialList.count)!)
            }
            else if (indexPath.section == 1 && !((self?.list.todoList[indexPath.row].done)!)  ) {
                var tmp: ToDo = (self?.list.todoList[indexPath.row])!

                self?.list.todoList.remove(at: indexPath.row)

                tmp.done = true;

                self?.list.todoList.insert(tmp, at: (self?.list.todoList.count)!)
            }

            tableView.reloadData()
    }
}
디자인 관련
Navigation Item
개념
https://velog.io/@kevinkim2586/iOS-Swift-공부-Navigation-Item
https://developer.apple.com/documentation/uikit/uinavigationbar
https://developer.apple.com/documentation/uikit/uinavigationitem
https://developer.apple.com/documentation/uikit/uinavigationcontroller
- Navigation Item : Navigation Bar의 컨텐츠를 표시하는 객체
- Navigation Bar에서 보여지는 title, leftBarButton, rightBarButton 등이
Navigation Item의 프로퍼티이다
- Navigation Bar에서 보여지는 title, leftBarButton, rightBarButton 등이
- View Controller가 전환될 때마다
Navigation Bar는 하나의 공동 객체 이지만,
Navigation Item은 각 뷰컨이 갖는 Property 이다
Navigation Bar의 색상
- 타이틀만 적용되고, 색상은 전혀 적용되지 않는다
navigationItem.title = "첫 번째 창"
navigationItem.titleView?.tintColor = .blue
navigationItem.titleView?.backgroundColor = .darkGray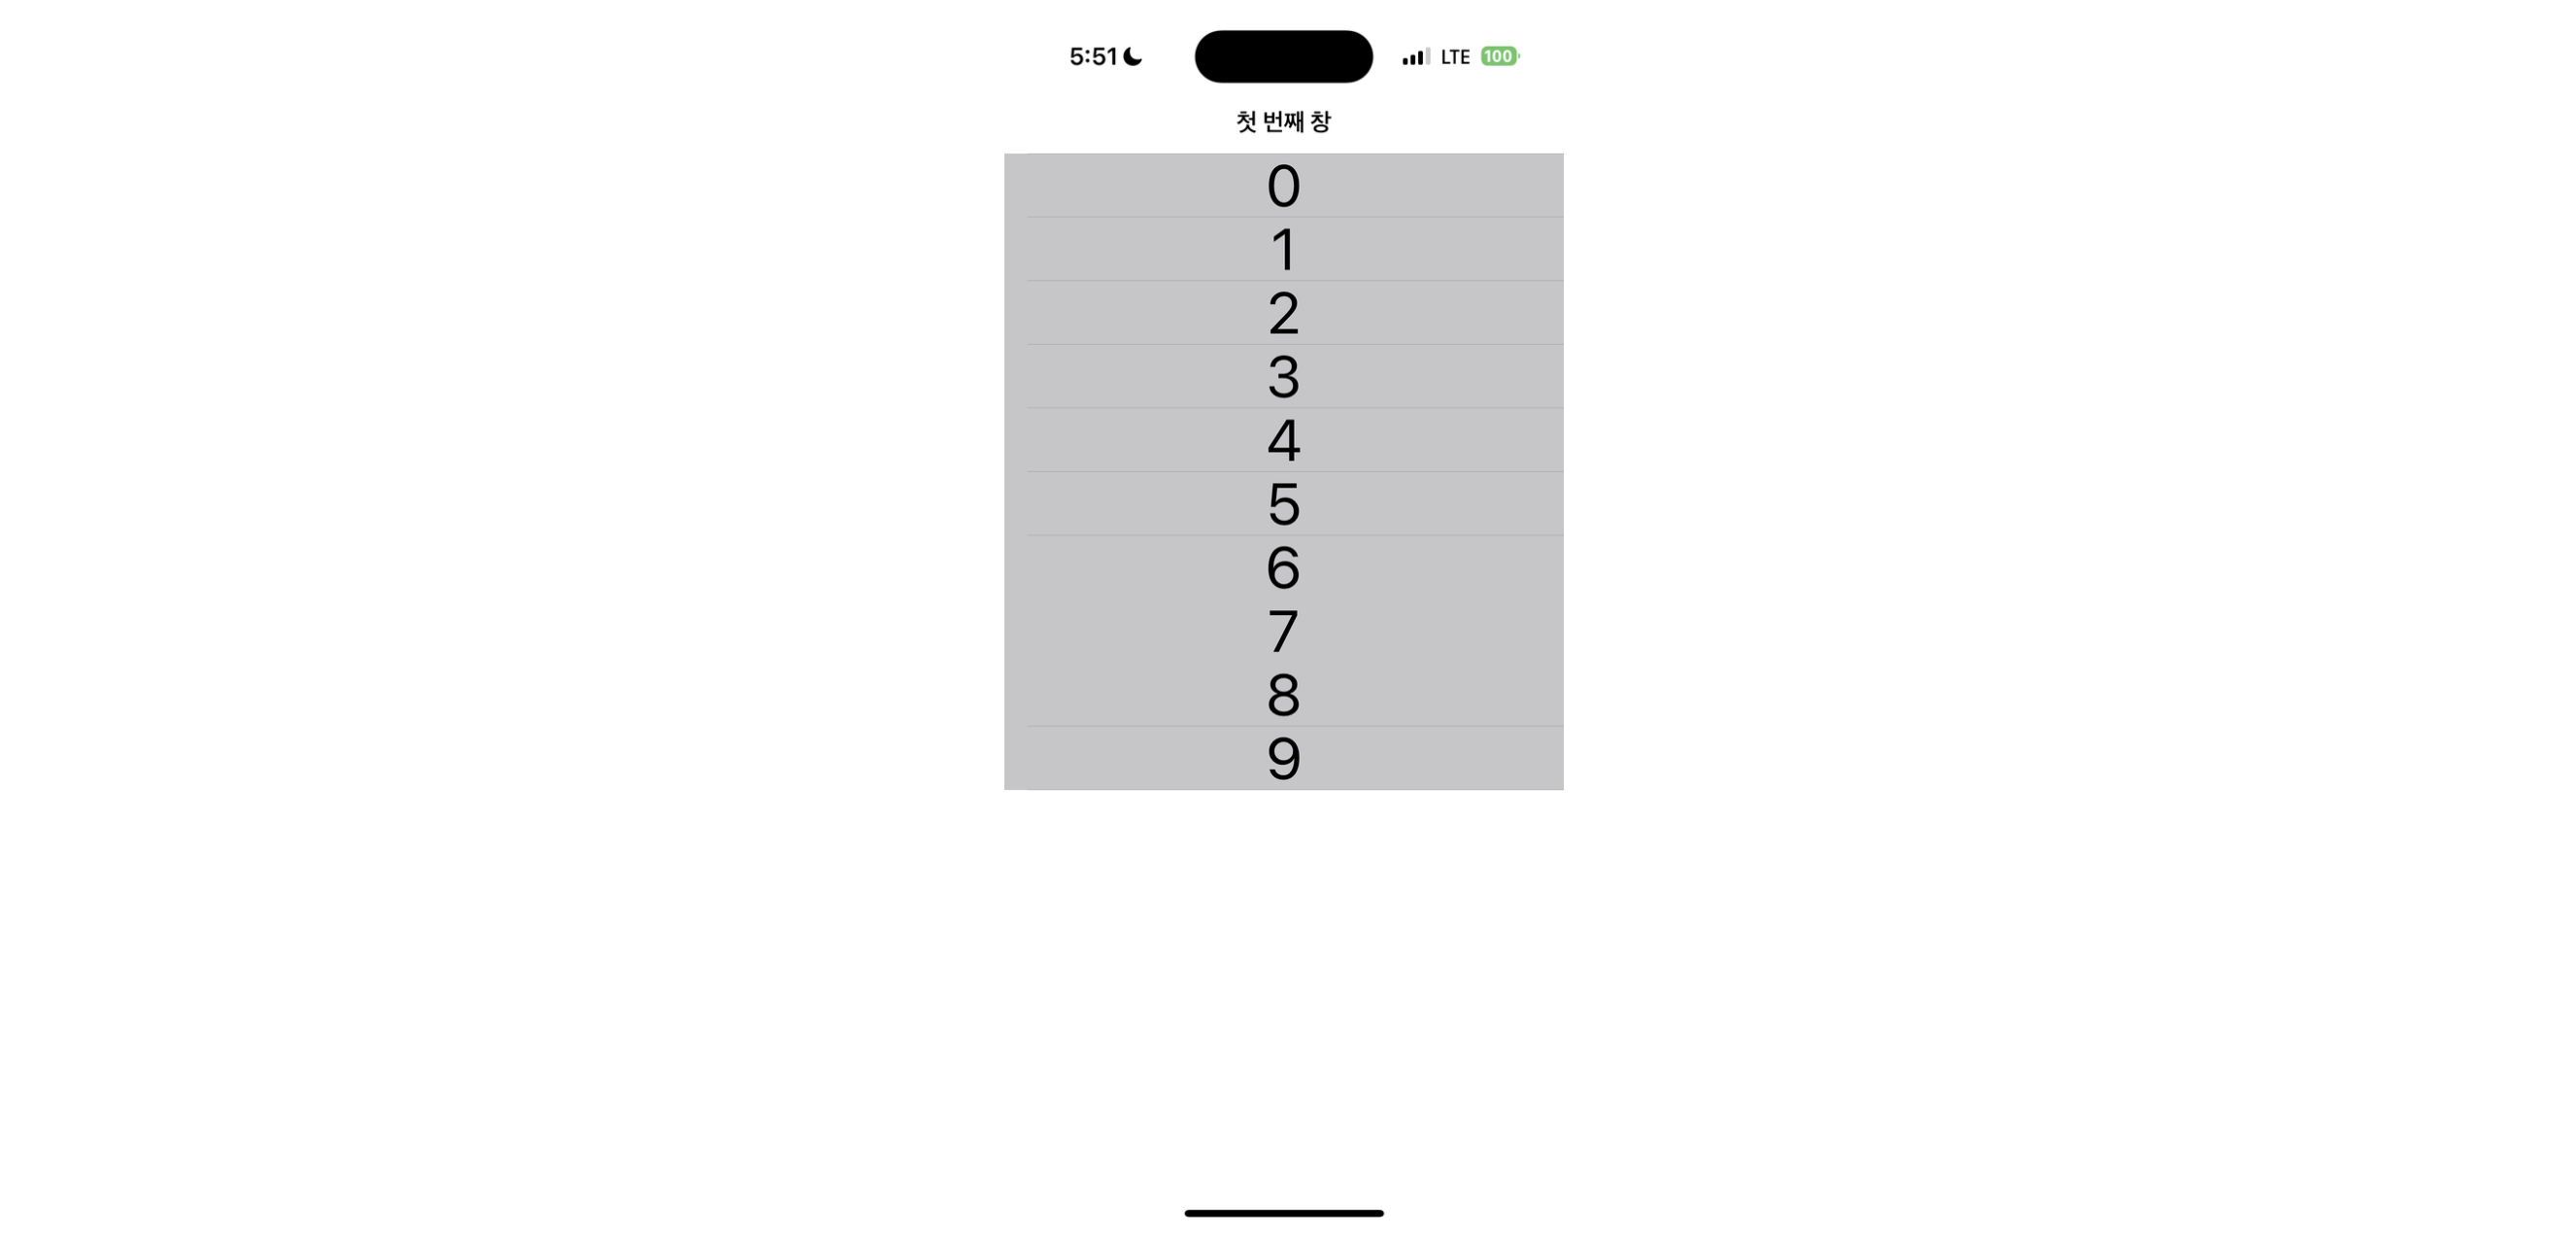
- 타이틀과 배경 색까지 적용되고, 아직 글씨 색은 변하지 않는다
또한, 스크롤 시 배경 색이 흐려진다navigationItem.title = "첫 번째 창" navigationController?.navigationBar.backgroundColor = .systemPink navigationController?.navigationBar.tintColor = .blue navigationController?.navigationBar.barTintColor = .blue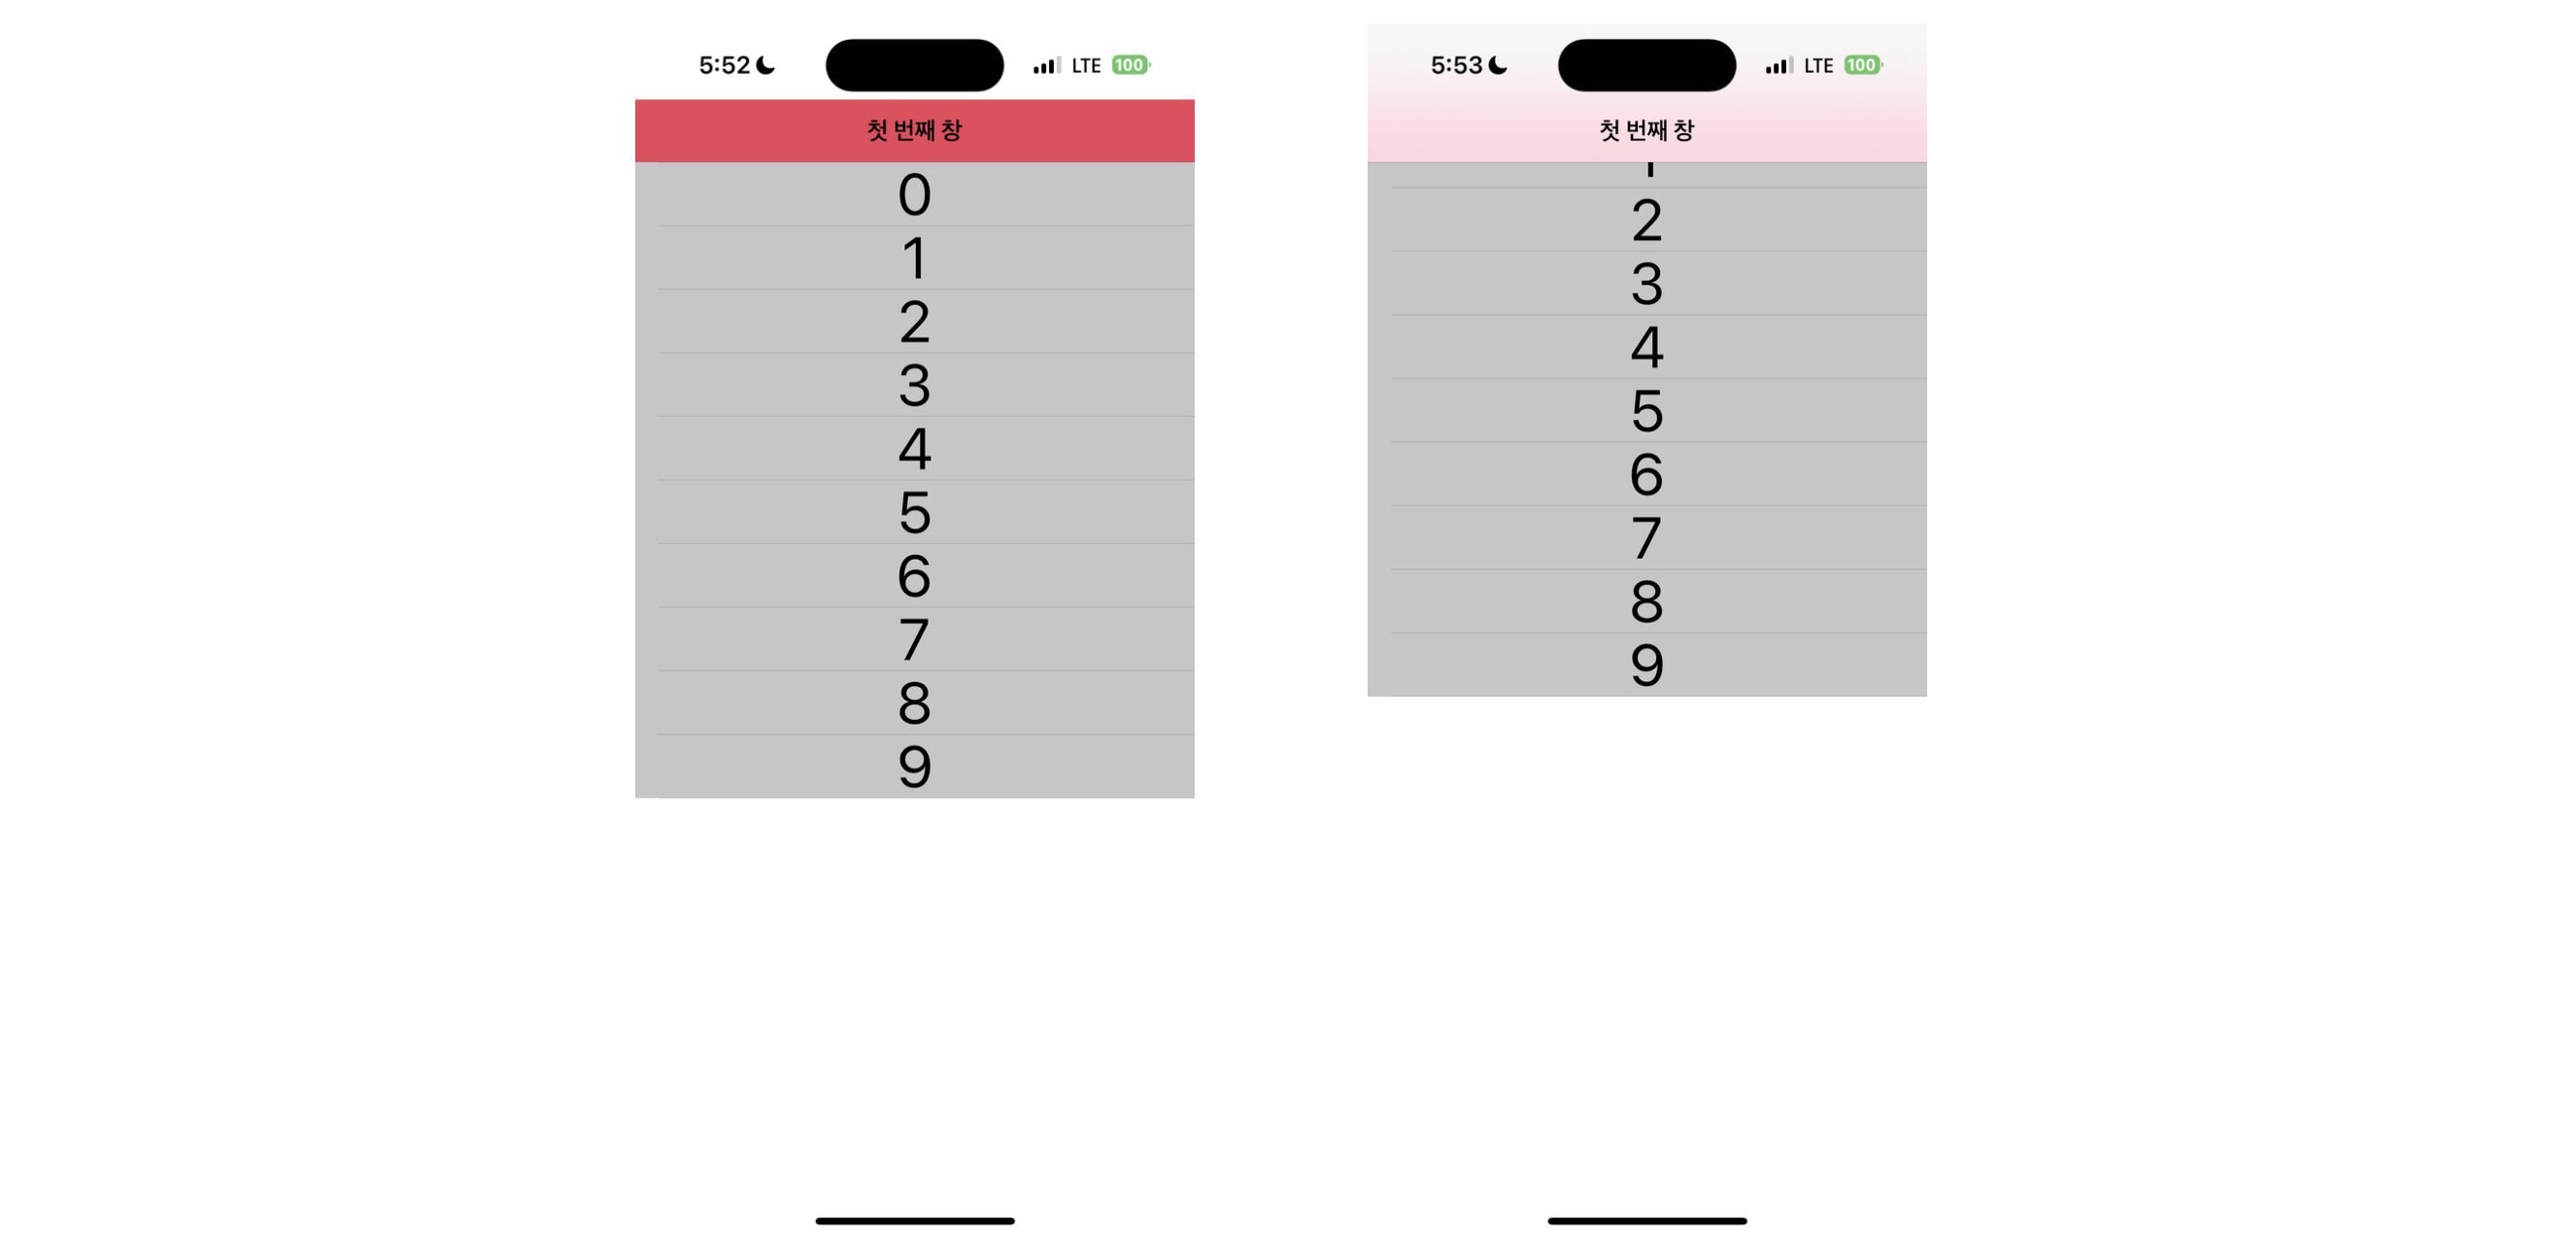
3 - 1. 스크롤해도 기존 배경 색을 유지한다
navigationItem.title = "첫 번째 창"
navigationController?.navigationBar.backgroundColor = .systemPink

let appearance = UINavigationBarAppearance()
appearance.configureWithTransparentBackground()
navigationController?.navigationBar.standardAppearance = appearance
navigationController?.navigationBar.scrollEdgeAppearance = appearance
navigationController?.navigationBar.compactAppearance appearance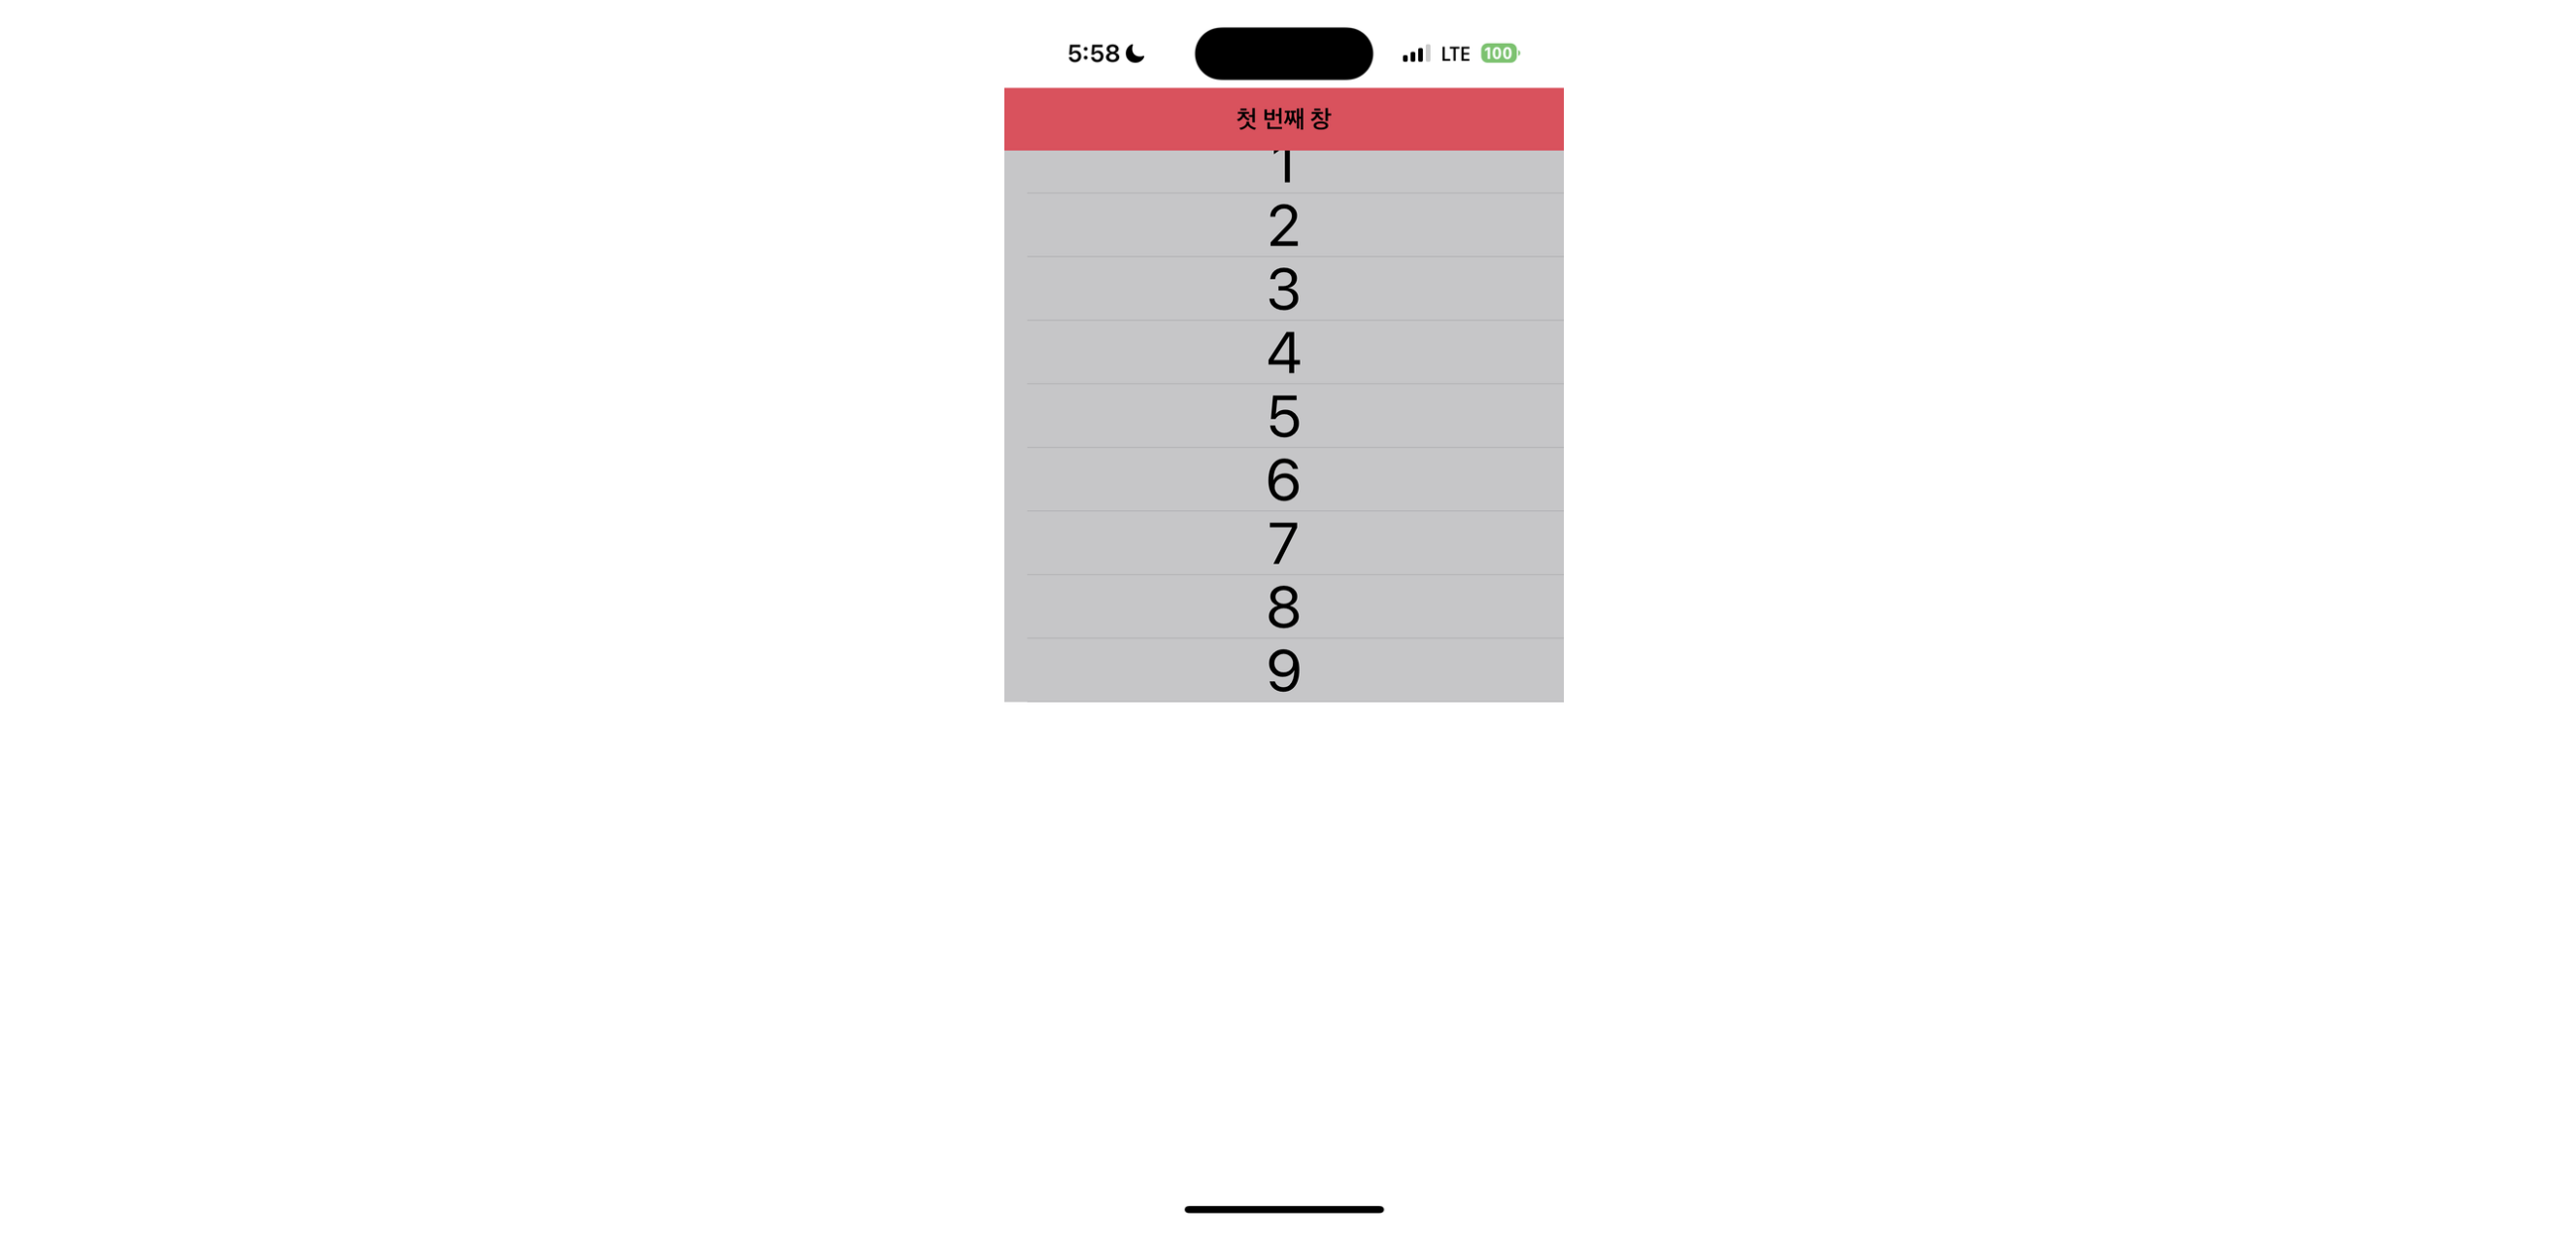
3 - 2. 글씨 색이 변한다. 하지만 스크롤 시 배경 색이 흐려진다.
navigationItem.title = "첫 번째 창"
navigationController?.navigationBar.backgroundColor = .systemPink
navigationController?.navigationBar.titleTextAttributes = [NSAttributedString.Key.foregroundColor: UIColor.white]

//        let appearance = UINavigationBarAppearance()
//        appearance.configureWithTransparentBackground()
//
//        navigationController?.navigationBar.standardAppearance = appearance
//        navigationController?.navigationBar.scrollEdgeAppearance = appearance
//        navigationController?.navigationBar.compactAppearance = appearance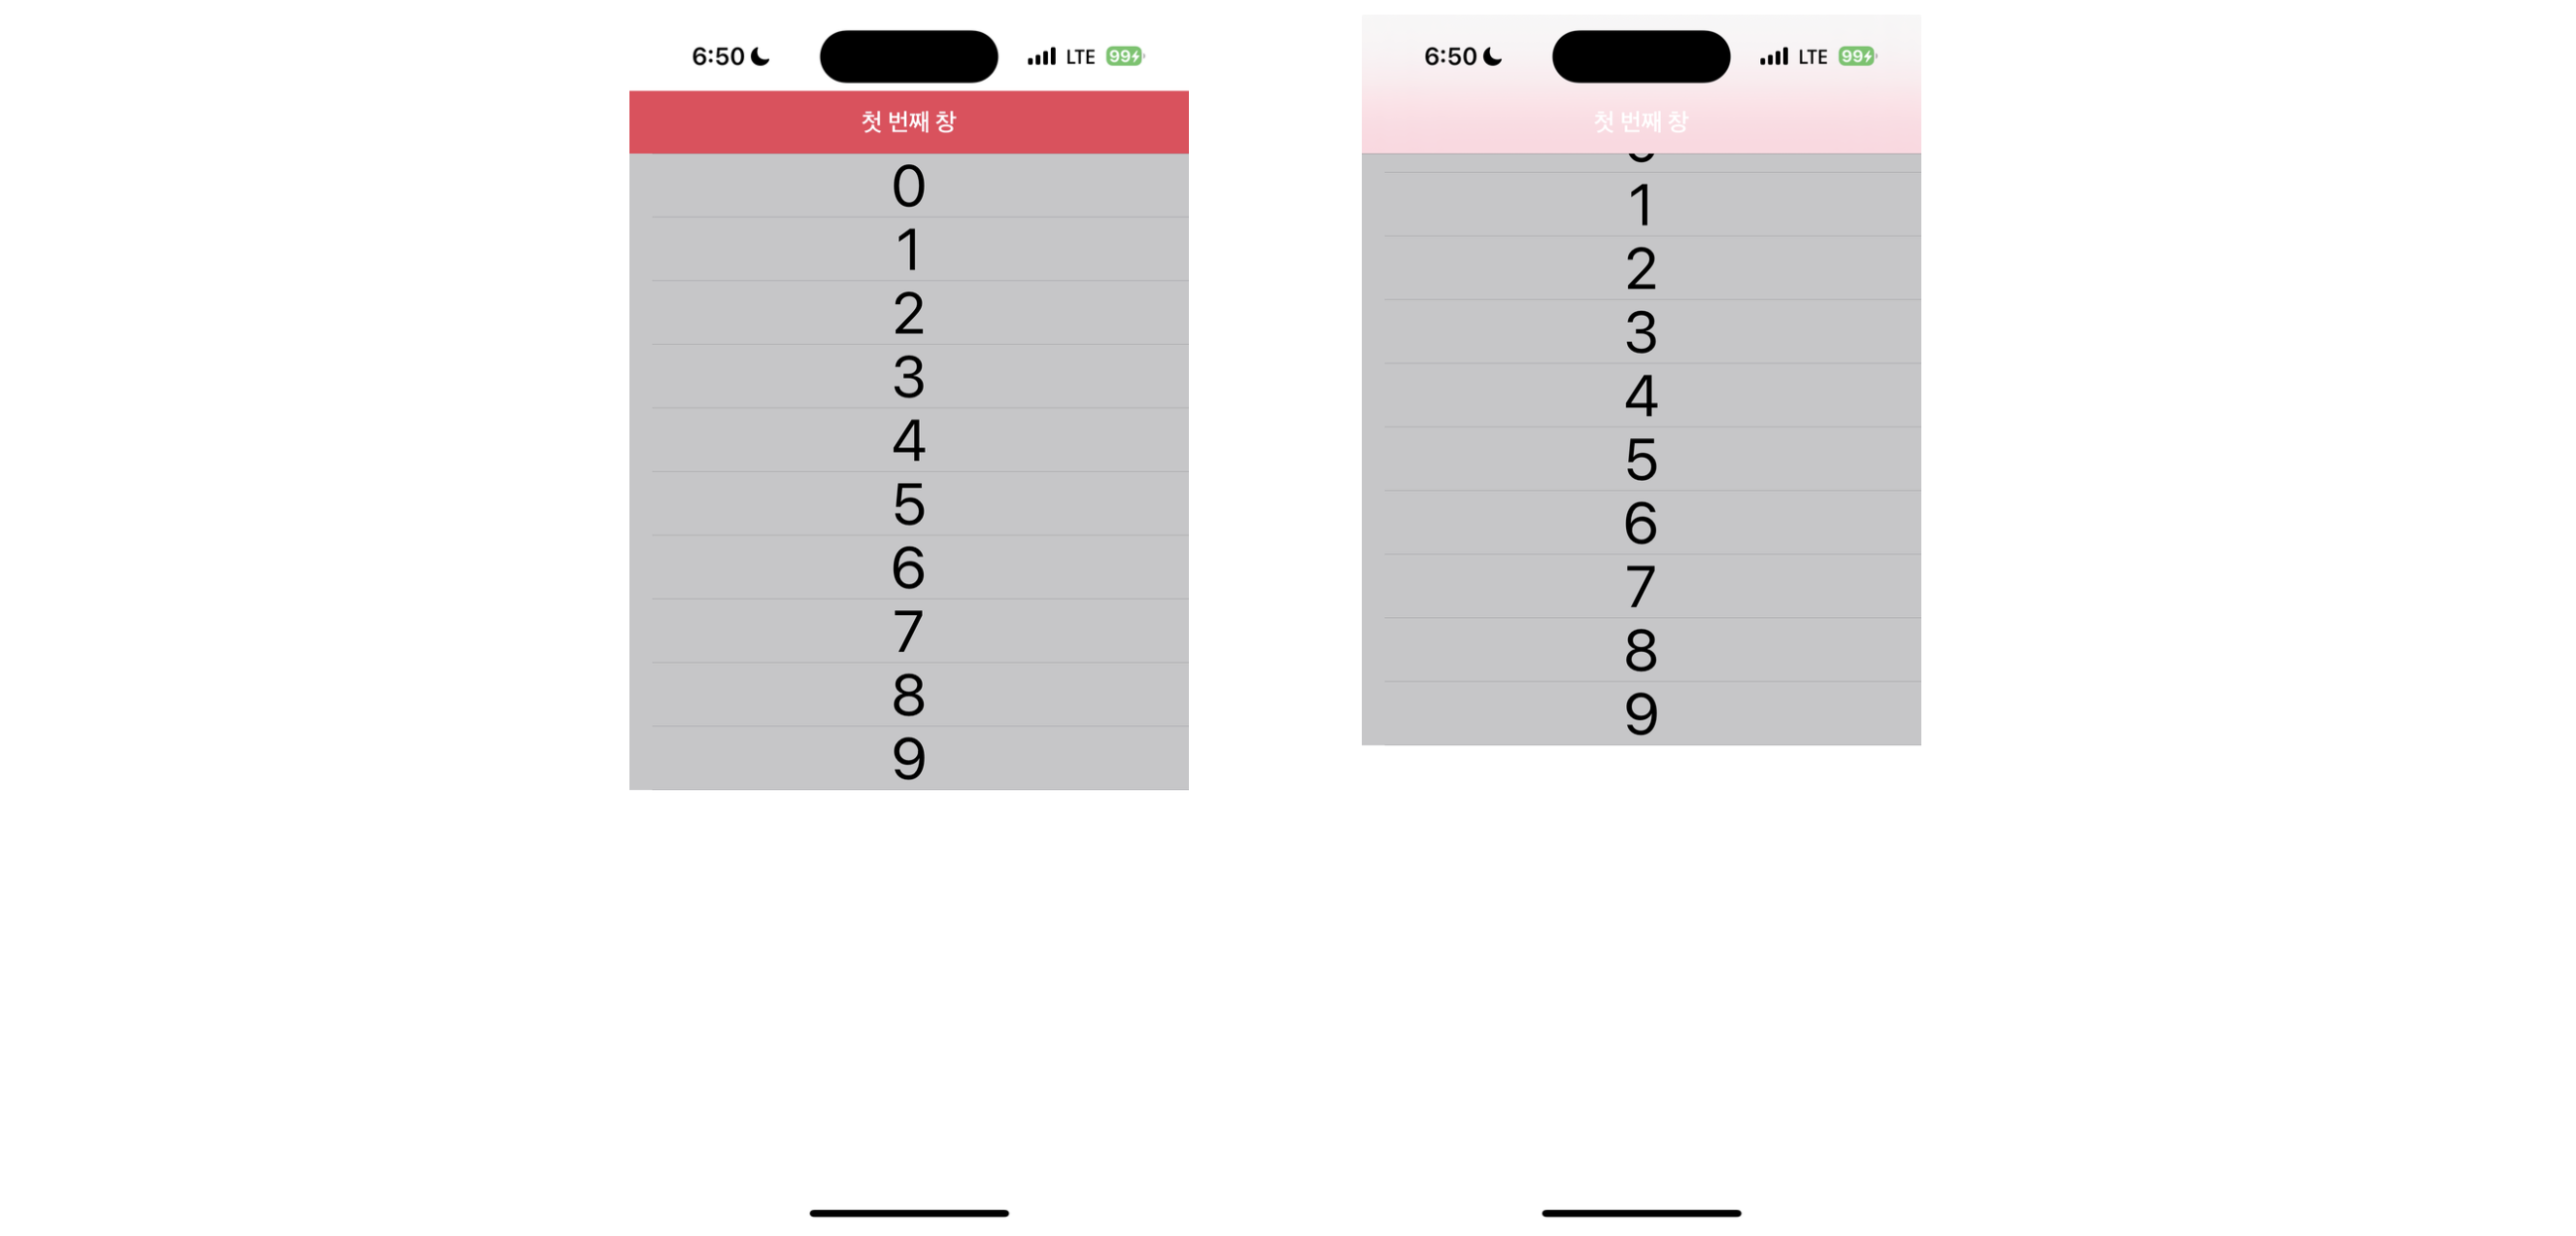
- 글씨 색도 바꾸고, 스크롤 시 뒷배경이 유지되도록 하는 방법을 찾지 못했다..
UIButton의 Text 크기
- 과제를 하면서 UIButton의 text 크기 조절이 안돼서 멘탈이 나갔다
- 결과적으로 해결하긴 했지만, 100% 코드만을 이용해서 해결한 것이 아니기 때문에 아쉬운 점이 있다
- 시도했던 것들 중 기억나는 5개의 방법을 끄적거렸다
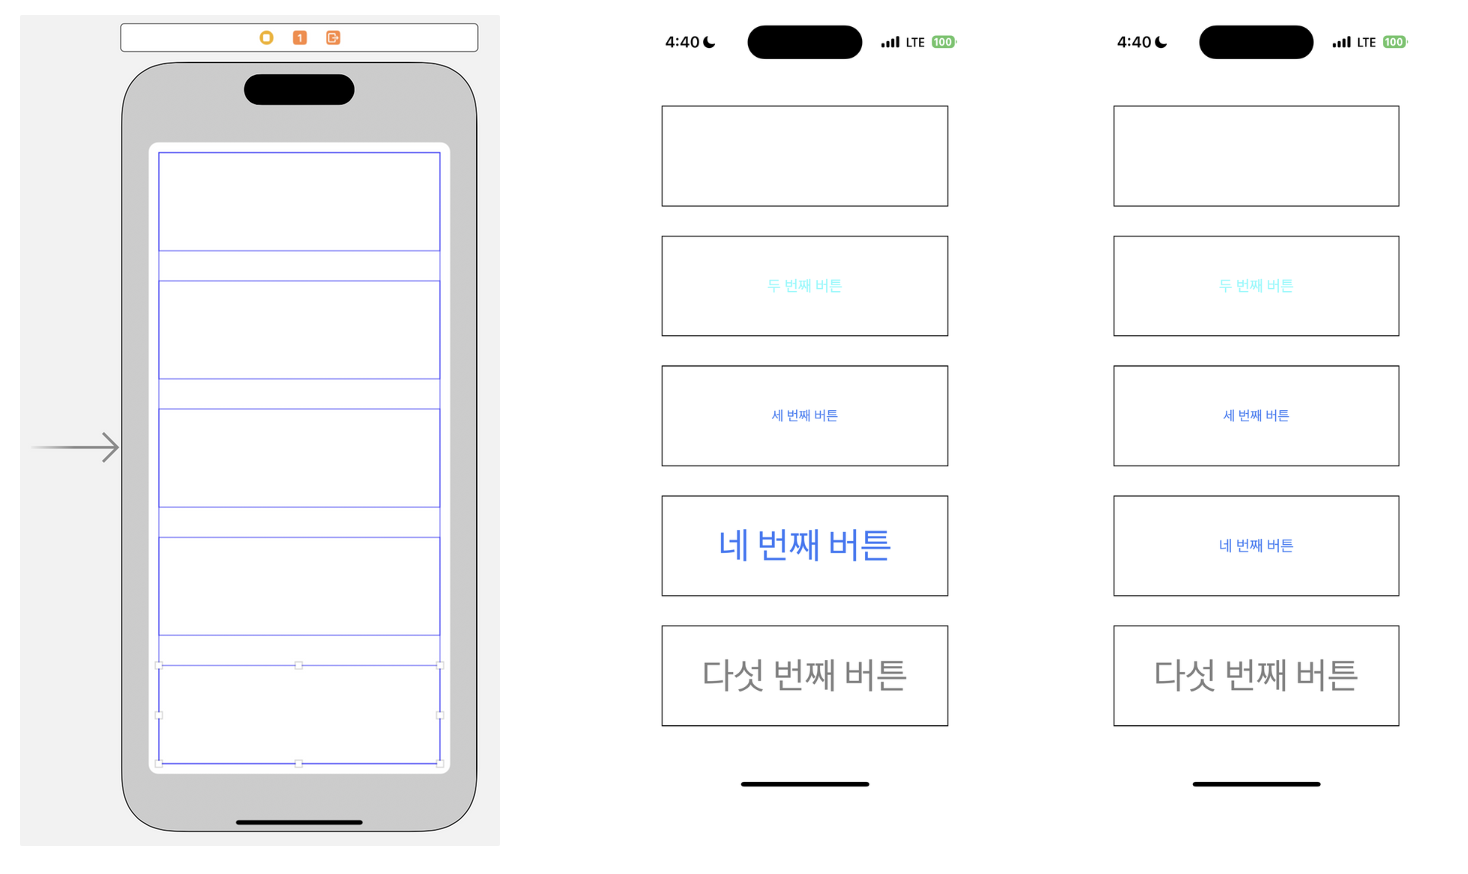
- 기본적으로 모든 버튼의 Type은 .plain으로 기본 설정이 되어있다
button 1
-
아예 타이틀이 나오지도 않는다
// button1
button1.titleLabel?.text = "첫 번째 버튼"
button1.titleLabel?.font = .systemFont(ofSize: 30)
button1.tintColor = .blue
button 2
-
타이틀은 나오지만, 폰트가 적용되지 않는다
-
여기서부터 슬슬 멘탈이 흔들렸다
// button 2
button2.setTitle("두 번째 버튼", for: .normal)
button2.titleLabel?.font = .systemFont(ofSize: 40)
button2.tintColor = .cyan
button 3
-
작은 버튼을 만드는게 목적이었기 때문에, 아예 버튼 사이즈를 mini로 설정했다
-
물론 글씨가 작아지긴 하지만, 여전히 폰트는 적용되지 않는다
// button 3
button3.setTitle("세 번째 버튼", for: .normal)
button3.configuration?.buttonSize = .mini

button2.titleLabel?.font = .systemFont(ofSize: 40)
button 4
-
수업시간에 배웠던 버튼의 configuration을 이용하는 방법을 시도했다
-
드디어 폰트가 적용되었다! 라고 생각했지만 버튼을 한 번 터치하면 다시 폰트가 초기화된다...
-
여기서 멘탈이 나갔다
// button 4
var config = UIButton.Configuration.plain()
config.title = "네 번째 버튼"
button4.configuration = config

button4.titleLabel?.font = .systemFont(ofSize: 40)
button 5
- 돌고 돌아 결국 이 방법으로 해결했다
- 인스펙터 영역에서 버튼의 style을 default로 바꿔주었다
- 레이아웃을 제외한 모든 속성을 코드로 설정하고 싶었는데 아직까지 위 style을 코드로 수정하는 방법을 찾지 못했다
- 사실상 button 2와 코드는 동일하다
// button 5
button5.setTitle("다섯 번째 버튼", for: .normal)
button5.titleLabel?.font = .systemFont(ofSize: 40)
button5.tintColor = .gray
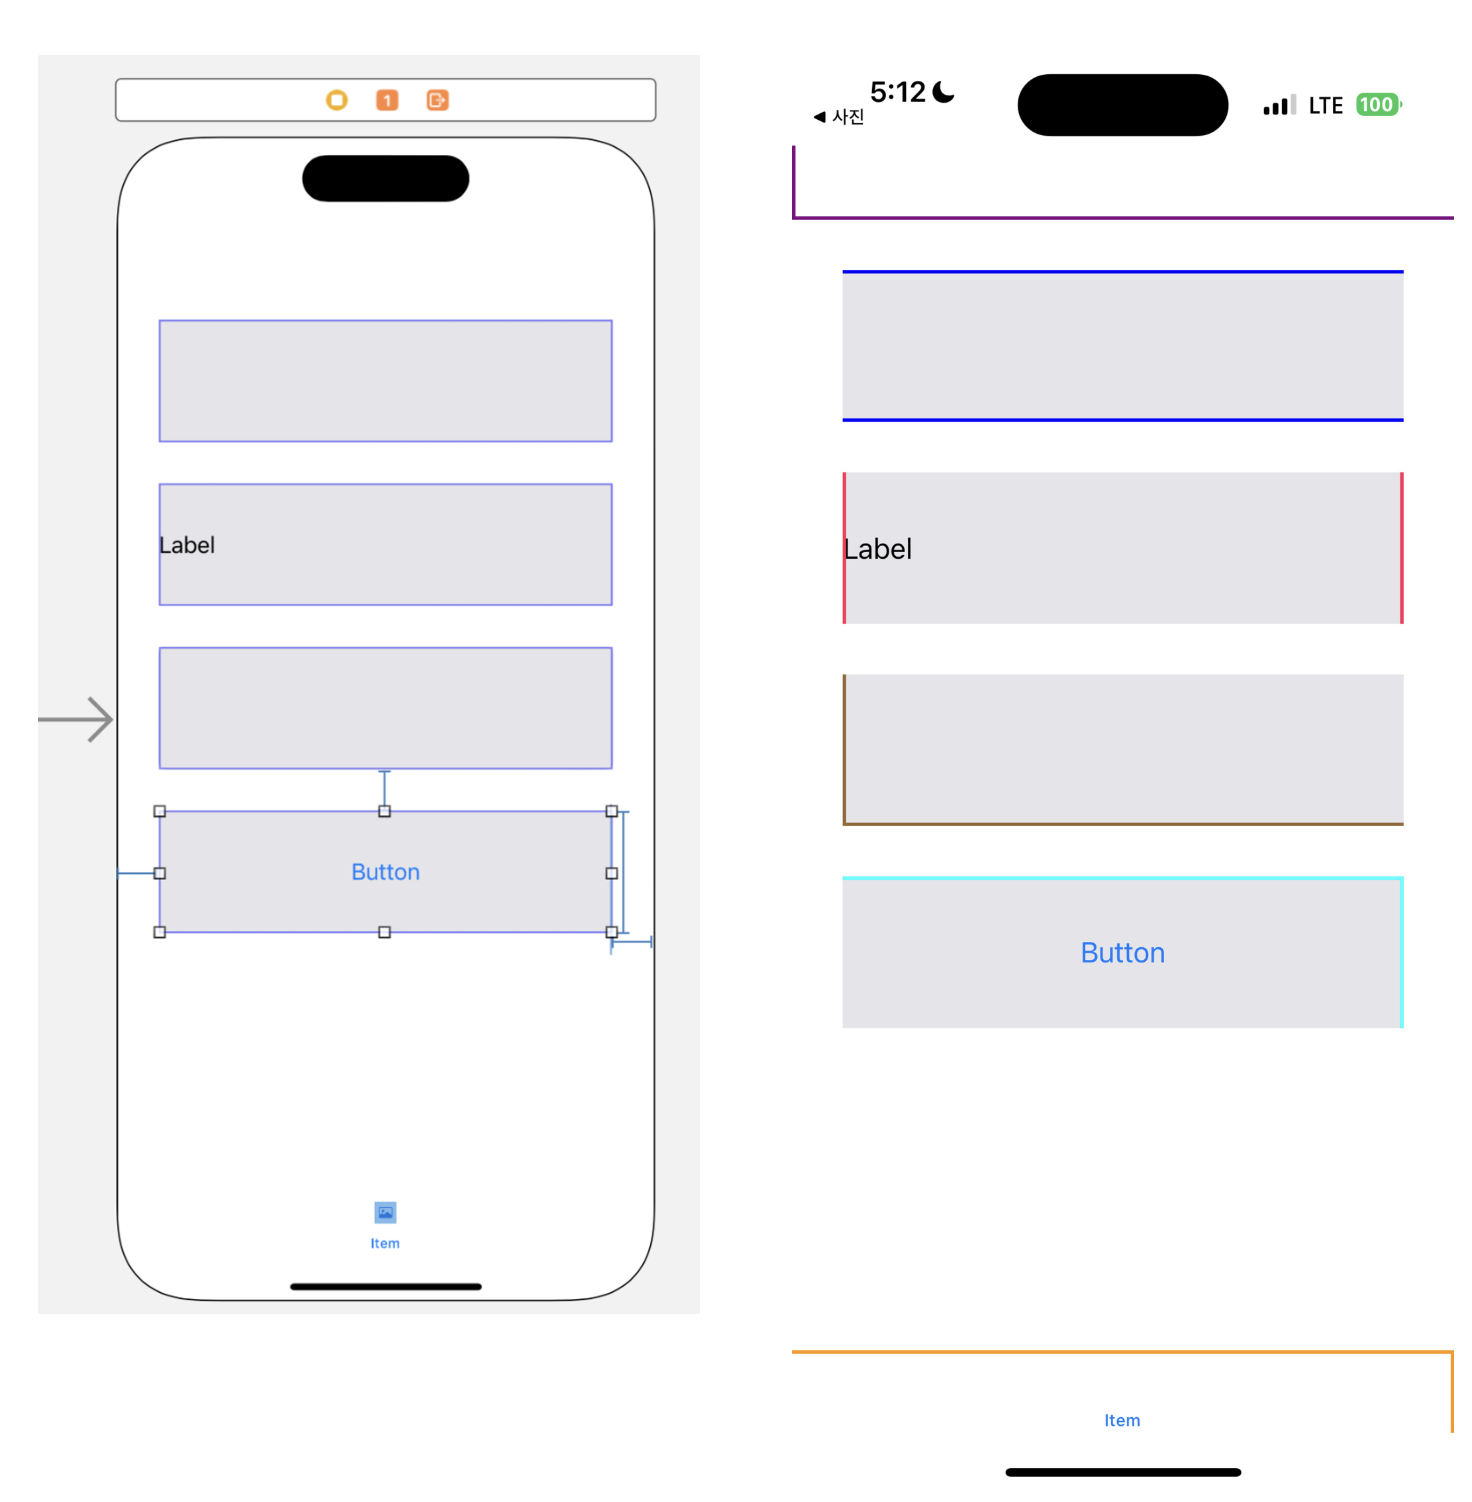
원하는 위치만 테두리 넣어주기
- view의 원하는 위치에만 border를 주고 싶을 때가 있다
- 밑줄만 있는 textfield, navigation bar의 경계선 등등
- 구글링을 하다가 CALayer를 확장해서 메서드를 새로 추가하는 방법을 찾았다
참고
https://babbab2.tistory.com/53
https://devsc.tistory.com/62
- UIView는 CALayer 타입의 layer라는 프로퍼티를 갖는다
코드
extension CALayer {
    func addBorder(_ arr_edge: [UIRectEdge], color: UIColor, width: CGFloat) {
        for edge in arr_edge {
            let border = CALayer()

            switch edge {
            case UIRectEdge.top:
                border.frame = CGRect.init(x: 0, y: 0, width: frame.width, height: width)
                break
            case UIRectEdge.bottom:
                border.frame = CGRect.init(x: 0, y: frame.height - width, width: frame.width, height: width)
                break
            case UIRectEdge.left:
                border.frame = CGRect.init(x: 0, y: 0, width: width, height: frame.height)
                break
            case UIRectEdge.right:
                border.frame = CGRect.init(x: frame.width - width, y: 0, width: width, height: frame.height)
                break
            default:
                break
            }

            border.backgroundColor = color.cgColor;

            self.addSublayer(border)
        }
    }
}
class AddBorderViewController: UIViewController {
@IBOutlet var borderView: UIView!
@IBOutlet var borderLabel: UILabel!
@IBOutlet var borderTextField: UITextField!
@IBOutlet var borderButton: UIButton!
override func viewDidLoad() {
super.viewDidLoad()
borderView.layer.addBorder([.top, .bottom], color: .blue, width: 2)
borderLabel.layer.addBorder([.left, .right], color: .systemPink, width: 2)
// textfield는 기본 border가 있기 때문에 제거해주고, addBorder를 실행시킨다
borderTextField.borderStyle = .none
borderTextField.layer.addBorder([.left, .bottom], color: .brown, width: 2)
borderButton.layer.addBorder([.top, .right], color: .cyan, width: 2)
navigationController?.navigationBar.layer.addBorder([.left, .bottom], color: .purple, width: 2)
tabBarController?.tabBar.layer.addBorder([.top, .right], color: .systemOrange, width: 2)
}
}결과 화면