Notification (Local)
- 권한을 허용했을 때, iOS 알림 센터에 표시된다
- 앱에 지속적으로 들어올 수 있는 재사용률(Retention)에 기여한다
- 앱이 종료된 경우에도 사용자에게 새로운 정보를 표시한다
단계
- Authorization (권한 요청)
- Options : alert, badge, sound
- Request (알림 요청)
- Content (전달할 정보) : title, body, badge
- Trigger (전달할 시점) : time, calendar, location
- Notification
코드
AppDelegate
-
알림 권한 설정
-
foreground에서 알림 여부
- 특정 알림만 수신하는 기능 구현 가능 (ex. 카톡 채팅방)
// 알림 권한 설정
func application(_ application: UIApplication, didFinishLaunchingWithOptions launchOptions: [UIApplication.LaunchOptionsKey: Any]?) -> Bool {

    UNUserNotificationCenter.current().delegate = self
    UNUserNotificationCenter.current().requestAuthorization(
        options: [.badge, .alert, .sound]) { success, error in
            print(success, error)
        }

    return true
}

// foreground에서 알림 여부 설정
extension AppDelegate: UNUserNotificationCenterDelegate {

    func userNotificationCenter(_ center: UNUserNotificationCenter, willPresent notification: UNNotification, withCompletionHandler completionHandler: @escaping (UNNotificationPresentationOptions) -> Void) {
        completionHandler( [.sound, .badge, .banner, .list] )
    }
}
SceneDelegate
-
배지, 알림 센터의 알림 개수 조절
- ex). 쌓여있는 카톡 알림, 끝낸 투두 리스트
func sceneDidBecomeActive(_ scene: UIScene) {

    // 배지 개수 조절
    UIApplication.shared.applicationIconBadgeNumber = 10

    // 스택에 떠있던 모든 알림 제거
    UIUserNOtificationCenter.current().removeAllDeliveredNotifications()

    // 대기중이었던 알림 제거
    UNUserNotificationCenter.current().removeAllPendingNotificationRequests()

    // remove로 사용해서 특정 알림만 제거하는 것도 가능
}
ViewController
// 1. 컨텐츠 설정
let content = UNMutableNotificationContent()
content.title = "알림 타이틀입니다"
content.body = "알림 바디입니다. 다마고치에게 물을 주세요"
content.badge = 99 // 초기 배지 개수
// 2. 언제 (trigger)
// 2 - 1. time interval
let trigger = UNTimeINtervalNotificationTrigger(
timeInterval = 1,
repeats: false // repeats이 true라면 최소 interval = 60
}
// 2 - 2. calendar
var component = DateComponents()
component.minute = 5
component.hour = 10
let trigger = UNCalendarNotificationTrigger(
dateMatching: component,
repeats: false
}
// 3. Notification
let request = UNNotificationRequest(
identifier: "\(Date)" // 하나의 identifier당 하루에 64개 제한
content: content
trigger: trigger
}
UNUserNotificationCenter.current().add(request) { error in
print(error)
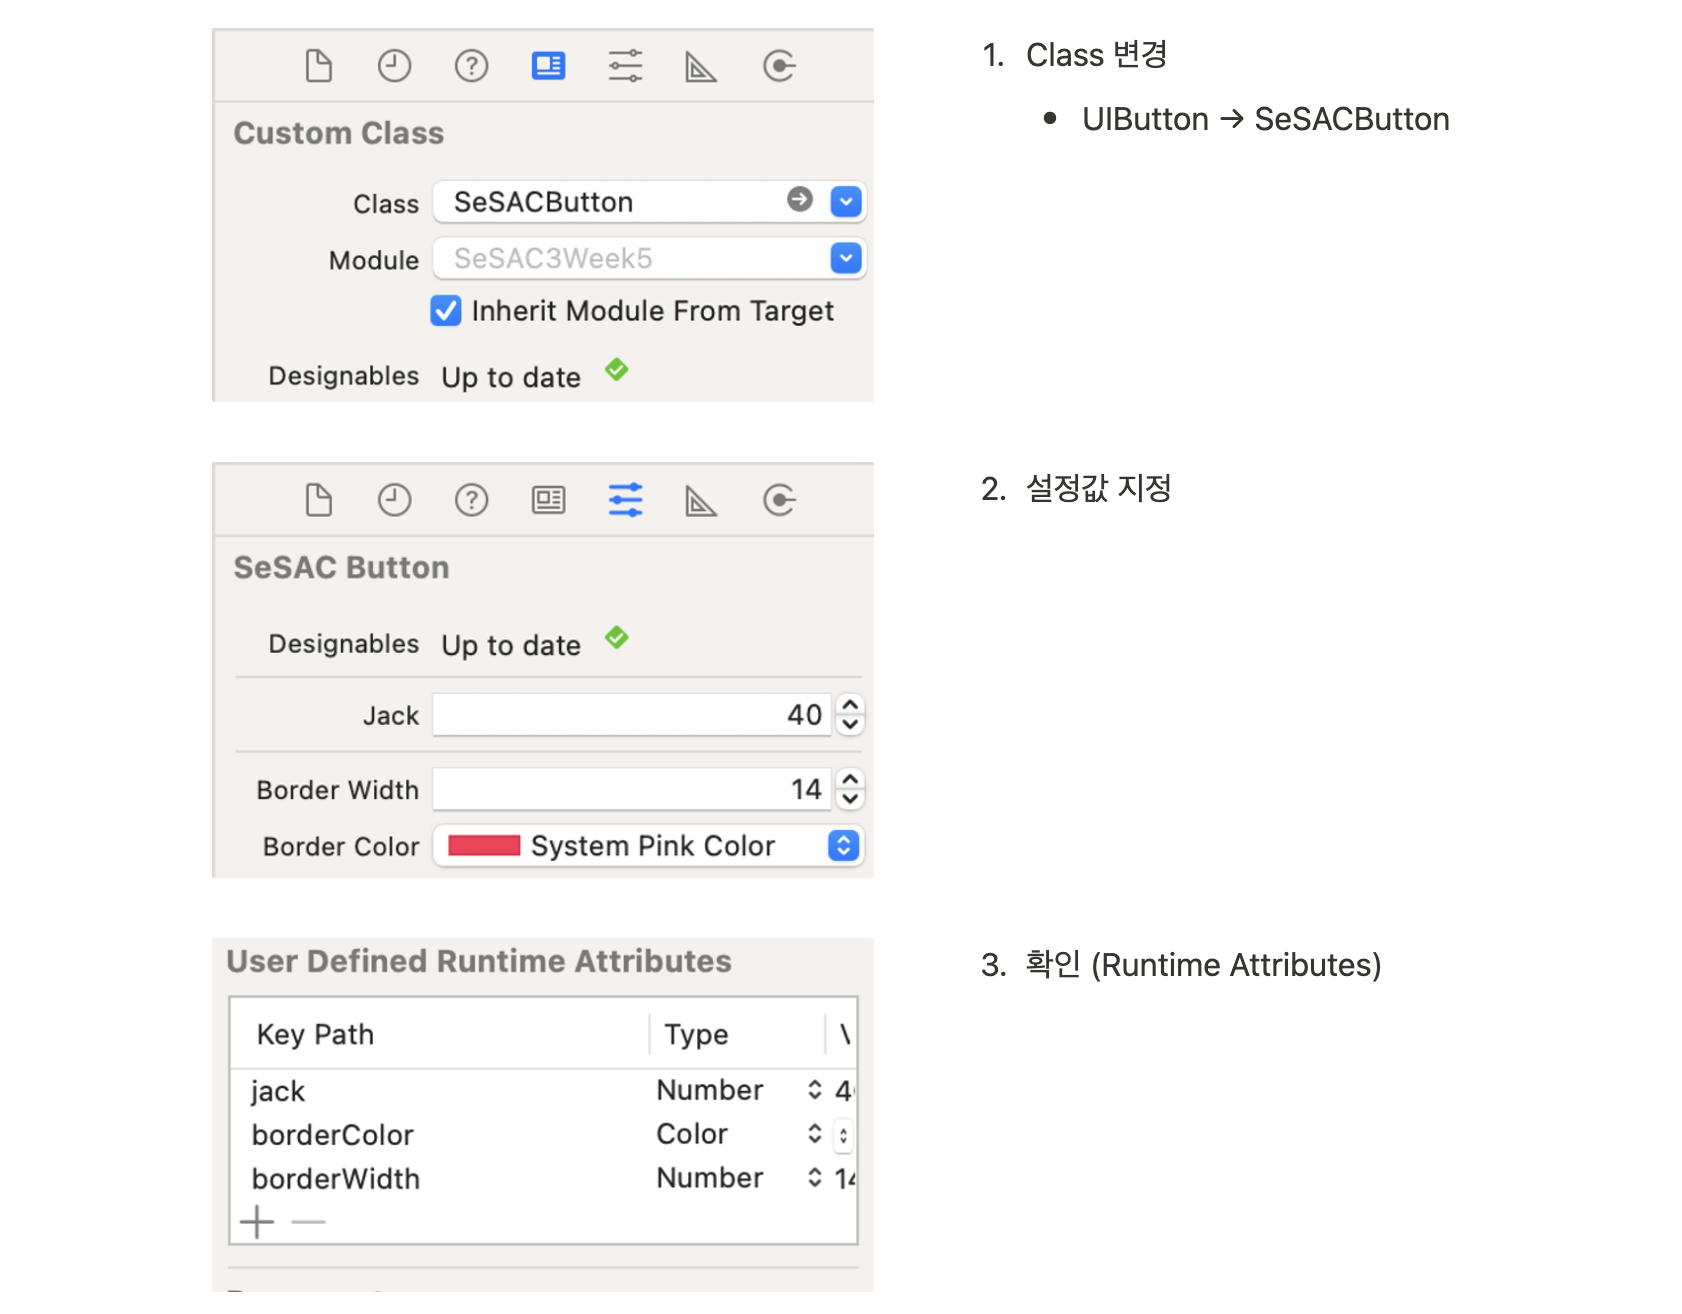
}@IBDesignable, @IBInspectable
- 기존에 스토리보드에서 설정할 수 없는 값들을 가능하게 한다 (인스펙터 영역)
- 런타임에 확인할 수 있는 내용을 컴파일 타임에 확인할 수 있다
코드
@IBDesignable
class SeSACButton: UIButton {

    @IBInspectable
    var jack: CGFloat {
    	get {
        	return layer.cornerRadius
        }
        set {
        	layer.cornerRadius = newValue
        }
    }

    @IBInspectable
    var borderWidth: CGFloat {
    	get { return layer.borderwidth }
        set { layer.borderwidth = newValue }
    }

    @IBInspectable
    var borderColor: UIColor {
    	get { return UIColor(cgColor: layer.borderColor!) }
        set { layer.borderColor = newValue.cgColor }
    }
}
인스펙터 영역
Hugging Priority &
Compression Resistance Prioriy
개념
- Hugging : "본질적인 크기만큼 내가 작아질거야"
- Compression Resistence: "본질적인 크기만큼 내가 커질거야"
- 본질적인 크기 (Intrinsic Content Size)
- switch, label, button은 내부 content에 따라 기본적인 크기를 갖는다
- 여유 공간의 상태에 따라 구분하자
- 공간이 부족하면, compression priority가 높은 친구가 우선
- 공간이 남으면, hugging priority가 높은 친구가 우선
- 우선 : 본질적인 크기를 갖는다
예시
- 두 개의 레이블이 있고, 왼쪽, 가운데, 오른쪽 여백의 크기를 지정한다
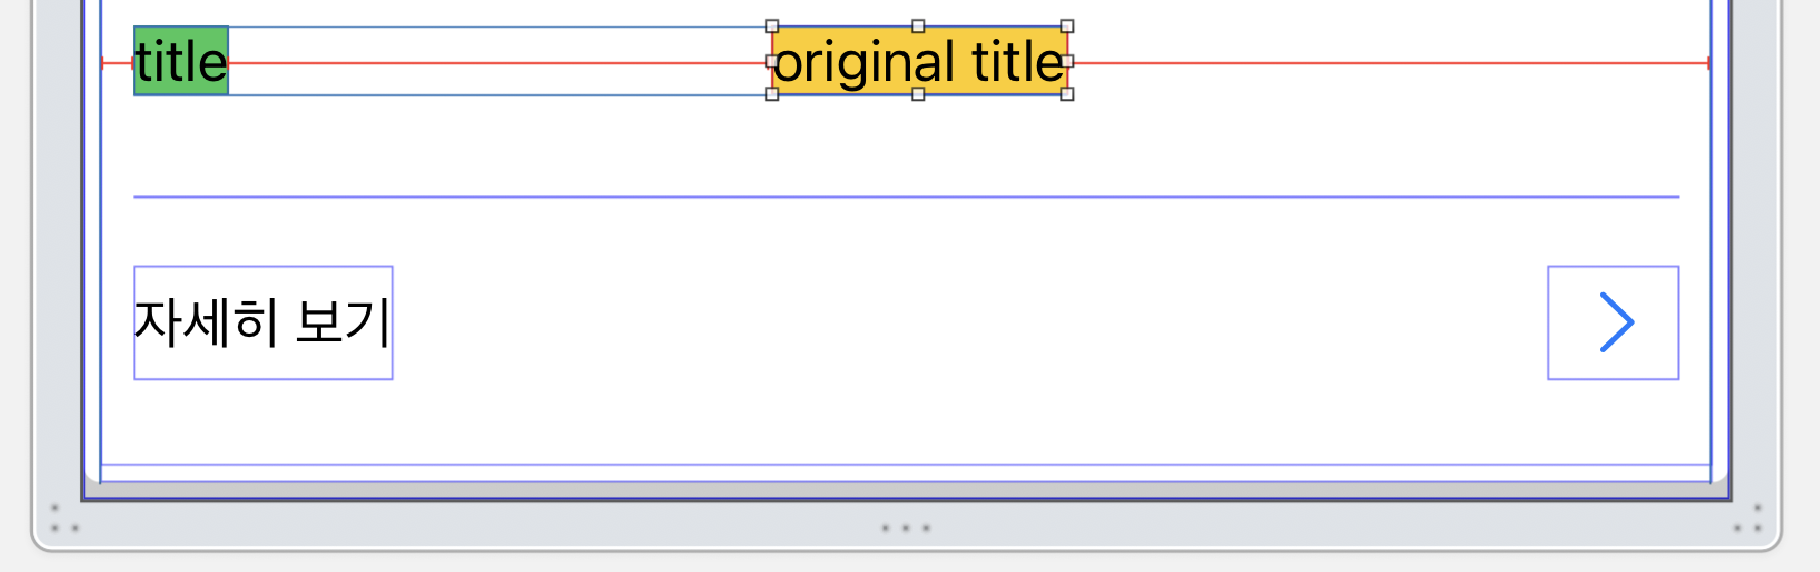
- 아직 레이아웃이 잡히지 않는다. 레이블들의 width가 정해지지 않음
- 기존 해결책 : 둘 중 하나 width를 잡아버리고, 나머지 하나는 기기 사이즈에 따라 유동적으로 변할 수 있게 한다
- Hugging Priority
- title : 250, original title : 251
- 현재 위 그림은 공간이 남은 상태이기 때문에,
hugging priority가 높은 original title이 우선순위를 갖는다
즉, title의 길이가 늘어난다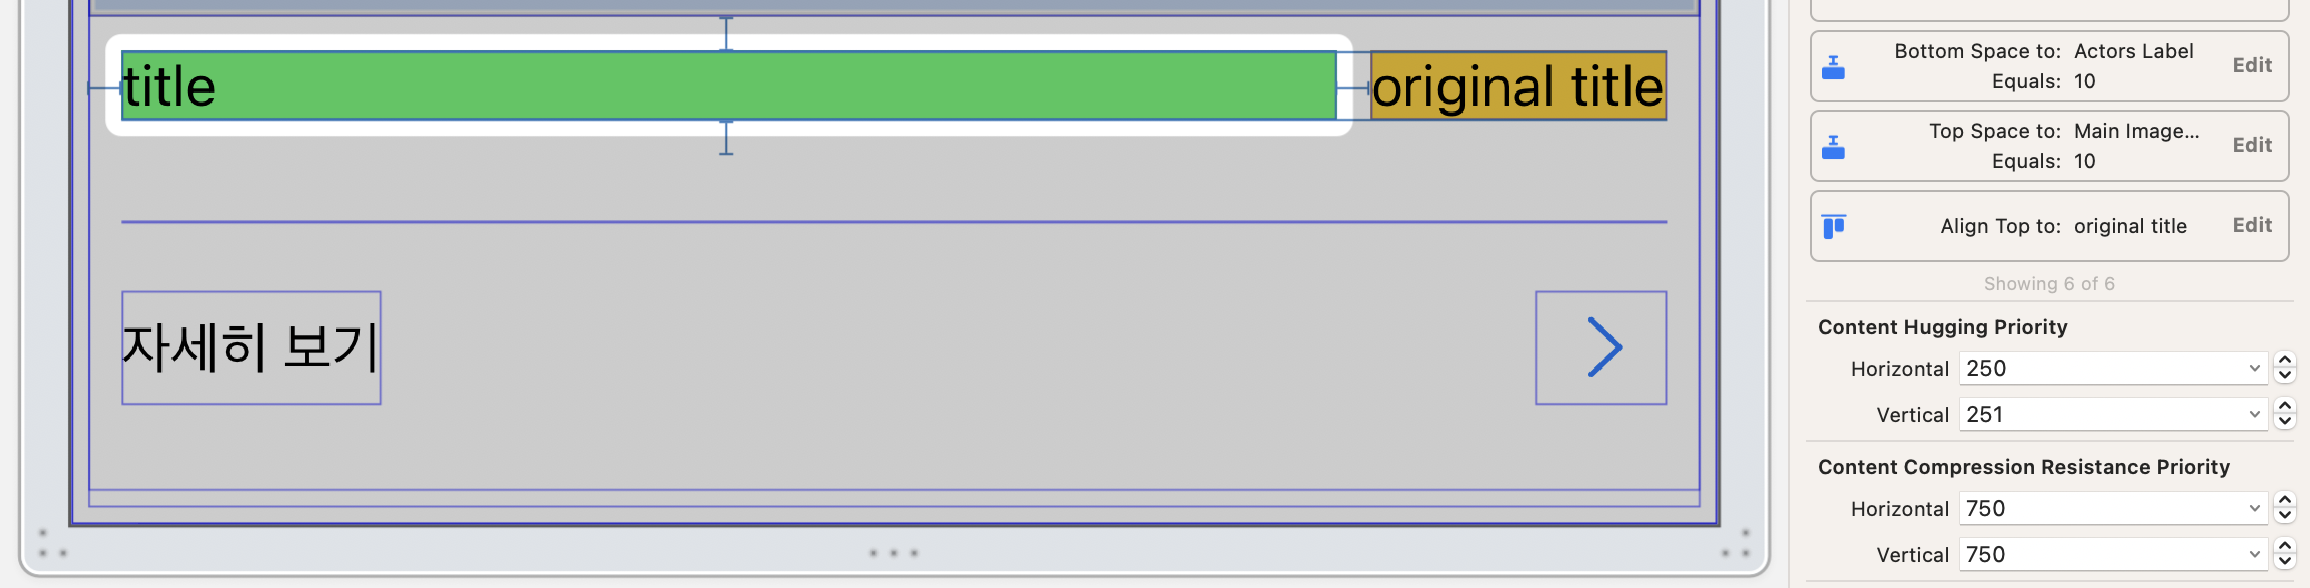
- Compression resistence Priority
- 만약 위 그림에서 original title의 길이가 너무 커지면, 레이아웃이 깨진다
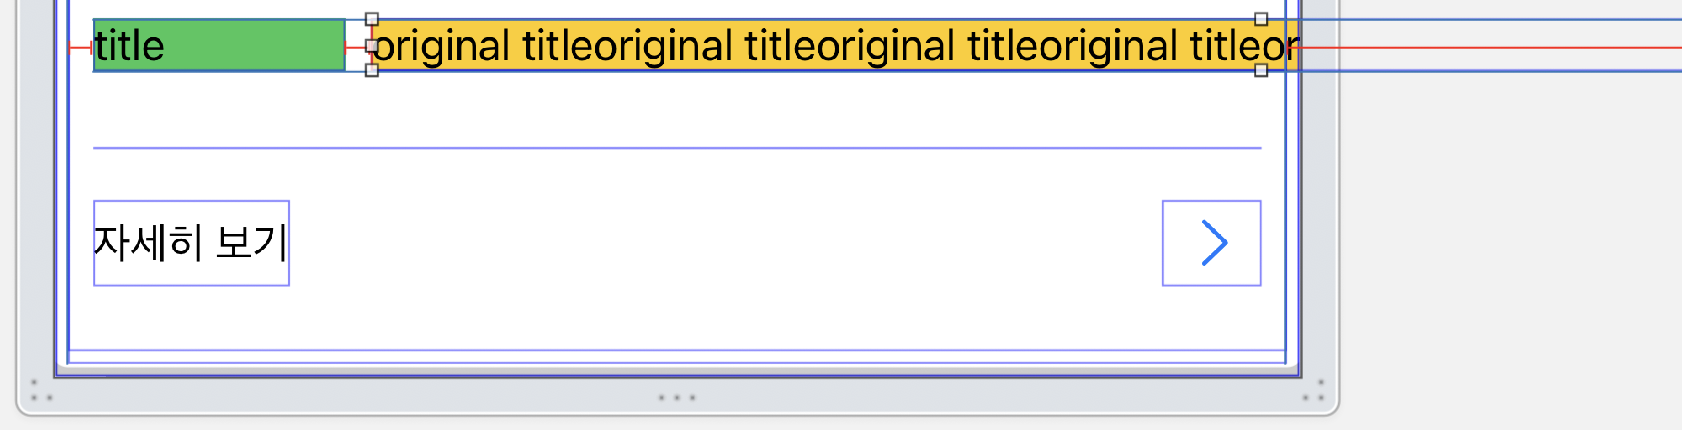
- title : 751, original title : 750
- 현재 위 그림은 (좀 이상하게 나왔지만) 공간이 부족한 상태이기 때문에
compression resistence priority가 높은 title이 우선순위를 갖는다
즉, original title의 길이가 줄어든다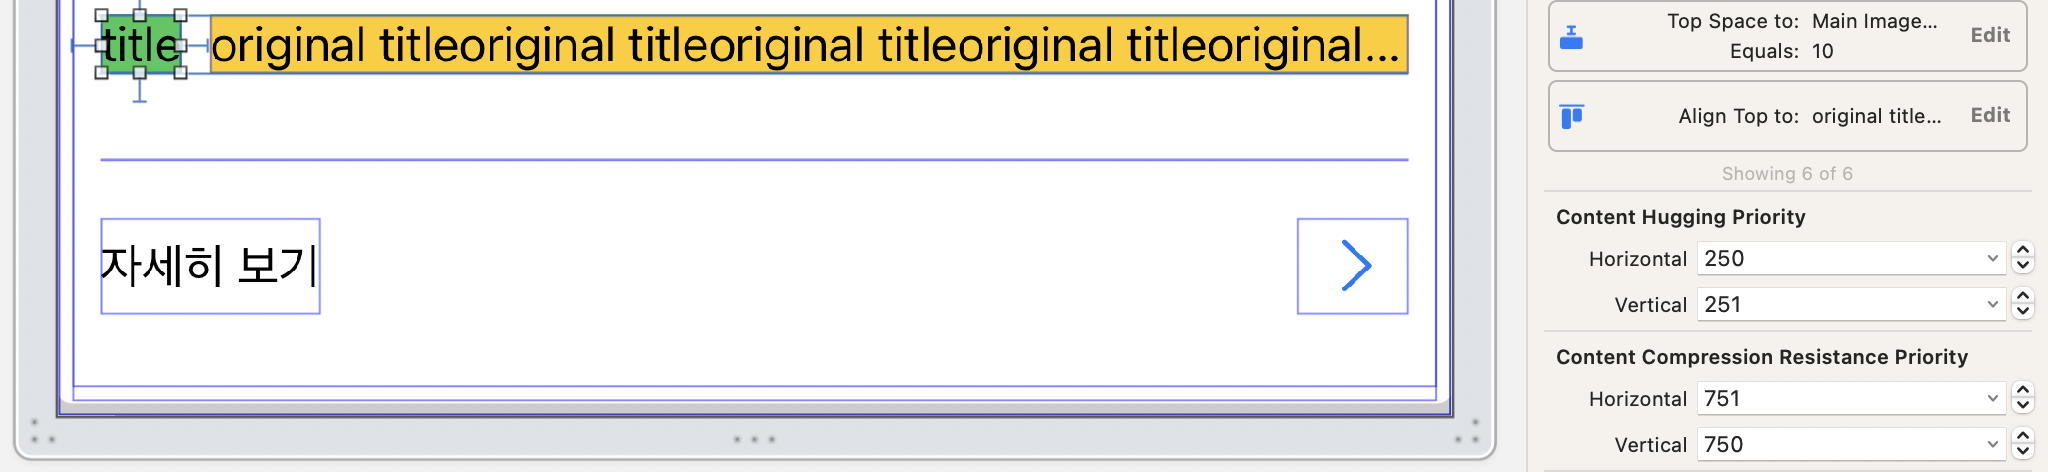
- 만약 위 그림에서 original title의 길이가 너무 커지면, 레이아웃이 깨진다
- 실제 앱 구동
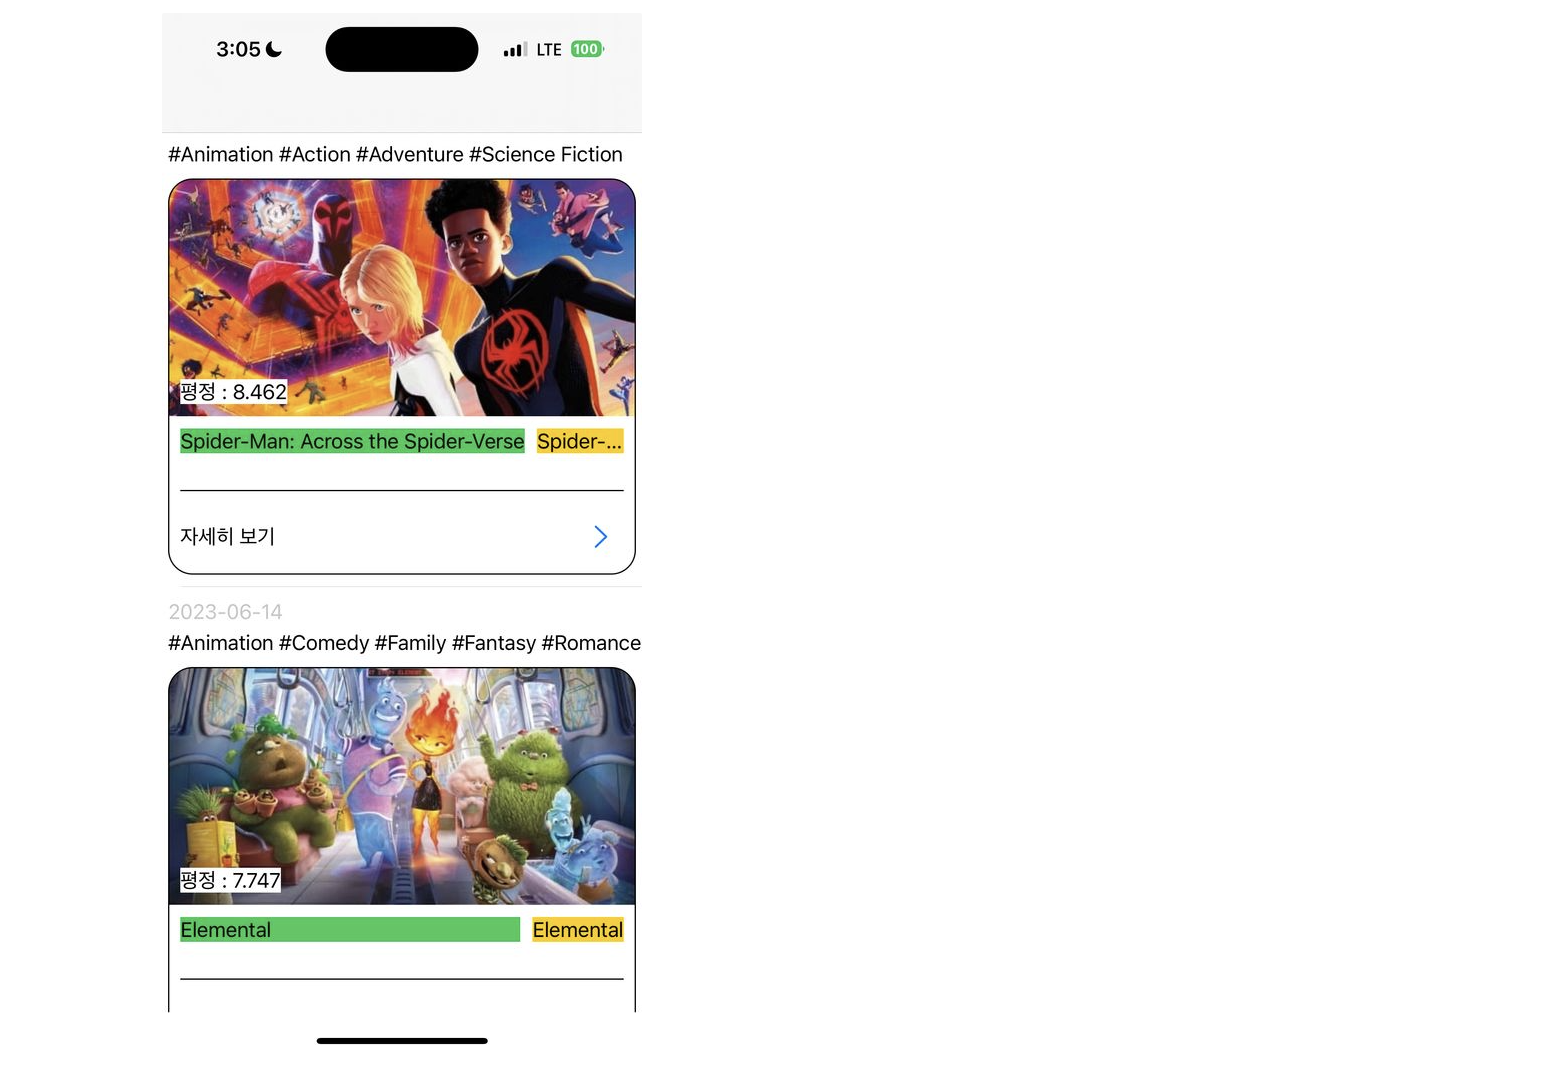
- 우연히 두 셀이 비슷하게 출력되긴 했지만, 전혀 다른 상황인 점을 캐치하자
Code Base
- 스토리보드를 사용하지 않고, 코드로만 화면을 구현한다
- 인스턴스 생성 + 속성 정의
a. 클로저 사용
b.lazy var+func사용
c.let/var+static func사용
- 루트 뷰에 추가
view.addSubview()
a. 각각 추가
b. for loop 사용
c. forEach 사용
-
레이아웃
a. frame 기반 -> 한계 (디바이스의 크기가 다양해짐)
b. AutoResizingMask, AutoLayout -> 스토리보드
c. NSLayoutConstrainttranslatesAutoresizingMaskIntoConstraints = falseisActiveaddConstraints
d. NSLayoutAnchor
e. SnapKit
CoreLocation + MapKit
권한
- 아이폰 위치 서비스를 켰냐 껐냐
- 켰다 -> 권한 요청
- 허용 -> 접근 가능
- 나중에 거부 -> alert 띄워서 iOS 시스템 설정 쪽으로 유도
- 거절 -> alert 띄워서 iOS 시스템 설정 쪽으로 유도
- 허용 -> 접근 가능
- 껐다 -> alert 띄워서 iOS 시스템 설정 쪽으로 유도
- 켰다 -> 권한 요청
코드
1. import
import CoreLocation
import MapKit
2. 인스턴스 생성
let locationManager = CLLocationManager()
let mapView = MKMapView()
3. 프로토콜 연결
locationManager.delegate = self
mapView.delegate = self
4. 내장함수
extension LocationViewController: CLLocationManagerDelegate {

	// 사용자의 위치를 성공적으로 가져온 경우
	func locationManager(_ manager: CLLocationManager, didUpdateLocations locations: [CLLocation]) {
		// 날씨 API를 호출하거나, 지도의 annotation을 추가하기

		// 사용자의 위치에 지도 anotation 추가하고, 화면 포커스 지정
		if let coordinate = location.last?.coordinate {
			setRegionAndAnnotation(center: coordinate)  // 보여지는 범위 조정
		}

		locationManager.stopUpdatingLocation()  // 이제 stop
	}


	// 사용자의 위치를 가져오는 데 실패한 경우
	// (권한 거부, gps 박살, ...)
	func locationManager(_ manager: CLLocationManager, didFailWithError error: Error) {
	}


	// 사용자의 권한 상태가 바뀐 경우
	// (거부 -> 허용, notDetermined -> 허용/거부 등등)
	// - iOS 14 이상
	func locationManagerDidChangeAuthorization(_manager: CLLocationManager) {
		checkDeviceLocationAuthorization()
	}

	// - iOS 14 미만
	func locationManager(_ manager: CLLocationManager, didChangeAuthorization status: CLAuthorizationStatus) {
	}
}


extension LocationViewController: MKMapViewDelegate {

	// 지도를 움직였다가 멈추면 호출
	func mapView(_ mapView: MKMapView, regionDidChangeAnimated animated: Bool) {
	}

	// 뭐 선택하면 호출
	func mapView(_ mapView: MKMapView, didSelec annotation: MKAnnotation) {
	}

}
5. 커스텀 함수
// 원하는 annotation을 설정
func setAnnotation(type: Int) {
	// mapView.removeAnnotation
	// mapView.addAnnotation
	// mapViwe.removeAnnotations(mapView.annotations)    // 다지워
}


// 화면에 보여질 위치(범위) 설정 + annotation 추가
func setRegionAndAnnotation(center: CLLocationCoordinate2D) {

	// 위치
	let region = MKCoordinateRegion(
		center: center,
		latitudinalMeters: 100,
		longitudinalMeters: 100
	)
	mapView.setRegion(region, animated: true)

	// annotation
	let annotation = MKPointAnnotation()  // 기본 모양
	annotation.title = "여긴 어디입니다"
	annotation.coordinate = center
	mapView.addAnnotation(annotation)
}


// 위치 권한을 허용해달라는 alert 실행 -> 설정 창으로 바로 이동
func showLocationSettingAlert() {

	let alert = UIAlertController(
		title: "위치 정보 이용",
		message: "위치 서비스를 이용할 수 없습니다. 기기의 '설정>개인정보 보호'에서 위치 서비스를 켜줘",
		preferredStyle: .alert)
	)

	let goSetting = UIAlertAction(title: "설정으로 이동", style: .default) { _ in
		if let appSetting = URL(string: UIApplication.openSettingURLString) {
				UIApplication.shared.open(appSetting)
		}
	}
	// 나머지는 alert 코드와 동일
}


// 위치 서비스 권한 체크 -> DispatchQueue.global
func checkDeviceLocationAuthorization() {

	DispatchQueue.global().async {
		if CLLocationManager.locationServicesEnabled() {    // 기기 자체의 위치 서비스 권한
				let authorization: CLAuthorizationStatus    // enum (0 ~ 5)

				// 사용자의 위치 권한
				if #available(iOS 14.0, *) {
					authorization = self.locationManager.authorizationStatus
				}
				else {
					authorization = CLLocationManager.authorizationStatus()
				}

				// 타 작업은 다시 DipatchQueue.main
				DispatchQueue.main.async {
					self.checkCurrentLocationAuthorization(status: authorization)
				}
		}
		else {
				print("위치 서비스가 꺼져 있기 때문에 위치 권한 요청을 할 수 없습니다")
		}
	}
}


// 현재 권한에 따른 작업 실행
func checkCurrentLocationAuthorization(status: ClAuthorizationStatus) {
	switch status {
	case .notDetermined:
		// 정확도 설정
		locationManager.desiredAccuracy = kCLLLocationAccuracyBest
		// 권한 선택 alert (info.plist 필수)
		locationManager.requestWhenInUseAuthorization()
	case .restricted:
	case .denied:
		// 위치 권한 설정 유도
		showLocationSettingAlert()
	case .authorizedAlways:
	case .authorizedWhenInUse:
		// didUpdateLocation 메서드 실행
		locationManager.startUpdatingLocation()
	case .authorized:
	@unknown default:    // "위치 권한 종류가 추후에 더 생길 가능성 대비"
}
6. viewDidLoad
override func viewDidLoad) {
super.viewDidLoad()
checkDeviceLocationAuthorization()
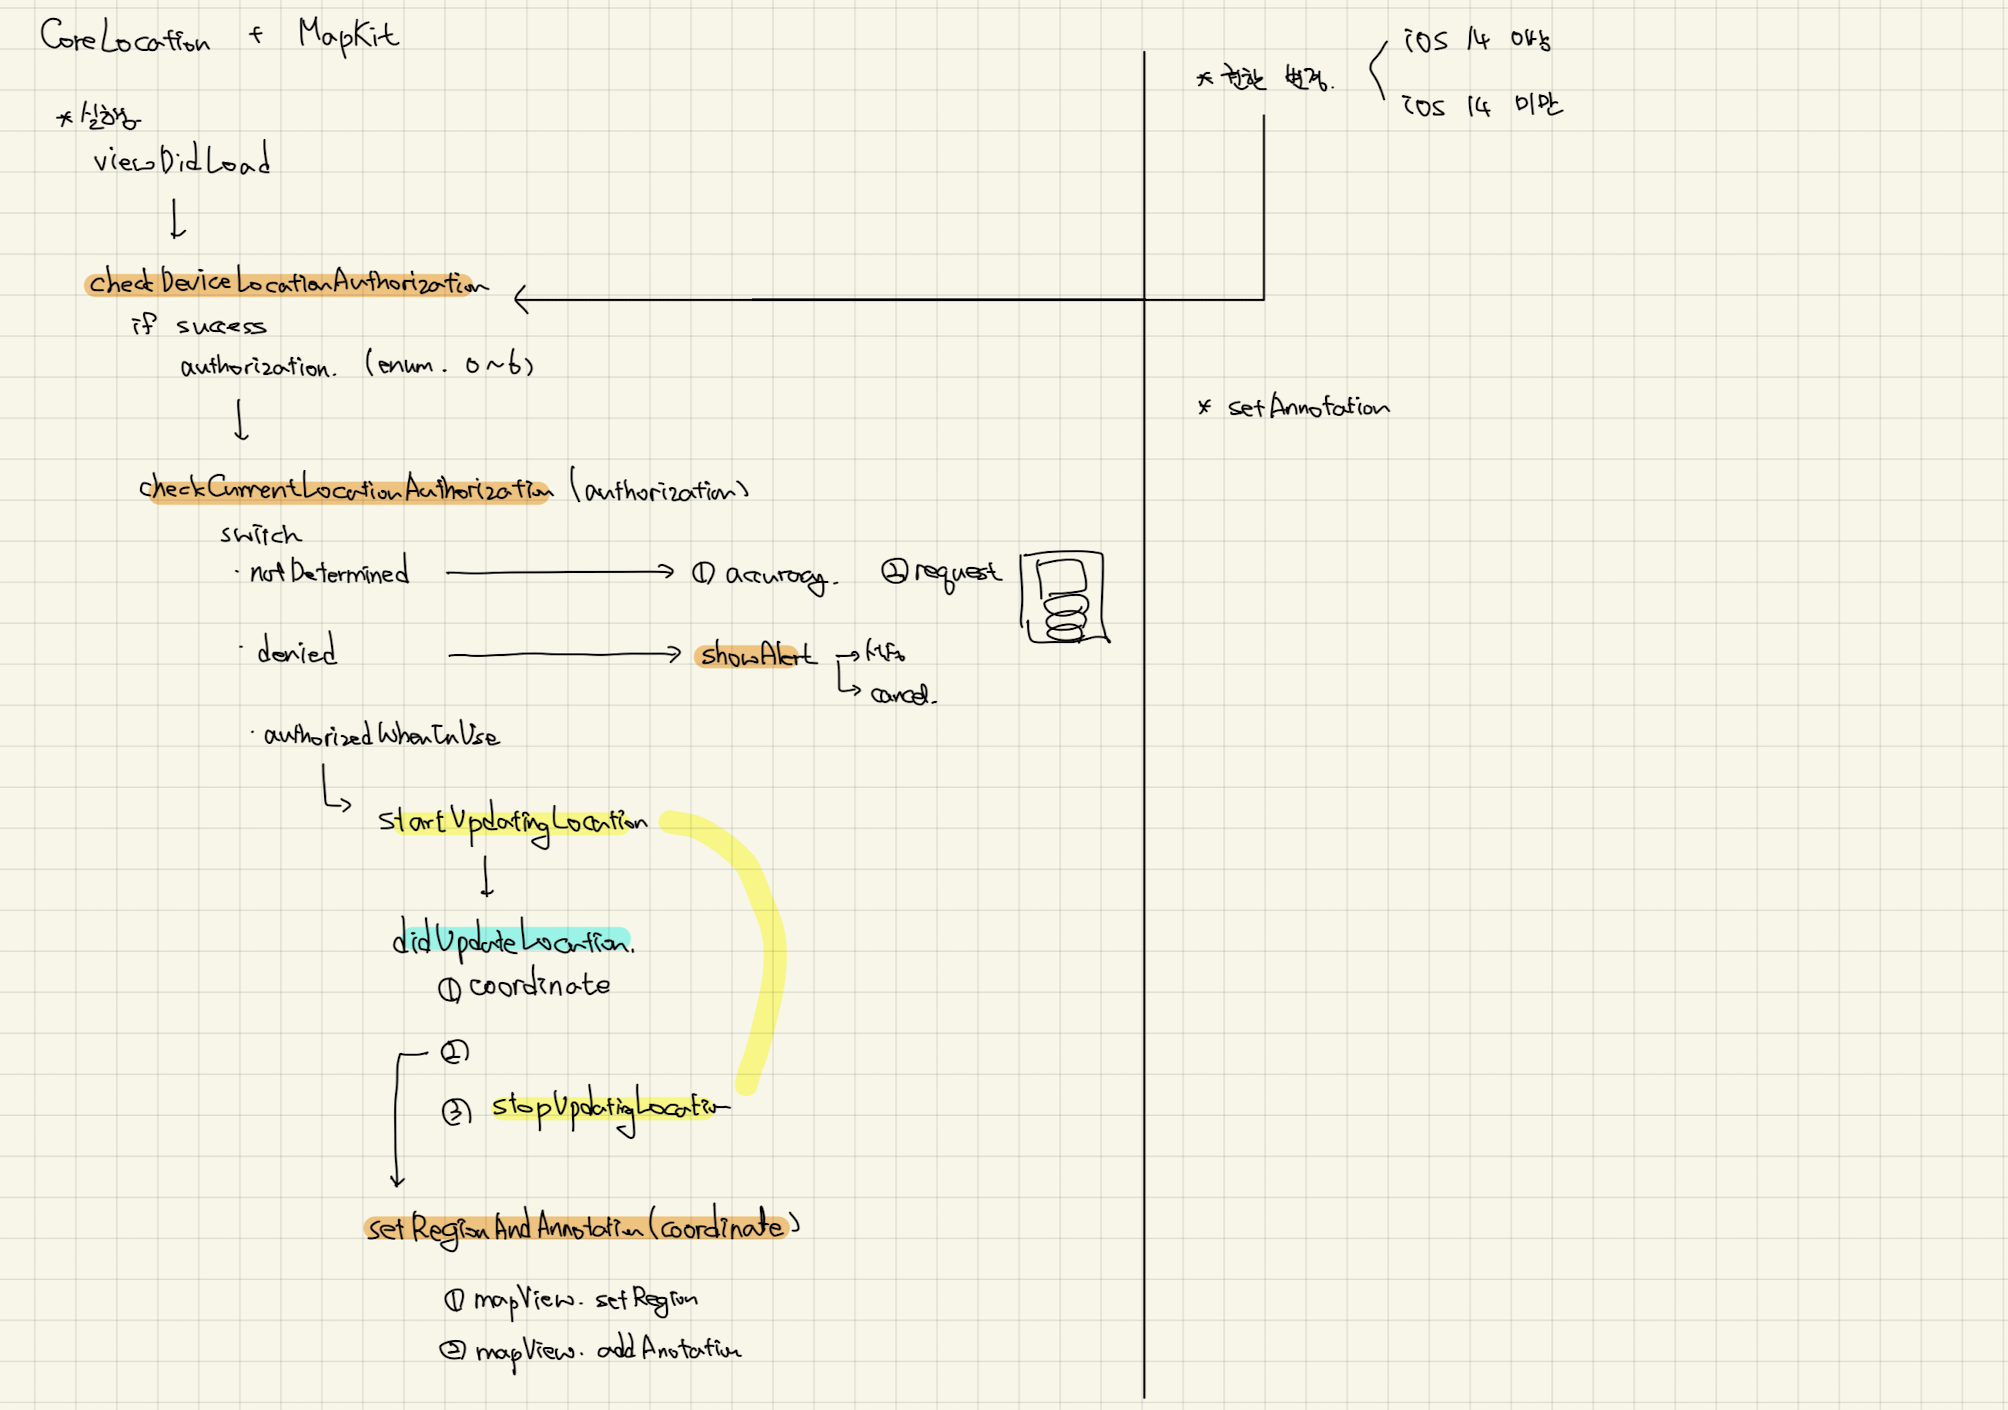
}Flow Chart
ImagePickerController
- deprecated 예정
- 인스턴스 생성
let picker = UIImagePickerController()
let fontPicker = UIFontPickerViewController()		// 폰트 피커
let colorPicker = UIColorPickerViewController() // 컬러 피커- 소스 타입 확인, 프로토콜 연결, 옵션 설정 + present
// 소스 타입에 접근 가능한지 확인 (.photoLibrary, .camera)
guard let UIImagePickerController.isSourceTypeAvailable(.photoLibrary) else {
	print("갤러리 사용 불가. 사용자에게 얼럿 메세지 띄워주기")
	return
}

picker.delegate = self
picker.sourceType = .photoLibrary
picker.allowsEditing = true
// allowsEditing : 편집할 수 있는 창
// => didFinish에서 originalImage -> editedImage로 변경

present(picker, animated: true)- 프로토콜 채택, 함수 선언
- (UIImagePickerControllerDelegate, UINavigationControllerDelegate)
extension TextViewController: UIImagePickerControllerDelegate, UINavigationControllerDelegate {
	// 취소 시 실행
	func imagePickerControllerDidCancel(_ picker: UIImagePicerController) {
    	dismiss(animated: true)
    }

    // (사진 선택 or 카메라 촬영) 직후
	func imagePickerController(_ picker: UIImagePickerController, didFinishPickingMediaWithInfo info: [UIImagePickerController.InfoKey: Any]) {
    // info : 딕셔너리 타입

        if let image = info[UIImagePickerController.InfoKey.editedImage] as? UIImage {
        	// 편집한 이미지 : editedImage
            // 원본 이미지 : originalImage

            self.photoImageView.image = image
            dismiss(animated: true)
        }
    }
}
Generic + Transition
- Generic : 타입에 유연하게 대응하기 위한 요소
- 코드 중복과 재사용에 대응하기 좋아서 추상적인 표현 가능
- 프로토콜과 함께 맛있게 사용 가능
- 타입 제약(Type Constraints)
- 클래스 타입 제약 : 해당 클래스를 상속받은 타입만 사용 가능
func configureBorder<T, UIView)(view: T) { view.layer.borderColor = UIColor.black.cgColor view.layer.borderWidth = 1 } - 프로토콜 타입 제약 : 해당 프로토콜을 채택한 타입만 사용 가능
func sum<T: AdditiveArithmetic>(a: T, b: T) -> T {
    return a + b
}
- 클래스 타입 제약 : 해당 클래스를 상속받은 타입만 사용 가능
- T (Type Parameter), U(UpperCased)
활용 (화면 전환)
함수 선언
enum TransitionStyle {
	case present                  // 네비게이션 없이 present
	case presentNavigation        // 네비게이션 달아서 present
	case presentFullNavigation    // 네비게이션 달고 fullscreen으로 present
	case push                     // 푸쉬이
}

func transition<T: UIViewController>(viewController: T.Type, storyboard: String, style: TransitionStyle) {

	// 1. 스토리보드가 살아있을 때
	let sb = UIStoryboard(name: storyboard, bundle: nil)
	guard let vc = sb.instantiateViewController(withIdentifier: String(describing: viewController))
		as? T else { return }

	// 2. 스토리보드가 죽었을 때
	let vc = T()
	// let vc = viewController.init() 동일하게 실행

	// 화면 전환 방식
	switch style {
	case .present:
		present(vc, animated: true)
	case .presentNavigation:
		let nav = UINavigationController(rootViewController: vc)
		present(nav, animated: true)
	case .presentFullNavigation:
		let nav = UINavigationController(rootViewController: vc)
		nav.modalPresentationStyle = .fullScreen
		present(nav, animated: true)
	case .push:
		navigationController?.pushViewController(vc, animated: true)
	}
}
화면 전환
transition(viewController: GenericViewController.self, storyboard: "Main", style: .presentFullNavigation)Meta Type
- 이론적으로 공부할 때는 오케이 하고 넘어갔는데,
막상 실제 코드에 사용하니까 직관적으로 바로 이해가 되지 않았다
- 위 코드에 작성한 내용 기반으로 정리해둔다
<T: UIViewController>- T -> UIViewController를 상속받는 특정 하나의 클래스 (타입)
-
(viewController: T.Type, storyboard: String, ...)-
T.Type -> T 자체의(?) 타입!!
- T보다 더 큰(?) 범위
- T같은 애들(?)을 포함하는 하나의 "타입"
-
T -> 지금 들어온 그 특정 하나의 클래스
-
guard let vc = ... as? T else { return }- T -> 지금 들어온 그 특정 하나의 클래스
let vc = T()- T() -> 그 특정 하나의 클래스의 인스턴스 생성
let vc = viewController.init()- 얘는 생성자 통해서 인스턴스 생성해야 한다
스토리보드 제거
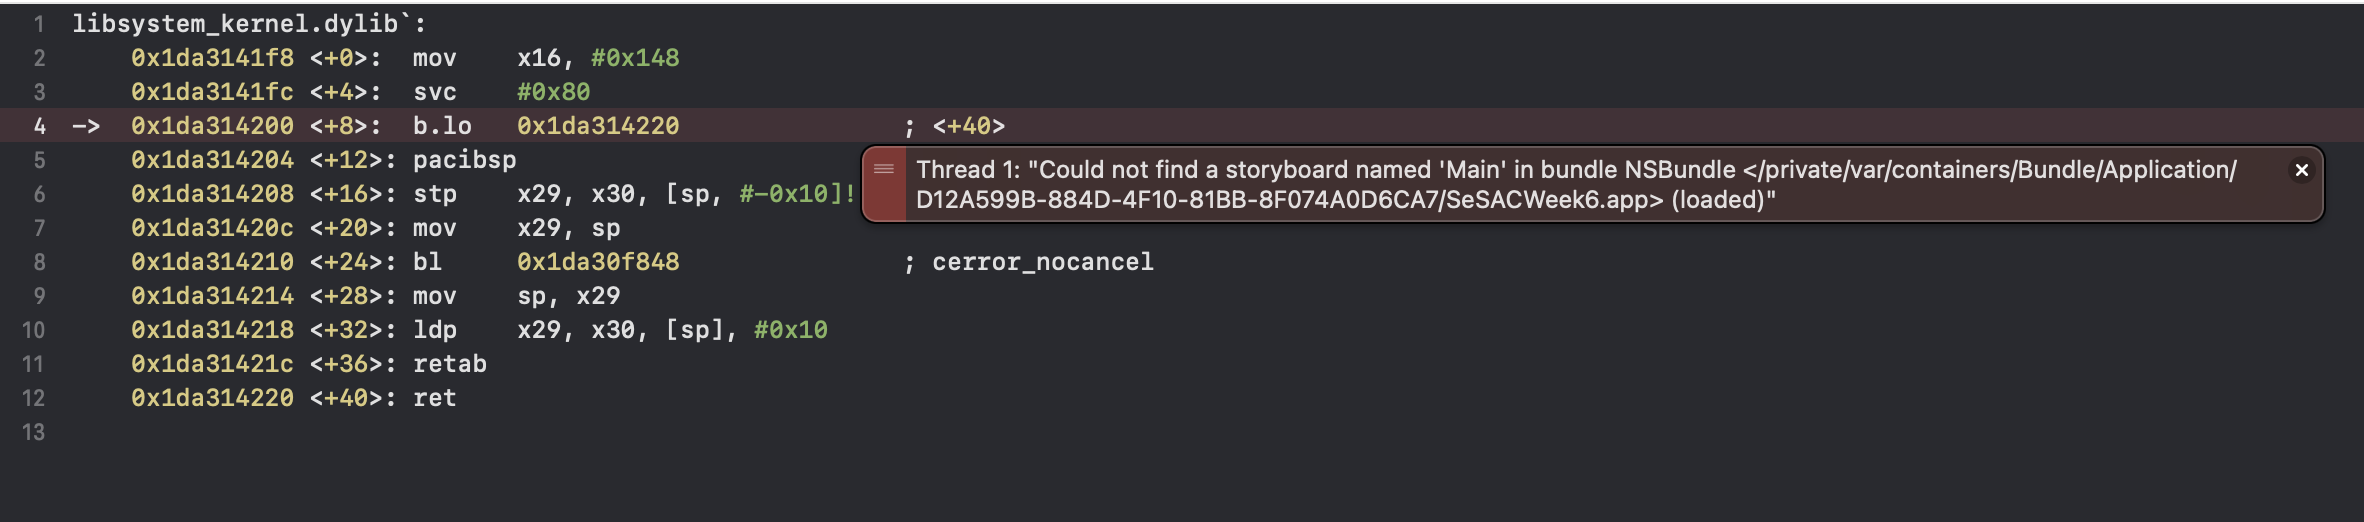
main.storyboard파일 제거 (Move To Trash)
- 프로젝트 Run -> main 찾을 수 없어서 에러
- 스토리보드를 사용하도록 설정된 모든 부분을 수정한다
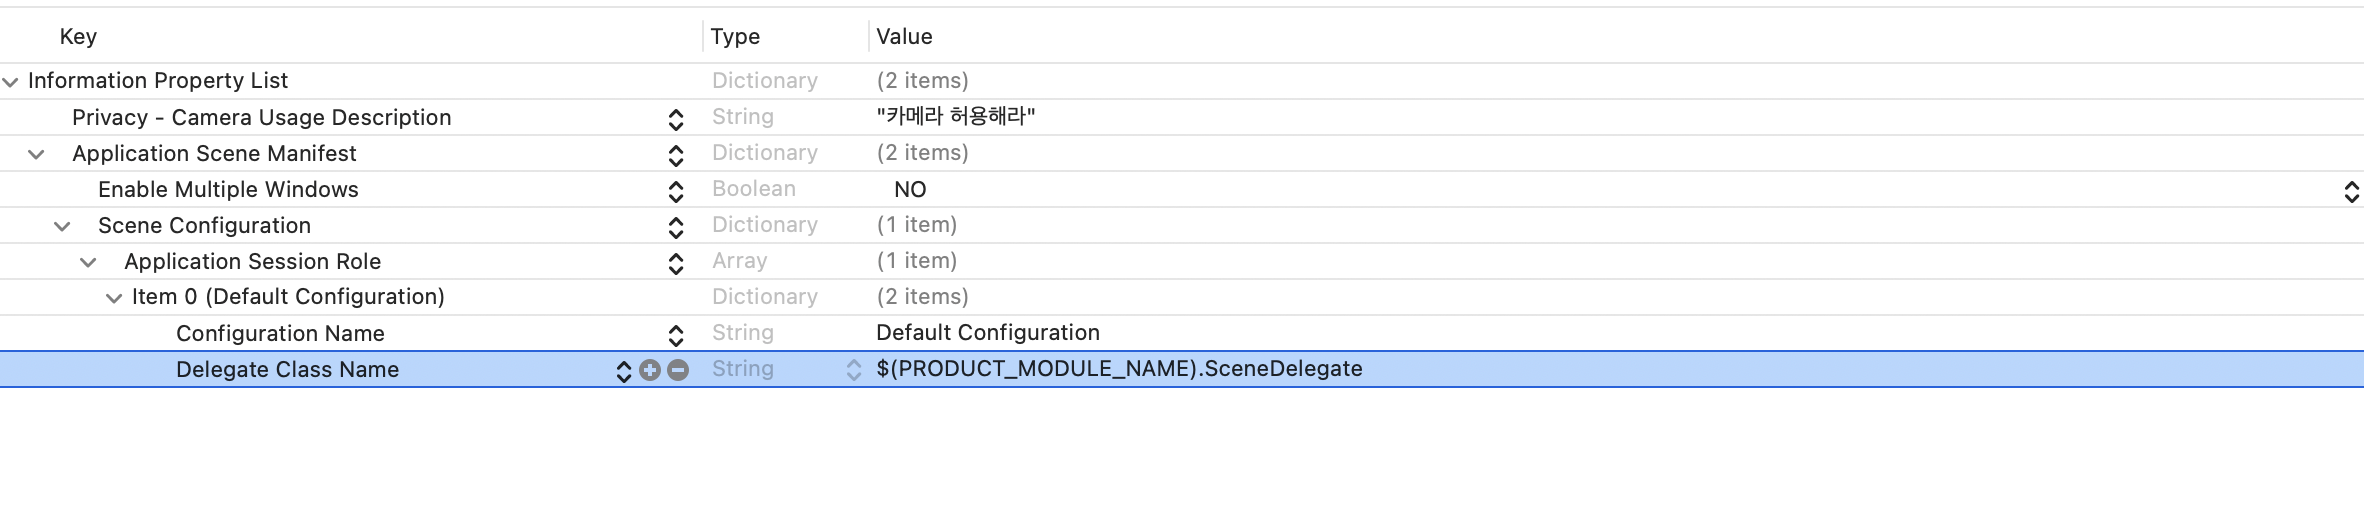
-
info.plist
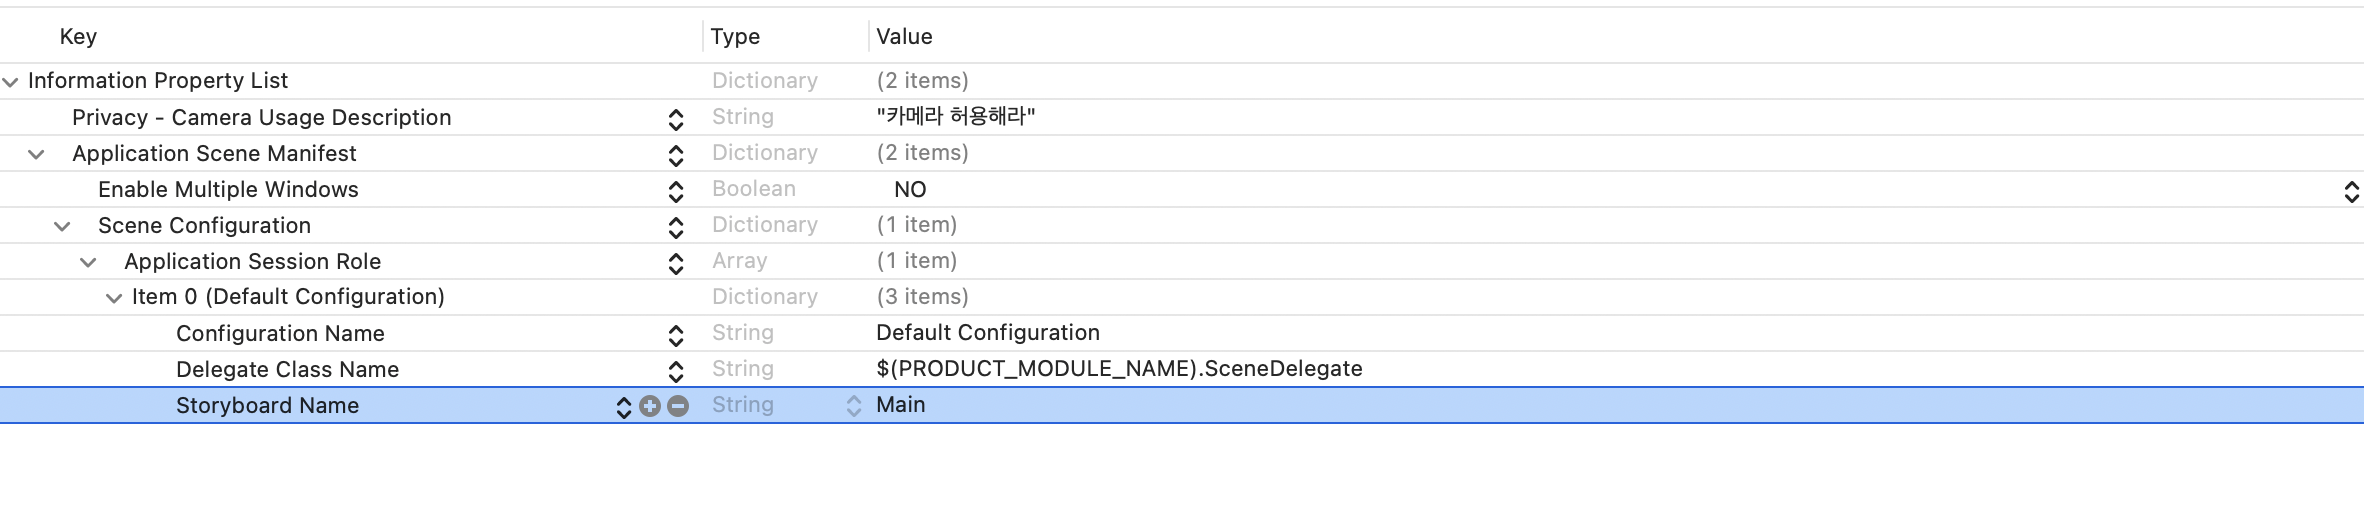
-> storyboard Name Delete
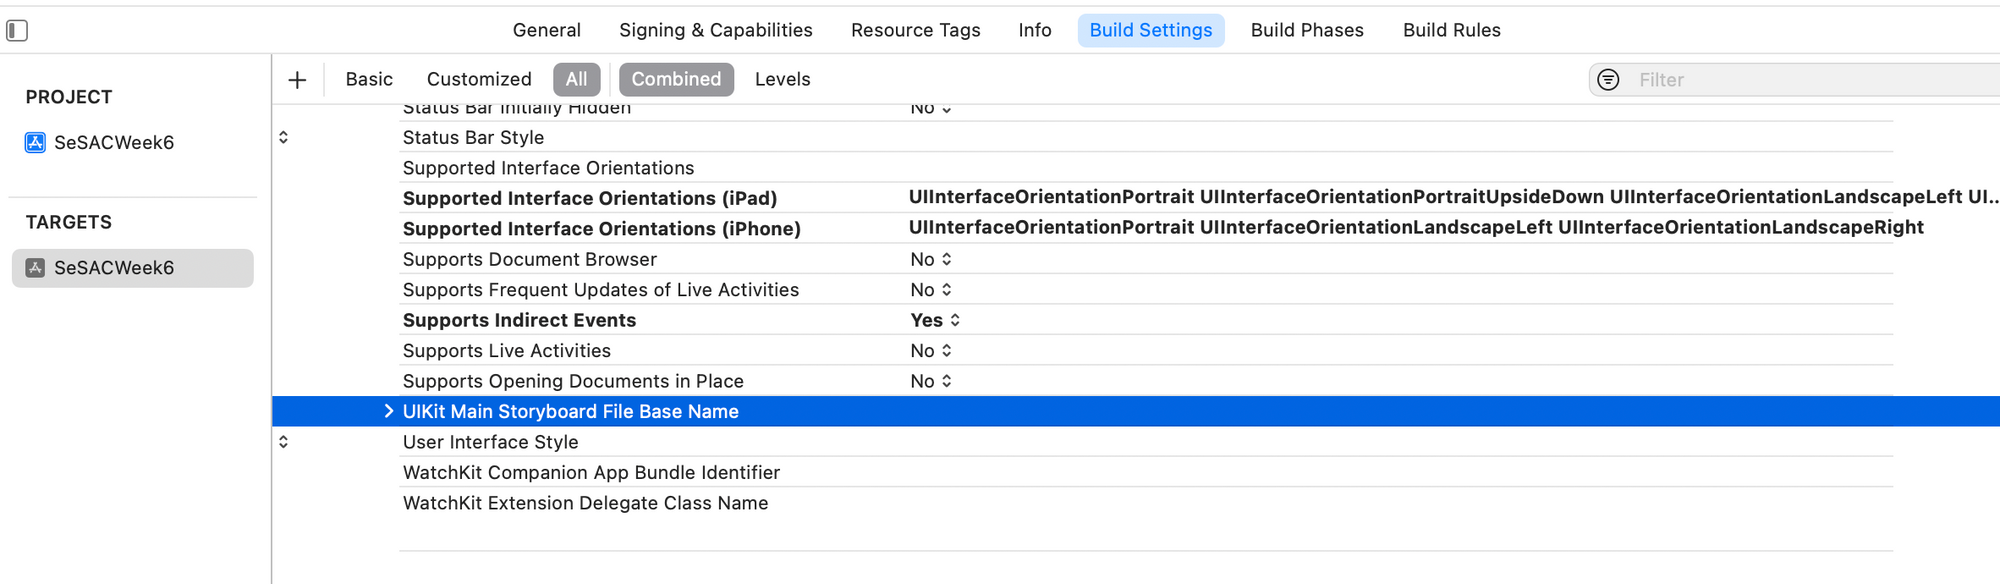
-
build setting
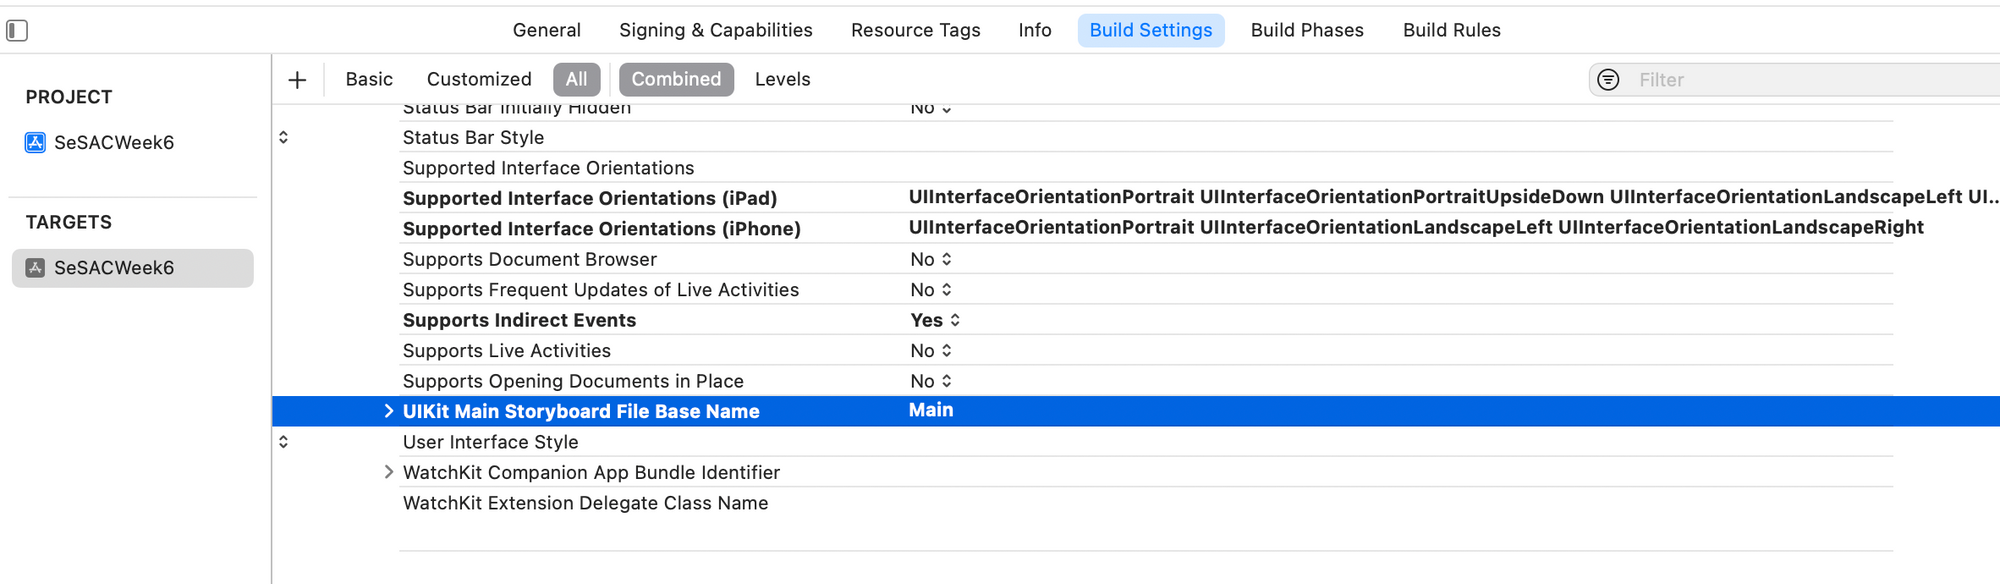
-> Erase Main
-
- SceneDelegate에서 시작 화면 제어
// SceneDelegate.swift
func scene(_ scene: UIScene, willConnectTo session: UISceneSession, options connectionOptions:UIScene.ConnectionOptions) {

	guard let scene = (scene as? UIWindowScene) else { return }
	window = UIWindow(windowScene: scene)
	let vc = GenericViewController()
	window?.rootViewController = vc
	window?.makeKeyAndVisible()
}