View & ViewController 역할분담
(CollectionViewCell protocol)
- collectionView를 화면에 구현하기 위해서는,
프로토콜(delegate, datasource) 을 채택하고
함수(cellForRowAt, didSelectItemAt, ...)를 정의해야 한다
- 화면에 대한 정보가 View와 ViewController 클래스로 나뉘어져 있을 때,
어느 클래스에서 프로토콜을 채택해야 할까
- 보통 실질적인 데이터는 ViewController 클래스에서 관리하는 경우가 많다.
(서버 통신 등)
- 정적인 데이터를 cell에 나타낼 때는 View에서 함수를 정의하는 것이 적절할 수 있고,
서버 통신 등 동적인 데이터를 나타낼 때는 ViewController에서 하는 것이 적절할 수 있다.
- 뭐가 정답이라고 할 수는 없다
1. View에서 채택
- 셀을 선택했을 때 화면 전환이 되는 기능을 구현하려고 할 때,
View에서 함수를 정의하면 바로 push/pop이나 present/dismiss 함수를 사용할 수 없다. (ViewController 클래스의 메서드이기 때문이다)
- 그래서 이 기능을 delegate pattern을 이용해서 ViewController 클래스로부터 전달받아야 한다.
- 이 지점에서 weak 키워드의 필요성(Memory Leak)을 직접 확인해볼 수 있었다.
Memory Leak
// FirstProtocol.swift
protocol FirstSendDataProtocol {
    func receiveData(_ sender: String)
}


// FirstView.swift
class FirstView: BaseView {

    var delegate: FirstSendDataProtocol?

    lazy var collectionView = {
        let view = UICollectionView(frame: .zero, collectionViewLayout: collectionViewLayout())

        view.register(PracticeCollectionViewCell.self, forCellWithReuseIdentifier: "PracticeCollectionViewCell")

        // First
        view.delegate = self;
        view.dataSource = self;

        return view
    }()

    deinit {
        print("First 뷰 deinit")
    }
}

extension FirstView: UICollectionViewDelegate, UICollectionViewDataSource {
    func collectionView(_ collectionView: UICollectionView, didSelectItemAt indexPath: IndexPath) {

        delegate?.receiveData("hi \(indexPath)")
    }
}


// FirstViewController.swift
class FirstViewController: BaseViewController {

    let mainView = FirstView()

    override func loadView() {
        self.view = mainView

        mainView.delegate = self
    }

    deinit {
        print("First 뷰컨 deinit")
    }
}

extension FirstViewController: FirstSendDataProtocol {
    func receiveData(_ sender: String) {
        print(sender)
        navigationController?.popViewController(animated: true)
    }
}-
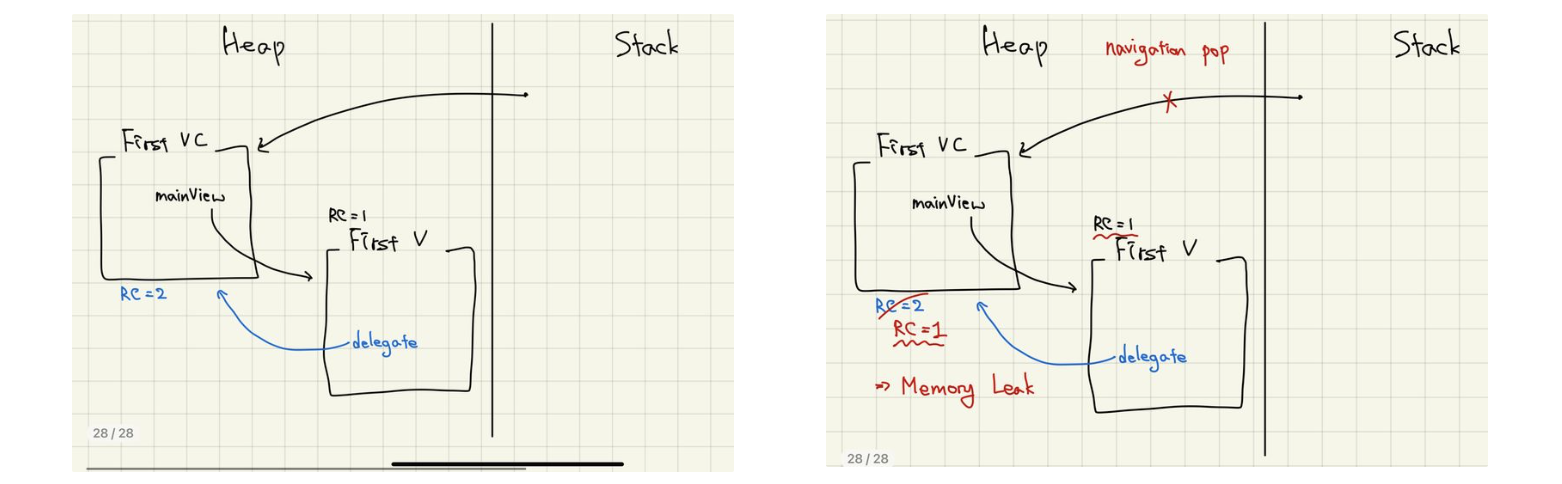
First 화면에 들어갔다가 나오면, 정상적으로 deinit() 함수가 실행되어야 하는데, 함수가 실행되지 않는다.
-
delegate 변수가 First VC의 RC를 올려주고 있기 때문에,
Stack 상에서 First VC의 RC를 낮춰도, 여전히 RC가 남아있게 된다 -
즉, Memory Leak이 발생한다
weak + AnyObject
-
delegate가 First VC를 가리키긴 하지만, RC를 올리지 않게 하기 위해 weak 키워드를 사용한다.
-
weak은 거의 클래스에서만 사용하기 때문에, delegate 프로토콜에 AnyObject를 써주어서 클래스만 해당 프로토콜을 채택할 수 있게 한다
// FirstProtocol.swift
protocol FirstSendDataProtocol: AnyObject {
	func receiveData(_ sender: String)
}


// FirstView.swift
weak var delegate: FirstSendDataProtocol?
2. ViewController에서 채택
-
View에서는 객체 생성 / 뷰에 등록(addSubview) / 레이아웃 만 설정해준다
-
네트워크 통신을 통해 받은 데이터들을 바로 cell에 적용해줄 수 있다
// SecondViewController.swift
class SecondViewController: BaseViewController {
	let mainView = SecondView()

    override func loadView() {
        self.view = mainView

        // Second
        mainView.collectionView.dataSource = self
        mainView.collectionView.delegate = self
    }
}

extension SecondViewController: UICollectionViewDelegate, UICollectionViewDataSource {

    func collectionView(_ collectionView: UICollectionView, didSelectItemAt indexPath: IndexPath) {
    	// 바로 화면 전환이 가능하다
        navigationController?.popViewController(animated: true)
    }
}
URLSession
요약
1. 환경설정 (Configuration)
- 일반적인 프로퍼티(셀룰러 연결, 타임아웃, 요청 최대시간, ...), 쿠키 정책, 보안 정책, 캐시 정책(캐시 활성화/비활성화, 만료기간, ...), 백그라운드 전송 등을 세부적으로 설정한다
- Shared
- Singleton Pattern
- 동작&전송에 대한 정책이 기본적으로 설정되어 있어서 커스텀이 불가능
- 간단하고 기본적인 요청인 경우 사용한다
- 구현이 간단하지만 백그라운드 전송을 지원하지 않는다
- 응답을 반드시 completionHandler로 전달한다
- Default
- Shared와 유사하나, 커스텀이 가능하다
- 응답에서 delegate를 통해 세부적인 제어가 가능하다
- Ephemeral
- 쿠키, 캐시, 인증 정보 등을 디스크에 기록하지 않는다
- private 기능 구현할 때 사용한다 (시크릿 모드)
- Background
- 앱이 실행중이지 않을 때나 백그라운드 상태에서 데이터 다운로드/업로드
2. 데이터 (Task)
- URLSession을 통해 생성되는 개별 요청이 Task이다
- 데이터 전달 방식과 구현 목적에 따라 type이 나뉜다
- dataTask, uploadTask, downloadTask, streamTask
- Task는 suspend 상태로 시작하기 때문에
반드시 resume()을 호출해야 네트워크 통신을 시작할 수 있다
2.5. 요청 (Request)
-
네트워크 요청에 대한 정보를 표현하는 객체
-
URL 객체를 통해 통신하거나,
URLRequest 객체를 통해 세부 옵션(캐싱, HTTP Method 등)을 선택할 수 있다// URLRequest init( url: URL, cachePolicy: URLRequest.CachePolicy = .useProtocolCachePolicy, timeoutInterval: TimeInterval = 60.0 )
3. 응답 (Response)
- URL 로드 요청에 대한 응답과 관련된 메타데이터
- 데이터 처리 2가지 방법
- completionHandler
- Task가 종료되고 난 시점에 한 번만 호출
- 서버로부터 전달받은 data와 HTTP Header,
response (응답에 대한 메타데이터 등의 정보),
error (요청 실패했을 때)
- SessionDelegate (protocol)
- Task가 실행되는 동안 발생할 수 있는 다양한 상황에 세부적으로 처리
- 시작 / 받는 동안 / 완료
코드
shared
APIManagerClosure.swift (class)
class APIManagerClosure {

	static let shared = APIService()
    private init() { }

    func callRequest(completionHandler: @escaping (Photo?) -> Void) {
    	// 에러가 났을 때 completionHandler(nil)로 실행시키기 때문에
        // Photo? 로 선언한다

    	let url = URL(string: ~~)
        var request = URLRequest(url: url!, timeoutInterval: 10)

        URLSession.shared.dataTask(with: request) { data, response, error in

            /* ===========DispatchQueue.main.async ===========*/

            // 1. 에러 체크
            if let error {
            	completionHandler(nil)
                return
            }


            // 2. response 체크
            guard let response = response as? HTTPURLResponse,
            	(200...500).contains(reseponse.statusCode) else {
                	completionHandler(nil)
                    return
            }


            // 3. data 체크
            guard let data = data else {
            	completionHandler(nil)
                return
            }

            do {
            	let result = try JSONDecoder().decode(Photo.self, from: data)
                completionHandler(result)
                print("SUCCESS. RESULT : ", result)
            }
            catch {
            	print("ERROR : ", error)
                completionHandler(nil)
            }
        }.resume()
    }
}
SecondViewController (2.)
- API 호출
// SecondViewController.swift

class SecondViewController: BaseViewController {

    var list: Photo = Photo(total: 0, total_page: 0, result: [])

    override func viewDidLoad() {
    	super.viewDidLoad()

        APIMangerClosure.shared.callRequest { photo in
        	// photo에 nil 들어올 가능성
        	guard let photo = photo else {
            	// Error Alert을 띄워준다
            	return
            }

            print("API END")

            /* ===========DispatchQueue.main.async ===========*/
            self.mainView.collectionView.reloadData()
        }
    }
} - 여기까지 작성하면, 보라색 에러가 뜬다.
- UI 관련 작업은 반드시 main에서 해줘야 하기 때문에
DispatchQueue.main.async로 해당 코드를 감싸주어야 한다
- 이미지 다운로드 (KingFisher 사용 x)
// SecondViewController.swift
extension SecondViewController: UICollectionViewDelegate, UICollectionViewDataSource {

    func collectionView(_ collectionView: UICollectionView, cellForItemAt indexPath: IndexPath) -> UICollectionViewCell {
        guard let cell = collectionView.dequeueReusableCell(withReuseIdentifier: "PracticeCollectionViewCell", for: indexPath) as? PracticeCollectionViewCell else { return UICollectionViewCell() }
        cell.backgroundColor = .blue

        // 이미지 다운로드
        let thumb = list.results[indexPath.item].urls.thumb	// 이미지 링크
        let url = URL(string: thumb)	// url 변환

        DispatchQueue.global().async {
        	// Data() 코드가 동기로 실행되기 때문에 비동기도 돌려준다

            let data = try! Data(contentsOf: url!)

            // UI 작업은 다시 main으로 돌려준다
            DispatchQueue.main.async {
            	cell.imageView.imate = UIImage(data: data)
            }
        }
        return cell
    }
}
default
LoadingViewController (viewController class)
class LoadingViewController: UIViewController {

    // 세션 선언
    var session: URLSession!

    // 몇 % 다운받았는지 확인하기 위한 요소
    // 1. 총량
    var total: Double = 0
    // 2. 현재 다운받은 양
    var buffer: Data? {
    	didSet {
        	let result = Double(buffer?.count ?? 0) / total

            // total이 0이면 divided by zero 때문에 NaN이 출력됨
            if total != 0 {
            	progressLabel.text = "\(result * 100)%)"
            }
        }
    }

    override func viewDidLoad() {
    	super.viewDidLoad()

        // 버퍼 초기화 (초기화하지 않으면 append가 되지 않는다)
        buffer = Data()

		let url = URL(string: "https://apod.nasa.gov/apod/image/2308/M66_JwstTomlinson_3521.jpg")


        // 1. 세션 환경설정
        session = URLSession(
        	configuration: .defualt,
            delegate: self,
            delegateQueue: .main
        }

        // 2. 데이터 (Task)
        session.dataTask(with: url!).resume()
    }

    override func viewDidDisappear(_ animated: Bool) {
    	super.viewDidDisappear(animated)

        // 리소스 정리. 모두 무효화하고 취소
        session.invalidateAndCancel()

        // 진행중인 것 까지만 다운로드하고, 중지
        session.finishTasksAndInvalidate()
    }
}

extension LoadingViewController: URLSessionDataDelegate {

    // 서버에서 최초로 응답
    func urlSession(_ session: URLSession, dataTask: URLSessionDataTask, didReceive response: URLResponse) async -> URLSession.ResponseDisposition {
    	print("RESPONSE: ", response)

        if let response = response as? HTTPURLResponse,
        	(200...500).contains(response.statusCode) {
            	total = Double(response.value(forHTTPHeaderField: "Content-Length")!)!

                return .allow
        }
        else {
        	return .cancel
        }
    }


    // 서버에서 데이터 받을 때마다 호출
    func urlSession(_ session: URLSession, dataTask: URLSessionDataTask, didReceive data: Data) {
    	print("DATA : ", data)

        buffer?.append(data)	// 누적해서 buffer에 추가
    }


    // 서버에서 응답 완료된 후 호출
    func urlSession(_ session: URLSession, task: URLSessionTask, didCompleteWithError error: Error?) {
    	print("END")

        if let error {
        	print(error)
        }
        else {
        	guard let buffer = buffer else {
            	print(error)
                return
            }

            // 세션 환경설정에서 main으로 설정해주었기 때문에 DispatchQueue.main으로 돌릴 필요 없다
            imageView.image = UIImage(data: buffer)
        }
    }
}
값 전달
- 화면 A -> 화면 B 로 전환.
- 화면 B에서 선택한 값을 화면 A로 전달
1. Delegate Pattern
- protocol 선언 (필수 메서드)
protocol PassDataDelegate {
	func receiveData(data: String)
}- protocol 타입 변수 선언 (B.swift)
var delegate: PassDataDelegate?- 적절한 시점에 변수에 접근해서 함수 실행 (B.swift)
override func viewDidDisappear(_ animated: Bool) {	// 화면이 종료되는 시점에 전달
	super.viewDidDisappear(animated)

    if let txt = mainView.textField.text {
    	if (!txt.isEmpty) {
        	delegate?.receiveData(data: txt)
        }
    }
}- protocol 채택 후 함수 정의 (A.swift)
extension AViewController: PassDataDelegate {
	func receiveData(data: String) {
    	mainView.nameButton.setTitle(data, for: .normal)
    }
}- 변수 = self (A.swift)
@objc
func buttonClicked() {
	let vc = BViewController()
    vc.delegate = self
    navigationController?.pushViewController(vc, animated: true)
}
2. Closure
- 클로저 타입 변수 선언 (B.swift)
var completionHandler: ( (String) -> Void )?- 적절한 시점에 클로저 실행 (B.swift)
override func viewDidDisappear(_ animated: Bool) {	// 화면이 종료되는 시점에 전달
	super.viewDidDisappear(animated)

    if let txt = mainView.textField.text {
    	if (!txt.isEmpty) {
        	completionHandler(txt)
        }
    }
}- 클로저 정의 (A.swift)
@objc
func buttonClicked() {
	let vc = BViewController()
	vc.completionHandler = { str in
    	self.mainView.userNameButton.setTitle(str, for: .normal)
    }
    navigationController?.pushViewController(vc, animated: true)
}
3. Notification Center
- observer 실행 + 함수 정의 (A.swift)
override func viewDidLoad() {
	super.viewDidLoad()

    NotificationCenter.default.addObserver(
    	self,
        selector: #selector(newIntroduction),
        name: NSNotification.Name("introduction"),
        object: nil
    )
}

@objc
func newIntroduction(notification: NSNotification) {
	if let intro = notification.userInfl?["new intro"] as? String [
    	mainView.introButton.setTitle(intro, for: .normal)
    }
}- 적절한 시점에 post로 값 전달 (B.swift)
override cunf viewDidDisappear(_ animated: Bool) {
	super.viewDidDisappear(animated)

    if let txt = mainView.textView.text {
    	if (!txt.isEmpty) {
        	NotificationCenter.default.post(
            	name: NSNotification.Name(rawValue: "introduction"),
                object: nil,
                userInfo: ["new intro": txt]
            )
        }
    }
}
정방향
- A -> B로 값을 전달하려고 할 때, 같은 방법으로 Notification Center를 이용하려고 하면
정상적으로 전달이 안된다
- A에서 post
    @objc
    func introButtonClicked() {
        print("hi intro")

        /* 정바향 값전달 테스트 */
        NotificationCenter.default.post(
            name: NSNotification.Name(rawValue: "sendDataForward"),
            object: nil,
            userInfo: ["forward Data": "this is forward"]
        )

        let vc = IntroViewController()
        navigationController?.pushViewController(vc, animated: true)
}- B에서 observer
override func viewDidLoad() {
        super.viewDidLoad()

        /* 정방향 값전달 테스트 */
        NotificationCenter.default.addObserver(
            self,
            selector: #selector(printData),
            name: NSNotification.Name("sendDataForward"),
            object: nil
        )
}

@objc
func printData(notification: NSNotification) {
        print("hi")
        if let data = notification.userInfo?["forward Data"] as? String {
            print(data)
        } else {
            print("NotificationCenter 정방향 값전달 실패. data = nil")
        }
}- 아예 printData 함수가 실행이 안된다

- 신호를 받으려면, 미리 신호를 받을 준비가 되어 있어야 한다.
addObserver
즉, 미리 메모리에 올라와 있어야 한다 - "
addObserver보다post가 먼저 신호를 보내면addObserver가 신호를 받지 못한다
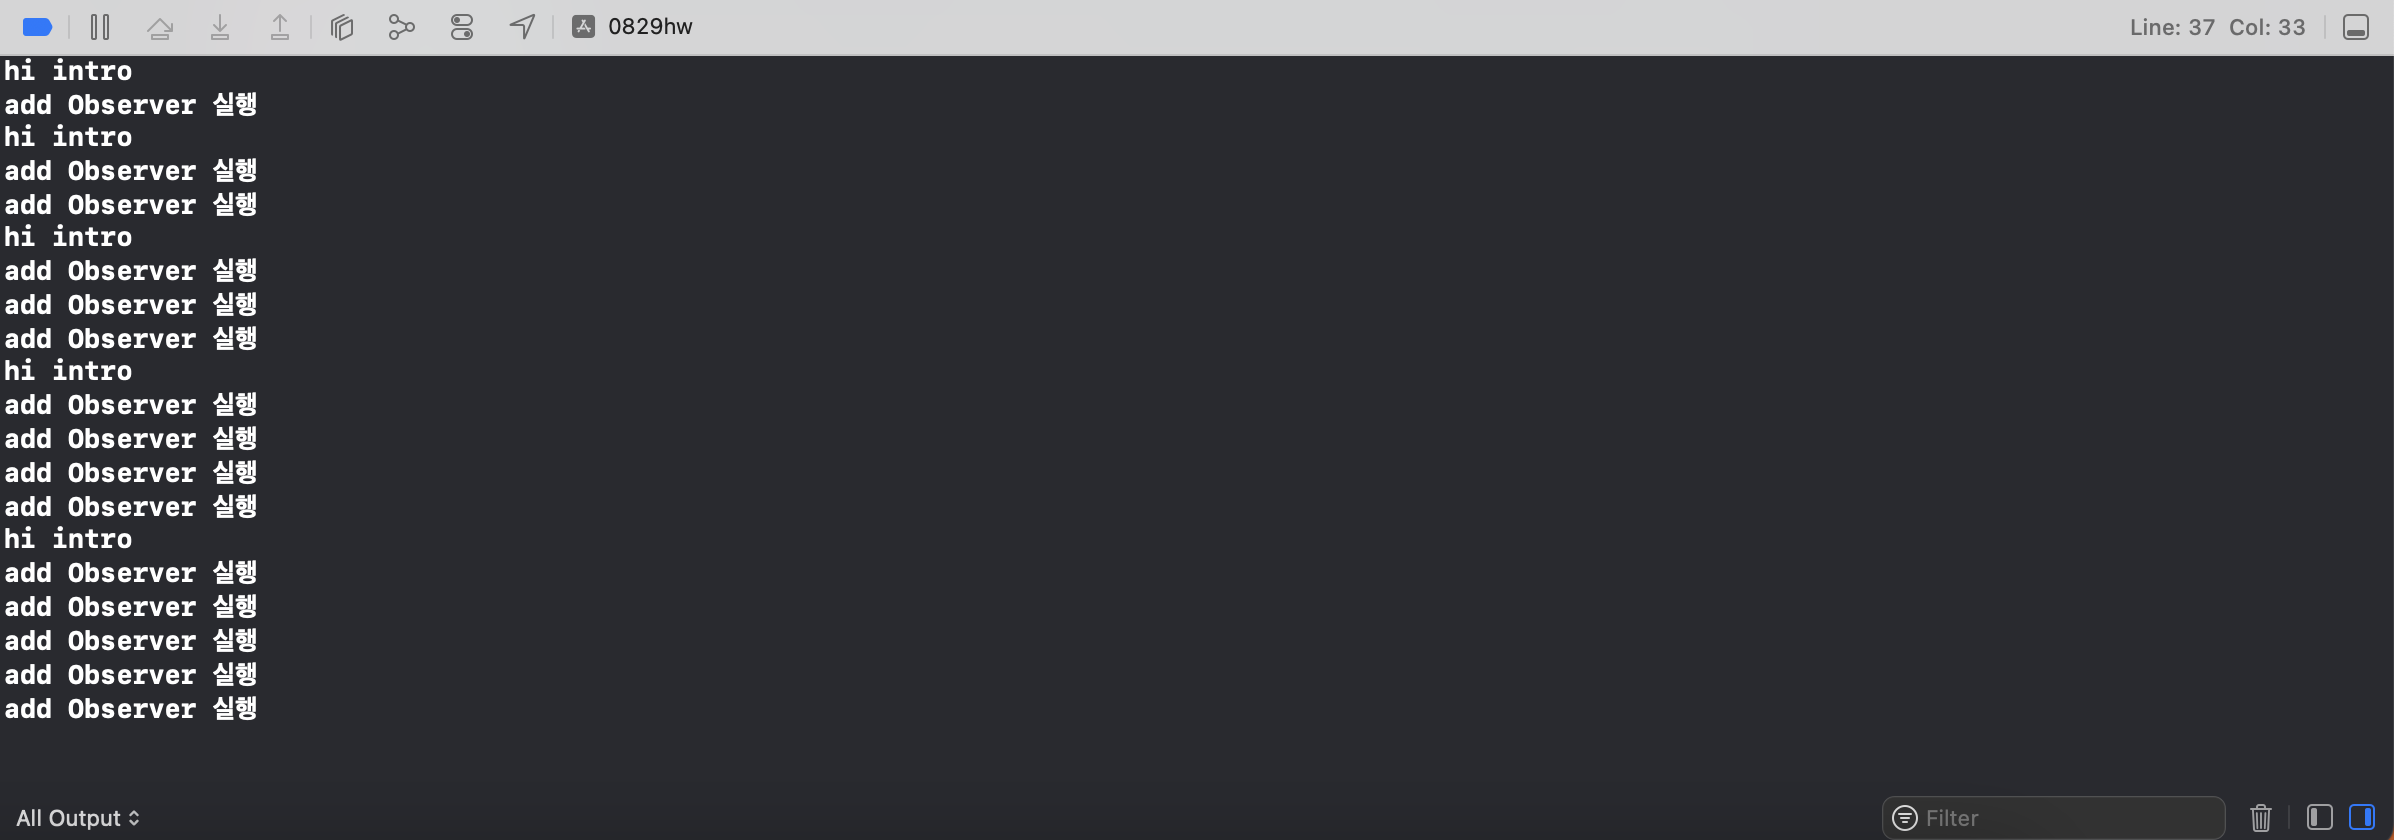
중복 Observer
-
addObserver를 실행하는 위치가 중요하다.
-
viewDidLoad에서 실행시키면 단 한 번만 실행되기 때문에 중복될 위험이 없지만,
화면을 넘어가는 버튼이나 그 외 여러 번 실행되는 곳에 addObserver를 실행시키면 여러 번 화면 전환이 일어날 때, 중복해서 addObserver가 실행되는 문제가 발생한다
    @objc
    func introButtonClicked() {
        print("hi intro")

        NotificationCenter.default.addObserver(self, selector: #selector(newIntroduction), name: NSNotification.Name("introduction"), object: nil)
        let vc = IntroViewController()
        navigationController?.pushViewController(vc, animated: true)
    }

    @objc
    func newIntroduction(notification: NSNotification) {
        print("add Observer 실행")
        if let intro = notification.userInfo?["new intro"] as? String {
            mainView.introButton.setTitle(intro, for: .normal)
        }
    }
Observer 제거
- 등록된 observer를 제거한다
    // 모든 옵저버 제거
    NotificationCenter.default.removeObserver(self)

    // 특정 옵저버 제거
    NotificationCenter.default.removeObserver(
    	self,
        name: "introduction,
        object: nil
    )
    NotificationCenter.default.removeObserver(
    	self,
        name: "forward data",
        object: nil
    )
Lazy + Weak
-
lazy와 weak 키워드를 함께 사용하면 컴파일 오류가 발생한다
- lazy
- 반드시 처음부터 초기화가 필요하지 않은 경우 (많은 메모리 차지하는 이미지)
- 값에 접근하는 순간, 초기화가 시작된다
- 생성자로 초기화하지 않기 때문에, 반드시 기본값이 필요
- 메모리 낭비 줄일 수 있고, 이미 초기화된 속성들 이용 가능
- weak
- 가리키는 인스턴스의 RC의 숫자를 올라가지 않게 한다
- 가리키는 인스턴스가 메모리에서 제거되면 nil값을 가지게 한다
- lazy + weak
- 선언 당시에는 해당 프로퍼티가 초기화되지 않는다
- 접근하는 순간, 프로퍼티가 초기화되면서 인스턴스가 생성된다. 프로퍼티는 해당 인스턴스를 가리키게 된다
- 문제는 weak으로 선언했기 때문에 인스턴스를 가리키긴 하지만, RC는 올리지 않는다
- 해당 인스턴스를 가리키는 다른 애들은 없기 때문에, 인스턴스의 RC는 0이고, 메모리에서 해제된다
- 결과적으로 프로퍼티는 nil값을 가지게 된다
