헤더메뉴 v-for
- v-for 디렉티브로 메뉴 반복 출력하기
- 메뉴데이터에 icon이 있는 경우에만 v-if를 통해 icon 출력하기
- v-bind:style를 통해 백그라운드 이미지 바인딩 하기
<template>
  <div class="sub--menu--group">
    <div class="inner">
      <div class="sub__nav">
        <div class="sub__nav__mail"></div>
        <div  v-for="menu in menuItems" :key="menu" class="sub__nav__items">
          <div :style="{backgroundImage:`url(${menu.icon})`}" class="sub__nav__icon" v-if="menu.icon"></div>
          {{menu.text}}
        </div>
        <div class="sub__nav__subItems" v-for="subMenu in subItems" :key="subMenu">
          {{subMenu}}
        </div>
        <div class="more">
          <span class="more_plus">더보기</span>
          <span class="material-icons">expand_more</span>
        </div>
        <Weather></Weather>
      </div>

    </div>

  </div>
</template>

<script>
import Weather from './Weather.vue'

  export default {
    components:{
      Weather
    },
    data(){
      return {
        menuItems:[
          {title:'mail',text:'메일'},
          {title:'cafe',text:'카페'},
          {title:'blog',text:'블로그'},
          {title:'qna',text:'지식IN'},
          {title:'shopping',text:'쇼핑'},
          {title:'shop-live',text:'',icon:'https://s.pstatic.net/static/www/img/uit/sp_main_dba1af.png'},
          {title:'pay',text:'Pay'},
          {title:'tv',text:'TV',icon:'https://s.pstatic.net/static/www/img/uit/sp_main_dba1af.png'}
        ],
        subItems :[
          '사전','뉴스','증권','부동산','지도','VIBE','책','웹툰'
        ]
      }
    }
  }
> </script>
weather API 받아서 출력해보기
요청 주소
https://api.openweathermap.org/data/2.5/weather?q={city name},{state code}&appid={API key}
&units={[standard] or [metric] or [imperial]}
그냥 요청 했을 경우 섭씨 온도가 아니기에 &units=metric 추가
<template>
<div class="weather">
<!-- <div @click="apply">
btn
</div> -->
<swiper>
<swiper-slide>
<img :src="icon" alt="" class="weather__icon">
<div class="temp">{{temp}}℃</div>
<div class="description">{{description}}</div>
<div class="temp_min_max">
<span class="temp_min">{{temp_min}}℃ <span style="color:#9d9d9d">/ </span> </span>
<span class="temp_max">{{temp_max}}℃</span>
</div>
</swiper-slide>
<swiper-slide>
<div class="city">{{city}}</div>
<div class="country">{{country}}</div>
</swiper-slide>
</swiper>
</div>
</template>
<script>
import axios from 'axios'
import {Swiper,SwiperSlide} from 'swiper/vue'
import 'swiper/swiper.scss';
export default {
components:{
Swiper,
SwiperSlide
},
data(){
return{
temp_min:'',
temp_max:'',
description:'',
icon:'',
main:'',
temp:'',
city:'',
country:''
}
},
methods:{
async apply(){
const API_KEY = 'API_KEY'
const res = await axios.get(`https://api.openweathermap.org/data/2.5/weather?q=seoul,kr&appid=${API_KEY}&lang=kr&units=metric`)
console.log(res)
this.temp = Math.ceil(res.data.main.temp)
this.temp_min = Math.ceil(res.data.main.temp_min)
this.temp_max = Math.ceil(res.data.main.temp_max)
this.description = res.data.weather[0].description
this.icon = `https://openweathermap.org/img/w/${res.data.weather[0].icon}.png`
this.main = res.data.weather[0].main
this.city = res.data.name
this.country = res.data.sys.country
}
},
mounted(){
this.apply()
}
}
</script>컴포넌트가 마운트 됐을때 바로 데이터를 받아 올수 있게
mounted(){}에서 함수 실행 해주었다
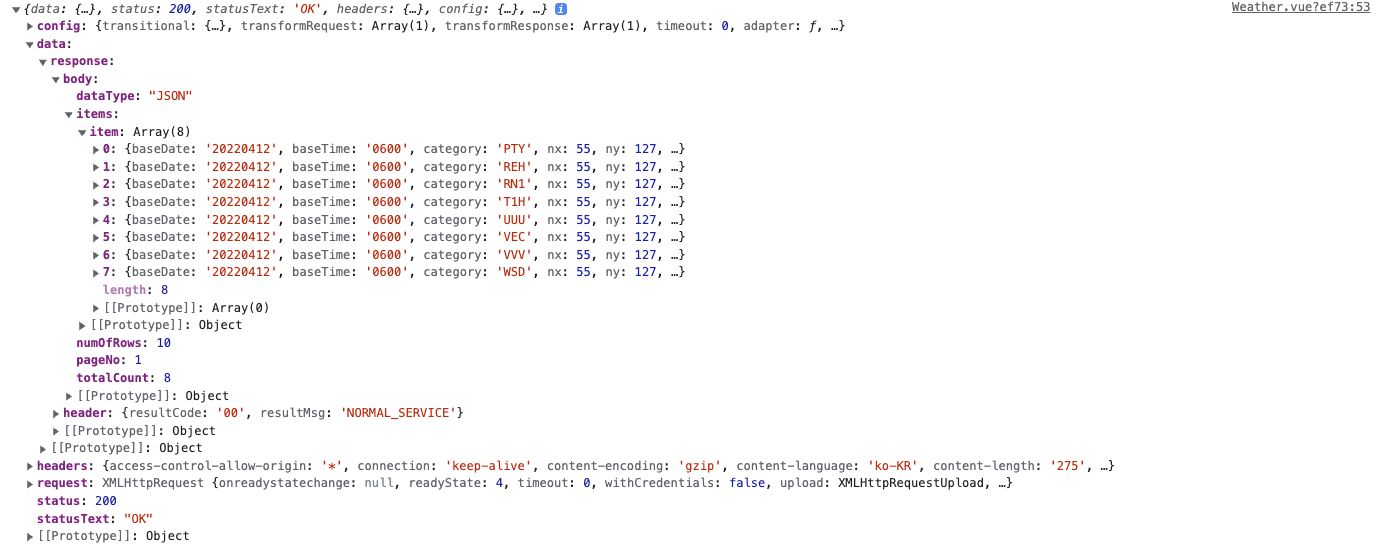
콘솔로 res를 찍었을때
{coord: {lon: 126.9778, lat: 37.5683},…}
base: "stations"
clouds: {all: 75}
cod: 200
coord: {lon: 126.9778, lat: 37.5683}
dt: 1649763987
id: 1835848
main: {temp: 16.11, feels_like: 15.92, temp_min: 12.69, temp_max: 18.66, pressure: 1011, humidity: 82}
feels_like: 15.92
humidity: 82
pressure: 1011
temp: 16.11
temp_max: 18.66
temp_min: 12.69
name: "Seoul"
sys: {type: 1, id: 8105, country: "KR", sunrise: 1649710919, sunset: 1649757814}
country: "KR"
id: 8105
sunrise: 1649710919
sunset: 1649757814
type: 1
timezone: 32400
visibility: 10000
weather: [{id: 803, main: "Clouds", description: "튼구름", icon: "04n"}]
0: {id: 803, main: "Clouds", description: "튼구름", icon: "04n"}
wind: {speed: 2.57, deg: 310}
가 출력 된다

페이지에 출력하니 좀 허접함
기상청 API
공공데이터 포털에서 기상청 API로 만들어보려 했으나
오류코드만 출력됨
검색해보니 CORS정책을 위반했기 때문에 발생한다는 것

검색으로 proxy도 바꿔보고 해봤지만 다 실패
요청주소 앞에
https://cors-anywhere.herokuapp.com/ 를 붙여준다
그러나 잘 작동하다가 403 에러가 뜬다.
cors-anywhere이 남용되고 있어서 직접 https://cors-anywhere.herokuapp.com/ 에 들어가서
방문자가 사용하겠다고 데모 버튼을 눌러서 잠금을 해제해야만 사용할 수 있다고 한다.
const res =  await axios.get(`https://cors-anywhere.herokuapp.com/http://apis.data.go.kr/1360000/VilageFcstInfoService_2.0/getUltraSrtNcst?serviceKey=${API_KEY}?dataType=JSON`)
console.log(res)새로운 오류
"<OpenAPI_ServiceResponse>
	<cmmMsgHeader>
		<errMsg>SERVICE ERROR</errMsg>
		<returnAuthMsg>SERVICE_KEY_IS_NOT_REGISTERED_ERROR</returnAuthMsg>
		<returnReasonCode>30</returnReasonCode>
	</cmmMsgHeader>
</OpenAPI_ServiceResponse>"
서버에 접속은 되나 data부분에 에러가 뜬다..
공공데이터 포털에서 api key 인코딩 디코딩 부분 바꿔서 작성 해봐도
똑같은 오류가 떴는데
쿼리를 다 지우고 하나씩 작성하다 보니 잘 된다...
api key는 인코딩키로 작성함
다음에 할것
- 기상청 API 파라미터 알아보고 출력하기

프론트엔드 수행중