
React에 대해 알아보자 (2)
리액트에서 주석처리 하는 방법!
html 코드처럼 생겼다고 해서
<!-- -->하면 안 된다!
자바스크립트처럼 {/* */} 해야하며, 중괄호가 꼭 있어야 한다.
내용 복습
import './App.css';
import { useState } from 'react';

function App() {
  // let _number = useState(0);
  // const number = _number[0]
  // const setNumber = _number[0]
  const [number, setNumber] = useState(0) //필수문장

  function sub(){
    setNumber(number-1)
  }
  function reset(){
    setNumber(0)
  }
  function add(){
    setNumber(number+1)
  }


  return (
          <div>
            <h2>{number}</h2>
            <button
            onClick={sub}
            >SUB</button>

            <button
            onClick={reset}
            >RESET</button>

            <button
            onClick={add}
            >ADD</button>
          </div>
        )

      }

export default App;
기억해야 할 두 가지!
출력해야 할 내용은 return 안에, 그 외의 다른 연산 등은 return 밖에 코드를 적는다.
useReducer(hook)
redux보다는 작은 상태관리 도구이다.
기존의 함수 방식은 숫자를 가져와서 더해, 숫자를 가져와서 빼기 해 이런식으로 과정을 전달해야 하는데 리듀서 방식은 더하기야. 빼기야. 라고 원하는 방식을 입력 해주면 함수가 실행될 수 있도록 하는 방법이다.
주문할 수 있는 메뉴가 적혀있는 함수 == reducer
useReducer는 인자가 2개가 필요하다.
변경될 값의 변수명을 정할 때 useState의 경우는 set~을 붙이는 경우가 많고, useReducer의 경우는 변수 앞에 dispatch~를 붙이는 경우가 많다. 변수명은 자유롭게 사용가능하지만 관습처럼 사용하는 부분이다.
function reducer(){} 의 경우 첫 번째 인자에 현재 값을 쓰도록 되어있고, 두 번째 인자에는 action(요청을 받을 내용)이 오도록 하는데 쉽게 이야기 해서 메뉴를 적는거다.
import './App.css';
import { useReducer } from 'react';

function App() {
  // let _number = useState(0);
  // const number = _number[0]
  // const setNumber = _number[0]
  /*const [number, setNumber] = useState(0) //필수문장

  function sub(){
    setNumber(number-1)
  }
  function reset(){
    setNumber(0)
  }
  function add(){
    setNumber(number+1)
  }*/

  function reducer(currentState, action){
    //console.log(action)
    if(action === 'sub'){
      return currentState -1
    }else if(action === 'reset'){
      return 0
    }else if(action === 'add'){
      return currentState +1
    }
  }

  const [ number,dispatchNumber ] = useReducer(reducer, 0 )

  function sub(){
    dispatchNumber("sub")
  }
  function reset(){
    dispatchNumber("reset")
  }
  function add(){
    dispatchNumber("add")
  }


  return (
          <div>
            <h2>{number}</h2>
            <button
            onClick={sub}
            >SUB</button>

            <button
            onClick={reset}
            >RESET</button>

            <button
            onClick={add}
            >ADD</button>
          </div>
        )

      }
글자 입력칸 추가 ver. (React input tag 특징)
리액트가 사용하는 언어 == jsx(javascript xml)
xhtml -> html5 로 변경될 때 x도 xml을 가리킨다.
문법적으로 보았을 때 제일 큰 차이는 xhtml은 무조건 닫기 표시를 해야한다.
따라서
<input type="text"></input>이렇게 html5의 input 태그는 닫는 태그가 없지만 xhtml는 규칙을 따라서 태그를 열었다면 닫아야 한다.
이처럼 리액트에서도 태그를 열었으면 무조건 닫아야 한다.
닫지 않으면 오류 발생!
value를 사용하기 위해서는 onChange를 사용하거나 readOnly 이벤트 핸들러를 사용해야 한다.
리액트에서 input type="text"는 value라는 속성을 쓰면 무조건 readyOnly속성이 된다.
그래서 text field를 수정하고 싶으면 onChange 이벤트를 사용해야 한다.
리액트에서 input type은 useState가 필요하다.
import { useState,useReducer } from 'react';

 const [value, setValue] = useState(1)

 return (
          <div>
            <h2>{value}</h2>
             <p>
              <input type="text"
              value={value}
              onChange={
                e => setValue(e.target.value)
              }
              ></input>
            </p>
          </div>
        )
         }

export default App;
세트를 잘 기억할 것!
만약 다 다른 값이 필요하다면 useState를 여러개 생성해야 한다.
import './App.css';
import { useState,useReducer } from 'react';

function App() {
  // let _number = useState(0);
  // const number = _number[0]
  // const setNumber = _number[0]
  /*const [number, setNumber] = useState(0) //필수문장

  function sub(){
    setNumber(number-1)
  }
  function reset(){
    setNumber(0)
  }
  function add(){
    setNumber(number+1)
  }*/

  function reducer(currentState, action){
    console.log(action)
    if(action.type === 'sub'){
      return currentState - action.number
    }else if(action.type === 'reset'){
      return 0
    }else if(action.type === 'add'){
      return currentState + action.number
    }
  }

  const [ number,dispatchNumber ] = useReducer(reducer, 0 )

  function sub(){
    dispatchNumber({type:"sub", number:value}) //dispatchNumber 에 의해서 reducer 함수가 호출이 되고, {type:"sub", number:value}로 인해 action.type, action.number이 전달되어 액션 조건에 따라서 필요한 문장을 만들어 쓰면 되는거다.
  }
  function reset(){
    dispatchNumber({type:"reset", number:value})
  }
  function add(){
    dispatchNumber({type:"add", number:value})
  }

  const [value, setValue] = useState(1)

  return (
          <div>
            <h2>{number}</h2>
            <button
            onClick={sub}
            >SUB</button>

            <button
            onClick={reset}
            >RESET</button>

            <button
            onClick={add}
            >ADD</button>

            <p>
              <input type="text"
              value={value}
              onChange={
                e => setValue(Number(e.target.value))

              }
              ></input>
            </p>
          </div>
        )

      }

export default App;
Context API
간단한 데이터를 주고받을 수 있는 API
React에서 class/style 사용하는 방법
- class -> className 이라고 사용한다.
- 직접 스타일 적용할 땐 style={} / style={{border: "5px solid tomato"}}
- 루트 컴포넌트가 하위 요소에 데이터를 전달할 때 다이렉트로 전달할 수 없으며 단계적으로 전달해야 한다. 따라서 vue에서는 vuex를 사용해서 상태관리를 했었는데, 리액트에서는 Reducer, Context API를 사용한다.
import React from 'react'
import './App.css';
function SubComp1({style}){
return(
<div style={style}>
<h3>Sub1</h3>
<SubComp2 style={style}></SubComp2>
</div>
)
}
function SubComp2({style}){
return(
<div style={style}>
<h3>Sub2</h3>
<SubComp3 style={style}></SubComp3>
</div>
)
}
function SubComp3({style}){
return(
<div style={style}>
<h3>Sub3</h3>
</div>
)
}
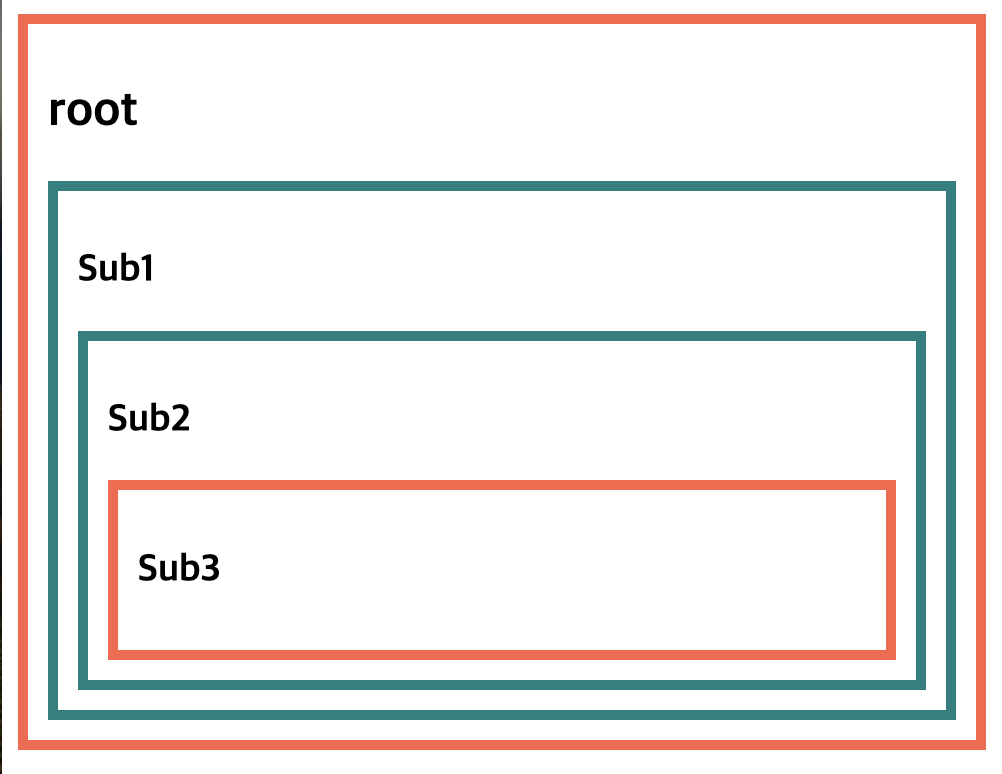
function App() {
const defaultTheme = {border: "5px solid tomato"}
return(
<div style={defaultTheme}>
<h2>root</h2>
<SubComp1 style={defaultTheme}></SubComp1>
</div>
)
}
export default App;
//css
#root div{
padding: 10px;
border: 5px solid teal
}
context api는 vuex처럼 상태공유를 하는 api이고, 사용하기 위해서는 두 개의 모듈이 필요하다.
1. 공유할 데이터를 만들기 (createContext)
2. 만든 데이터를 사용하기 (useContext)
만들기와 사용하기라는 두 가지의 모듈이 필요하다.
component들 간의 데이터는 직접적으로 공유할 수 없다.
컴포넌트들 간의 데이터 교환 방식이 필요한데, 상위 컴포넌트가 하위 컴포넌트한테 전달할 땐 prop을 사용해야 하고, 하위 컴포넌트가 상위 컴포넌트한테 데이터를 전달할 땐 event(함수)가 필요하다.
그러나 데이터가 필요하지 않은 컴포넌트도 데이터를 전달하기 위해 데이터를 받는 현상을 막기 위해 comtext api를 사용할 수 있다. (redux 보다는 성능이 낮다. 대형 프로젝트에서는 redux를 사용하는게 더욱 용이하다.)
(createContext, useContext를 사용하는 과정)
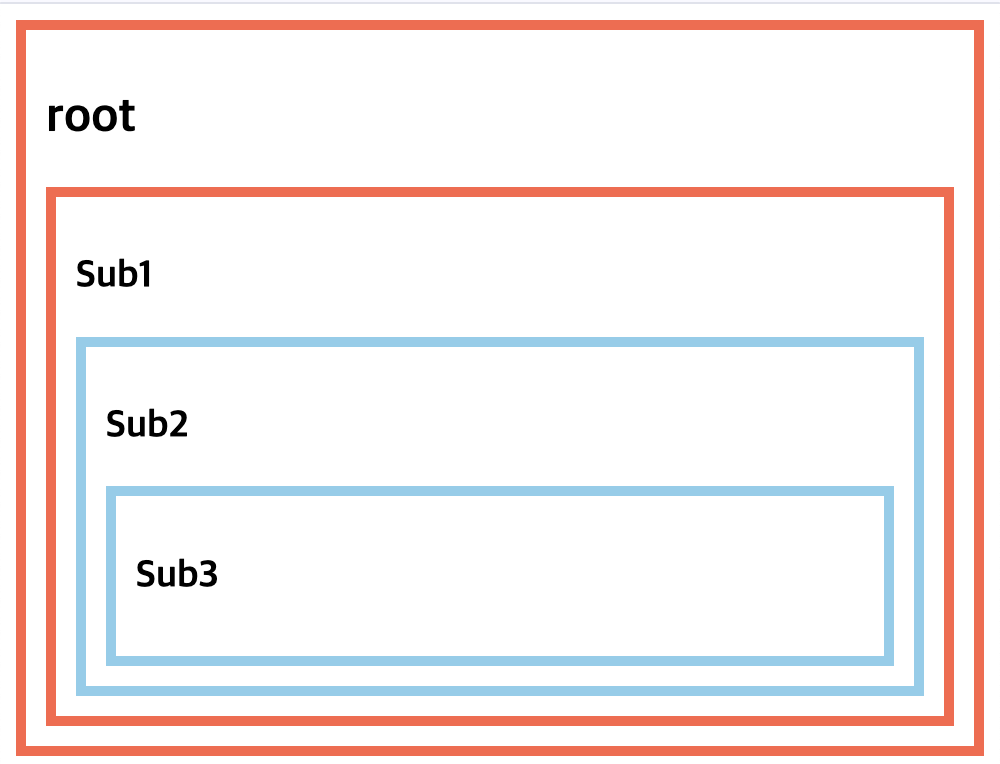
import React, { createContext, useContext  } from 'react'
import './App.css';

const defaultTheme = {border: "5px solid tomato"}
const themeContext = createContext(defaultTheme)


function SubComp1(){
  return(
    <div>
      <h3>Sub1</h3>
      <SubComp2></SubComp2>
    </div>
  )
}
function SubComp2(){
  return(
    <div>
      <h3>Sub2</h3>
      <SubComp3></SubComp3>
    </div>
  )
}
function SubComp3(){
  const theme = useContext(themeContext)
  return(
    <div style={theme}>
      <h3>Sub3</h3>
    </div>
  )
}

function App() {
  const theme = useContext(themeContext)
  return(
    <div style={theme}>
      <h2>root</h2>
      <SubComp1 ></SubComp1>
    </div>
  )
}

export default App;
(결과)
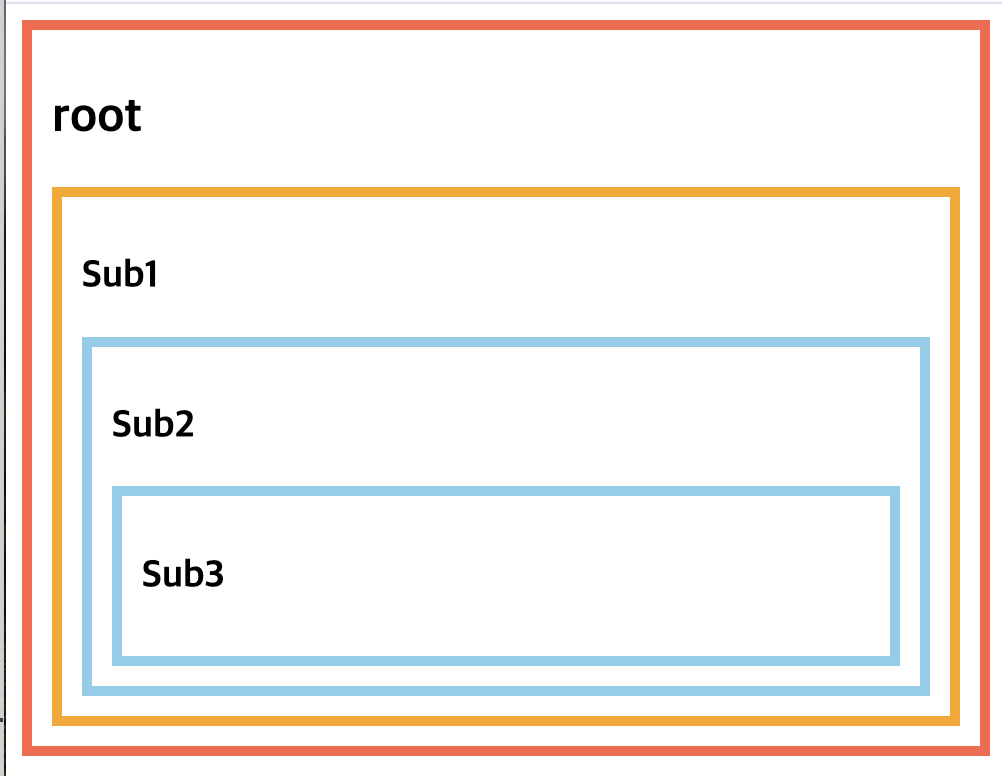
provider 사용하기
같은 데이터를 공유하더라도 다른 스타일을 적용하고 싶을 때 provider을 사용할 수 있다.
import React, { createContext, useContext  } from 'react'
import './App.css';

const defaultTheme = {border: "5px solid tomato"}
const themeContext = createContext(defaultTheme)


function SubComp1(){
  const theme = useContext(themeContext)
  return(
    <themeContext.Provider value={{border: '5px solid skyblue'}}>
    <div style={theme}>
      <h3>Sub1</h3>
      <SubComp2></SubComp2>
    </div>
    </themeContext.Provider>
  )
}
function SubComp2(){
  const theme = useContext(themeContext)
  return(
    <div style={theme}>
      <h3>Sub2</h3>
      <SubComp3></SubComp3>
    </div>
  )
}
function SubComp3(){
  const theme = useContext(themeContext)
  return(
    <div style={theme}>
      <h3>Sub3</h3>
    </div>
  )
}

function App() {
  const theme = useContext(themeContext)
  return(
    <div style={theme}>
      <h2>root</h2>
      <SubComp1 ></SubComp1>
    </div>
  )
}

export default App;
(결과)
만약 app 컴포넌트에 provider을 따로 적용하게 된다면 subComp1에 subComp2와 subComp3이 묶여있긴 하지만 가장 가까운 provider에 영향을 받기 때문에 subComp1의 스타일 적용을 받지 않게 된다.
function App() {
  const theme = useContext(themeContext)
  return(
    <themeContext.Provider value={{border: "5px solid orange"}}>
    <div style={theme}>
      <h2>root</h2>
      <SubComp1 ></SubComp1>
    </div>
    </themeContext.Provider>
  )
}
(결과)
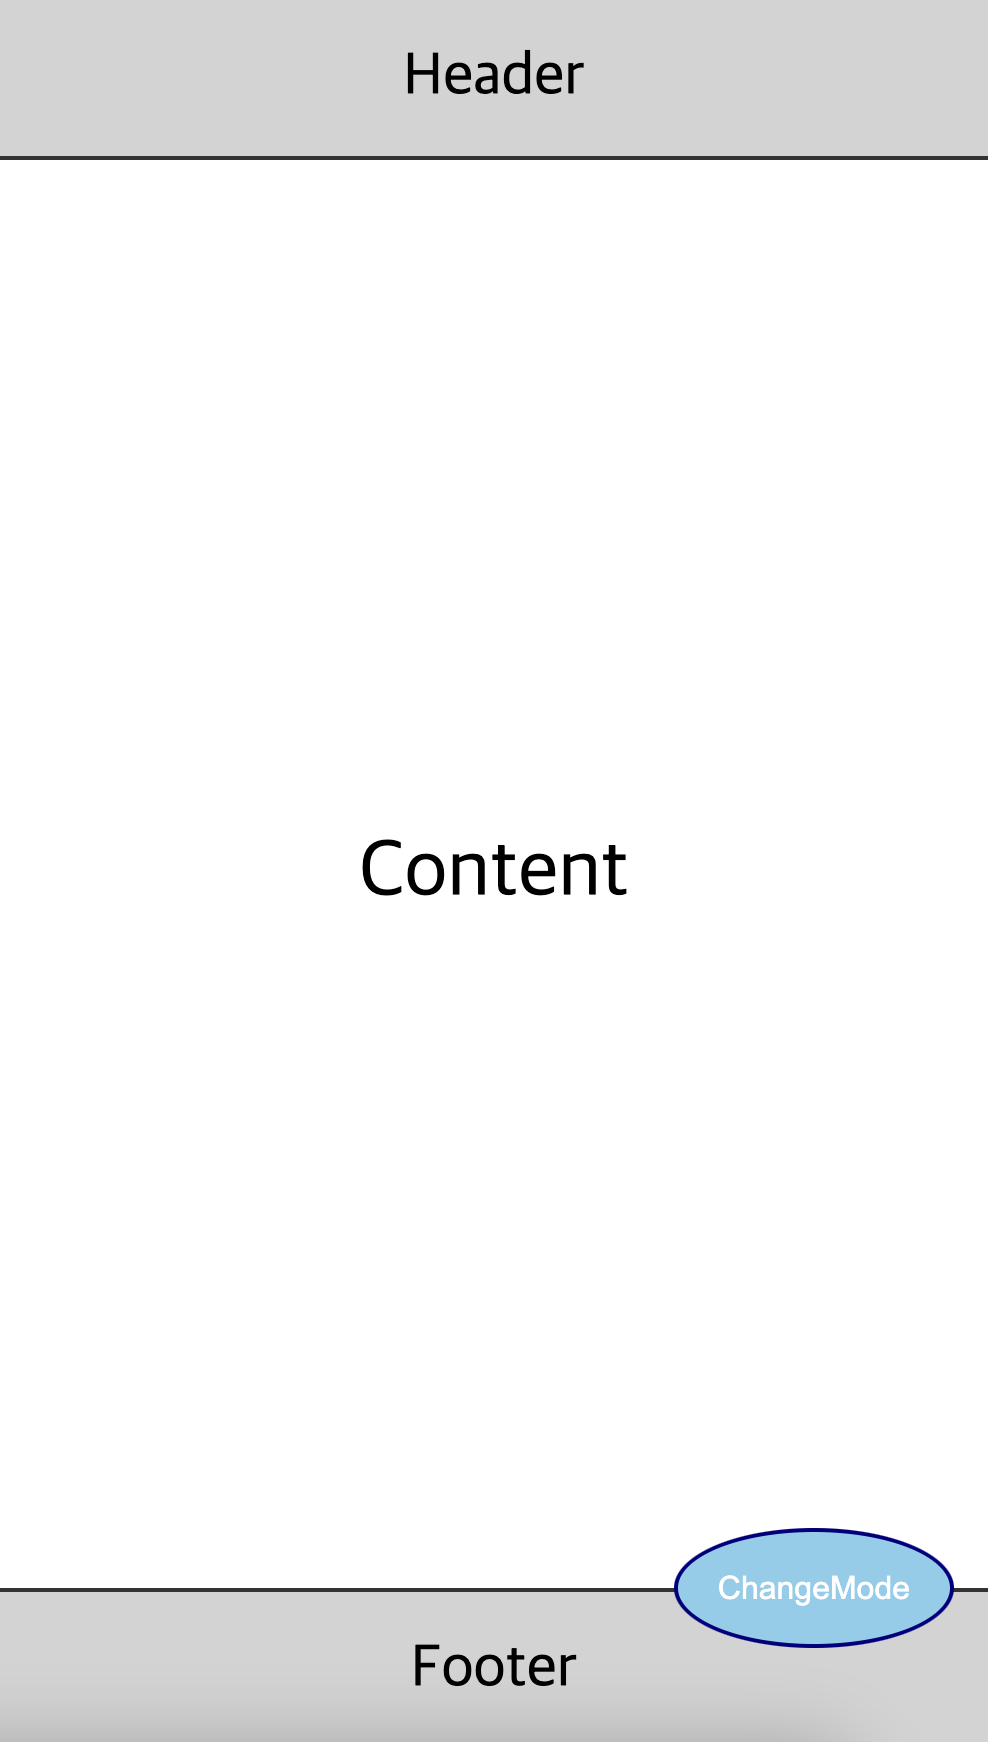
심화학습
Dark 모드 만들기
- useState로 상태를 새로고침할 수 있는 요소 생성
- props를 통해 스타일 변경을 위한 데이터 전달.
- isDark라는 변수명으로 {isDark} 전달.
//app.js
import React from 'react';
import Sub from './components/Sub';
import Button from "./components/Button"
import { useState } from 'react';
import './App.css';


function App() {
  const [isDark,setIsDark] = useState(false)

  return(

    <div>
      <Sub isDark={isDark}></Sub>
      <Button
      onChangeMode={()=>setIsDark(!isDark)}
      ></Button>
    </div>

  )
}

export default App;


//button.js
import React from 'react'

export default function Button({onChangeMode}) {
  return (
    <button
    className="btn"
    onClick={()=>
      onChangeMode()
    }
    >
      ChangeMode
    </button>
  )
}


//content.js
import React from 'react'

export default function Content({isDark}) {
  return (
    <div
    className='content'
    style={{
      background: isDark?"black":"white",
      color: isDark?"#fff": "#000"
    }}

    >
      Content
    </div>
  )
}


//header.js
import React from 'react'

export default function Header({isDark}) {
  return (
    <div
    className='header'
    style={{
      background: isDark?"black":"lightgrey",
      color: isDark?"#fff":"#000"
    }}
    >
      Header
    </div>
  )
}


//footer.js
import React from 'react'

export default function Footer({isDark}) {
  return (
    <div
    className='footer'
    style={{
      background: isDark?"black":"lightgrey",
      color: isDark?"#fff":"#000"
    }}
    >
      Footer
    </div>
  )
}


//app.css
body, div{
    margin:0;
    box-sizing: border-box;
}
.header{
    width: 100%;
    height: 80px;
    border-bottom: 2px solid #333;
    font-size: 30px;
    display:flex;
    justify-content: center;
    align-items: center;
}

.content{
    width: 100%;
    font-size: 40px;
    display:flex;
    justify-content: center;
    align-items: center;
    /*height: calc(100vh-160px);*/
    flex: 1
}

.container{
   width: 100%;
   height: 100vh;
   display:flex;
   flex-direction: column;
}

.footer{
    width: 100%;
    height: 80px;
    border-top: 2px solid #333;
    font-size: 30px ;
    display:flex;
    justify-content: center;
    align-items: center;
}

.btn{
    position: fixed;
    right: 20px;
    bottom: 50px;
    border-radius: 50%;
    padding: 20px;
    box-sizing: border-box;
    height: 60px;
    cursor: pointer;
    font-size: 16px;
    display: flex;
    justify-content: center;
    align-items: center;
    background-color: skyblue;
    color:white;
    border: 2px solid navy
}
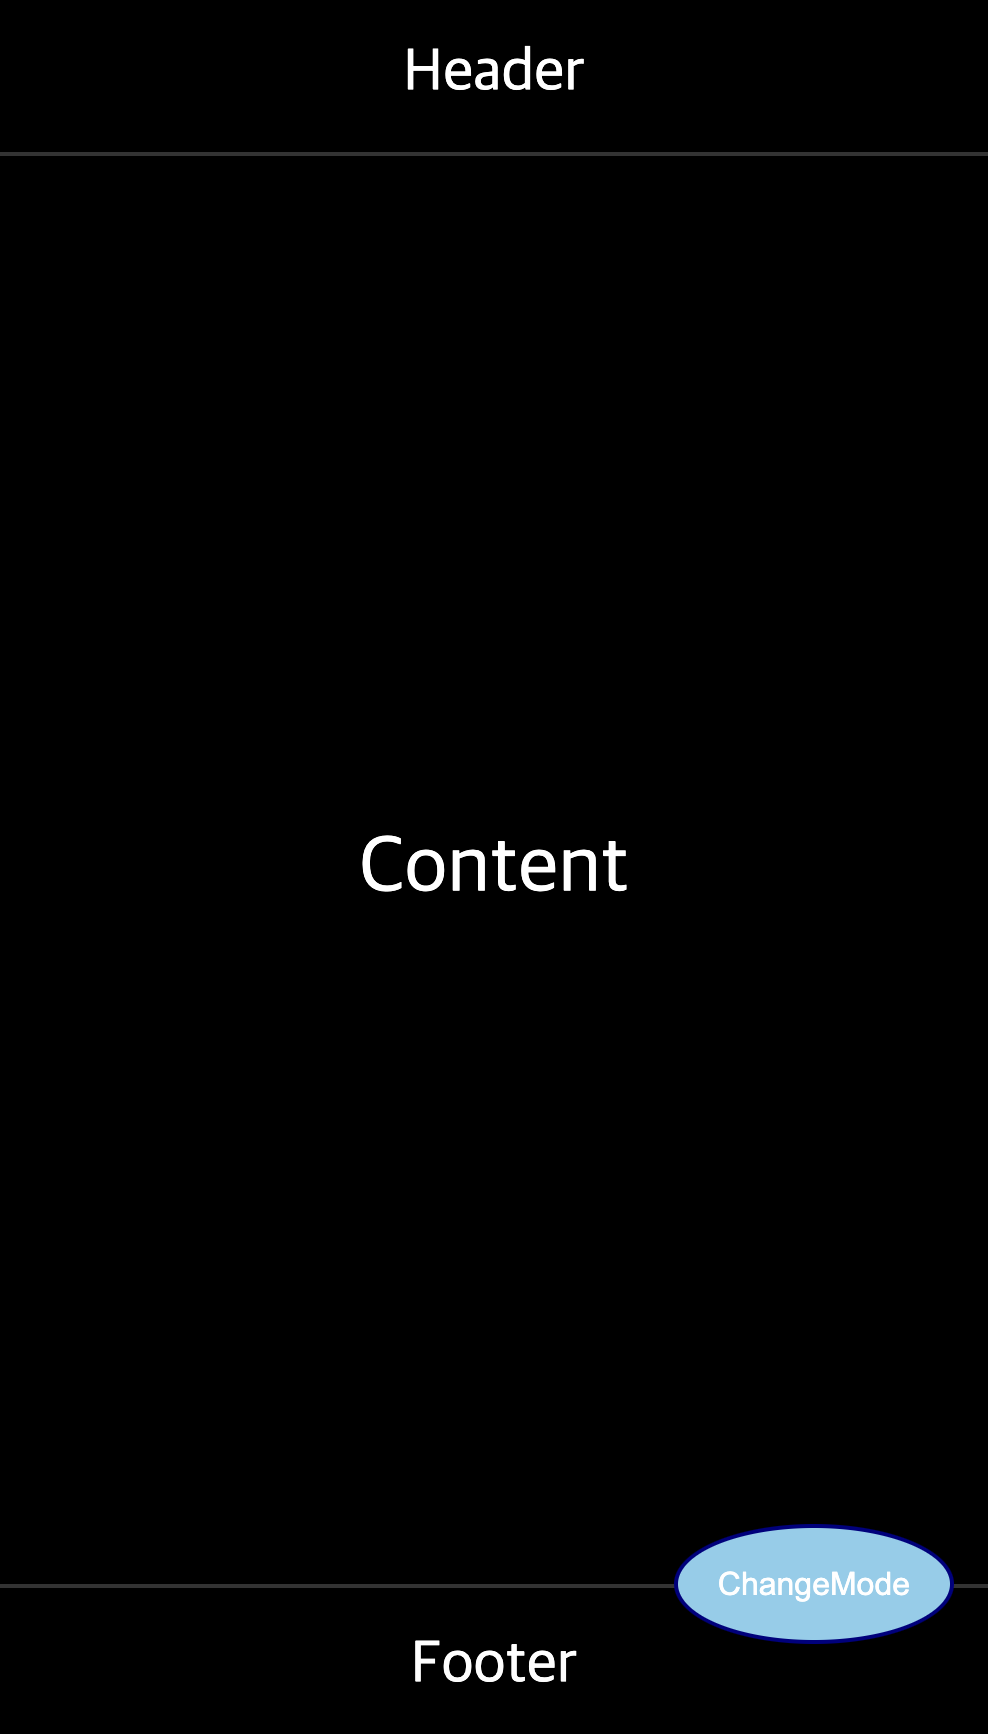
(결과)
context api를 사용한 Dark모드 구현
component 안에 context라는 하위 폴더 생성 후 ThemeContext.js 라는 파일 새로 생성 후 context 방식으로 작업.
기존의 방법과 다른 점은 기존에는 Props를 통해 데이터를 전달 받아서 사용할 수 있도록 했고, context api를 사용하면 component가 props를 통해 데이터를 전달-전달 받지않고 직접 사용할 수 있다는 점이다.
//ThemeContext.js
import { createContext } from 'react'
export const ThemeContext = createContext(null)


//app.js
import React from 'react';
import Sub from './components/Sub';
import Button from "./components/Button"
import { useState } from 'react';
import { ThemeContext } from './components/context/ThemeContext';
import './App.css';

function App() {
  const [isDark,setIsDark] = useState(false)

  return(

    <div>
      <ThemeContext.Provider value={{isDark, setIsDark}}>
      <Sub></Sub>
      <Button></Button>
      </ThemeContext.Provider>
    </div>

  )
}

export default App;

//header.js
import React, { useContext } from 'react'
import { ThemeContext } from './context/ThemeContext'

export default function Header() {
  /*const isDark = useContext(ThemeContext)
  console.log(isDark)*/
  const {isDark} = useContext(ThemeContext)
  return (
    <div
    className='header'
    style={{
      background: isDark?"black":"lightgrey",
      color: isDark?"#fff":"#000"
    }}
    >
      Header
    </div>
  )
}

//content.js
import React, { useContext } from 'react'
import { ThemeContext } from './context/ThemeContext'

export default function Content() {
  const {isDark} = useContext(ThemeContext)
  return (
    <div
    className='content'
    style={{
      background: isDark?"black":"white",
      color: isDark?"#fff": "#000"
    }}

    >
      Content
    </div>
  )
}

//footer.js
import React, { useContext } from 'react'
import { ThemeContext } from './context/ThemeContext'

export default function Footer() {
  const {isDark} = useContext(ThemeContext)
  return (
    <div
    className='footer'
    style={{
      background: isDark?"black":"lightgrey",
      color: isDark?"#fff":"#000"
    }}
    >
      Footer
    </div>
  )
}

//button.js
import React from 'react'
import { useContext } from 'react'
import { ThemeContext } from './context/ThemeContext'

export default function Button() {
  const {isDark,setIsDark} = useContext(ThemeContext)
  return (
    <button
    className="btn"
    onClick={
      ()=> setIsDark(!isDark)
    }
    >
      ChangeMode
    </button>
  )
}