8/24.
메모 앱의 간단한 기능들을 수행할 수 있는 앱을 만들어보았다.
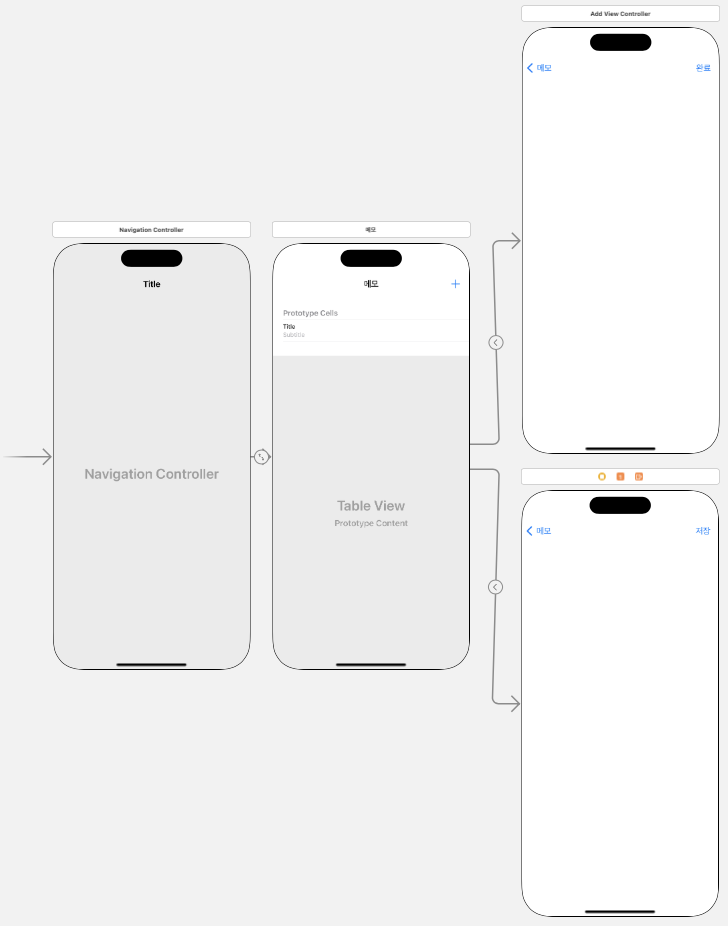
추가한 기능
- 메모 표시
- 메모 추가
- 메모 삭제
- 메모 순서 변경
- 메모 수정
기본적인 UI는 navigation controller와 table view를 사용하여 구성하였다.
table view를 통해 메모 목록을 볼 수 있도록 하였다.
[메모 표시]
기본 메모를 2개 정도 추가해주었다.
메모들은 새로운 swift파일에 추가하여 관리할 수 있도록 하였다.
메모에 관한 정보는 메모의 내용과 수정 날짜가 있다.
import Foundation

class Memo {
    var content : String
    var insertDate : Date

    init(content : String) {
        self.content = content
        insertDate = Date()
    }

    static var MemoList = [
        Memo(content: "첫번째 메모"),
        Memo(content: "두번째 메모")
    ]
    //메모 수정관련 함수
    func update(content: String) {
        self.content = content
        insertDate = Date() // 수정 날짜 갱신
    }
}
MemoList를 읽어 목록을 표시할 수 있도록 하였다.
    override func tableView(_ tableView: UITableView, cellForRowAt indexPath: IndexPath) -> UITableViewCell {
        let cell = tableView.dequeueReusableCell(withIdentifier: "myCell", for: indexPath)
        let target = Memo.MemoList[indexPath.row] // tableView에서 몇번쨰 cell인지 확인 가능
        cell.textLabel?.text = target.content
        cell.detailTextLabel?.text = formatter.string(from: target.insertDate)

        return cell
    }
[메모 추가]
메인화면에서 +버튼을 눌렀을 때 새로운 view controller인 AddViewController에 연결해 메모를 작성하고 완료버튼을 누르면 메모를 저장할 수 있도록하였다.
import UIKit

class AddViewController: UIViewController {

    @IBOutlet var memoText: UITextView!
    override func viewDidLoad() {
        super.viewDidLoad()
    }

    @IBAction func btnAdd(_ sender: UIBarButtonItem) {
        let memo = memoText.text
        let newMemo = Memo(content: memo ?? "")
        Memo.MemoList.append(newMemo)

        _ = navigationController?.popViewController(animated: true)
    }

}
메모의 text부분을 입력받아 MemoList에 추가하여 저장할 수 있도록 하였다.
이때 바뀐 메모의 목록을 reloading할 수 있는 함수를 정의해주었다.
    //바뀐 목록을 reloading
    override func viewWillAppear(_ animated: Bool) {
        super.viewWillAppear(animated)
        tableView.reloadData()
    }
[메모 삭제]
메모 삭제는 두 가지 방법으로 가능한데,
첫 번째는 오른쪽으로 슬라이드해서 삭제하는 방법이 있다. 메모를 오른쪽으로 슬라이드하면 delete라는 버튼이 나오는데 해당 버튼을 클릭하면 메모가 삭제된다.
    override func tableView(_ tableView: UITableView, commit editingStyle: UITableViewCell.EditingStyle, forRowAt indexPath: IndexPath) {
        if editingStyle == .delete {
            // Delete the row from the data source
            Memo.MemoList.remove(at: (indexPath as NSIndexPath).row)
            tableView.deleteRows(at: [indexPath], with: .fade)
        } else if editingStyle == .insert {
            // Create a new instance of the appropriate class, insert it into the array, and add a new row to the table view
        }
    }
delete버튼은 아래 함수를 사용하여 '삭제'로 바꿀 수도 있다.
    override func tableView(_ tableView: UITableView, titleForDeleteConfirmationButtonForRowAt indexPath: IndexPath) -> String? {
        return "삭제"
    }
두 번째는 edit버튼을 이용하는 방법인데, 이때 왼쪽 위의 edit버튼을 클릭하면 각각의 메모를 삭제할 수 있는 -버튼이 나타난다.
    override func viewDidLoad() {
        super.viewDidLoad()

        self.navigationItem.leftBarButtonItem = self.editButtonItem
    }
마지막 줄을 추가하여 기본적으로 제공하는 edit버튼을 사용가능하게 하였다.
