오늘 할일은 대망의 Redux-toolkit세팅이다.
1. Redux
먼저 Redux의 특징에 대해 알아보자.
1. 정의
Redux는 action이라는 이벤트를 사용하여 앱 상태를 관리하고 업데이트하기 위한 패턴이자 라이브러리이다. 전역에서 사용해야 하는 상태를 저장하기 위한 중앙 집중식 저장소 역할을 하며, 예측 가능한 방식으로만 상태를 업데이트할 수 있도록 규칙을 지정한다.
2. Redux의 장점
- 앱의 상태가 언제, 어디서, 왜, 어떻게 업데이트되는지, 그리고 이러한 변경이 발생할 때 앱 로직이 어떻게 작동하는지 더 쉽게 이해할 수 있음.
- Redux는 예측 가능하고 테스트 가능한 코드를 작성하도록 안내하므로 앱이 예상대로 작동할 것이라는 확신을 가질 수 있음.
3. Redux의 단점
- 배워야 할 개념이 많음
- 작성해야 할 (보일러 플레이트) 코드가 많음
4. Redux사용을 권장하는 케이스
- 여러 곳에서 필요한 대량의 애플리케이션 상태가 있는 경우
- 상태가 자주 업데이트되는 경우
- 상태를 업데이트하는 로직이 복잡한 경우
- 앱에 중대형 코드베이스가 있고, 많은 사람이 작업하는 경우
5. 관련 라이브러리 & 툴
React-Redux
React과 Redux store가 상호 작용할 수 있게 해주는 공식 패키지이다.
Redux DevTools Extension
시간 경과에 따른 Redux 저장소의 상태 변경 내역을 보여줌으로써 앱을 효과적으로 디버깅할 수 있다.
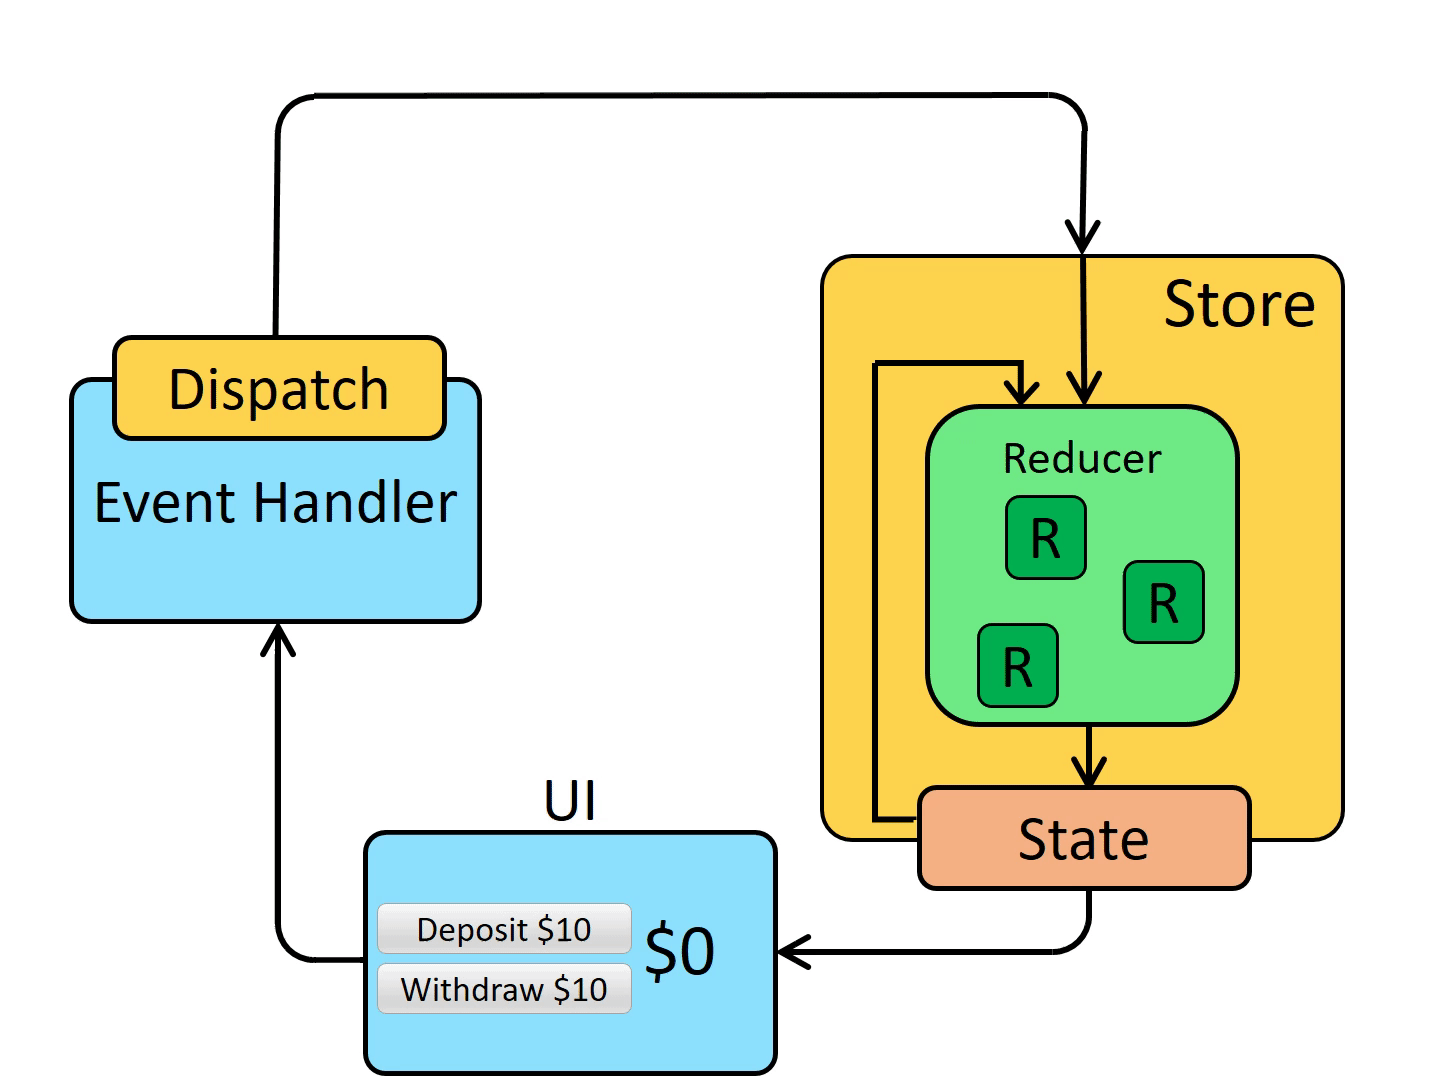
5. 주요 개념
1. Actions
action은 type field가 있는 일반 JavaScript 객체이다. action은 앱에서 발생한 일을 설명하는 이벤트라고 할 수 있다.
type field는 todos/todoAdded과 같이 이 action을 설명하는 이름을 부여하는 문자열이어야 한다. 일반적으로 domain/eventName과 같이 작성한다.
action에는 무엇이 일어났는지에 대한 추가 정보가 포함된 다른 field를 가질 수 있다. 이러한 정보는 payload라는 field에 저장한다.
const addTodoAction = {
  type: 'todos/todoAdded',
  payload: 'Buy milk'
}
2. Reducers
Reducers는 현재 상태와 action객체를 수신하고, 필요한 경우 상태를 업데이트하는 방법을 결정한 후 새로운 상태를 반환하는 함수이다.
(state, action) => newState
Reducers는 수신된 action(이벤트) 유형에 따라 이벤트를 처리하는 이벤트 리스너라고 생각하면 된다.
Reducers규칙
- 상태 및 상태 매개변수를 기반으로 새로운 상태 값만 계산해야 한다.
- 기존 상태를 수정할 수 없다. 대신 기존 상태를 복사하고 복사된 값을 변경하는 방식으로 불변 업데이트를 수행해야 한다.
- 비동기 로직을 수행하거나 random값을 계산하거나 하는 side effects를 일으키지 않아야 한다.
Reducers로직
1. Reducer가 이 action의 type이 조건에 맞는지 확인한다.
2-1. 그렇다면 상태의 복사본을 만들고, 새로운 값으로 복사본을 업데이트한 후 반환한다.
2-2. 그렇지 않다면 기존 상태를 변경하지 않고 반환한다.
const initialState = { value: 0 }

function counterReducer(state = initialState, action) {
  // Check to see if the reducer cares about this action
  if (action.type === 'counter/incremented') {
    // If so, make a copy of `state`
    return {
      ...state,
      // and update the copy with the new value
      value: state.value + 1
    }
  }
  // otherwise return the existing state unchanged
  return state
}
Reducers는 내부에서 if/else, switch, 반복문 등 모든 종류의 로직을 사용하여 새로운 상태를 결정할 수 있다.
3. Store
현재 Redux 애플리케이션 상태는 store라는 객체에 저장된다.
store는 Reducers를 전달하여 생성되며, 현재 상태 값을 반환하는 getState라는 메서드가 있다.
import { configureStore } from '@reduxjs/toolkit'

const store = configureStore({ reducer: counterReducer })

console.log(store.getState())
// {value: 0}
4. Dispatch
Redux store에는 dispatch라는 메서드가 있다. 상태를 업데이트하는 유일한 방법은 store.dispatch()를 호출하고 action객체를 전달하는 것이다. store는 Reducers함수를 실행하고 새로운 상태 값을 저장하며, getState()를 호출하여 업데이트된 값을 가질 수 있다.
store.dispatch({ type: 'counter/incremented' })

console.log(store.getState())
// {value: 1}
애플리케이션에서 action을 dispatch하는 것은 이벤트를 트리거하는 것이라고 생각하면 된다.
뭔가가 발생했을 때, store에서 이를 알기를 원한다.
Reducers는 이벤트 리스너처럼 작동하며, 관련 있는 action이 발생하면 이에 대한 응답으로 상태를 업데이트한다.
5. Selectors
Selectors는 store 상태 값에서 특정 정보를 추출하는 방법을 알고 있는 함수이다. 애플리케이션의 규모가 커지면 앱의 여러 부분에서 동일한 데이터를 읽어야 하는 상황이 많아질 때 반복되는 로직을 피하는 데 도움이 될 수 있다.
const selectCounterValue = state => state.value

const currentValue = selectCounterValue(store.getState())
console.log(currentValue)
// 2
2. Redux-thunk란?
redux-thunk는 리덕스에서 비동기 작업을 처리 할 때 가장 많이 사용하는 미들웨어이다. 이 미들웨어를 사용하면 action객체가 아닌 함수를 dispatch 할 수 있다.
- 장점 : 한 번에 여러가지를 dispatch 할 수 있게 해줌
- 단점 : 그게 다임, 나머지는 본인이 다 구현해야 함
( 출처 : https://shinejaram.tistory.com/76 & 제로초 노드버드 강의 )
3. Redux-saga란?
Redux-saga 또한 비동기 작업을 처리하기 위한 미들웨어이다. Redux-thunk가 함수를 dispatch 할 수 있게 해주는 미들웨어였다면, Saga는 action을 모니터링 하고 있다가 특정 action이 발생했을 때, 미리 정해둔 로직에 따라 특정 작업이 이루어진다. 또한 Sagas라는 순수함수들로 로직을 처리할 수 있는데, 순수함수로 이루어지다보니, side effect도 적고 테스트 코드를 작성하기에도 용이하다.
주요 기능
- delay, debounce, throttle 등 다양한 내장기능 제공
- takeLatest 기능 내장 (더블클릭이 되면 처음 건 무시하고 나중의 클릭에만 응답)
- throttle: 중복요청을 막는 방법. 마지막 요청만 인정해주거나 시간당 횟수 제한 등이 가능 ⇒ (스크롤이벤트시 요청이 수백개 가는 것을 방지할 때 씀)
( 출처 : https://shinejaram.tistory.com/76 & 제로초 노드버드 강의 )
4. Redux-toolkit이란?
Redux-toolkit은 아래와 같은 Redux의 불편함을 해결하기 위해 만들어졌다.
- Redux store 구성이 너무 복잡하다
- Redux가 유용한 작업을 수행하려면 많은 패키지를 추가해야 한다
- Redux에는 보일러 플레이트 코드가 너무 많이 필요하다
1. RTK Query란?
RTK Query는 @reduxjs/toolkit 패키지 내에서 옵션 추가기능으로 제공된다. 웹 애플리케이션에서 데이터를 로드하는 일반적인 사례를 간소화하여 데이터 패칭 및 캐싱 로직을 직접 작성할 필요가 없도록 하기 위한 기능이다.
2. Next.js 13에서의 Redux-toolkit세팅
Next.js 공식문서에도 Redux-toolkit 공식문서에도 Next.js 13에서 Redux-toolkit설치하는 내용이 없길래 구글링한 사이트를 참고했다. 아래에 기술하는 내용도 아래 사이트를 번역하여 요약한 내용이다.
1. Redux-toolkit설치
npm install @reduxjs/toolkit react-redux
2. Redux store만들기
src/redux/store.ts에 configureStore API를 불러온다.
import { configureStore } from "@reduxjs/toolkit";

export const store = configureStore({
  reducer: {},
  devTools: process.env.NODE_ENV !== "production",
});

export type RootState = ReturnType<typeof store.getState>;
export type AppDispatch = typeof store.dispatch;
위의 코드에서는 Redux-toolkit 라이브러리의 configureStore함수를 사용하여 Redux store의 새 인스턴스를 생성했다. 이 함수를 사용하면 store에 대한 옵션과 기본 미들웨어를 지정할 수 있다.
파일 하단에는 RootState type과 AppDispatch type을 export했다. store에서 type을 유추해서 새 상태를 추가하거나 미들웨어 설정을 변경할 때 최신 상태를 유지할 수 있다.
3. Typed Hooks정의
각 컴포넌트로 RootState 및 AppDispatch type을 import하는 대신 useDispatch 및 useSelector hooks의 typed versions을 생성하는 것이 좋다. 이렇게 하면 잠재적인 circular import dependency 문제를 방지하고 앱 전체에서 hooks를 더 쉽게 사용할 수 있다.
아래와 같이 src/redux/hooks.ts파일을 생성한다.
// src/redux/hooks.ts

import { TypedUseSelectorHook, useDispatch, useSelector } from "react-redux";
import type { RootState, AppDispatch } from "./store";

export const useAppDispatch = () => useDispatch<AppDispatch>();
export const useAppSelector: TypedUseSelectorHook<RootState> = useSelector;
4. Custom Provider정의
기존 Next.js에서는 아래와 같이 app컴포넌트를 Redux store로 감쌌다.
// _app.tsx
import type { AppProps } from 'next/app';
import Head from 'next/head';
import { wrapper } from 'store/store';

function MyApp({ Component, pageProps }: AppProps) {
  return (
    <Component {...pageProps} />
  );
}

export default wrapper.withRedux(MyApp);
Next.js 13에서는 모든 컴포넌트가 server-side component이므로, client-side에 있는 custom provider component를 생성하고 이를 자식 노드에 감싸는 것이 필요하다.
src/redux/provider.tsx라는 새 파일을 생성한다.
파일 상단에 "use client"를 사용하여 store컴포넌트가 client-side에 있어야 함을 표시한다.
// src/redux/provider.tsx

"use client";

import { store } from "./store";
import { Provider } from "react-redux";

export function Providers({ children }: { children: React.ReactNode }) {
  return <Provider store={store}>{children}</Provider>;
}
5. Next.js 13에 Redux Store 제공
자식 노드에 custom provider component를 감싸면 모든 컴포넌트가 Redux store에 액세스할 수 있다.
src/app/layout.tsx 파일로 이동하여 기존 코드를 아래와 같이 바꾸자.
// src/app/layout.tsx

import { Providers } from "../redux/provider";

export default function RootLayout({
  children,
}: {
  children: React.ReactNode;
}) {
  return (
    <html lang="en">
      <body>
        <Providers>{children}</Providers>
      </body>
    </html>
  );
}
6. Slice, Action Redux state 생성
Redux store와 provider컴포넌트가 설정되었으므로 이제 Redux를 활용하여 앱의 상태를 관리할 수 있다. 먼저 counter 컴포넌트의 상태관리를 담당할 slice파일을 생성해보자.
각 slice파일은 앱의 특정 상태 조각으로 생각할 수 있으며, 일반적으로 redux폴더의 features 폴더 내에 있다.
counter slice를 만들려면 redux폴더로 이동하여 features라는 새 폴더를 만든다. src/redux/features/counterSlice.ts라는 파일을 만들고 아래의 코드를 추가한다.
// src/redux/features/counterSlice.ts

import { createSlice, PayloadAction } from "@reduxjs/toolkit";

type CounterState = {
  value: number;
};

const initialState = {
  value: 0,
} as CounterState;

export const counter = createSlice({
  name: "counter",
  initialState,
  reducers: {
    reset: () => initialState,
    increment: (state) => {
      state.value += 1;
    },
    decrement: (state) => {
      state.value -= 1;
    },
    incrementByAmount: (state, action: PayloadAction<number>) => {
      state.value += action.payload;
    },
    decrementByAmount: (state, action: PayloadAction<number>) => {
      state.value -= action.payload;
    },
  },
});

export const {
  increment,
  incrementByAmount,
  decrement,
  decrementByAmount,
  reset,
} = counter.actions;
export default counter.reducer;
7. Store에 Slice Reducer 추가하기
Redux가 counter 상태를 관리할 수 있도록 하려면 counter slice의 reducer기능을 store에 통합해야 한다. reducer함수는 counter 상태에 대한 모든 업데이트를 전담한다.
이를 위해 counter slice에서 reducer 함수를 src/redux/store.ts 파일로 가져와 configureStore 함수의 reducer 파라미터에 포함시킨다. 이렇게 하면 Redux store가 reducer함수를 사용하여 counter 상태의 업데이트를 관리할 수 있다.
// src/redux/store.ts

import { configureStore } from "@reduxjs/toolkit";
import counterReducer from "./features/counterSlice";

export const store = configureStore({
  reducer: {
    counterReducer,
  },
});

export type RootState = ReturnType<typeof store.getState>;
export type AppDispatch = typeof store.dispatch;
8. Next.js13에서 Redux State와 Action 사용하기
counter slice를 사용해 앱의 상태를 관리할 counter 컴포넌트를 만들어 보자.
파일 시작 부분에 "use client" 플래그를 사용하여 이 코드가 client-side에 있어야 함을 표시해야 한다.
src/app/page.tsx 파일을 열고 해당 내용을 아래의 코드로 바꿔보자.
// src/app/page.tsx

"use client";

import { decrement, increment, reset } from "@/redux/features/counterSlice";
import { useAppDispatch, useAppSelector } from "@/redux/hooks";

export default function Home() {
  const count = useAppSelector((state) => state.counterReducer.value);
  const dispatch = useAppDispatch();

  return (
    <main style={{ maxWidth: 1200, marginInline: "auto", padding: 20 }}>
      <div style={{ marginBottom: "4rem", textAlign: "center" }}>
        <h4 style={{ marginBottom: 16 }}>{count}</h4>
        <button onClick={() => dispatch(increment())}>increment</button>
        <button
          onClick={() => dispatch(decrement())}
          style={{ marginInline: 16 }}
        >
          decrement
        </button>
        <button onClick={() => dispatch(reset())}>reset</button>
      </div>
    </main>
  );
}
3. Next.js 13에서의 RTK Query
1. RTK Query API Service 생성
Next.js 13에서 RTK Query를 사용하여 API에서 데이터를 가져오고 server-side 상태를 처리하는 방법을 살펴보자. server-side 상태는 일반적으로 redux폴더 내에 있는 services폴더에 정의한다.
API서비스를 만들려면 src/redux/services/userApi.ts를 생성하고 아래의 코드를 복사하면 된다.
// src/redux/services/userApi.ts

import { createApi, fetchBaseQuery } from "@reduxjs/toolkit/query/react";

type User = {
  id: number;
  name: string;
  email: number;
};

export const userApi = createApi({
  reducerPath: "userApi",
  refetchOnFocus: true,
  baseQuery: fetchBaseQuery({
    baseUrl: "https://jsonplaceholder.typicode.com/",
  }),
  endpoints: (builder) => ({
    getUsers: builder.query<User[], null>({
      query: () => "users",
    }),
    getUserById: builder.query<User, { id: string }>({
      query: ({ id }) => `users/${id}`,
    }),
  }),
});

export const { useGetUsersQuery, useGetUserByIdQuery } = userApi;
위의 userApi.ts 파일은 두 개의 엔드포인트, getUsers와 getUserById를 정의한다.
getUsers는 https://jsonplaceholder.typicode.com/ 에서 사용자 목록을 가져오고, getUserById는 id로 사용자를 검색한다.
또한 앱창이 다시 포커싱될 때, 구독된 모든 쿼리가 RTK Query에서 다시 가져올 수 있도록 refetchOnFocus: true를 설정했다.
2. Store에서 RTK Query API Service 추가하기
이제 API 서비스를 정의했으므로 이를 Redux store에 통합해야 한다. service의 reducer를 reducer 매개변수에 추가하고, 해당 미들웨어를 configureStore함수의 미들웨어 매개변수에 추가하는 것이 포함된다.
또한 refetchOnFocus기능을 활성화하려면 setupListeners(store.dispatch)를 호출해야한다.
src/redux/store.ts를 열고 아래의 코드로 바꾸자.
// src/redux/store.ts

import { configureStore } from "@reduxjs/toolkit";
import counterReducer from "./features/counterSlice";
import { userApi } from "./services/userApi";
import { setupListeners } from "@reduxjs/toolkit/dist/query";

export const store = configureStore({
  reducer: {
    counterReducer,
    [userApi.reducerPath]: userApi.reducer,
  },
  devTools: process.env.NODE_ENV !== "production",
  middleware: (getDefaultMiddleware) =>
    getDefaultMiddleware({}).concat([userApi.middleware]),
});

setupListeners(store.dispatch);

export type RootState = ReturnType<typeof store.getState>;
export type AppDispatch = typeof store.dispatch;
3. Next.js 13에서 RTK Query 사용하기
counter slice와 API 서비스를 만들었으니 src/app/page.tsx 파일에서 이를 사용해보자.
// src/app/page.tsx

"use client";

import { useGetUsersQuery } from "@/redux/services/userApi";
import { decrement, increment, reset } from "@/redux/features/counterSlice";
import { useAppDispatch, useAppSelector } from "@/redux/hooks";

export default function Home() {
  const count = useAppSelector((state) => state.counterReducer.value);
  const dispatch = useAppDispatch();

  const { isLoading, isFetching, data, error } = useGetUsersQuery(null);

  return (
    <main style={{ maxWidth: 1200, marginInline: "auto", padding: 20 }}>
      <div style={{ marginBottom: "4rem", textAlign: "center" }}>
        <h4 style={{ marginBottom: 16 }}>{count}</h4>
        <button onClick={() => dispatch(increment())}>increment</button>
        <button
          onClick={() => dispatch(decrement())}
          style={{ marginInline: 16 }}
        >
          decrement
        </button>
        <button onClick={() => dispatch(reset())}>reset</button>
      </div>

      {error ? (
        <p>Oh no, there was an error</p>
      ) : isLoading || isFetching ? (
        <p>Loading...</p>
      ) : data ? (
        <div
          style={{
            display: "grid",
            gridTemplateColumns: "1fr 1fr 1fr 1fr",
            gap: 20,
          }}
        >
          {data.map((user) => (
            <div
              key={user.id}
              style={{ border: "1px solid #ccc", textAlign: "center" }}
            >
              <img
                src={`https://robohash.org/${user.id}?set=set2&size=180x180`}
                alt={user.name}
                style={{ height: 180, width: 180 }}
              />
              <h3>{user.name}</h3>
            </div>
          ))}
        </div>
      ) : null}
    </main>
  );
}