Sudoku
- 직접 구현한 PBSudoku 라이브러리를 사용한 스도쿠 앱
- github
기능
✅ 오늘의 게임
- 오늘의 게임 난이도는 랜덤으로 설정
- 오늘의 게임을 클리어한 날짜 확인 가능
- 달력 확인 가능
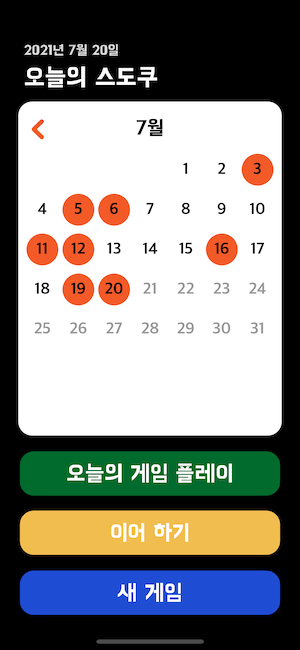
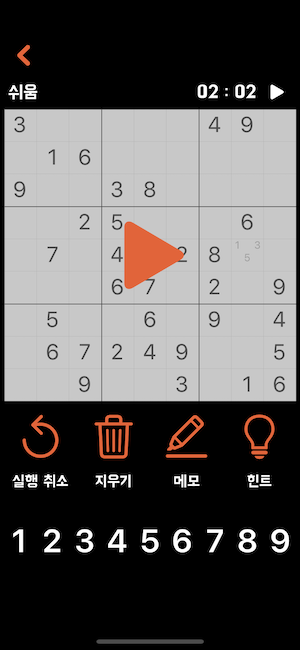
✅ 이어하기
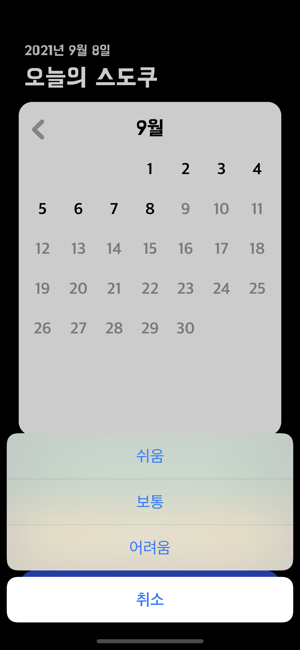
✅ 새 게임
- 쉬움, 보통, 어려움 세 가지의 난이도를 선택할 수 있음.
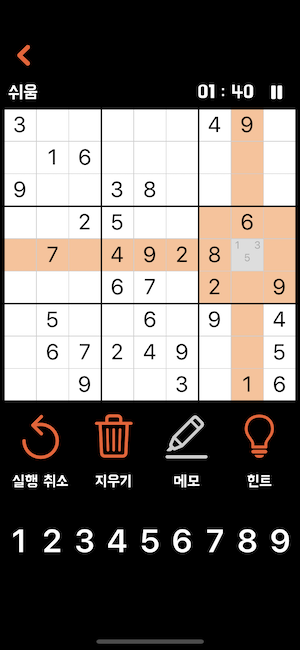
✅ 스도쿠 게임
- 타이머를 활용한 시간 측정 가능.
- 실행 취소, 지우기, 힌트 사용 가능.
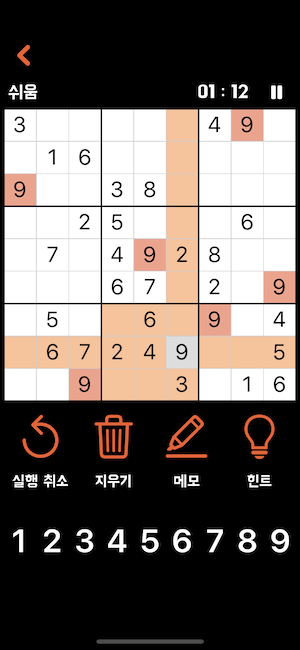
- 메모 기능을 활용하여 칸에 들어갈 숫자 후보를 나타낼 수 있음.
설계
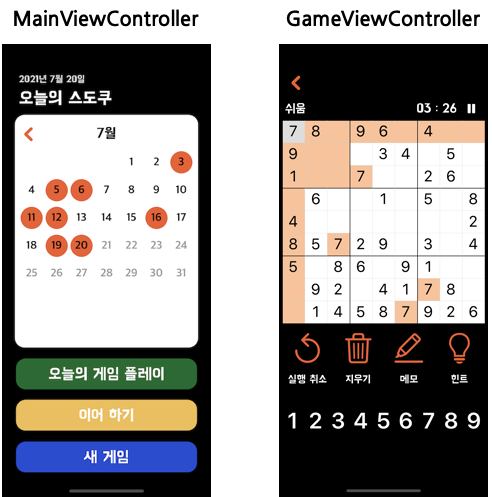
✅ ViewController 구성
✅ ViewCotroller의 역할
MainViewController
- 오늘의 게임을 클리어한 날짜를 확인할 수 있는 달력을 보여준다.
- 오늘의 게임, 이어하기, 새 게임 중 원하는 게임을 선택할 수 있다.
GameViewController
- Timer를 활용해 시간을 나타낸다.
- 스도쿠 판에 입력 할 숫자(스도쿠에 다 사용되지 않은 숫자)를 보여준다.
- 스도쿠 판을 보여준다.
- 사용자가 클릭한 칸을 보여준다.
- 옵션(실행취소, 지우기, 메모, 힌트)을 보여준다.
✅ ViewModel의 역할
CalendarViewModel
- Calendar를 활용하여 현재 날짜를 가져오고 달력의 나타낼 날짜를 계산한다.
SudokuViewModel
- PBSudoku라이브러리를 통해 스도쿠를 생성한다.
- 사용자가 입력한 숫자와 옵션을 토대로 스도쿠를 수정한다.
- 사용자가 클릭한 칸과 관련된 칸들을 계산한다.
GameViewModel
- 스도쿠 게임을 저장한다.
- 스도쿠 게임을 불러온다.
DayilGameViewModel
- 오늘의 게임을 저장한다.
- 오늘의 게임을 불러온다.
- 오늘의 게임을 클리어한 날짜를 저장한다.
구현
✅ PBSuoku
✅ 달력
- Calendar와 DateFormatter를 사용
- 달력에 표시할 날짜의 연도와 달을 입력 받는다.
- 해당 연도가 윤년인지 체크한다.
① 서력 기원 연수가 4로 나누어 떨어지는 해는 우선 윤년으로 하고,
② 그 중에서 100으로 나누어 떨어지는 해는 평년으로 하며,
③ 다만 400으로 나누어 떨어지는 해는 다시 윤년으로 정하였다.
[네이버 지식백과] 윤년 leap year, 閏年
- 해당 달이 시작하는 요일을 구한다.
① DateFormatter를 활용하여 받아온 날짜(String)을 Date 타입으로 변환
② Calendar.component를 활용하여 요일을 받아온다.
private func setDays(_ currentYear: Int, _ currentMonth: Int)-> [Int]{
let currentMonthIndex = currentMonth
var day: [Int] = []
numOfDaysInMonth[2] = checkLeapYear(currentYear) ? 29 : 28
guard let firstWeekDay = dayOfWeek("\(currentYear)-\(currentMonth)") else { return [] }
while day.count < firstWeekDay{
day.append(0)
}
for i in 1...numOfDaysInMonth[currentMonthIndex]{
day.append(i)
}
return day
}
private func checkLeapYear(_ year: Int)-> Bool{
return year % 4 == 0 && year % 100 != 0 || year % 400 == 0
}
private func dayOfWeek(_ today:String) -> Int?{
let formatter = DateFormatter()
formatter.dateFormat = "yyyy-MM"
guard let todayDate = formatter.date(from: today) else { return nil }
let myCalendar = Calendar(identifier: .gregorian)
let weekDay = myCalendar.component(.weekday, from: todayDate)
return weekDay - 1
}
✅ Timer
- timperPlay()에서 setTime()을 1초마다 반복하는 timer를 생성한다.
- setTime()에서 timeCount를 "%02d : %02d" 형태로 바꾸어 출력 후 timeCount를 1 증가 시킨다.
- timerPasue()와 viewWillDisappear에서 timer?.invalidate()를 통해 타이머를 중지하고 런 루프에서 제거를 요청한다.
var timer: Timer?
var timeCount: Double = 0
func timerPlay(){
isPlayingButton.setImage(UIImage(systemName: "pause.fill"), for: .normal)
isPlaying = true
timer = Timer.scheduledTimer(
timeInterval: 1.0,
target: self,
selector: #selector(setTime),
userInfo: nil,
repeats: true)
}
func timerPasue(){
isPlayingButton.setImage(UIImage(systemName: "play.fill"), for: .normal)
isPlaying = false
timer?.invalidate()
}
@objc func setTime(){
timerLabel.text = secondsToString(sec: timeCount)
timeCount += 1
}
func secondsToString(sec: Double) -> String {
guard sec != 0 else { return "00 : 00" }
let totalSeconds = Int(sec)
let minute = totalSeconds / 60
let seconds = totalSeconds % 60
return String(format: "%02d : %02d", minute, seconds)
}
override func viewWillDisappear(_ animated: Bool) {
super.viewWillDisappear(true)
timer?.invalidate()
saveSudoku()
}
런루프
- RunLoop 객체는 소켓, 파일, 키보드 마우스 등의 입력 소스를 처리하는 이벤트 처리 루프로, 쓰레드가 일해야 할 때는 일하고, 일이 없으면 쉬도록 하는 목적으로 고안되었다.
- Thread는 모두 각자의 RunLoop를 가진다.
- Thread를 생성할 때 RunLoop가 자동으로 생성되지만 자동으로 실행되진 않는다.
- MainThread는 자동으로 RunLoop를 실행시킨다. 그러므로 Timer를 MainThread에서 실행시키면 자동으로 실행된다.
✅ CALayer
- shadow, corner radius, border, 3D transform, masking contents, animation과 같이 뷰 위에 컨텐츠나 애니메이션을 그리는 행위를 담당한다.
- UIVIew에 관련된 작업은 CPU를 사용하여 메인스레드에서 작동되는 반면 CALayer는 GPU에서 직접 그려지며 별도의 스레드에서 작동된다.
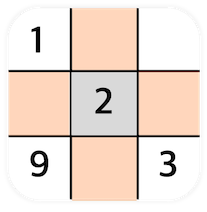
CALayer를 활용하여 스도쿠 3 x 3의 테두리를 꾸며준다.
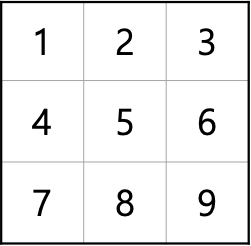
- setEdge(_ i: Int)를 통해 받아온 인덱스가 9칸 중 (위 사진 참고) 어느 곳에 위치해있는지 구한 후 layer를 추가해준다.
- edgeArr은 [top, bottom, left, right]의 속성을 나타낸다.
class SudokuCollectionViewCell: UICollectionViewCell{
func setEdge(_ i: Int){
var edgeArr: [LayerType] = []
if (i / 9 % 3) == 0 {
if i % 3 == 0 {
edgeArr = [.bold,.basic,.bold,.basic]
} else if i % 3 == 1 {
edgeArr = [.bold,.basic,.basic,.basic]
} else{
edgeArr = [.bold,.basic,.basic,.bold]
}
} else if (i / 9 % 3) == 1 {
if i % 3 == 0 {
edgeArr = [.basic,.basic,.bold,.basic]
} else if i % 3 == 1{
edgeArr = [.basic,.basic,.basic,.basic]
}else {
edgeArr = [.basic,.basic,.basic,.bold]
}
} else{
if i % 3 == 0 {
edgeArr = [.basic,.bold,.bold,.basic]
} else if i % 3 == 1 {
edgeArr = [.basic,.bold,.basic,.basic]
} else{
edgeArr = [.basic,.bold,.basic,.bold]
}
}
contentView.layer.addBorder(edgeArr,1,0.5)
}
}
- addBorder( arr_edge: [LayerType], boldWidth : CGFloat, _ basicWidth: CGFloat)를 통해 top, bottom, left, right의 속성과 테두리 두께를 받아온다.
- boldCgRect, basicCgRect를 top, bottom, left, right 순으로 미리 정의해 두어 해당하는 layer를 추가해준다.
extension CALayer{
func addBorder(_ arr_edge: [LayerType], _ boldWidth : CGFloat, _ basicWidth: CGFloat) {
let boldWidth: CGFloat = boldWidth
let basicWidth: CGFloat = basicWidth
let boldCgRect: [CGRect] = [CGRect.init(x: 0, y: 0, width: frame.width, height: boldWidth),
CGRect.init(x: 0, y: frame.height - boldWidth, width: frame.width, height: boldWidth),
CGRect.init(x: 0, y: 0, width: boldWidth, height: frame.height),
CGRect.init(x: frame.width - boldWidth, y: 0, width: boldWidth, height: frame.height)]
let basicCgRect: [CGRect] = [CGRect.init(x: 0, y: 0, width: frame.width, height: basicWidth),
CGRect.init(x: 0, y: frame.height - basicWidth, width: frame.width, height: basicWidth),
CGRect.init(x: 0, y: 0, width: basicWidth, height: frame.height),
CGRect.init(x: frame.width - basicWidth, y: 0, width: basicWidt
for j in 0...3 {
let border = CALayer()
if arr_edge[j] == .basic {
border.frame = basicCgRect[j]
border.backgroundColor = #colorLiteral(red: 0.8039215803, green: 0.8039215803, blue: 0.8039215803, alpha: 1)
}else{
border.frame = boldCgRect[j]
border.backgroundColor = #colorLiteral(red: 0, green: 0, blue: 0, alpha: 1)
}
self.addSublayer(border)
}
}
}