https://dkfk2747.tistory.com/22 이 사이트를 참고하였습니다.
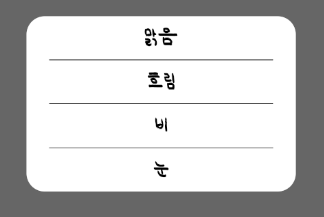
1. xml을 만들어 줍니다.
<?xml version="1.0" encoding="utf-8"?>
<androidx.constraintlayout.widget.ConstraintLayout
    xmlns:android="http://schemas.android.com/apk/res/android"
    xmlns:app="http://schemas.android.com/apk/res-auto"
    xmlns:tools="http://schemas.android.com/tools"
    android:layout_width="300dp"
    android:layout_height="wrap_content"
    android:background="@drawable/alert_background">

    <Button
        android:id="@+id/btn_weather1"
        android:background="@android:color/transparent"
        android:layout_width="match_parent"
        android:layout_height="wrap_content"
        android:text="맑음"
        android:textColor="@color/black"
        android:textSize="20sp"
        app:layout_constraintEnd_toEndOf="parent"
        app:layout_constraintStart_toStartOf="parent"
        app:layout_constraintTop_toTopOf="parent"
        app:layout_constraintBottom_toTopOf="@+id/v1"/>

    <View
        android:id="@+id/v1"
        android:layout_width="250dp"
        android:layout_height="3px"
        android:background="@color/black"
        app:layout_constraintStart_toStartOf="parent"
        app:layout_constraintEnd_toEndOf="parent"
        app:layout_constraintBottom_toTopOf="@+id/btn_weather2"/>

    <Button
        android:id="@+id/btn_weather2"
        android:layout_width="match_parent"
        android:layout_height="wrap_content"
        android:background="@android:color/transparent"
        android:text="흐림"
        android:textColor="@color/black"
        android:textSize="20sp"
        app:layout_constraintStart_toStartOf="parent"
        app:layout_constraintEnd_toEndOf="parent"
        app:layout_constraintBottom_toTopOf="@+id/v2"/>

    <View
        android:id="@+id/v2"
        android:layout_width="250dp"
        android:layout_height="3px"
        android:background="@color/black"
        app:layout_constraintStart_toStartOf="parent"
        app:layout_constraintEnd_toEndOf="parent"
        app:layout_constraintBottom_toTopOf="@+id/btn_weather3"/>

    <Button
        android:id="@+id/btn_weather3"
        android:layout_width="match_parent"
        android:layout_height="wrap_content"
        android:background="@android:color/transparent"
        android:text="비"
        android:textColor="@color/black"
        android:textSize="20sp"
        app:layout_constraintStart_toStartOf="parent"
        app:layout_constraintEnd_toEndOf="parent"
        app:layout_constraintBottom_toTopOf="@+id/v3" />

    <View
        android:id="@+id/v3"
        android:layout_width="250dp"
        android:layout_height="3px"
        android:background="@color/black"
        app:layout_constraintStart_toStartOf="parent"
        app:layout_constraintEnd_toEndOf="parent"
        app:layout_constraintBottom_toTopOf="@+id/btn_weather4"/>

    <Button
        android:id="@+id/btn_weather4"
        android:layout_width="match_parent"
        android:layout_height="wrap_content"
        android:background="@android:color/transparent"
        android:text="눈"
        android:textColor="@color/black"
        app:layout_constraintStart_toStartOf="parent"
        app:layout_constraintEnd_toEndOf="parent"
        app:layout_constraintBottom_toBottomOf="parent"/>


</androidx.constraintlayout.widget.ConstraintLayout>
2. Dialog 모서리 둥글게
drawable에 resource파일을 추가해줍니다.
<?xml version="1.0" encoding="utf-8"?>
<shape xmlns:android="http://schemas.android.com/apk/res/android"
    android:shape="rectangle">
    <solid android:color="@color/white" />
    <corners android:radius="20dp" />
</shape>
radius를 통해 둥근 정도를 바꿀 수 있습니다.
3. Dialog 생성
MainActivity로 가서 해당 리스너안에 코드를 구현해줍니다.
            val dialog = Dialog(this)

            dialog.requestWindowFeature(Window.FEATURE_NO_TITLE)   //타이틀바 제거
            dialog?.window?.setBackgroundDrawable(ColorDrawable(Color.TRANSPARENT)) // 백그라운드 컬러 투명 (이걸 해줘야 background가 설정해준 모양으로 변함)
            dialog.setContentView(R.layout.aletr_weather)
            dialog.setCancelable(false)    // 다이얼로그외에 다른 화면을 눌렀을 때 나가는 것 방지

            var btn_weather1 : Button = dialog.findViewById(R.id.btn_weather1) // 버튼을 dialog에 연결
            var btn_weather2 : Button = dialog.findViewById(R.id.btn_weather2)
            var btn_weather3 : Button = dialog.findViewById(R.id.btn_weather3)
            var btn_weather4 : Button = dialog.findViewById(R.id.btn_weather4)

            btn_weather1.setOnClickListener{
                tv_weather.setText("날씨 : 맑음")
                dialog.dismiss()
            }
            btn_weather2.setOnClickListener{
                tv_weather.setText("날씨 : 흐림")
                dialog.dismiss()
            }
            btn_weather3.setOnClickListener{
                tv_weather.setText("날씨 : 비")
                dialog.dismiss()
            }
            btn_weather4.setOnClickListener{
                tv_weather.setText("날씨 : 눈")
                dialog.dismiss()
            }

            dialog.show()