TIL 14 | fetch 함수를 통한 Data호출 실습

2021년 04월 07일 오후3시 벡엔드로부터 첫 데이터를 받아왔다!
역사적인 순간을 기념하며 fetch 함수 사용법과 수정한 코드를 기록하려한다.
실무에서는 fetch함수 보다는 axios 라이브러리를 많이 쓰지만, http 통신의 요청과 응답에 대한 이해가 더 중요한데 이후에 Promise 개념도 정리할 예정이다.
내가 작성한 코드
회원가입
 goTomain = () => {
    fetch("http://10.58.3.99:8000/users/signin", {
      method: "POST",
      body: JSON.stringify({
        email: this.state.idInputData,
        password: this.state.pwInputData,
        phonenumber: "01011112222",
        username: "펭수",
        name: "김펭수",
      }),
    })
      .then((response) => response.json())
      .then((result) => console.log("결과 :", result));
  };
method 는 get과 post 방식이 있습니다.
post로 데이터를 보낼 때
body는 JSON형태로 보내기 위해 JSON.stringfy() 함수에 객체를 인자로 전달하여 JSON형태로 변환합니다.
로그인 성공 시
goTomain = () => {
    fetch("http://10.58.3.99:8000/users/signin", {
      method: "POST",
      body: JSON.stringify({
        email: this.state.idInputData,
        password: this.state.pwInputData,
      }),
    })
      .then((response) => response.json())
      .then((data) => {
        console.log("결과 :", data);
        if (data["MESSAGE"] === "SUCCESS") {
          alert("로그인 성공!");
          this.props.history.push("/MainJ");
          localStorage.setItem("token", data.access_token);
        } else {
          alert("로그인에 일치하지 않습니다!");
        }
      });
  };
로그인 메세지가 SUCCESS 이면 로그인 성공! 알림창을 띄워주고 메인page로 이동한다.
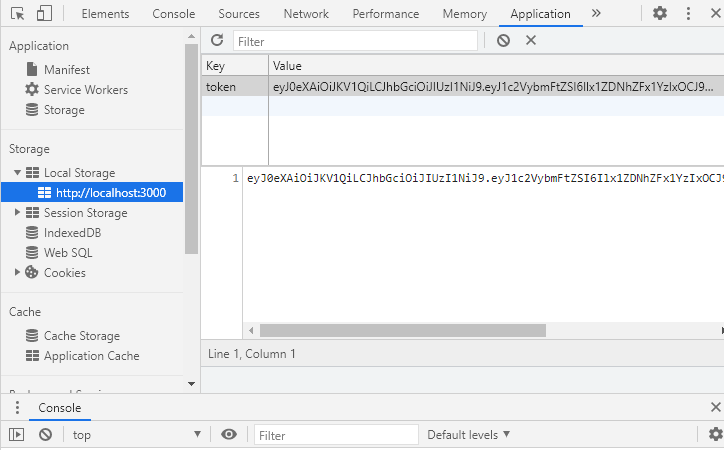
localStorage.setItem("token", data.access_token);
로컬스토리지에 token을 저장한다. data.access_token 은 백엔드 개발자가 준 토큰의 이름이다! 이부분이 틀려서 토큰이 몇번 저장 되지 않는 것을 겪었다! 이제 완전 머리속에 저장저장!


안녕하세요! 프론트엔드 개발자 새미입니다:D