지금까지 회고록의 시행착오 과정은 다음과 같다.
- Entity <-> Request/Response DTO 1:1 대응
- 도메인 중심의 가변적인 Entity 설계
- Param 도입
이러한 일련의 과정을 거치며, 설계와 아키텍처에 대한 고민은 점차 실전 운영 관점으로 확장되었다. 실제로 1년 넘게 서비스를 운영하면서 기능 추가, 정책 변경, 사업 아이템 확장, 버그 대응과 같은 다양한 변경 요구사항이 반복되었고, 이에 따라 변화에 유연하게 대응할 수 있는 구조의 중요성이 명확해졌다. 유지보수성과 확장성을 고려한 설계는 단순한 기술 선택의 문제가 아니라, 서비스 생명주기 전반에 영향을 미치는 핵심 요소로 작용하게 된다.
이러한 문제의식에서 출발해, 클라이언트와 서버 각각의 상태 관리 책임을 명확히 분리하고 상태의 성격에 따라 관리 단위를 나누는 아키텍처를 도입하게 되었다. 클라이언트는 UI 단의 로컬 상태만을 관리하고, 서버 상태는 API 응답 또는 내부 DB와 같은 외부 데이터 소스로부터 발생하는 비동기 상태를 전담하는 구조다. 이전에는 이 두 상태를 하나의 Bloc 혹은 Cubit에서 통합 관리했지만, 현재는 역할에 따라 상태를 분리하고 독립적으로 관리하는 방식으로 변경하여 사용하고 있고 지속적으로 검증 중이다. 단순히 이론적인 접근이 아니라, 실전에서 발생하는 문제들을 해결하면서 점점 더 구체화되고 있는 구조라고 보면 좋을 것 같다.
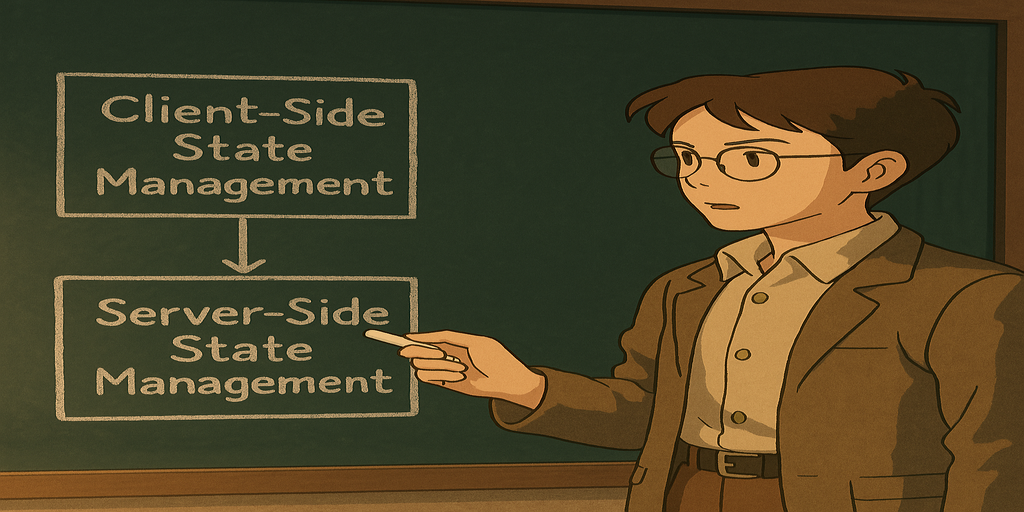
Keyword 및 중점 내용
- Client-Side State / Client Side Cubit
- Server-Side State / Server Side Bloc
개요
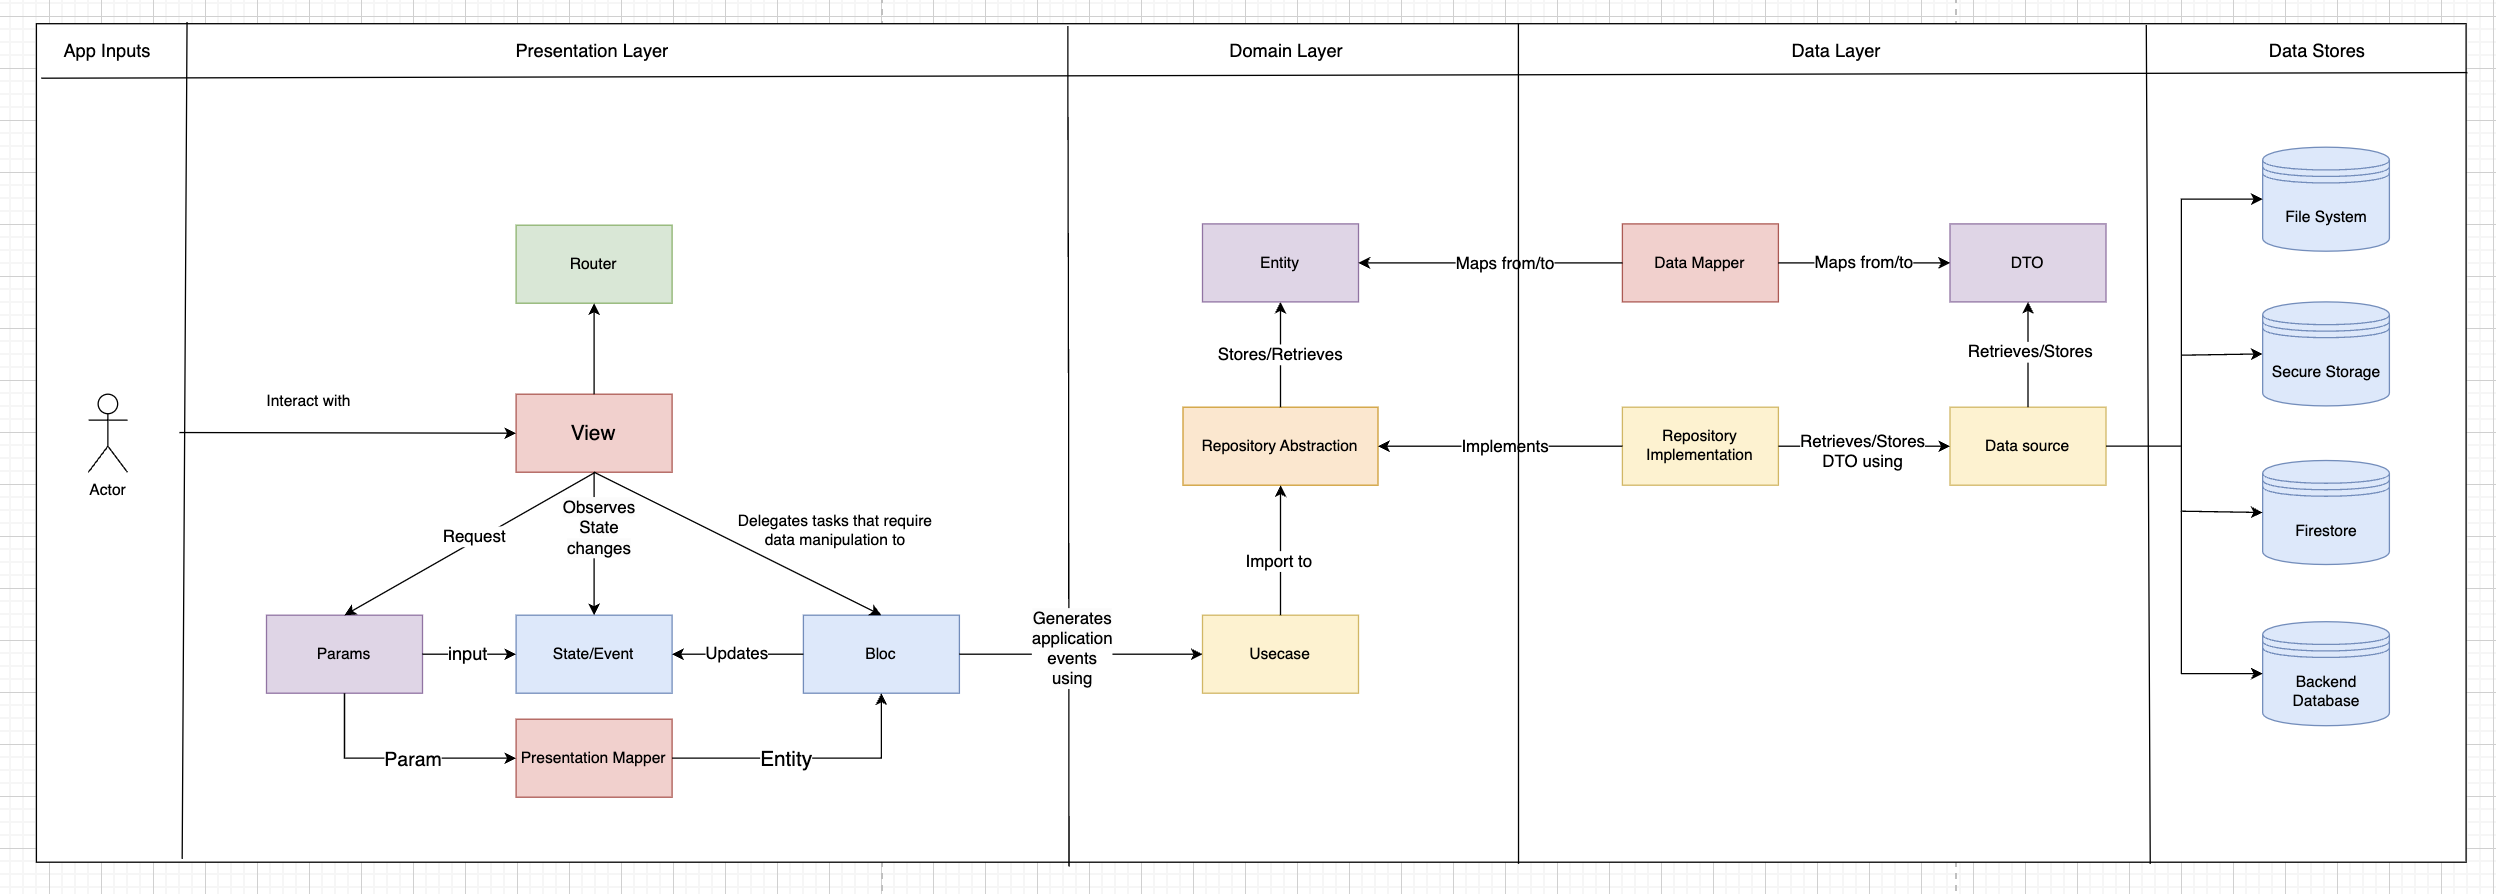
▲ 그림 1. 이전 게시글의 Param 도입 컴포넌트 다이어그램
다음은 이전 게시글에서 언급했던 Param을 도입한 컴포넌트 다이어그램이다. Param을 도입함으로써 다양한 입력 양식이나 화면 단계가 존재하는 복잡한 폼 구조에서 필요한 데이터만 수집하고 이를 관리한다는 점에서 용이하였으나, Presentation 전용 Mapper(Param -> Entity) 가 필요하다보니 Mapper 클래스가 하나 더 추가되면서 구조가 불필요하게 복잡해지는 측면이 있었다.
또한, 데이터 수집 및 상태 관리를 전적으로 Param과 Bloc에 위임하는 구조에서는, UI 단에서만 필요한 상태 로직(예: 입력값 유효성 검사, UI 조건 분기 등)과 도메인 로직을 수행하기 위한 상태 로직(예: 서버 통신, API 호출 등)이 하나의 Bloc 내부에 혼재되어 관리되는 문제가 있었다. 유효성 검사와 같은 UI 상태에 대해 별도의 상태를 정의하고 이를 BlocBuilder에서 처리하려 할 경우, 도메인 상태와 UI 상태를 모두 구분 렌더링해야 하는 비효율적인 구조로 이어질 수밖에 없다. 이런 설계는 단순 UI 상의 상태 변화까지도 BlocBuilder가 리렌더링을 관장하게 되어, 불필요한 렌더링을 유발하고 컴포넌트 간 책임 구분을 모호하게 만든다. 이처럼 UI 로직과 도메인 로직이 동일한 Bloc 내에서 함께 처리되다 보면, Bloc이 지나치게 많은 책임을 지게 되고, 관심사 분리가 어렵고 구조가 복잡해지는 단점이 발생한다.
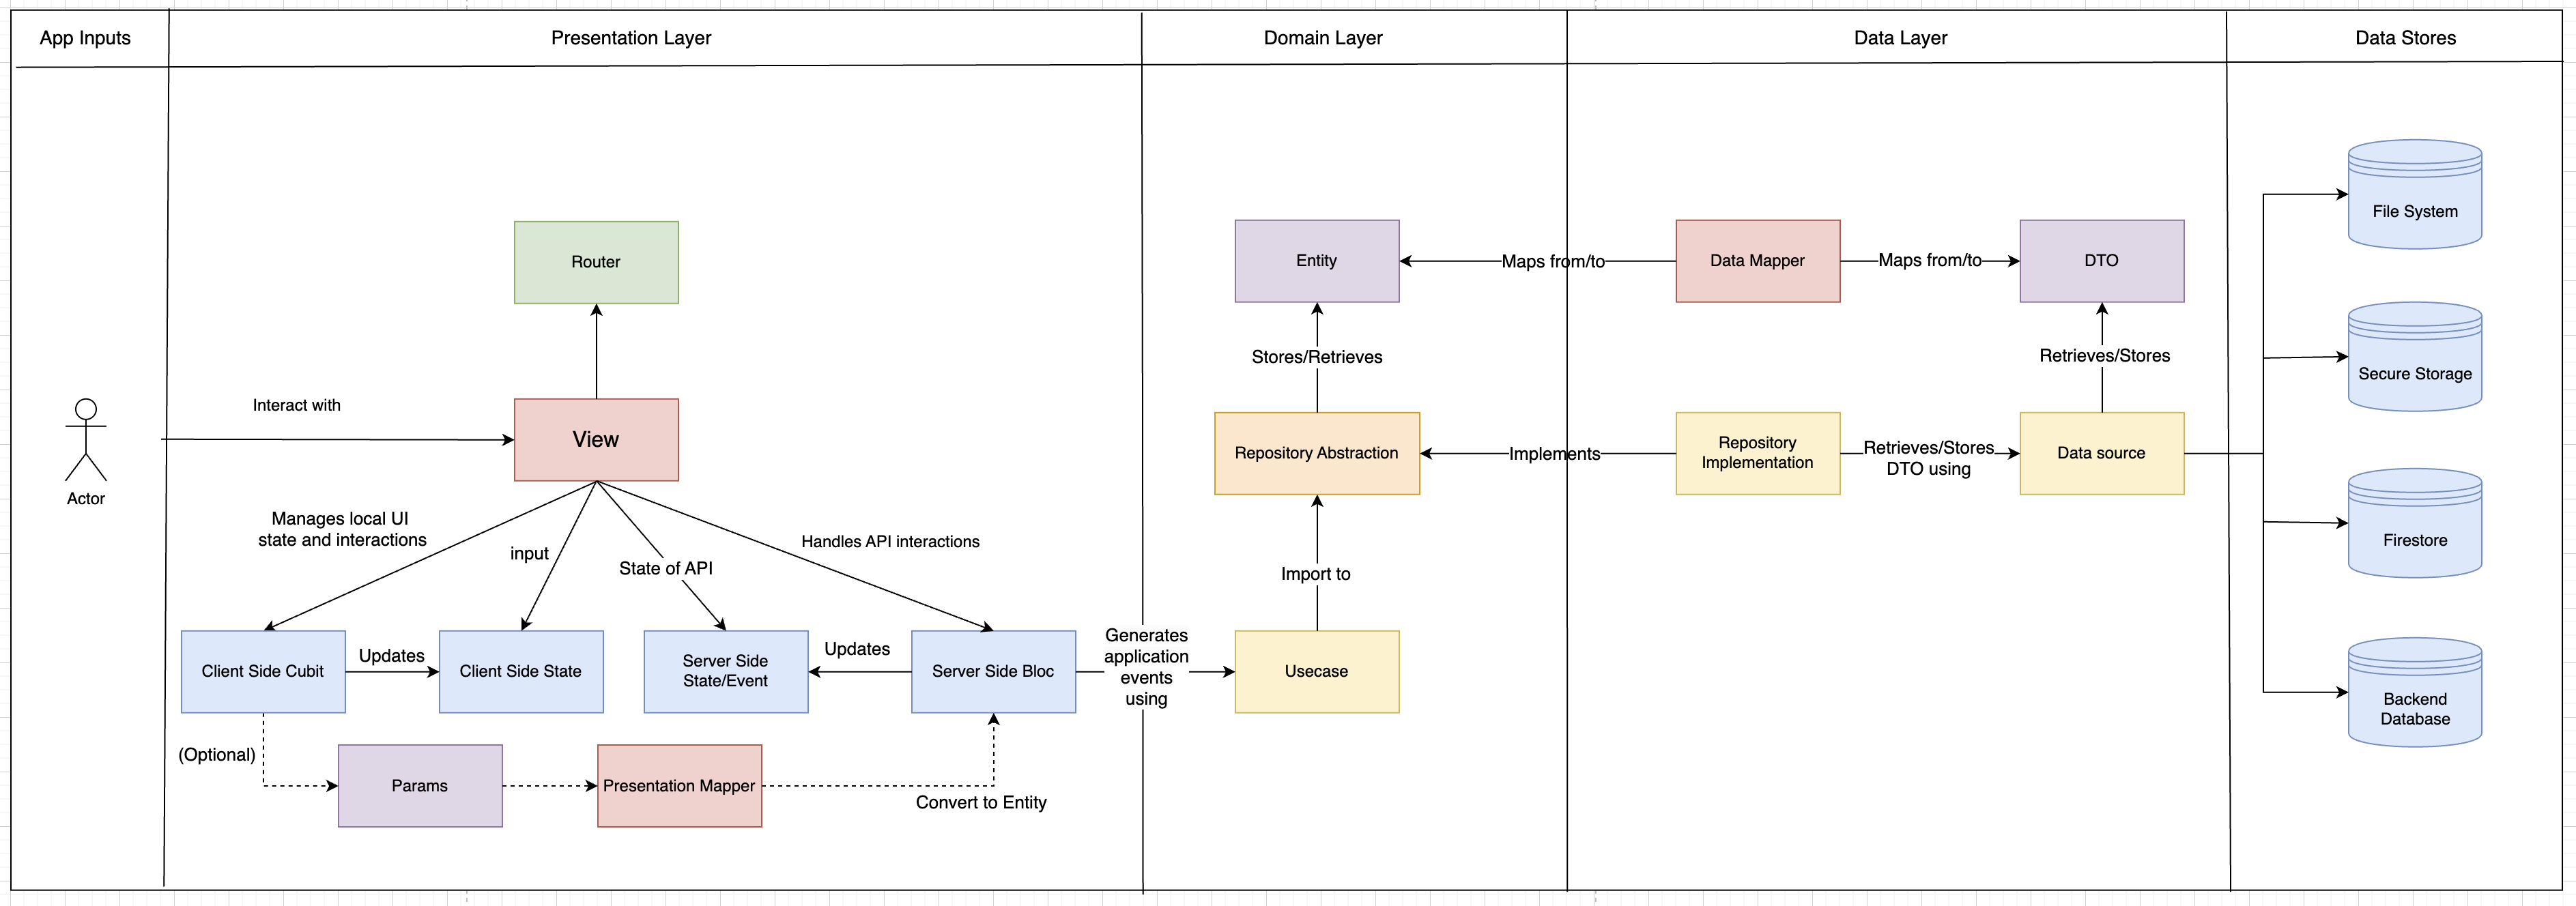
▲ 그림 2. Client-side, Server-side 상태 관리 분리
이러한 문제를 해결하고자, UI 상태를 전담하는 Client Side Cubit/State와 서버 통신 상태를 처리하는 Server Side Bloc/State 구조로 분리하였다. 이를 통해 각 계층의 역할을 명확히 하고, 상태 관리 기준을 UI 로직과 도메인 로직 단위로 나누는 설계 전환을 시도하게 되었다.
이번 포스트도 마찬가지로, 클린 아키텍처 회고록 시리즈에서 다뤄왔던 '프로필 생성 시나리오'를 예시로 들겠다.
Client-side vs Server-side 상태 분리 기준

▲ 그림 3. 프로필 생성 시나리오
해당 시나리오를 기준으로 필요한 'UI 로직'과 '도메인 로직'은 다음과 같다.
- UI 로직
- 국가 선택, 거주 연수, 성별, 생년월일 등 폼 입력값 선택/유지
- 닉네임 텍스트 입력 상태
- 유효성 검사 (ex. 필수 항목 선택 및 기입 여부)
- 모든 조건이 충족되었을 때만 “가입완료하고 시작하기” 버튼 활성화
- 도메인 로직
- 닉네임 중복확인(Server 에 API 요청)
- 프로필 생성(Server 에 API 요청)
UI 상태는 사용자의 입력에 즉각적으로 반응하며, 클라이언트 컴포넌트 내부에서만 유효한 정보이므로 Client-side에서 관리하는 것이 적절하다. 반면, 서버와의 통신이 수반되는 도메인 로직은 Server-side Bloc을 통해 비동기적으로 처리하여 상태 흐름을 관리한다.
Client-side Cubit/State
- Client-side State & Cubit 핵심 역할
- Client-side State
-> UI에서 입력된 데이터를 일시적으로 저장하고, 입력값의 유효성(Validation) 여부까지 포함하여 사용자 상호작용에 따른 화면 상태를 관리- Client-side cubit
-> 상태를 조작하고 업데이트하는 역할로, 사용자의 입력이나 액션에 따라 state를 변경하고, 폼 완성 여부 등을 판단하는 로직을 포함
- personal_profile_create_client_state.dart
이전 게시글에서는 Param 에서 수집해야 하는 데이터들을 모두 가지고 있었는데, 이와 비슷한 논리로 Client-side State 에서 수집한 데이터들을 가지면 된다. 기존 Param 과 다른 점은, validation 관련 변수들이 추가된 점이다. 해당 변수들은 UI 단에서 수집된 데이터들이 유효한 값을 가지는지에 대해 나타내는 변수로 컴포넌트 렌더링에 직접적인 영향을 주는 변수이기 때문에 Client-side State 에서 관리하도록 했다.
class PersonalProfileCreateClientState extends Equatable {
final String profilePhoto;
final String nickName;
final String introduction;
final String residenceCountryCode;
final String residenceStateCode;
final String residenceCityCode;
final String birth;
final bool male;
final bool traveler;
final double residenceYear;
final List<InterestExpertiseType> interests;
final List<InterestExpertiseType> expertises;
/**
* Validation 관련 변수들
*/
/// 닉네임 중복 검사
final bool isNicknameUnique;
/// 필수입력 값들 모두 받았는지 => 프로필 생성 버튼 활성화
final bool isCreated;
/// 초기화
const PersonalProfileCreateClientState(
{this.profilePhoto = '',
this.backgroundProfilePhoto = '',
this.nickName = '',
this.introduction = '',
this.residenceCountryCode = '',
this.residenceStateCode = '',
this.residenceCityCode = '',
this.birth = '',
this.male = true,
this.traveler = true,
this.residenceYear = 1,
this.interests = const [],
this.expertises = const [],
this.isCreated = false,
this.isLoadedProfilePhoto = false,
this.isLoadedBackgroundPhoto = false,
this.nicknameUniqueInfoMessage = '',
this.isNicknameUnique = false});
/// 객체 복사
PersonalProfileCreateClientState copyWith({
String? profilePhoto,
String? backgroundProfilePhoto,
String? nickName,
String? introduction,
String? residenceCountryCode,
String? residenceStateCode,
String? residenceCityCode,
String? birth,
bool? male,
bool? traveler,
double? residenceYear,
List<InterestExpertiseType>? interests,
List<InterestExpertiseType>? expertises,
bool? isCreated,
bool? isNicknameUnique,
}) {
return PersonalProfileCreateClientState(
profilePhoto: profilePhoto ?? this.profilePhoto,
backgroundProfilePhoto:
backgroundProfilePhoto ?? this.backgroundProfilePhoto,
nickName: nickName ?? this.nickName,
introduction: introduction ?? this.introduction,
residenceCountryCode: residenceCountryCode ?? this.residenceCountryCode,
residenceStateCode: residenceStateCode ?? this.residenceStateCode,
residenceCityCode: residenceCityCode ?? this.residenceCityCode,
birth: birth ?? this.birth,
male: male ?? this.male,
traveler: traveler ?? this.traveler,
residenceYear: residenceYear ?? this.residenceYear,
interests: interests ?? this.interests,
expertises: expertises ?? this.expertises,
isCreated: isCreated ?? this.isCreated,
isNicknameUnique: isNicknameUnique ?? this.isNicknameUnique,
);
}
List<Object?> get props => [
profilePhoto,
backgroundProfilePhoto,
nickName,
expertises,
introduction,
residenceCountryCode,
residenceStateCode,
residenceCityCode,
birth,
male,
residenceYear,
traveler,
interests,
isCreated,
isNicknameUnique,
];
}- personal_profile_create_client_cubit.dart
해당 Cubit 에서는 State 에서 관리하는 변수들을 초기화 하는 로직들과 마지막에_isValidForm()와 같은 필수입력 값들을 모두 받았는지 확인하는 로직을 가지고 있다.
class PersonalProfileCreateClientCubit
    extends Cubit<PersonalProfileCreateClientState> {
  PersonalProfileCreateClientCubit()
      : super(PersonalProfileCreateClientState());

  void setProfilePhoto(String profilePhoto) {
    emit(state.copyWith(profilePhoto: profilePhoto));
    emit(state.copyWith(isCreated: _isValidForm()));
  }

  void setExpertises(List<InterestExpertiseType> expertises) {
    emit(state.copyWith(expertises: expertises));
    emit(state.copyWith(isCreated: _isValidForm()));
  }

  void setInterests(List<InterestExpertiseType> interests) {
    emit(state.copyWith(interests: interests));
    emit(state.copyWith(isCreated: _isValidForm()));
  }

  void setIntroduction(String introduction) {
    emit(state.copyWith(introduction: introduction));
    emit(state.copyWith(isCreated: _isValidForm()));
  }

  ...
  (생략)

  bool _isValidForm() {
    return state.profilePhoto.isNotEmpty &&
        state.nickName.isNotEmpty &&
        state.introduction.isNotEmpty &&
        state.residenceCountryCode.isNotEmpty &&
        state.birth.isNotEmpty &&
        ...
        state.interests.isNotEmpty &&
        state.expertises.isNotEmpty &&
        state.isNicknameUnique;  // 닉네임 중복검사 여부 확인
  }
}
- 프로필 수정 (Update) 유스케이스 적용 방식
위의 예시는 '프로필 생성' 에 관련된 유스케이스를 다루지만, 서버로부터 데이터(ex. 로그인한 사용자 프로필)를 받아와 수정하는 화면에서는 어떻게 해야할까? '생성' 유스케이스에서는 사용자로부터 직접 데이터 입력을 받아 생성자를 초기화할 때 Default 값을 넣어줬지만, '수정' 유스케이스에서는 사용자가 이전에 입력했었던 정보들을 서버로부터 받아와 초기화해줘야 하므로 생성자 부분에 초기화하는 로직만 다를 뿐, 데이터 저장 & 데이터 조작 & 유효성 검증의 책임은 모두 동일하다.
- personal_profile_update_client_state.dart
part of 'personal_profile_update_client_cubit.dart';

class PersonalProfileUpdateClientState extends Equatable {
  (create_client_state 멤버 변수들과 동일)
  ...

  const PersonalProfileUpdateClientState(
      {required this.profilePhoto,
      required this.backgroundProfilePhoto,
      required this.nickName,
      required this.introduction,
      required this.residenceCountryCode,
      required this.residenceStateCode,
      required this.residenceCityCode,
      required this.residenceYear,
      required this.traveler,
      required this.interests,
      required this.expertises,
      this.isUpdated = false,
      this.isLoadedProfilePhoto = false,
      this.isLoadedBackgroundPhoto = false,
      this.nicknameUniqueInfoMessage = '',
this.isNicknameUnique = false});- personal_profile_update_client_cubit.dart
class PersonalProfileUpdateClientCubit
    extends Cubit<PersonalProfileUpdateClientState> {
  final ProfileEntity entity; // 서버로부터 받은 데이터

  PersonalProfileUpdateClientCubit(this.entity)
      : super(PersonalProfileUpdateClientState(
          profilePhoto: entity.profilePreviewEntity.profilePhotoUrl,
          backgroundProfilePhoto: entity.backgroundPhotoUrl,
          nickName: entity.profilePreviewEntity.nickname,
          introduction: entity.profilePreviewEntity.introduction,
          residenceCountryCode: entity.residenceCountryCode,
          residenceStateCode: entity.residenceStateCode ?? '',
          residenceCityCode: entity.residenceCityCode ?? '',
          residenceYear: entity.residenceYear,
          traveler: entity.profilePreviewEntity.traveler,
          interests: entity.interests,
          expertises: entity.expertises,
        ));

  (데이터 조작하는 로직 & 유효성 검증 함수 동일 -> 생략)
  ...
Server-side Bloc/State
- Server-side State & Bloc 핵심 역할
- Server-side State
-> 서버에서 받아온 데이터를 저장하고 UI에 전달하는 역할- Server-side Bloc
-> 서버와의 비즈니스 로직(예: API 호출, 데이터 파싱 등)을 수행하고 그 결과를 State에 반영하는 역할
- personal_profile_create_server_event.dart
프로필 생성 시나리오에서는 서버에 호출해야 하는 API 가 2개 있다. 바로 '닉네임 중복검사' 와 '프로필 생성' 인데, Server-side Event는 사용자의 요청에 따라 서버와 통신이 필요한 작업들을 구체적으로 정의하며, 각각의 이벤트는 해당 목적에 맞는 데이터를 포함하고 있다.
CreatePersonalProfile 이벤트에서 param 객체를 사용하는 이유는, 서버에 전달해야 할 필드가 10개 이상으로 많기 때문에 이를 하나의 객체로 래핑하여 전달하는 것이 가독성과 유지보수 측면에서 유리하기 때문이다. 이는 위 그림 2. Client-side, Server-side 상태 관리 분리 에서 Server-side Param 사용은 Optional로 표현된 이유와도 연결된다. 해당 Param은 별도의 도메인 로직을 포함하지 않고, 단순히 데이터 전달을 위한 구조체 역할에 집중하도록 설계되었기 때문이다.
part of 'personal_profile_create_server_bloc.dart';
sealed class PersonalProfileCreateServerEvent extends Equatable {
const PersonalProfileCreateServerEvent();
}
/// 프로필 생성 요청
final class CreatePersonalProfile extends PersonalProfileCreateServerEvent {
const CreatePersonalProfile({required this.userId, required this.param});
final ProfileUpdateParam param;
final int userId;
List<Object?> get props => [userId, param];
}
/// 닉네임 중복검사 요청
final class CheckNickname extends PersonalProfileCreateServerEvent {
const CheckNickname({required this.nickname});
final String nickname;
List<Object?> get props => [nickname];
}- personal_profile_create_server_state.dart
Server-side State는 서버와의 통신 상태를 표현하는 역할을 하며, API 호출의 진행 상태(초기/로딩/성공/실패)를 기반으로 클라이언트 UI가 어떻게 반응할지 결정하는 데 사용된다. 이 State는 로딩 프로그래스바 표시, 성공 시 라우팅 혹은 데이터 기반 렌더링, 실패 시 에러 메시지 노출 등 프레젠테이션 레벨의 로직 제어에 핵심적인 역할을 한다.
part of 'personal_profile_create_server_bloc.dart';
sealed class PersonalProfileCreateServerState extends Equatable {
const PersonalProfileCreateServerState();
List<Object> get props => [];
}
final class PersonalProfileCreateServerInitial
extends PersonalProfileCreateServerState {}
final class PersonalProfileCreateServerLoading
extends PersonalProfileCreateServerState {}
final class PersonalProfileCreateServerLoaded
extends PersonalProfileCreateServerState {
final ProfileEntity createdData;
const PersonalProfileCreateServerLoaded(this.createdData);
List<Object> get props => [createdData];
}
final class PersonalProfileCreateServerFailure
extends PersonalProfileCreateServerState {
final String errorMessage;
const PersonalProfileCreateServerFailure(this.errorMessage);
List<Object> get props => [errorMessage];
}
final class IsUnique extends PersonalProfileCreateServerState {
const IsUnique(this.data);
final String data;
List<Object> get props => [data];
}- personal_profile_create_server_bloc.dart
Server-side Bloc 에서는 주로 서버와 통신하는 모든 비즈니스 로직을 담당한다. 프로필 생성 시나리오에서는 닉네임 중복 검사 및 프로필 생성 요청 처리, 이미지 S3 업로드 등 서버에 의존적인 작업을 수행하게 된다. 위에서 언급한 Server-side State 들을 API 호출 과정에서 emit 하여 UI 가 로딩, 성공, 실패 등의 상태에 따라 동작하도록 프레젠테이션 로직을 유기적으로 연결하기도 한다.
-> Bloc 에서 다루는 멤버 변수들 : Client-side cubit, Usecase, View 전용 Mapper
part 'personal_profile_create_server_event.dart';

part 'personal_profile_create_server_state.dart';

class PersonalProfileCreateServerBloc extends Bloc<
    PersonalProfileCreateServerEvent, PersonalProfileCreateServerState> {
  /// UI 단에서 수집한 데이터
  final PersonalProfileCreateClientCubit personalProfileCreateClientCubit;

  /// Usecase -> 프로필 생성 & 이미지 S3 업로드
  final CreateMyProfileUseCase createMyProfileUseCase =
      serviceLocator<CreateMyProfileUseCase>();
  final AwsUploadMediaUseCase awsUploadMediaUseCase =
      serviceLocator<AwsUploadMediaUseCase>();

  /// View 전용 Mapper(Param -> Entity 변환)
  ...
  final profileMapper = ViewProfileMapper();
  ...
-> Bloc 생성자 및 Action
PersonalProfileCreateServerBloc(
      {required this.personalProfileCreateClientCubit})
      : super(PersonalProfileCreateServerInitial()) {
    /// 프로필 생성
    on<CreatePersonalProfile>(_createPersonalProfile);

    /// 닉네임 중복 확인
    on<CheckNickname>(_checkNickname);
  }

  Future<void> _createPersonalProfile(CreatePersonalProfile event,
      Emitter<PersonalProfileCreateServerState> emit) async {
    emit(PersonalProfileCreateServerLoading());

    String? profilePhotoUrl;

    // 프로필 사진과 배경 사진에 대한 UploadEntity 생성
    ...(일부 생략)

    // 프로필 사진 업로드
    final profileUploadTask =
        await awsUploadMediaUseCase.execute(profilePhotoUrlUploadEntity);
    profileUploadTask.when(
      success: (urls) {
        if (urls.isNotEmpty) {
          profilePhotoUrl = urls.first; // 프로필 사진 URL 저장
        }
      },
      failure: (error) {
        emit(PersonalProfileCreateServerFailure(error));
      },
    );

    /// View Mapper 를 통해 Param -> Entity로 변환
    final profileCreateEntity = profileMapper.mapProfileCreateParamToEntity(
      param: event.param,
      profilePhoto: profilePhotoUrl ?? defaultImage,
    );

    /// 프로필 생성 Usecase 실행
    final result =
        await createMyProfileUseCase.execute(event.userId, profileCreateEntity);

    result.when(
      success: (data) {
        emit(PersonalProfileCreateServerLoaded(data));
      },
      failure: (error) {
        emit(PersonalProfileCreateServerFailure(error));
      },
    );
  }

  Future<void> _checkNickname(CheckNickname event,
      Emitter<PersonalProfileCreateServerState> emit) async {
    emit(PersonalProfileCreateServerInitial());
    final result = await createMyProfileUseCase.checkNickname(event.nickname);
    result.when(
      success: (data) {
        emit(IsUnique(data));
      },
      failure: (error) {
        emit(PersonalProfileCreateServerFailure(error));
      },
    );
  }
View
다음은 프로필 생성 두번째 화면에 대한 코드 전문을 다루도록 하겠다. 해당 단락에서 핵심 내용은
(1) Client-side Cubit 과 BlocBuilder 를 활용하여 프레젠테이션 로직을 유기적으로 연결시켰는지
(2) buildWhen 기법을 어떻게 활용해서 컴포넌트별 재렌더링을 줄일 수 있는지
(3) Server-side Bloc 을 활용해서는 API 호출 과정 중 상태별로 어떤 로직들을 처리했는지
에 초점을 맞추어 설명하고자 한다.
- 멤버 변수, initState, dispose
class ProfileCreateSecondView extends StatefulWidget {
ProfileCreateSecondView({super.key});
static const String id = "...";
State<ProfileCreateSecondView> createState() => _ProfileCreateSecondViewState();
}
class _ProfileCreateSecondViewState extends State<ProfileCreateSecondView> {
late PersonalProfileCreateClientCubit personalProfileCreateClientCubit;
late PersonalProfileCreateServerBloc personalProfileCreateServerBloc;
...
void initState() {
/// context 로부터 등록된 cubit 과 bloc 을 받아 온다.
personalProfileCreateClientCubit =
BlocProvider.of<PersonalProfileCreateClientCubit>(context);
personalProfileCreateServerBloc =
BlocProvider.of<PersonalProfileCreateServerBloc>(context);
...
super.initState();
}
void dispose() {
/// 메모리 명시적 해제
personalProfileCreateClientCubit.close();
PersonalProfileCreateServerBloc.close();
...
super.dispose();
}- build()
- Server-side Event 에 대해 State 관리(프로필 생성 요청 담당)- Loading -> Loading Widget 리턴
- Error -> Error Dialog 와 에러 위젯 리턴
- Success -> Navigator 를 통한 화면 라우팅
- buildWhen: 해당 BlocBuilder 는 '프로필 생성' 유스케이스를 책임지므로 이와 관련없는 '닉네임 중복확인 -
isUnique'는 처리하지 않으므로 buildWhen 을 통해 re-rendering 을 막음
Widget build(BuildContext context) {
return GestureDetector(
onTap: () {
FocusManager.instance.primaryFocus?.unfocus();
},
child: Scaffold(
backgroundColor: Palette.valueBackground,
appBar: getAppbarWidget(),
extendBodyBehindAppBar: false,
body: BlocConsumer<PersonalProfileCreateServerBloc,
PersonalProfileCreateServerState>(
/// 화면 라우트 시 listener 이용
listener: (context, state) {
if (state is PersonalProfileCreateServerLoaded) {
userEntityCubit.updateProfile(state.createdData);
Navigator.of(context).popUntil((route) => route.isFirst);
}
},
/// 닉네임 중복확인 책임 x
buildWhen: (previous, current) {
if (current is IsUnique) {
return false;
}
return true;
},
/// Server-side State 별 화면 렌더링
builder: (context, state) {
if (state is PersonalProfileCreateServerLoading) {
return LoadingWidget();
} else if (state is PersonalProfileCreateServerFailure) {
WidgetsBinding.instance.addPostFrameCallback(
(_) => showDialog(
context: context,
builder: (BuildContext context) {
return AppWidgets.getErrorMessage(
context, state.errorMessage);
},
),
);
return ErrorWidget();
}
return getBodyWidget();
},
),
),
);
}- getBodyWidget()
- 각 컴포넌트 별로BlocBuilder를 통해 렌더링 관리buildWhen을 통해 이전값과 현재값 비교해서 변경되지 않은 경우 re-rendering x- '프로필 설정 완료' 버튼의 경우, Client-side Cubit & State 에서 필수입력값들에 대한 유효성 검사 이후, 통과가 되면 활성화
- 즉 Client-side Cubit -> UI 렌더링 / Server-side Bloc -> 서버와의 비즈니스 로직 수행 후 결과 반영
Widget getBodyWidget() {
    return SingleChildScrollView(
      child: Padding(
        padding: EdgeInsets.symmetric(horizontal: 15.w),
        child: GestureDetector(
          onTap: () {
            FocusManager.instance.primaryFocus?.unfocus();
          },
          child: Column(
            children: [
              (생략)
              ...

              /// 프로필 사진
              BlocBuilder<PersonalProfileCreateClientCubit,
                  PersonalProfileCreateClientState>(
                buildWhen: (previous, current) {
                  return previous.profilePhoto != current.profilePhoto;
                },
                builder: (context, state) {
                  return ProfilePhotoWidget(
                      setProfileFunction:
                          personalProfileCreateClientCubit.setProfilePhoto,
                      setIsLoadedProfilePhoto: personalProfileCreateClientCubit
                          .setIsLoadedProfilePhoto,
                      profilePhoto: state.profilePhoto);
                },
              ),
              SizedBox(
                height: 20.h,
              ),

              /// 닉네임 설정
              BlocBuilder<PersonalProfileCreateServerBloc,
                  PersonalProfileCreateServerState>(
                /// 프로필 생성과 관련된 상태는 관여 x
                buildWhen: (previous, current) {
                  return current is IsUnique;
                },
                builder: (context, state) {
                  if (state is IsNotUnique) {
                    personalProfileCreateClientCubit.setNicknameUnique(false);
                  }
                  ...
                  return BlocBuilder<PersonalProfileCreateClientCubit,
                          PersonalProfileCreateClientState>(
                      buildWhen: (previous, current) {
                    return previous.nickName != current.nickName ||
                        previous.nicknameUniqueInfoMessage !=
                            current.nicknameUniqueInfoMessage ||
                        previous.isNicknameUnique != current.isNicknameUnique;
                  }, builder: (context, state) {
                    return NicknameWidget(
                        checkNickName: checkNickName,
                        setNickname:
                            personalProfileCreateClientCubit.setNickName,
                        clearNickname:
                            personalProfileCreateClientCubit.clearNickname,
                        nickname: state.nickName,
                        message: state.nicknameUniqueInfoMessage);
                  });
                },
              ),
              SizedBox(
                height: 30.h,
              ),

              /// 자기소개
              BlocBuilder<PersonalProfileCreateClientCubit,
                  PersonalProfileCreateClientState>(
                buildWhen: (previous, current) {
                  return previous.introduction != current.introduction;
                },
                builder: (context, state) {
                  return IntroductionWidget(
                    setIntroduction:
                        personalProfileCreateClientCubit.setIntroduction,
                    introduction: state.introduction,
                  );
                },
              ),
              SizedBox(
                height: 30.h,
              ),

              (생략)
              ...

              /// 프로필 설정 완료 버튼
              BlocBuilder<PersonalProfileCreateClientCubit,
                  PersonalProfileCreateClientState>(
                buildWhen: (previous, current) {
                  return current.isCreated != previous.isCreated;
                },
                builder: (context, state) {
                  return TextButton(
                    style: TextButton.styleFrom(
                        fixedSize: Size(345.w, 60.h),
                        shape: RoundedRectangleBorder(
                            borderRadius: BorderRadius.circular(10.r)),
                        backgroundColor: state.isCreated
                            ? Palette.valuePink
                            : Palette.valueGrey),
                    onPressed: () {
                      if (state.isCreated) {
                        createProfile();
                      }
                    },
                    child: Text('프로필 설정 완료',
                        style: TTextTheme.textTheme.bodyLarge!
                            .apply(color: Palette.valueWhite)),
                  );
                },
              ),
- 그 이외 코드
- Server-side Bloc 에 Event 를 dispatch 하는 코
- [Optional] Context 관련 UI 생성 코드(ex. showDialog() 등)
void checkNickName(String nickname) {
    personalProfileCreateServerBloc.add(CheckNickname(nickname: nickname));
  }

void createProfile() {
    final param = personalProfileCreateServerBloc.toProfileCreateParam();
    personalProfileCreateServerBloc.add(CreatePersonalProfile(
        userId: userEntityCubit.state!.userId, param: param));
  }
결론
Client-side 와 Server-side 로 나누어 프레젠테이션 로직을 관리했을 때, 본 회고록의 프로젝트 계층 구조는 다음과 같다.
lib/
├── **Presentation Layer**
│   ├── bloc/
│   │   ├── [feature]_client_cubit.dart
│   │   ├── [feature]_client_state.dart
│   │   ├── [feature]_server_bloc.dart
│   │   ├── [feature]_server_event.dart
│   │   └── [feature]_server_state.dart
│   ├── mapper/ (optional)
│   │   └── [feature]_view_mapper.dart
│   ├── param/ (optional)
│   │   └── [feature]_param.dart
│   └── screen/
│       └── [feature]_view.dart
│
├── **Domain Layer**
│   ├── entity/
│   │   └── [feature]_entity.dart
│   ├── repository/
│   │   └── [feature]_repository.dart
│   └── usecase/
│       └── [usecase].dart
│
└── **Data Layer**
    ├── data_source/
    │   ├── local/
    │   │   └── [feature]_local_api.dart
    │   └── remote/
    │       └── [feature]_remote_api.dart
    ├── mapper/
    │   └── [feature]_mapper.dart
    ├── model/
    │   ├── request/
    │   │   └── [feature]_request_model.dart
    │   └── response/
    │       └── [feature]_response_model.dart
    └── repository/
        └── [feature]_repository_impl.dart
Presentation Layer는 단순히 화면을 구성하는 계층을 넘어, 유지보수성과 확장성을 고려하여 명확한 관심사 분리가 필요하다. 이를 위해 아래와 같이 각 컴포넌트의 책임을 분리해 설계한다.
| 구성요소 | 책임 및 관심사 |
|---|---|
| View | UI 컴포넌트 렌더링, Context 기반 작업, Cubit/Bloc dispatch |
| ClientCubit | UI 내부 상태 관리 및 유효성 로직 |
| ServerBloc | 도메인 로직 호출 및 그 결과에 따른 UI 상태 처리 |
1. View
- 역할
- UI 요소의 렌더링과 사용자 인터랙션 처리
- 책임
- Stateless한 위젯 구성 및 화면 표현
- Bloc/Cubit에 이벤트를 전달 (dispatch, emit)
- showDialog, SnackBar, Navigator 등 BuildContext를 요구하는 작업 수행
- 제한
- 비즈니스 로직을 직접 수행하거나 상태를 가공하지 않음
- 도메인 로직 호출은 Bloc에 위임
2. ClientCubit / ClientState
- 역할
- UI 내에서 발생하는 상태 변화를 관리
- ClientState
- 사용자의 입력값, 유효성 여부 등 View가 렌더링에 필요한 상태를 보유
- ClientCubit
- 단순한 상태 변경을 처리 (setNickname, setBirth 등)
- 내부적으로_isValidForm()같은 UI validation logic을 포함
-emit()을 통해 View에 변경 사항을 전달
3. ServerBloc / ServerState / ServerEvent
- 역할
- 도메인 레이어와의 인터페이스, 비즈니스 로직 호출 및 결과 상태 관리
- ServerBloc
- 도메인 레이어에 정의된 UseCase를 호출
- 서버 통신 또는 비즈니스 로직 수행 결과에 따라 View에 알맞은 상태를 전달 (emit)
- ServerEvent
- View로부터 전달받은 이벤트
- ServerState
- 서버 처리의 결과 (Success, Failure, Loading 등)를 구체화하여 View에 전달
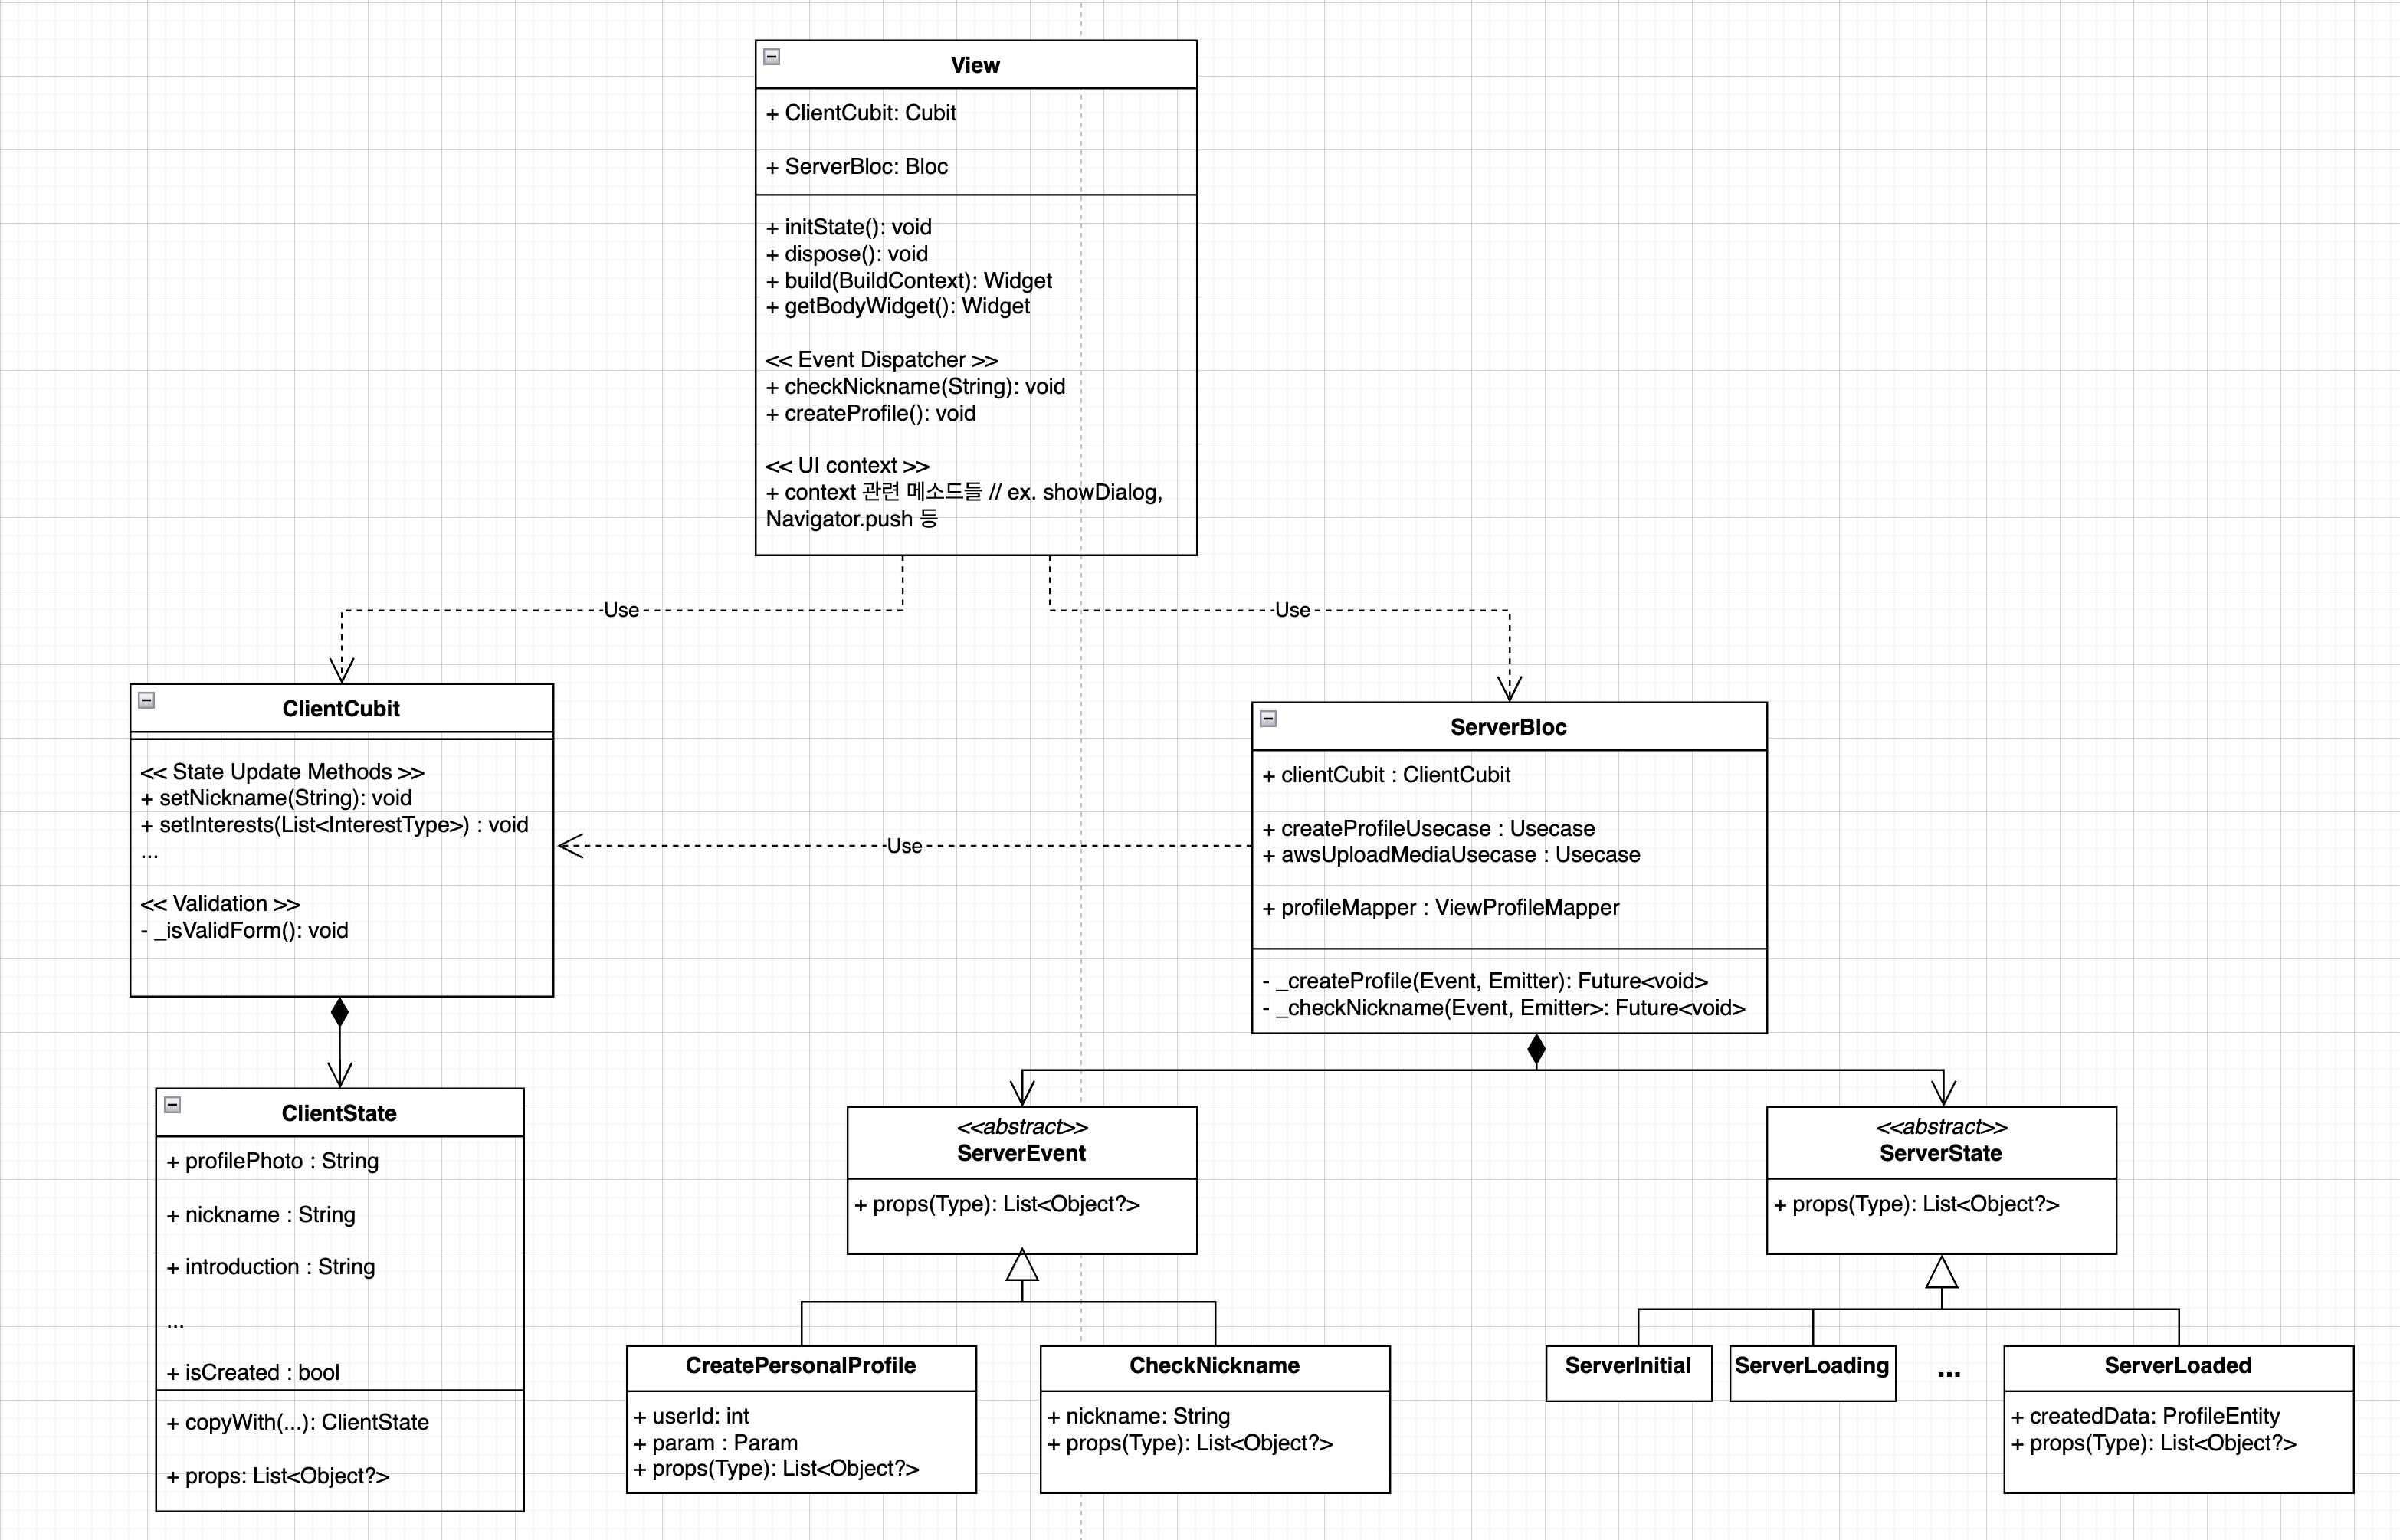
▲ 그림 4. Presentation Layer Class Diagram
끝으로
클린 아키텍처는 “관심사의 분리를 통해 도메인 중심의 견고한 설계를 추구하는 것” 을 주요 아이디어로 삼는다. 이러한 구조는 특히 백엔드 혹은 복잡한 도메인 모델링이 필요한 시스템에서 강력한 유지보수성과 확장성을 보장해준다.
하지만 프론트엔드나 모바일 애플리케이션 영역에서는 이와는 또 다른 고민이 병행되어야 한다. 위에서 다루었던 "프로필 생성 유스케이스"를 예시로 들자면, 서버와 통신하기 위해 UseCase를 호출하고, 이미지 업로드 및 도메인 로직 흐름을 설계하는 것도 중요하다. 마찬가지로 이에 못지않게, 사용자의 입력값을 UI 상태로 관리하고, 이를 바탕으로 화면을 구성하거나 유효성 검증을 반영하는 등 Presentation Layer 내에서의 데이터 수집 및 상태 관리하는 것도 중요하다. 1년간 서비스를 운영하며 총 24회의 버전 업데이트를 거치는 과정에서 다음과 같은 인사이트를 얻었다.
- 도메인 설계의 중요성: 변경의 전파를 최소화하기 위한 중심축
서비스 기획은 반복적으로 바뀌며, 그에 따라 입력 항목이 추가되거나 제거되는 일이 빈번하다. 이는 단순히 화면 단에서 끝나지 않고, 도메인 모델 자체의 변경으로 이어지며 애플리케이션 전반에 영향을 미친다. 이런 변경 흐름을 여러 차례 경험하면서 탄탄한 도메인 설계는 유지보수의 난이도를 줄이고 전체 개발 속도를 빠르게 만든다는 점을 실감하게 되었다. 도메인 계층이 잘 정리되어 있을수록, 변경이 생겨도 영향 범위를 좁게 만들 수 있으며, 기능 단위로 안전하게 수정·배포할 수 있다.
- 그러나 Presentation Layer의 변화도 결코 작지 않다
클린 아키텍처는 보통 도메인 중심 설계에 초점을 맞추지만, 실제 운영 경험에서 느낀 바로는 Presentation Layer 또한 기획 변경의 영향을 크게 받는다. 단순히 도메인의 엔티티만 수정해서 끝나는 게 아니라,
- 입력 필드 구성의 변경 (필드 추가/삭제에 따른 UI 구조 변화)
- 화면 동작 흐름의 변경 (데이터에 따라 달라지는 화면 상태 또는 인터랙션 처리)
- 입력값에 대한 전처리 및 유효성 검사 로직의 추가/변경
이 모든 것들이 화면 단에서 병행하여 수정되어야 한다. 도메인을 변경할 때, 그만큼 View의 논리도 재정비가 필요했던 것이다.
- Presentation Layer 역시 관심사 분리가 필요하다
선언형 UI 패러다임에서는 자연스럽게 View 코드의 양이 많아진다. 하지만 이 View 안에 유효성 검사, 조건 처리, 상태 변화 로직이 모두 뒤섞이기 시작하면 컴포넌트의 재사용성은 떨어지고 유지보수는 급격히 어려워진다. 따라서 다음과 같은 분리가 반드시 필요하다:
- View는 UI 렌더링과 Context 기반의 작업에만 책임 분리
- ClientCubit은 사용자 입력에 대한 상태 변화 및 유효성 검증 책임 분리
- ServerBloc은 도메인 호출과 결과 상태 전달 책임 분리
이러한 구조는 단순히 “Clean Code”를 위한 것이 아니라, 실제 운영과 유지보수 상황에서 실질적인 시간과 비용을 줄여주는 설계 전략임을 체감하게 되었다.
끝으로 아키텍처에 대해선 정답이 없다. 해당 포스트에서 정리한 구조와 방향성이 어떤 프로젝트에서는 효과적일 수 있지만, 다른 맥락에서는 오히려 적절하지 않을 수도 있다. 소프트웨어 설계에 “Silver Bullet” 은 존재하지 않으며, 나 역시 아직 모든 경우를 경험해본 것이 아니기에 논리가 부족한 부분도 있고, 미처 보지 못한 단점들도 분명 존재할 것이다.
하지만 중요한 건, 더 나은 구조를 향한 지속적인 고민과 실천이라고 생각한다. 내가 생각하는 "클린 코드" 란 단지 기술적인 규칙을 따르는 것이 아니라 변경이 쉽고 유지보수에 용이하며 확장성이 높은 코드라 생각하는데,
내가 지향하는 "클린 코드"에 다다르기까지 이 회고록 시리즈 역시 여기서 멈추지 않고, 앞으로의 운영과 경험을 통해 계속해서 다듬고 개선해 나갈 예정이다.