1. 테스트
1-1. 테스트 자동화의 중요성
-
매뉴얼 테스트(인간이 실행)는 직관적이지만 실행 속도가 느리고 부정확할 수 있다
-
테스트를 자동화해서 정확하고 누락된 부분 없이 테스트를 할 수 있다
-
개발하는데 시간을 쓰는만큼이나 테스트에도 시간을 들여야한다
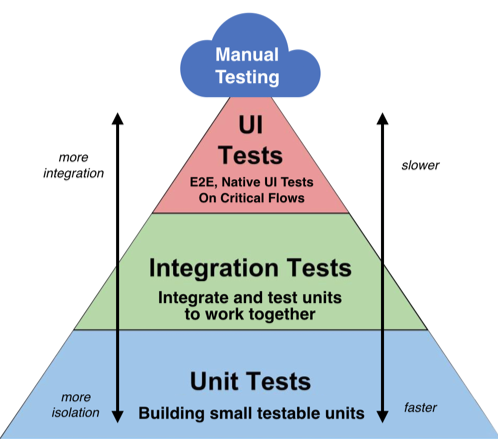
1-2. 테스트의 종류

1. UI test / End-to-End test :
UI에 직접 입력하고 기능이 정상 작동하는지, 화면에 정상으로 출력되는지 테스트해 보는 방식. 실제 서비스 사용과 같이 테스트할 수 있다. 하지만 시간이 많이 소요되고 모든 시스템을 실행 시키고 연결해야 테스트가 가능하다. Selenium 같은 UI 테스트 프레임워크로 어느 정도 자동화 가능하지만 완벽한 자동화엔 어려움이 있다.
2. Integration test :
테스트하고자 하는 시스템을 실행시켜 실행하는 테스트. 하나의 시스템만 테스트하므로 UI 테스트에 비해 실행 시간과 설정이 간단하고, UI 요소가 없는 시스템의 경우 테스트하기 용이하다.
3. Unit test :
시스템을 실행하여 테스트하기보다 코드를 직접 테스트하는 개념. 함수등 시스템을 이루는 구성 단위를 독립적으로 테스트한다. 실행하기 쉽고 빠르며, 디버깅이 비교적 쉽다. 하지만 전체적인 부분을 테스트하기에는 제한적이다.
⚠️ 아래 단계일 수록 테스팅과 디버깅이 쉽기 때문에 전체 테스트에서 더 많은 비중을 둬야한다 ⚠️
⚠️ 테스트를 다음 단계로 미루는 것은 버그 발견을 미루고 수정을 힘들게 할뿐이다 ⚠️
2. pytest
파이썬의 단위 테스트를 위한 외부 라이브러리
-
pytest 실행 시 이름이
test_로 시작하는 파일을 테스트 파일로 인식하고 실행한다 -
함수명도
test_로 시작해야 단위 테스트 함수로 인식하고 실행한다
2-1. 간단 예시
# test_multiply_by_two.py

def multiply_by_two(x):
	return x * 2

def test_multiply_by_two():
assert multiply_by_two(4) == 8- 위처럼 함수
multiply_by_two()와 이 함수를 테스트할 함수test_multiply_by_two()가 test_ 로 시작하는 이름을 가진 파일에 있을때 해당 파일 경로에서 pytest를 실행하면 아래처럼 테스트를 한다
$ pytest
======================== test session starts ===========================
platform linux -- Python 3.7.9, pytest-6.2.2, py-1.10.0, pluggy-0.13.1
rootdir: /home/sangmin/PycharmProjects/api
collected 1 items

test_multiply_by_two.py P                                         [100%]

========================= 1 passed in 4.13s ============================
2-2. setup, teardown function
- 모든 함수를 독립적으로 테스트하려면 유저 생성과 같은 테스트에 필요한 부분을 매번 구현해 줘야한다. 공통된 부분은 테스트 함수 실행 전
setup_function()실행 후teardown_function()으로 쉽게 구현할 수 있다.
# test_api.py
def setup_function():
    # 테스트 사용자 생성
    hashed_password = bcrypt.hashpw(
        b"test password",
        bcrypt.gensalt()
    )
    test_user = {
            'id': 1,
            'name': "test_name1",
            'email': "test1@test.com",
            'profile': "this is a test use1",
            'hashed_password': hashed_password
            }

    database.execute(text("""
        INSERT INTO users (
            id,
            name,
            email,
            profile,
            hashed_password
        ) VALUES (
            :id,
            :name,
            :email,
            :profile,
            :hashed_password
        )
    """), test_user)

def teardown_function():
    database.execute(text("SET FOREIGN_KEY_CHECKS=0"))
    database.execute(text("TRUNCATE users"))
    database.execute(text("TRUNCATE tweets"))
    database.execute(text("TRUNCATE users_follow_list"))
database.execute(text("SET FOREIGN_KEY_CHECKS=1"))setup_function()과 teardown_function()는 pytest 예약 함수로 함수 내 코드를 각 테스트 함수 실행 전/후에 실행한다
⚠️ SET FOREIGN_KEY_CHECK=0는 임시로 외래키 제약을 끈다. 프러덕션 환경에서는 실행하면 안되는 구문이다 ⚠️
3. pytest로 Flask 엔드포인트 테스트
팔로우 엔드포인트를 테스트하는 예시
- 테스트용 config(테스트용 DB URI 등)를 설정해준다
# app.py
def create_app(test_config=None):
    app = Flask(__name__)
    app.config.from_pyfile("config.py")

    if test_config is not None:
        app.config.update(test_config)
    ...
(생략)- 테스트 함수를 구현한다
# test_endpoints.py
(생략)
...
@pytest.fixture
def api():
    app = create_app(config.test_config)
    app.config['TEST'] = True
    api = app.test_client()
    return api


def login_user1(api):
    # 테스트 사용자1 로그인
    resp = api.post(
        '/login',
        data=json.dumps({'email': "test1@test.com", 'password': "test password"}),
        content_type='application/json'
    )
    resp_json = json.loads(resp.data.decode('utf-8'))
    access_token = resp_json['access_token']
    return access_token


def test_follow(api):
    # 새로 생성한 사용자1 로그인
    access_token = login_user1(api)

    # 사용자1 timeline 비었는지 확인
    resp = api.get('/timeline/1')
    tweets = json.loads(resp.data.decode('utf-8'))
    assert resp.status_code == 200
    assert tweets == {
        'user_id': 1,
        'timeline': []
    }

    # 사용자2 팔로우
    resp = api.post(
        '/follow',
        data=json.dumps({'follow': 2}),
        content_type='application/json',
        headers={'Authorization': access_token}
    )
    assert resp.status_code == 200

    # 사용자2의 트윗 사용자1 타임라인에 표시 확인
    resp = api.get('/timeline/1')
    tweets = json.loads(resp.data.decode('utf-8'))
    assert resp.status_code == 200
    assert tweets == {
        'user_id': 1,
        'timeline': [
            {
                'user_id': 2,
                'tweet': "Hello world"
            }
        ]
}-
@pytest.fixture : 해당 데코레이터가 적용된 함수와 같은 이름의 인자가 테스트 함수에 있다면 자동으로 인자를 입력해준다
-
app.test_client() : 테스트용 클라이언트를 생성한다. 앱 실행 없이 URI와 메소드를 기반으로 원하는 엔드포인트를 호출할 수 있다
-
json.dumps() : 파이썬 객체를 JSON 문자열로 직렬화한다
-
json.loads() : JSON 문자열을 파이썬 객체로 역직렬화한다

