
1. JDBC
Java 어플리케이션과 RDBMS를 연결해주는 모듈
-
2개의 레이어로 구성
- JDBC API : 개발자가 사용
- JDBC Driver : RDBMS 벤더가 작성 및 관리

-
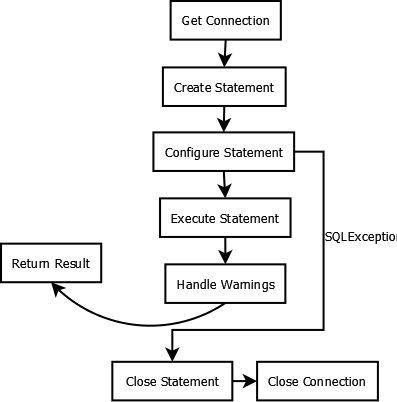
JDBC의 플로우
- DriverManager를 통해 connection 객체를 받아온다
- Connection을 통해 Statement를 가져옴
- Statement를 통해 뭐리를 실행, result set을 가져오거나 update 실행
- DB connection 종료
2. JDBC를 통한 CRUD
2-1. SELECT staetment 실행하기
- connection과 statement를 설정 후, statement를 통해 sql을 실행해 결과 값을 얻는다
resultSet.getXXX("필드명")의 형태로 데이터를 읽을 수 있다- 리소스들은 꼭
close()해줘야 자원 낭비가 없다 - 팁으로 시간 관련 정보를 읽을때
LocalDateTime객체로 변환해주면 다양한 메소드를 활용할 수 있다
public class JdbcCustomerRepository {

    private static final Logger logger = LoggerFactory.getLogger(JdbcCustomerRepository.class);

    public static void main(String[] args) {
        Connection connection = null;
        Statement statement = null;
        ResultSet resultSet = null;
        try {
            // connection 획득
            connection = DriverManager.getConnection("jdbc:mysql://localhost/order_mgmt", "root", "1234");
            // statement 객체 생성
            statement = connection.createStatement();
            // RDB와 통신
            resultSet = statement.executeQuery("SELECT * FROM customers");
            while (resultSet.next()) {
                var customerId = UUID.nameUUIDFromBytes(resultSet.getBytes("customer_id"));
                var name = resultSet.getString("name");
                logger.info("customer id -> {} name -> {}", customerId, name);

            }
        } catch (SQLException throwables) {
            logger.error("Got error while closing connection", throwables);
        } finally {
            // 사용한 객체들 반납
            try {
                if (connection != null) connection.close();
                if (statement != null) statement.close();
                if (resultSet != null) resultSet.close();
            } catch (SQLException e) {
                logger.error("Got error while closing connection", e);
            }
        }
    }
}- Java 10에서 try-with 문법이 추가되어 일일히 close할 필요 없이 아래처럼 조금 더 간단하게 코드를 작성할 수 있다
public class JdbcCustomerRepository {

    private static final Logger logger = LoggerFactory.getLogger(JdbcCustomerRepository.class);
    public static void main(String[] args) {
        try (
            // try문이 끝난후 자동으로 close할 객체들
            var connection = DriverManager.getConnection("jdbc:mysql://localhost/order_mgmt", "root", "1234");
            var statement = connection.createStatement();
            var resultSet = statement.executeQuery("SELECT * FROM customers");
            )
        {
            while (resultSet.next()) {
                var customerId = UUID.nameUUIDFromBytes(resultSet.getBytes("customer_id"));
                var name = resultSet.getString("name");
                logger.info("customer id -> {} name -> {}", customerId, name);
            }
        } catch (SQLException throwables) {
            logger.error("Got error while closing connection", throwables);
        }
    }
}
2-2. prepareStatement로 인젝션 방지하기
- 사용자 입력을 받아 SQL문의 조건을 추가한다면, 간단하게는 다음처럼 할 수 있다
// name은 사용자 입력 문자열
findName(String name) {
    SQL = "SELECT * FROM customers WHERE name = '" + name + "'";
    ...
    statement.executeQuery(SQL)
    ...
}-
하지만 만약
"' OR 'a' = 'a"같은 입력이 들어온다면, 조건이 항상 true가 되어 모든 결과를 전송할 것이다 -
이런 SQL 인젝션 문제를 방지하기 위해
prepareStatement()를 사용한다
public List<String> findNames(String name) {
        var SELECT_SQL = "select * from customers where name = ?";
        List<String> names = new ArrayList<>();

        try (
            var connection = DriverManager.getConnection("jdbc:mysql://localhost/order_mgmt", "root", "1234");
            var statement = connection.prepareStatement(SELECT_SQL);
        )
        {
            statement.setString(1, name);
            try (var resultSet = statement.executeQuery()) {
                while (resultSet.next()) {
                    var customerId = UUID.nameUUIDFromBytes(resultSet.getBytes("customer_id"));
                    var customerName = resultSet.getString("name");
                    var createdAt = resultSet.getTimestamp("created_at").toLocalDateTime();
                    logger.info("customer id -> {} name -> {} createdAt -> {}", customerId, customerName, createdAt);
                    names.add(customerName);
                }
            }
        } catch (SQLException throwables) {
            logger.error("Got error while closing connection", throwables);
        }

        return names;
}- 인젝션 시도시 SQL문에서 다음과 같은 차이가 발생한다
-- 단순 문자열 조합
SELECT * FROM customers WHERE name = '' OR 'a' = 'a';
-- prepareStatements() 사용
SELECT * FROM customers WHERE name = ''' OR ''a''=''a'- 이 이외에도 문자열 조합의 경우 매번 sql 실행을 위해 connection, statement, execute 3단계를 거쳐야하지만, prepareStatement의 경우 statement를 미리 만들어 놓기 때문에 성능면에서도 더 뛰어나다
2-3. JDBC를 통한 업데이트
- 위에서 select문을 실행한것처럼 다른 동작들도 실행할 수 있다
    public int insertCustomer(UUID customerId, String name, String email) {
	String INSERT_SQL = "insert into customers(customer_id, name, email) VALUES (UUID_TO_BIN(?), ?, ?)";

        try (
            var connection = DriverManager.getConnection("jdbc:mysql://localhost/order_mgmt", "root", "1234");
            var statement = connection.prepareStatement(INSERT_SQL);
        )
        {
            statement.setBytes(1, customerId.toString().getBytes());
            statement.setString(2, name);
            statement.setString(3, email);
            return statement.executeUpdate();
        } catch (SQLException throwables) {
            logger.error("Got error while closing connection", throwables);
        }

        return 0;
    }

    public int updateCustomerName(UUID customerId, String newName) {
        String UPDATE_BY_ID_SQL = "update customers set name = ? WHERE customer_id = UUID_TO_BIN(?)";

        try (
            var connection = DriverManager.getConnection("jdbc:mysql://localhost/order_mgmt", "root", "1234");
            var statement = connection.prepareStatement(UPDATE_BY_ID_SQL);
        )
        {
            statement.setString(1, newName);
            statement.setBytes(2, customerId.toString().getBytes());
            return statement.executeUpdate();
        } catch (SQLException throwables) {
            logger.error("Got error while closing connection", throwables);
        }

        return 0;
    }

    public int deleteAllCustomer() {
        String DELETE_ALL_SQL = "delete from customers";

        try (
            var connection = DriverManager.getConnection("jdbc:mysql://localhost/order_mgmt", "root", "1234");
            var statement = connection.prepareStatement(DELETE_ALL_SQL);
        )
        {
            return statement.executeUpdate();
        } catch (SQLException throwables) {
            logger.error("Got error while closing connection", throwables);
        }

        return 0;
    }
3. DataSource
-
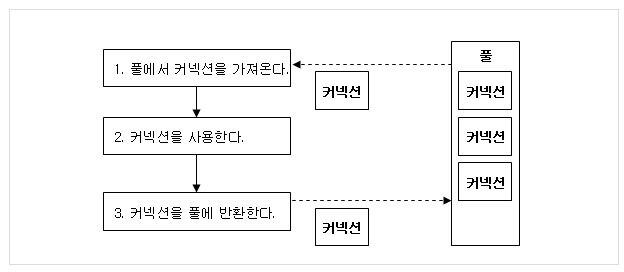
매번 Connection을 생성하는 것은 오버헤드가 크다
-
DataSource를 통해 커넥션 풀을 활용할 수 있다
3-1. 커넥션 풀 (DBCP)
-
커넥션을 미리 만들어 캐싱하고 필요시마다 사용/반환할 수 있다
-
DataSource가 커넥션 풀을 관리한다
3-2. DataSource의 구현체
-
SimpleDriverDataSource : 스프링부트에서 제공하는 기본적인 데이터 소스 구현체
- 풀에서 관리하지 않고 매번 driver에서 커넥션을 가져온다
- 디버깅/테스팅용
-
HikariCP :
- 스프링 부트 2.0 이전에는 톰캣에서 제공하는 DBCP를 사용함(Apache Common DBCP와 동일)
- 2.0 이후로는 HikariCP를 사용한다
- 오픈소스로 안정적이고 빠르다
DataSource datasource = DataSourceBuilder.create()
                            .url("jdbc:mysql://localhost/order_mgmt")
                            .username("root")
                            .password("1234")
                            .type(HikariDataSource.class)
.build();- 앞서 위에서는
DriverManager로 매번 커넥션을 생성했지만, 이제dataSource.getConnection으로 더 효율적으로 커넥션을 관리할 수 있다
3-3. DBCP 사이즈 설정
-
dataSource.setMaximumPoolSize(int maxPoolSize): idle과 사용중인 커낵션을 포함한 최대 풀 크기 -
dataSource.setMinimumIdle(int minIdle): 풀 내에 유지하는 최소 idle 커낵션 수
3-4 DataSource를 사용한 CRUD
DriverManager대신DataSource를 사용해 커낵션을 가져오는것 이외에는 동일하다
public Optional<List<Customer>> findAll() {
    List<Customer> customerList = new ArrayList<>();
    try (
        var connection = dataSource.getConnection();
        var statement = connection.prepareStatement(SELECT_ALL_SQL);
        var resultSet = statement.executeQuery();
    )
    {
        while(resultSet.next()) {
            mapToCustomer(customerList, resultSet);
        }
    } catch (SQLException throwable) {
        logger.error("Got error while closing connection", throwable);
        throw new RuntimeException(throwable);
    }
    return Optional.of(customerList);
}
편하게 읽기 좋은 단위의 포스트를 추구하는 개발자입니다