Splash 구현
- 오늘은 앱 실행 시 로딩되는 것 처럼 보이게 하기 위해 Splash를 구현해 보겠습니다.
목차
-
Splash Activity 생성
-
splash layout 구성
-
SplashActivity 설정
-
AndroidMainfest 앱 구동시 첫 화면 설정
1. Splash Activity 생성
- 기존 Activity 생성과 동일하게 Splash Activity를 생성해준다.
2. splash layout 구성
- activity_splash.xml에서 화면에 보여질 layout을 구성해준다.
<?xml version="1.0" encoding="utf-8"?>
<LinearLayout xmlns:android="http://schemas.android.com/apk/res/android"
    xmlns:app="http://schemas.android.com/apk/res-auto"
    xmlns:tools="http://schemas.android.com/tools"
    android:id="@+id/main"
    android:layout_width="match_parent"
    android:layout_height="match_parent"
    tools:context=".SplashActivity"
    android:orientation="vertical">

    <ImageView
        android:src="@drawable/logo"
        android:layout_width="match_parent"
        android:layout_height="match_parent"/>

</LinearLayout>
3. SplashActivity 설정
- Splash 동작을 위해 SplashActivity에서 Handler를 설정해준다.
package com.sangmoki.bts_photo

import android.content.Intent
import android.os.Bundle
import android.os.Handler
import androidx.activity.enableEdgeToEdge
import androidx.appcompat.app.AppCompatActivity

class SplashActivity : AppCompatActivity() {
    override fun onCreate(savedInstanceState: Bundle?) {
        super.onCreate(savedInstanceState)
        enableEdgeToEdge()
        setContentView(R.layout.activity_splash)
        Handler().postDelayed(Runnable {
            // 앱의 MainActivity로 넘어가기
            val i = Intent(this@SplashActivity,MainActivity::class.java)
            startActivity(i)
            // 현재 액티비티 닫기
            finish()
        }, 1000) // 3초
    }
}
4. AndroidManifest.xml 설정
- 앱 구동 시 첫 화면이 보여질 구성을 여기서 한다.
- 프로젝트 생성 시 default가 main으로 잡혀있어 수정해준다.
<?xml version="1.0" encoding="utf-8"?>
<manifest xmlns:android="http://schemas.android.com/apk/res/android"
    xmlns:tools="http://schemas.android.com/tools">

    <application
        android:allowBackup="true"
        android:dataExtractionRules="@xml/data_extraction_rules"
        android:fullBackupContent="@xml/backup_rules"
        android:icon="@mipmap/ic_launcher"
        android:label="@string/app_name"
        android:roundIcon="@mipmap/ic_launcher_round"
        android:supportsRtl="true"
        android:theme="@style/Theme.Bts_photo"
        tools:targetApi="31">
        <activity
            android:name=".SplashActivity"
            android:exported="true"
            android:theme="@style/Theme.Design.NoActionBar" >
            <intent-filter>
                <action android:name="android.intent.action.MAIN" />
                <category android:name="android.intent.category.LAUNCHER" />
            </intent-filter>
        </activity>
            android:name=".Bts3Activity"
            android:exported="false" />
        <activity
            android:name=".Bts2Activity"
            android:exported="false" />
        <activity
            android:name=".Bts1Activity"
            android:exported="false" />
        <activity
            android:name=".MainActivity" >
        </activity>
    </application>

</manifest>
이와 같이 구성 후 실제 구동 화면이다.
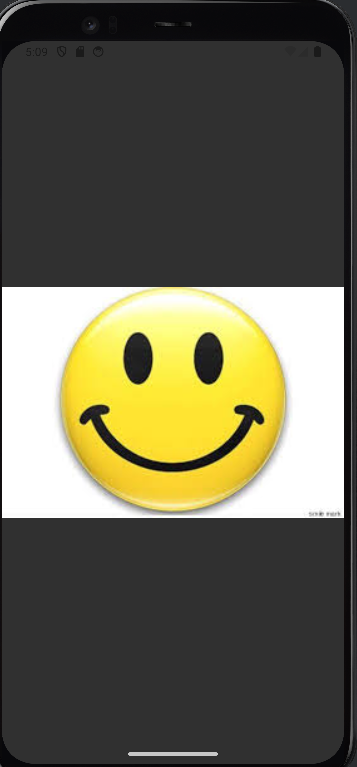
이 로고가 보이고 Hadler로 설정해놓은 1초 뒤 main 화면으로 이동한다.

기록은 기억을 지배한다.