Intro
코드스쿼드 마스터즈 테스트 중 여러 Object(행성)을 생성하는 단계에서 나의 코드는 중복되는 코드를 계속 반복해서 생성 하고 있었다. 어떻게 중복되는 코드를 줄일가 고민하고 찾아보던 중 객체 지향 프로그래밍에 대한 공부가 더 필요하다고 생각되어 공부를 해보며 나의 코드를 수정해보고자 한다.
생성과 호출을 각 행성 마다 반복하고있는 나의 코드...
// 각 행성의 지름값으로 행성 생성에 필요한 정보를 가져온다.
space.planetSize = function (d) {
  const dia = Number(d); // 지름
  const radius = Math.floor(d / 2); // 반지름
  const centerX = radius;
  const centerY = radius;

  switch (dia) {
    case 7:
      this.makeSun(dia, radius, centerX, centerY);
      break;
    case 5:
      this.makeMars(dia, radius, centerX, centerY);
      break;
    case 3:
      this.makeEarth(dia, radius, centerX, centerY);
      break;
    case 1:
      this.makeMoon(dia, radius, centerX, centerY);
      break;
  }
};

// Sun 생성 함수 (Mars, Earth, Moon 도 같은 함수를 반복중...)
space.makeSun = function (d, r, x, y) {
  this.sun = Array.from({ length: d }, () => Array(d));

  for (let i = x - r; i <= x + r; i++) {
    for (let j = y - r; j <= y + r; j++) {
      if ((i - r) * (i - r) + (j - r) * (j - r) <= r * r) {
        this.sun[i][j] = "🔥";
      } else {
        this.sun[i][j] = "";
      }
    }
  }
  this.showTheSun(d);
};

// Mars 호출 함수 (호출도 각 행성마다 반복중...)
space.showTheMars = function (d) {
  for (let i = 0; i < d; i++) {
    const div = document.createElement("div");
    div.innerText = this.mars[i];
    marsObject.appendChild(div);
  }
};
객체 지향 프로그래밍(OOP)
- 로직을 상태(state)와 행위(behave)로 이루어진 객체로 만드는 것이다.
- 언어차원(프로그래밍)에서 취지(기능,연관)의 변수, 메서드를 그룹화(객체화)해서 관리한다고 생각하면 된다.
- 좋은 부품의 로직을 만드는 길이다.
객체
객체란 서로 연관된 변수와 함수를 그룹핑한 그릇이다.
객체 내의 변수를 프로퍼티, 함수를 메서드라고 부른다.
const person = {} // object
person.name = 'kim' // 프로퍼티
person.introduce = function() { // 메서드
retuen 'My name is ' + this.name;
}
// 위와 같은 객체 만드는 방식은 분산되어 있다. 객체를 정의 할 때 값을 그룹으로 셋팅하도록 해보자.

const person = {
  		'name' : 'kim'
  		'introduce' : function() {
          	return 'My name is ' + this.name;
        }
}
// 위 처럼 객체를 만들수도 있다. (분산이 없어서 실수가 줄거나 가독성이 좋을 수 있다.)
생성자와 new
위 객체 코드에서 사람이 두명이 있다고 생각해보자.
const person1 = {
  		'name' : 'kim'
  		'introduce' : function() {
          	return 'My name is ' + this.name;
        }
}

const person2 = {
  		'name' : 'lee'
  		'introduce' : function() {
          	return 'My name is ' + this.name;
        }
}
이름의 값을 제외하고 모든 코드가 중복되고 있다. 중복은 프로그래밍에서 피해야만 한다.
생성자(constructor)
생성자는 객체를 만드는 역할을 하는 함수다. 자바스크립트에서 함수는 재사용 가능한 로직의 묶임이 아니라 객체를 만드는 창조자라고 할 수 있다.
function Person() {}

const p = new Person(); // new 를 붙여서 함수를 실행하면 객체가 된다. === const p = {}
p.name = 'kim';
p.introduce = function() {
  	return 'My name is ' + this.name;
}
// 생성자를 이용하여 객체를 만들었지만, 중복됨은 변함이 없다.

const p1 = new Person()
p1.name = 'kim';
p.introduce = function() {
  	return 'My name is ' + this.name;
}

const p2 = new Person()
p2.name = 'lee';
p.introduce = function() {
  	return 'My name is ' + this.name;
}
// name 값을 제외하고 중복되고 있다.


function Person(name) { // 생성자 Person이라는 함수를 정의함
  this.name = name; // name 초기화
  this.introduce = function() {
    	return 'My name is ' + this.name;
 	} // introduce 초기화
}
const p1 = new Person('kim'); // 생성자 함수에 new를 추가하고 인자 '이름'을 전달함
const p2 = new Person('lee');
console.log(p1.introduce());
console.log(p1.introduce());
// introduce 메서드 중복이 사라졌다.
// 생성자가 하는일이 "객체의 초기화" 임을 알 수 있다.
전역객체란?
모든 객체는 전역객체의 프로퍼티다.
function func() {
  alert('hello');
}
// func()
// window.func()
// 위 둘은 같다. 윈도우의 속성 func가 함수이기에 메소드 이다.
// 자바스크립트에서 모든 객체는 기본적으로 전역객체의 프로퍼티임을 알 수 있다.
this
👉 더 알아보기
함수를 어떻게 호출하느냐에 따라서 this가 가리키는 대상이 달라진다.
함수와 객체의 관계가 느슨한 자바스크립트에서 this는 이 둘을 연결시켜주는 연결점의 역할을 한다.
let funcThis = null;

function Func() {
  funcThis = this;
}

// 일반함수 호출
let o1 = Func();
if(funcThis === window) {
  console.log('window');
} // 일반함수 호출에서의 this는 함수의 객체 window를 가리킨다.

// 생성자 함수 호출
let o2 = new Func();
if(funcThis === o2) {
  console.log('o2');
} // 생성자 함수로 호출하면 생성자 함수를 호출한 변수가 this가 된다.
함수의 메서드인 apply, call을 이용하면 this의 값을 제어할 수 있다.
let o = {}
let p = {}
function func() {
  switch(this) {
    case o:
      console.log('o');
      break;
    case p:
      console.log('p');
      break;
    case window:
      console.log('window');
      break;
  }
}
func(); // window
func.apply(o); // o
func.apply(p); // p
상속
모객체에는 변수와 메서드가 존재한다. 새로운 자객체를 모객체에 상속한다면 자객체는 모객체의 변수와 메서드의 기능을 그대로 사용할 수 있다. 또한, 자객체가 가지고 있는 변수와 메서드도 활용 할 수 있다. 필요에 따라 다른 객체의 변수와 메서드를 이용하면서 새로운 로직 구성이 가능하다는 것이다. 이는 로직의 재활용이 가능하기에 객체지향에는 필수적인 요소다.
// 일반적인 생성자 생성
function Person(name) {
  this.name = name;
  this.introduce = function() {
    return 'My name is ' + this.name;
  }
}
let p1 = new Person('kim');
console.log(p1.introduce());
// My name is kim

// 상속을 위한 코드로 변경해보자. (준비단계)
function Person(name) {
  this.name = name;
}
Person.prototype.name = null; // Person의 프로퍼티 객체에 name부여
Person.prototype.introduce = function() { // Person의 프로퍼티 객체에 introduce부여
  return 'My name is ' + this.name;
}
let p1 = new Person('kim');
console.log(p1.introduce());
// My name is kim

// 상속받을 Programmer를 만들어보자
function Programmer(name) {
  this.name = name;
}
Programmer.prototype = new Person(); // Programmer 프로퍼티 객체에 new Person부여 -> 상속
let p1 = new Programmer('kim');
console.log(p1.introduce());
// My name is kim
위 예제로 상속하는 방법을 알아보았다. 그럼 상속 받은 객체에 새로운 기능을 추가하는 방법을 보자.
function Person(name){
    this.name = name;
}
Person.prototype.name=null;
Person.prototype.introduce = function(){
    return 'My name is '+this.name;
}

function Programmer(name){
    this.name = name;
}

// Programmer는 사람이면서 코딩이 가능하다.
Programmer.prototype = new Person(); // 사람 상속
Programmer.prototype.coding = function(){ // 코딩이라는 가능 추가
    return "hello world";
}

var p1 = new Programmer('kim');
console.log(p1.introduce());
console.log(p1.coding());
// My name is kim
// hello world
Programmer는 Person의 기능을 가지고 있으면서
Person이 가지고 있지 않은 기능인 메소드 coding을 가지고 있다.
프로토타입이란?
-
자바스크립트는 명령형, 함수형, 프로토타입 기반, 객체지향 프로그래밍을 지원하는 멀티 패러다임 프로그래밍 언어이다.
-
자바스크립트는 객체 기반의 프로그래밍 언어이며 자바스크립트를 이루고 있는 거의 모든 것이 객체이며, 원시타입의 값을 제외한 나머지 값들(함수, 배열 정규 표현식 등)은 모두 객체다.
-
자바스크립트에서 객체가 만들어지기 위해서는 자신을 만드는 데 사용된 원형인 프로토타입 객체를 이용하여 객체를 만든다.
-
이때 만들어진 객체 안에 proto 속성이 자신을 만들어낸 원형을 의미하는 프로토타입 객체를 참조하는 숨겨진 링크가 있다. 이 숨겨진 링크를 프로토타입이라고 한다.
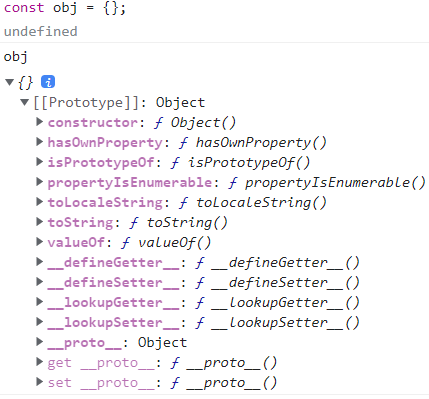
즉 JS는 원시타입을 제외한 모든 것이 객체이며, 이 객체에는 proto라는 속성이 숨겨져 있다. 이 속성(proto)을 다른 객체에 상속하거나 다른 객체의 속성(proto)를 가져올 수 있다.
프로토타입의 상속과 체인
-
상속은 객체지향 프로그래밍의 핵심개념으로, 어떤 객체의 프로퍼티 또는 메서드를 다른 객체가 상속받아 그대로 사용할 수 있는 것을 말한다.
-
자바스크립트는 프로토타입을 기반으로 상속을 구현하여 불필요한 중복을 제거한다.
function Ultra() {}
Ultra.prototype.ultraProp = true;

function Super() {}
Super.prototype = new Ultra();

function Sub() {}
Sub.prototype = new Super();

const o = new Sub();
console.log(o.ultraProp);
// true

o.ultraProp = 1;
console.log(o.ultraProp);
// 1
- 상속을 받기 위해서는 부모객체의 프로토타입에 new 부모객체를 부여해야한다.
- Ultra, Super, Sub는 프로토타입 체인 상태이다.
- console.log(o.ultraProp)의 경우 Sub > Super > Ultra 순으로 값을 찾는다.
Outro
- 행성을 생성하는 Planet 생성자와 행성을 호출하는 Space생성자로 기능을 구분했다.
- 행성을 생성하고 그 행성을 우주에 호출 할 수 있도록 Space 기능을 상속시켰다.
- 반복되던 생성 함수와 호출 함수 중복을 제거하였다. 🎉
// Space 생성자 (Space 관리자 - 행성을 추출하여 우주에 호출한다.)
function Space(objName) {
  this.objName = objName;
}

Space.prototype.objName = null;

// 행성을 추출하는 메서드
Space.prototype.getObj = function () {
  switch (this.objName) {
    case "sun":
      this.showObj(sunObject);
      break;
    case "mars":
      this.showObj(marsObject);
      break;
    case "earth":
      this.showObj(earthObject);
      break;
    case "moon":
      this.showObj(moonObject);
      break;
  }
};

// 추출한 행성을 호출하는 메서드
Space.prototype.showObj = function (toHtml) {
  for (let i = 0; i < this.dia; i++) {
    const div = document.createElement("div");
    div.innerText = this.array[i];
    toHtml.appendChild(div);
  }
};

// Planet 생성자 (Planet 관리자 - 행성을 생성한다.)
function Planet(objName, dia) {
  this.objName = objName;
  this.dia = dia;
  this.radius = Math.floor(dia / 2);
  this.centerX = this.radius;
  this.centerY = this.radius;
  this.array = new Array();
}

// Planet에 Space를 상속 시킨다. Space > Planet
Planet.prototype = new Space();

// 인자(지름)값으로 생성할 행성을 선택한다.
Planet.prototype.selectPlanet = function () {
  switch (this.dia) {
    case 7:
      this.makePlanet("🔥");
      break;
    case 5:
      this.makePlanet("🎈");
      break;
    case 3:
      this.makePlanet("🌏");
      break;
    case 1:
      this.makePlanet("🌕");
      break;
  }
};

// 선택받은 행성을 생성한다.
Planet.prototype.makePlanet = function (imo) {
  this.array = Array.from({ length: this.dia }, () => Array(this.dia));

  for (
    let i = this.centerX - this.radius; i <= this.centerX + this.radius; i++) {
    for (let j = this.centerY - this.radius; j <= this.centerY + this.radius; j++) {
      if (
        (i - this.radius) * (i - this.radius) + (j - this.radius) * (j - this.radius) <=
        this.radius * this.radius
      ) {
        this.array[i][j] = `${imo}`;
      } else {
        this.array[i][j] = "";
      }
    }
  }
};

// 행성이름과 지름값을 부여한다.
const sun = new Planet("sun", 7);
const earth = new Planet("earth", 3);
const moon = new Planet("moon", 1);
const mars = new Planet("mars", 5);

// 각 행성 생성함수와 호출함수 실행
sun.selectPlanet();
sun.getObj();
mars.selectPlanet();
mars.getObj();
earth.selectPlanet();
earth.getObj();
moon.selectPlanet();
moon.getObj();
😅 느낀점
- 생활코딩 강의를 듣고 코드 작성해보고 다시 보고 다시 작성하기를 3일...만에 중복을 제거 할 수 있었다.
- 객체 지향을 이해했다기 보다는 생성자와 상속을 이해하고 쪼금 친해진 것 같다. (그게 객체 지향으로 가는 길이라는 거지??)
- 문제는 이렇게 작성하는게 맞는지를 모르겠다.... 누군가의 피드백을 받고 싶다...
- 각 행성마다 실행함수를 저렇게 작성하면 좋지 않아보이는데... 다시 고민해보자.
생활코딩 강의를 참조했습니다.