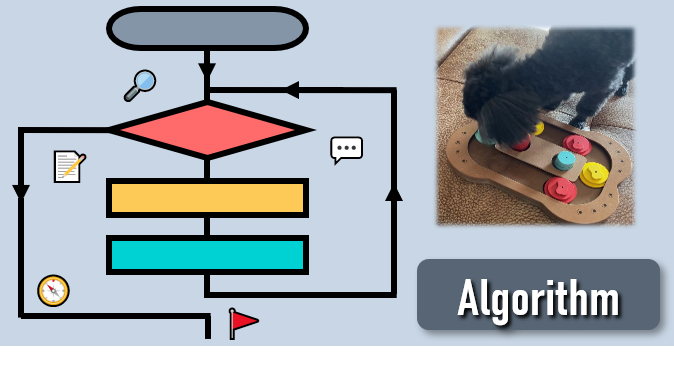
Linked List (연결 리스트) 란?
- 원소들을 연결된 링크로 관리한다.
- 배열과 비슷하지만 인덱스가 아닌 노드로 원소와 원소가 연결되어 있다.
- 배열 리스트의 공간적인 문제를 해결하기 위해 탄생한 자료구조다.
- 저장 공간이 가변적이다는 장점을 가지고 있다.
- 인덱스를 가지고 있지 않기에 배열 보다 특정 값을 찾는 것은 효율성이 떨어진다.
Linked List 노드들을 그림으로 표현 (출처 : 생활코딩)
배열 리스트와 연결 리시트의 차이점을 잘 보여주는 그림 (출처 : 생활코딩)
Linked List의 장점
- 맨 앞에 원소를 삽입하는 시간복잡도가 O(1) 이다.
- 민 뒤에 원소를 삽입하는 시간복잡도가 O(1) 이다.
- 새로운 원소가 삽입되거나 삭제될 때, 저장 공간을 확장하거나 축소하는 재할당이 필요 없다.
Linked List의 단점
- 특정 위치에 있는 원소에 대한 접근의 시간복잡도는 최대 O(n) 이다.
- 특정 위치에 있는 원소에 대한 수정의 시간복잡도는 최대 O(n) 이다.
- 연결 리스트 중간에 원소가 삽입되거나 삭제될 때의 시간복잡도 또한 최대 O(n) 이다.
Array List vs Linked List
- 데이터에 대한 접근이 잦은 경우 ==> 배열
- 데이터에 대한 수정이 잦은 경우 ==> 배열
- 데이터의 추가, 삽입, 삭제가 잦은 경우 ==> 연결 리스트
Linked List의 알고리즘을 직접 구현해보자.
1. 노드라는 클래스를 구성한다. (각 노드들을 정의한다.)
// 노드 클래스
class Node {
  // 마지막 노드의 next는 다폴트로 null이 되도록 구조생성
  constructor(data, next = null) {
    this.data = data;
    this.next = next;
  }
}

const n1 = new Node(100);
console.log(n1);
// Node { data: 100, next: null } 노드를 생성 할 수 있다.
2. Linked List 클래스를 구성한다.
// 링크드 리스트 클래스
class LinkedList {
  constructor() {
    this.head = null;
    this.size = 0;
  }
}
// 현재는 목록이 비어있기 때문에 디폴트 head = null, size = 0
- head가 존재하며 기본적으로 null값을 가진다.
- head가 null이면 목록이 비어 있음을 의미한다.
- size : 목록의 크기를 추적한다.
3. 첫번째 리스트에 노드 삽입 기능을 구현한다.
  // Insert first node
  insertFirst(data) {
    this.head = new Node(data, this.head);
    this.size++;
  }
const ll = new LinkedList();
ll.insertFirst(100);
console.log(ll);
LinkedList { head: Node { data: 100, next: null }, size: 1 }
- 새로운 노드가 생성되면서 연결리스트 head로 생성된 노드가 들어간다.
- 여기서 추가된 노드는 data:100 next:null을 가진다.
- 목록 사이즈가 늘어난다.
4. 추가로 첫번째 리스트에 노드를 삽입한다.
const ll = new LinkedList();
ll.insertFirst(100);
ll.insertFirst(200);
console.log(ll);
LinkedList {
head: Node { data: 200, next: Node { data: 100, next: null } },
size: 2
}
- 새로 추가된 노드가 리스트의 헤드가 된다.
- next는 기존의 노드가 된다.
5. 노드의 데이터값만 순서대로 출력하는 기능을 구현한다.
  // Print list data
  printListData() {
    let current = this.head; // current는 지금의 헤드

    while (current) { // current가 null이 될때 까지
      console.log(current.data, current.next);
      current = current.next; // current는 next의 헤드가 된다.
    }
  }

const ll = new LinkedList();
ll.insertFirst(100);
ll.insertFirst(200);
ll.insertFirst(300);
ll.printListData();
- head는 data:300의 노드가 된다.
- 가장 처음에 생성한 data:100 노드가 꼬리가 된다.
6. 리스트의 마지막에 노드를 추가하는 기능을 구현한다.
  // Insert last node
  insertLast(data) {
    let node = new Node(data); // 헤드에 생성하는게 아니므로
    let current; // current를 초기화

    // 우선 마지막 노드를 먼저 고려한다.
    // If empty, make head 리스트가 비어있다면 헤드가 되야한다.
    if (!this.head) {
      this.head = node;
    } else {
      current = this.head; // 헤드가 있다면, 기존의 헤드를 가져온다.

      while (current.next) { // 헤드의 다음 노드가 있는지 확인하기 위해
        current = current.next; // current를 마지막까지 이동
      }

      current.next = node; // 마지막 current의 next에 새노드 추가
    }

    this.size++; // 마지막에 추가되었기에 사이즈 ++
  }
const ll = new LinkedList();
ll.insertFirst(100);
ll.insertFirst(200);
ll.insertFirst(300);
ll.insertLast(400);
ll.printListData();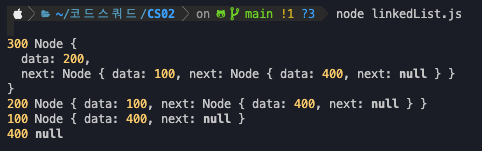
- 처음이 아닌 리스트 마지막에 data:400 노드가 추가되었다.
- 마지막 노드를 탐색하고 마지막 노드의 next에 새로운 노드를 추가시키는 방법
7. 원하는 위치(인덱스)에 노드를 추가하는 기능을 구현한다.
  // Insert at index
  insertAt(data, index) {
    // If index is out of range 리스트 사이즈보다 큰 인덱스의 경우
    if (index > 0 && index > this.size) {
      return;
    }

    // If first index 지정한 인덱스가 0 즉 헤드인 경우
    if (index === 0) {
      this.insertFirst(data) // insertFirst()과 동일
      return;
    }

    // 인덱스가 0이 아닌 경우
    const node = new Node(data); // 새로운 노드가 필요하다.
    let current, previous; // current와 previous를 초기화

    // Set current to first // current를 먼저 셋팅하자
    current = this.head; // current는 현재의 헤드
    let count = 0;

    // 인덱스가 2라고 가정한다면
    while (count < index) { // ex) 0 < 2 => 1 < 2 => 2 < 2
      previous = current; // Node before index
	  // pre=0 => pre=1 => pre=2
      count++; // 1 => 2 => 3
      current = current.next; // Node after index
      // current=1 => current 2 => 3
    }

    // current = 3 pre = 2
    node.next = current;
    previous.next = node;
    // 새로운 노드는 2와 3사이에 들어간다.

    this.size++;
  }
const ll = new LinkedList();
ll.insertFirst(100);
ll.insertFirst(200);
ll.insertFirst(300);
ll.insertLast(400);
ll.insertAt(500, 2);
ll.printListData();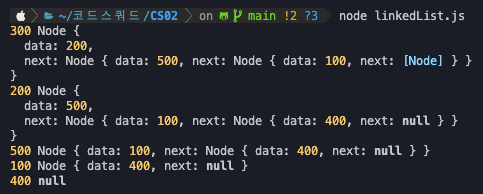
- 특정 인덱스가 추가한다면 리스트 범위를 벗어나는 경우를 생각한다.
- 특정 인덱스가 0이라면 헤드 노드 생성 함수와 같다.
- 특정 인덱스가 0이 아니라면 새로운 노드를 생성하고
- 헤드 부터 특정 인덱스까지 탐색 후 삽입한다.
8. 특정 인덱스(노드) data를 호출하는 기능을 구현한다.
  // search for data by index
  searchAt(index) {
    let current = this.head; // 헤드부터 탐방
    let count = 0; // 특정 인덱스까지

    while (current) { // current가 null까지
      if (count === index) {
        console.log(current.data);
      }
      count++;
      current = current.next; // 다음 노드로 이동
    }

    return null; // 찾으면 종료
  }
const ll = new LinkedList();
ll.insertFirst(100);
ll.insertFirst(200);
ll.insertFirst(300);
ll.insertLast(400);
ll.insertAt(500, 0);
ll.printListData();
console.log("\n");
ll.getAt(2);
// 
9. 특정 인덱스(노드)를 제거하는 기능을 구현한다.
  // Remove at index
  removeAt(index) { // 범위 벗아나면 리턴
    if (index > 0 && index > this.size) {
      return;
    }

    let current = this.head; // 헤드부터 탐방
    let previous;
    let count = 0;

    // Remove first
    if (index === 0) {
      this.head = current.next; // 헤드를 다음 노드로 지정 (기존 헤드 삭제)
    } else { // 2라고 가정한다면
      while (count < index) { // 0 < 2 => 1 < 2 => 2 < 2
        count++; // 1 => 2 => 3
        previous = current; // pre:0 => pre:1 => pre:2
        current = current.next; // cur:1 => cur:2 => cur:3
      }

      // pre: 2 cur: 3
      previous.next = current.next;
      // 2번쨰 노드의 next를 3번쨰 노드 next로 바꿈
      // 즉 2번쨰 노드의 data가 사라진다.
    }

    this.size--;
  }
const ll = new LinkedList();
ll.insertFirst(100);
ll.insertFirst(200);
ll.insertFirst(300);
ll.insertLast(400);
ll.insertAt(500, 0);
ll.removeAt(2);
ll.printListData();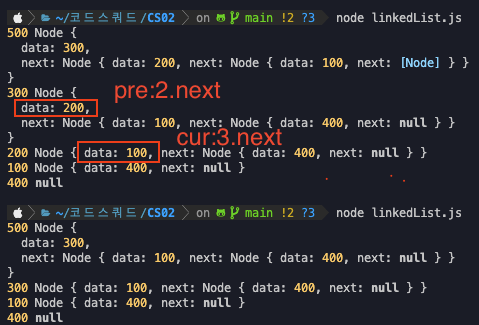
- 삭제 인덱스가 0이라면 헤드를 다음 노드로 지정하면 기존 헤드 노드 사라진다.
- 특정 인덱스를 삭제 하기위해서는 특정 인덱스의 이전 노드의 next를 특정 인덱스의 next로 바꿔준다.
- 특정 인덱스의 전 노드와의 연결고리가 사라지면서 삭제된다.
10. 리스트 전체 삭제 기능을 구현한다.
  // Clear list
  clearList() {
    this.head = null;
    this.size = 0;
  }
const ll = new LinkedList();
ll.insertFirst(100);
ll.insertFirst(200);
ll.insertFirst(300);
ll.insertLast(400);
ll.insertAt(500, 0);
ll.removeAt(2);
ll.clearList();
ll.printListData();- 헤드를 null로 만들면 모든 연결고리가 사라지면서 리스트는 초기화된다.
참고자료

한 발자국, 한 걸음 느리더라도 하루하루 발전하는 삶을 살자.