상태 관리 라이브러리 - Jotai

상태 관리 툴이 필요한 이유
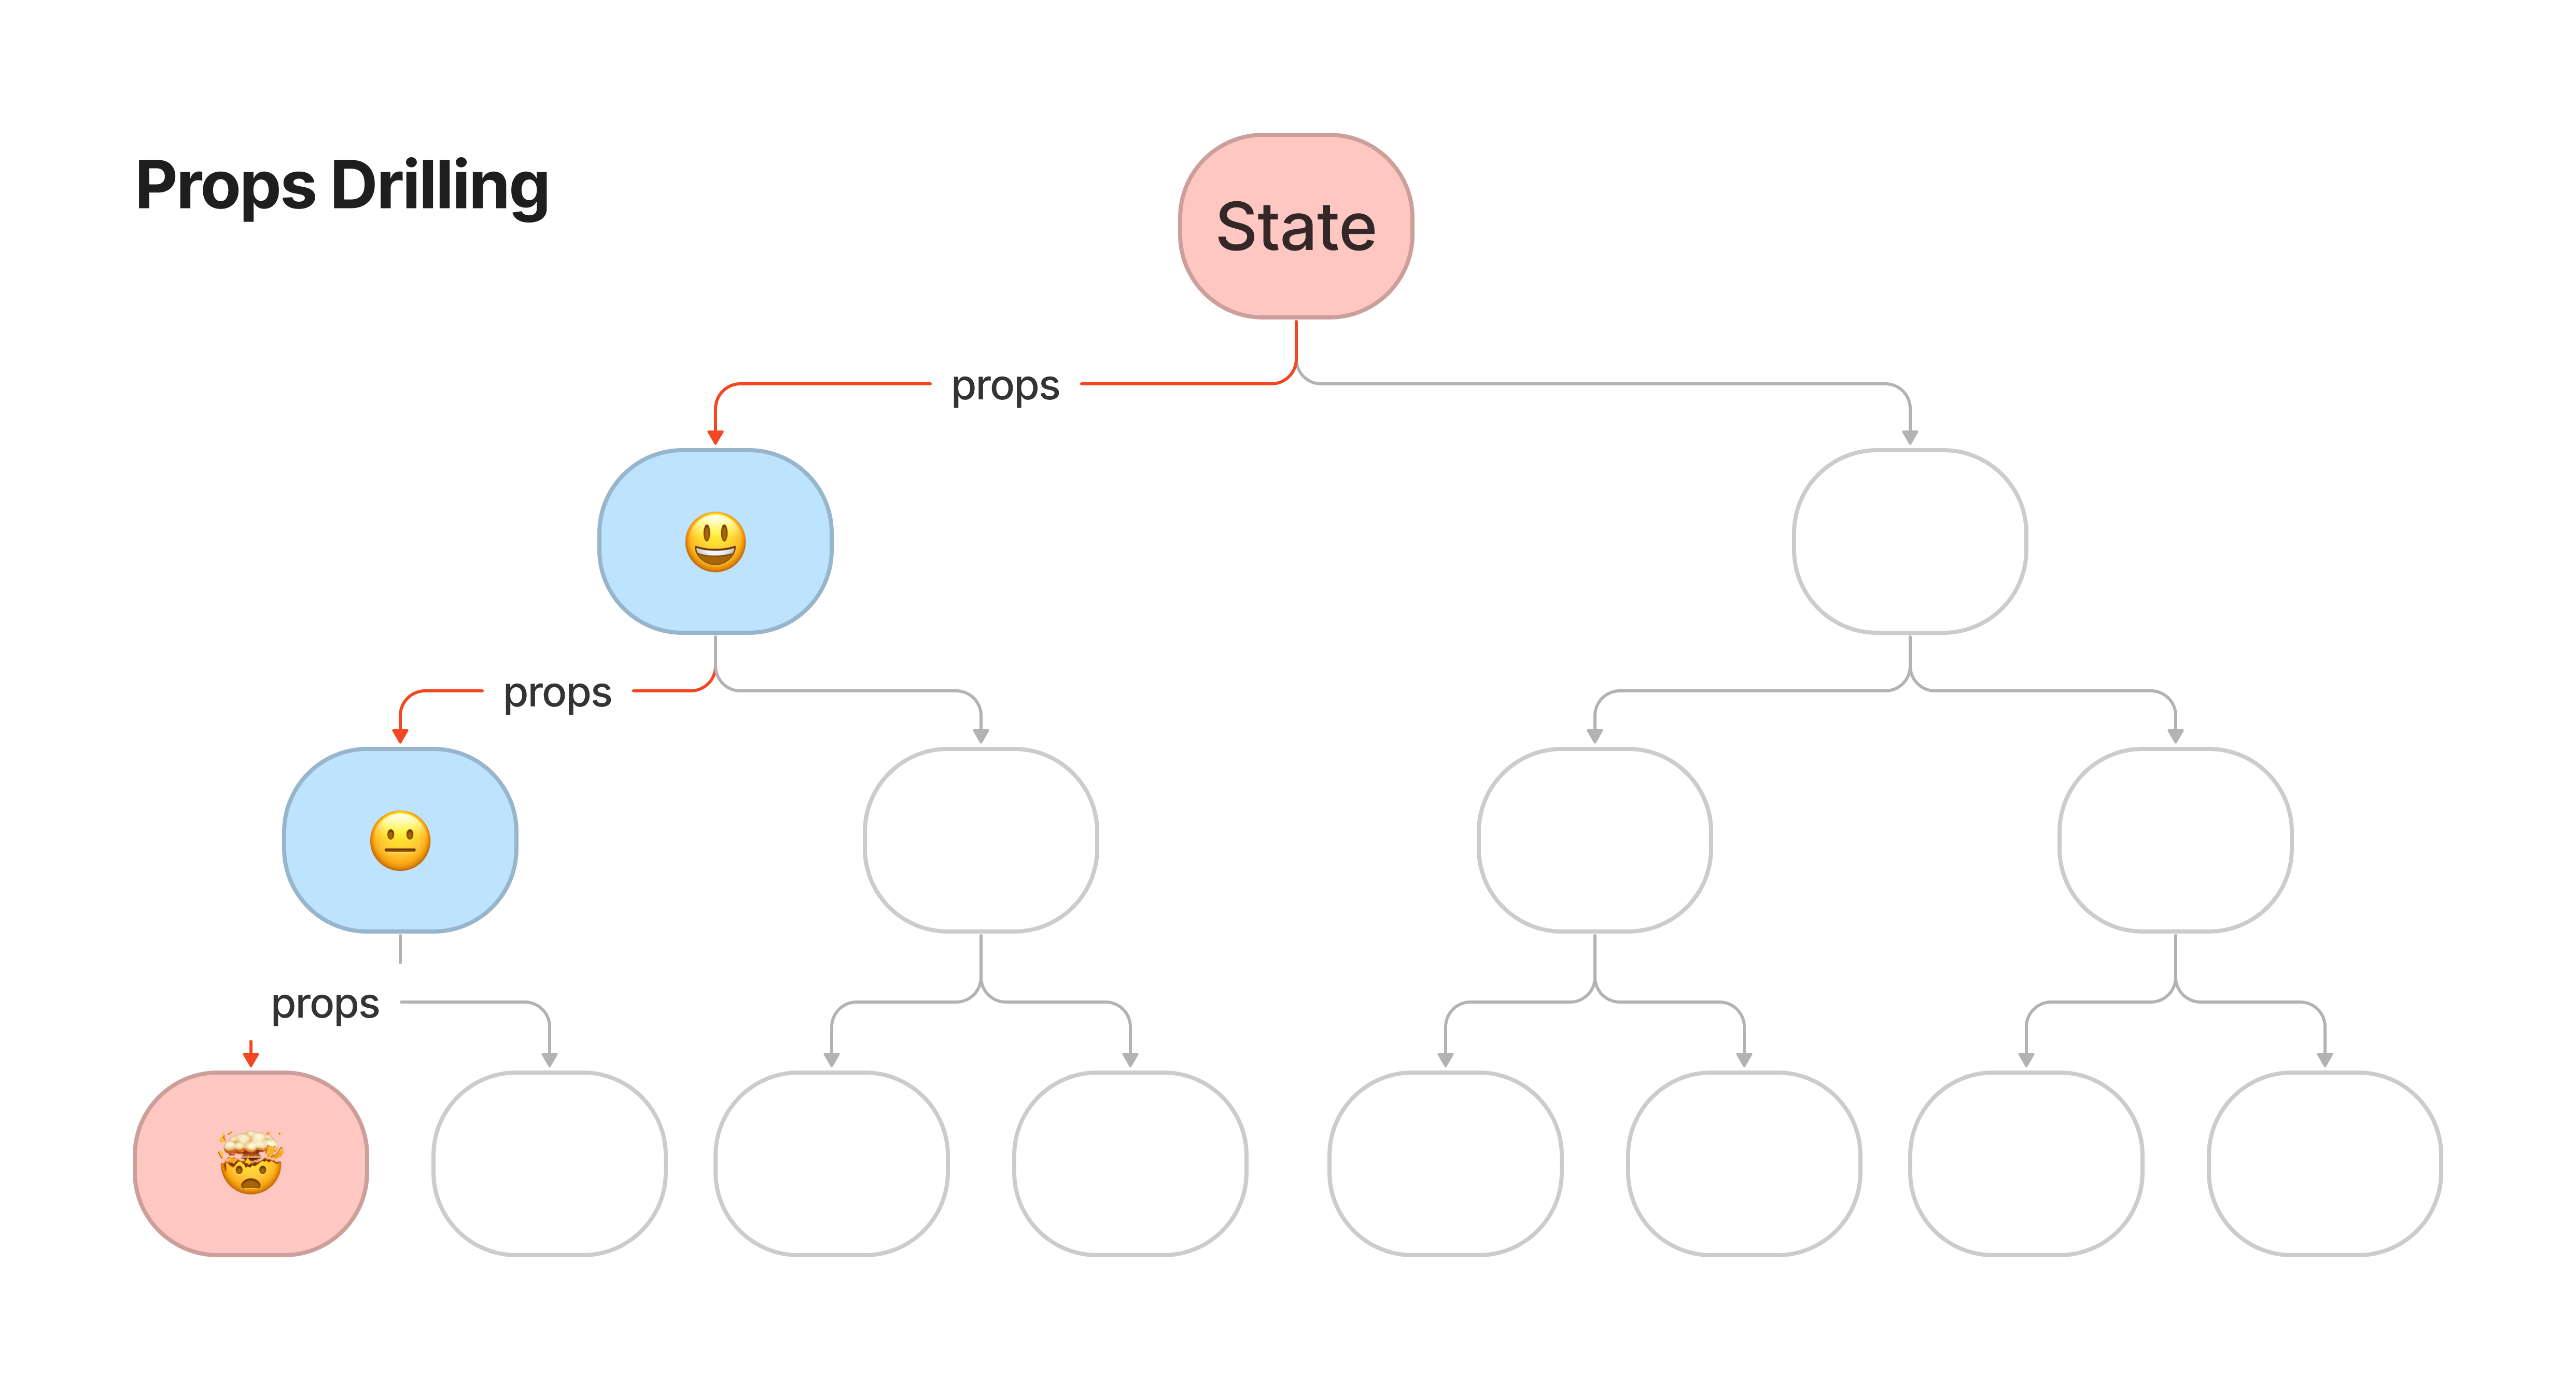
props drilling🪛
Props Drilling 이란 props 를 하위 컴포넌트로 전달하는 과정에서 몇개의 컴포넌트를 뚫고 들어가는 형태를 의미한다.
props로 전달하는 컴포넌트 수가 적으면 크게 문제가 되지 않지만, 많은 컴포넌트들을 뚫고 state를 전달해야 한다면 그 props를 추적하기 어려워진다.
redux, recoil 등의 전역 상태 관리 라이브러리를 사용하여 이와 같은 props drilling을 방지할 수 있다.
상태 관리 패턴
Flux (Redux, Zustand)
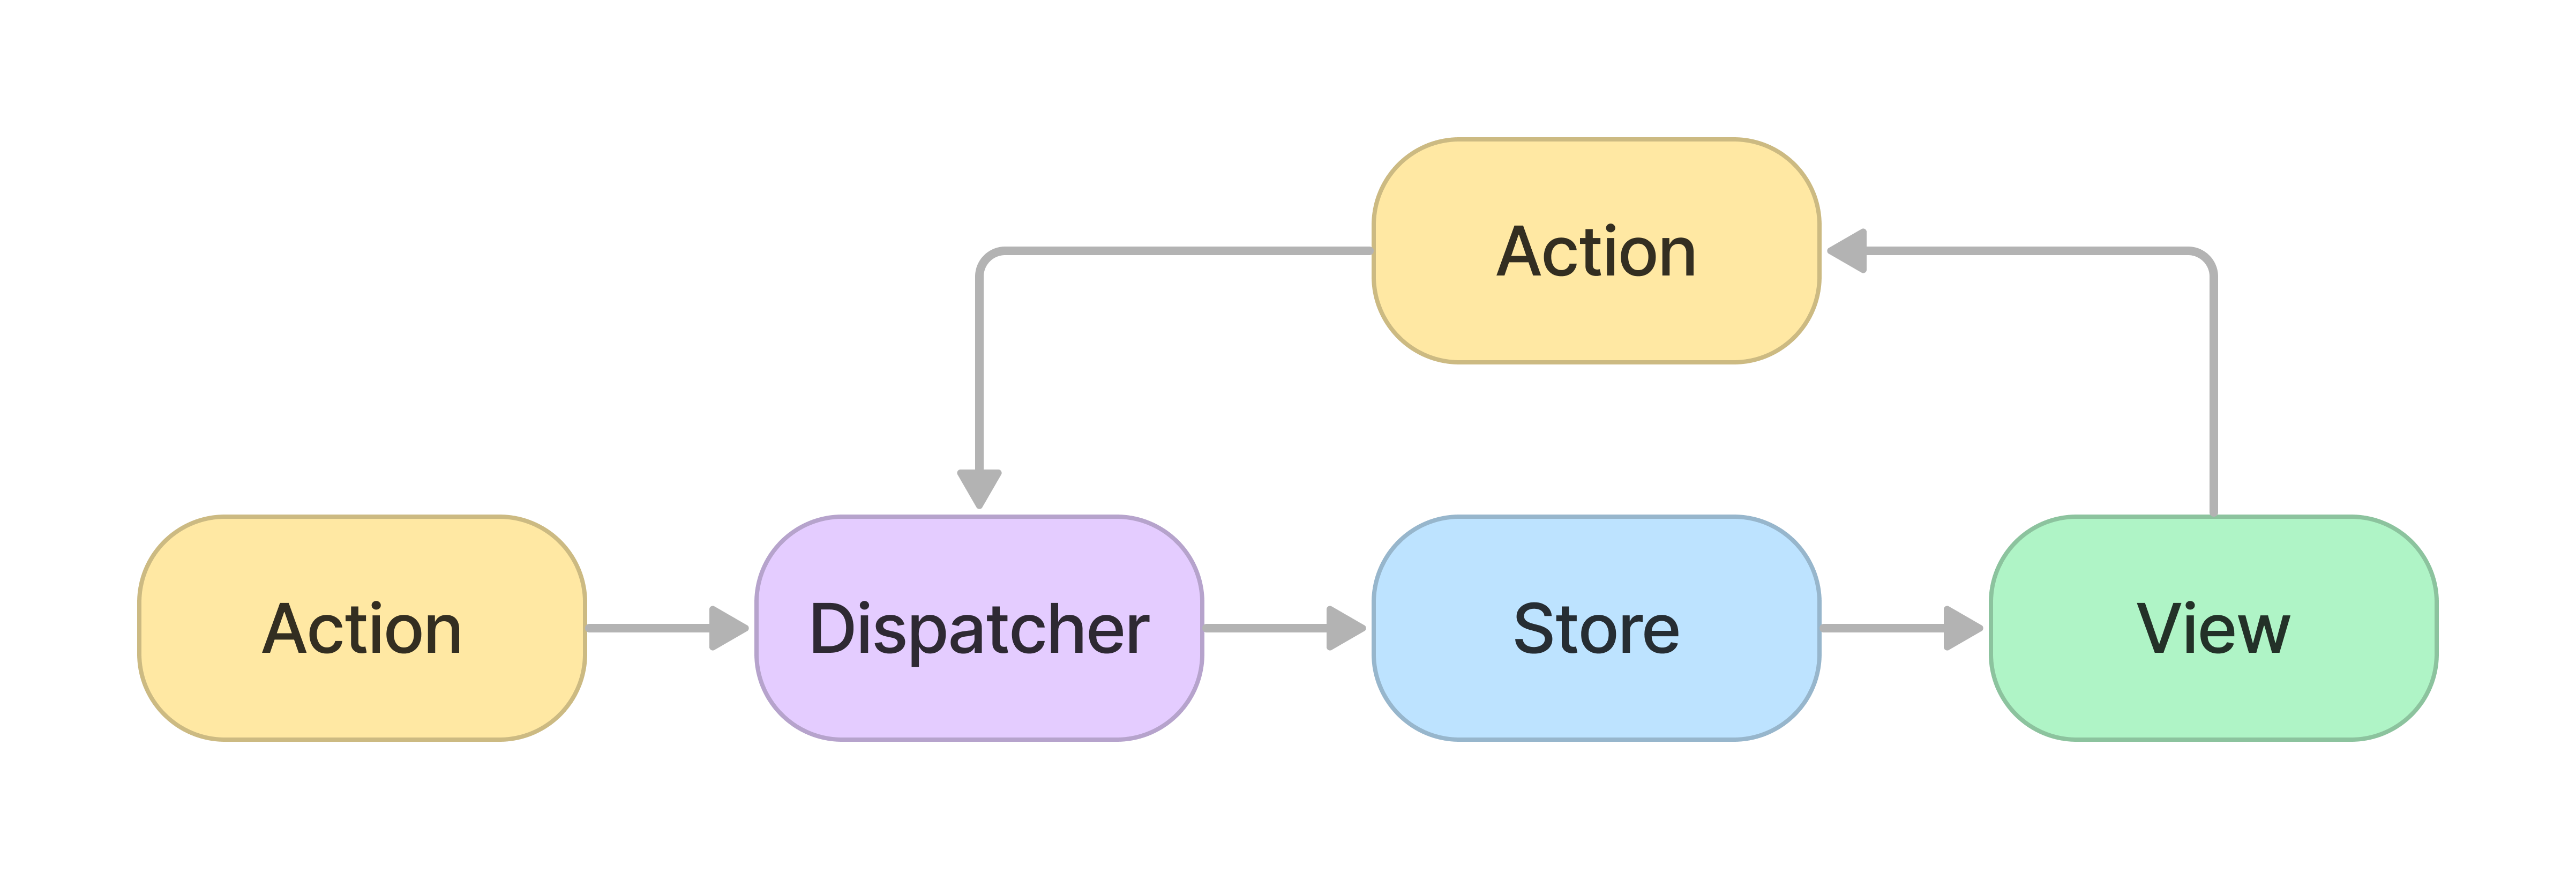
Store라는 상태 저장소를 기반으로, Action 타입을 Reducer에 전달하면 해당 타입에 맞는 동작에 따라 상태값을 갱신
컴포넌트는 Selector를 사용해 Store에서 필요한 상태값을 구독(subscribing)하는 형태
-
장점: 단방향 데이터 구조 → 예측 가능한 상태 관리 -
단점: 많은 보일러플레이트 코드 -
Action
- 어떤 행동을 할지 나타내는 자바스크립트 객체
- 예) "카운트를 1 증가시킨다", "상품을 카트에 추가한다"와 같은 행동
- 액션을 Dispatch하면 액션이 스토어로 전달
-
Dispatcher
- Dispatcher는 Flux 어플리케이션의 모든 데이터 흐름을 관리하는 일종의 허브 역할
- 액션이 발생하면 Dispatcher로 액션 객체가 전달되고 Dispatcher에서는 액션 객체를 스토어로 전달
-
Store
- 애플리케이션의 전체 상태 트리를 저장하는 장소
- Dispatcher를 사용해서 전달된 Action을 기반으로 애플리케이션의 상태를 변화시킨다.
-
View
- Store에서 변경된 데이터를 가져와 화면을 보여주는 역할
Proxy (MobX, Valtio)
전체 상태들을 모아놓고 엑세스를 제공하며, 컴포넌트에서 사용되는 일부 상태를 자동으로 감지하고 업데이트를 인지하는 패턴
장점: store 데이터에 바로 엑세스하여 변경 가능 → 편리성단점: 단순한 패턴인 만큼 디버깅이 어렵다
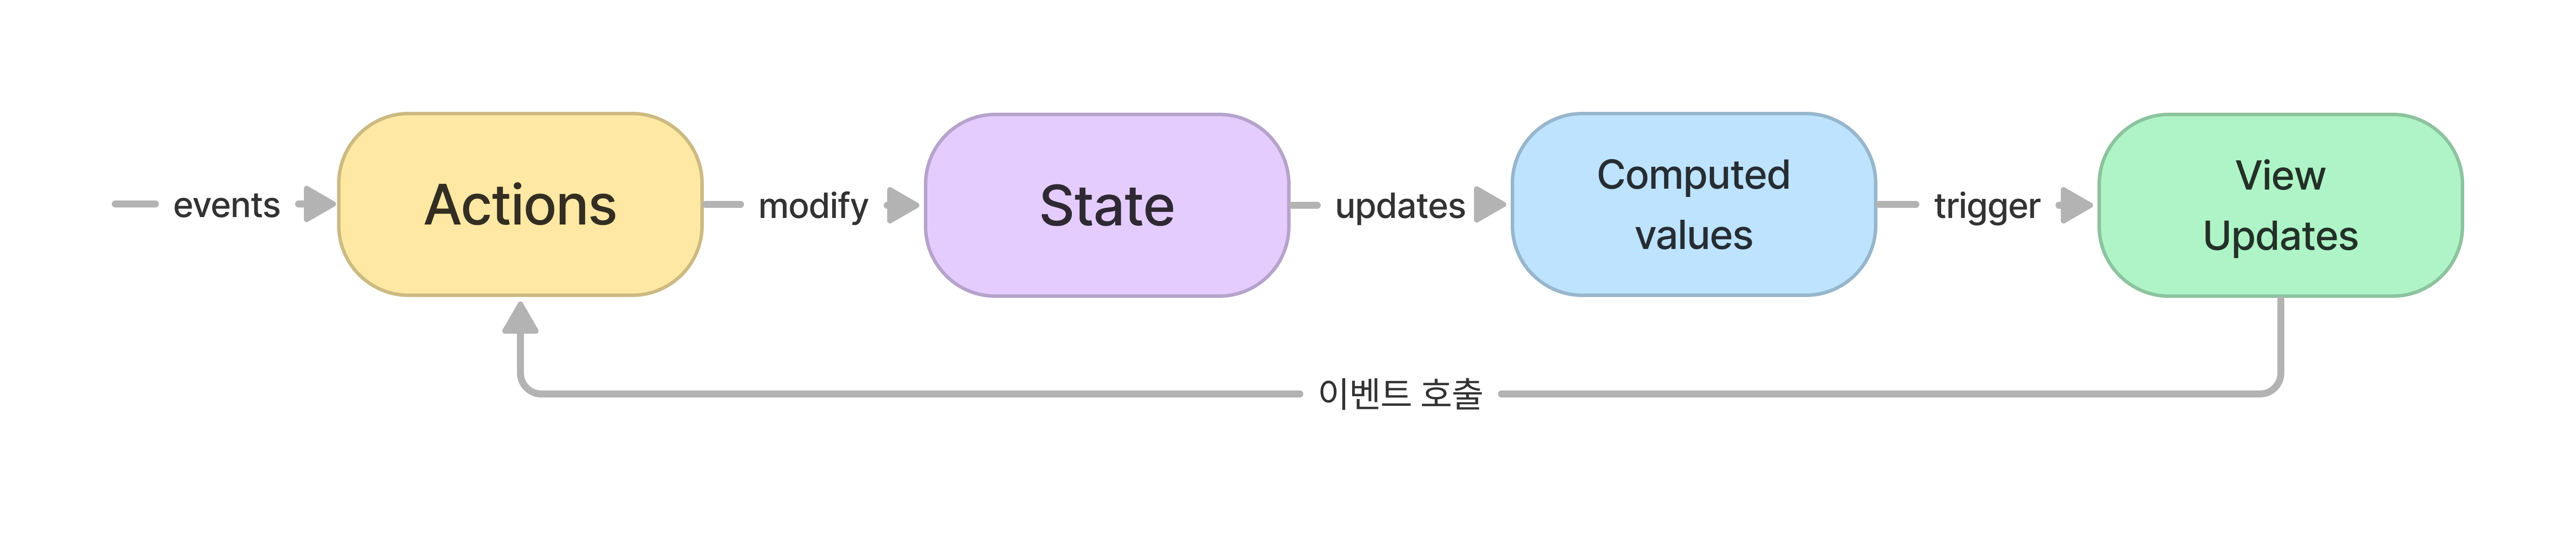
Atomic (Recoil, Jotai)
React의 state와 비슷하게, 컴포넌트 트리 안에 상태들이 존재하며 이들이 상향식(bottom-up)으로 수집 및 공유되는 패턴이다.
상태들은 atom이라고 불리는 객체에서 설정하며, 값의 참조와 조작은 React.useState와 유사하게[state, setState]튜플로 수행한다.
Store에서 하향식(top-down)으로 관리되던 기존 패턴과 매우 다르기에, 다른 라이브러리보단 React의 Hooks 및 Context API와 많이 비교된다.
- atom: 하나의 전역 상태
- 하나의 전역 상태
- 어느 하나의 컴포넌트에 묶여있지 않고, 모든 컴포넌트에서 접근 가능한 하나의 그래프
- Selector는 전역 상태 값을 기반으로 어떤 계산을 통해 파생된 상태(derived state)를 반환하는
순수함수입니다.
Jotai

- 리액트의 애니메이션 라이브러리로 유명한 react-spring을 개발한 Pmndrs 팀에서 개발 시작.
- 1달에 한번씩 버전 업데이트가 이루어지며 신기능, 버그 수정이 빠름 (열린 PR이 없는 정도)
- Recoil에 비해 용량이 매우 적음
- Typescript 기반
Atom 생성
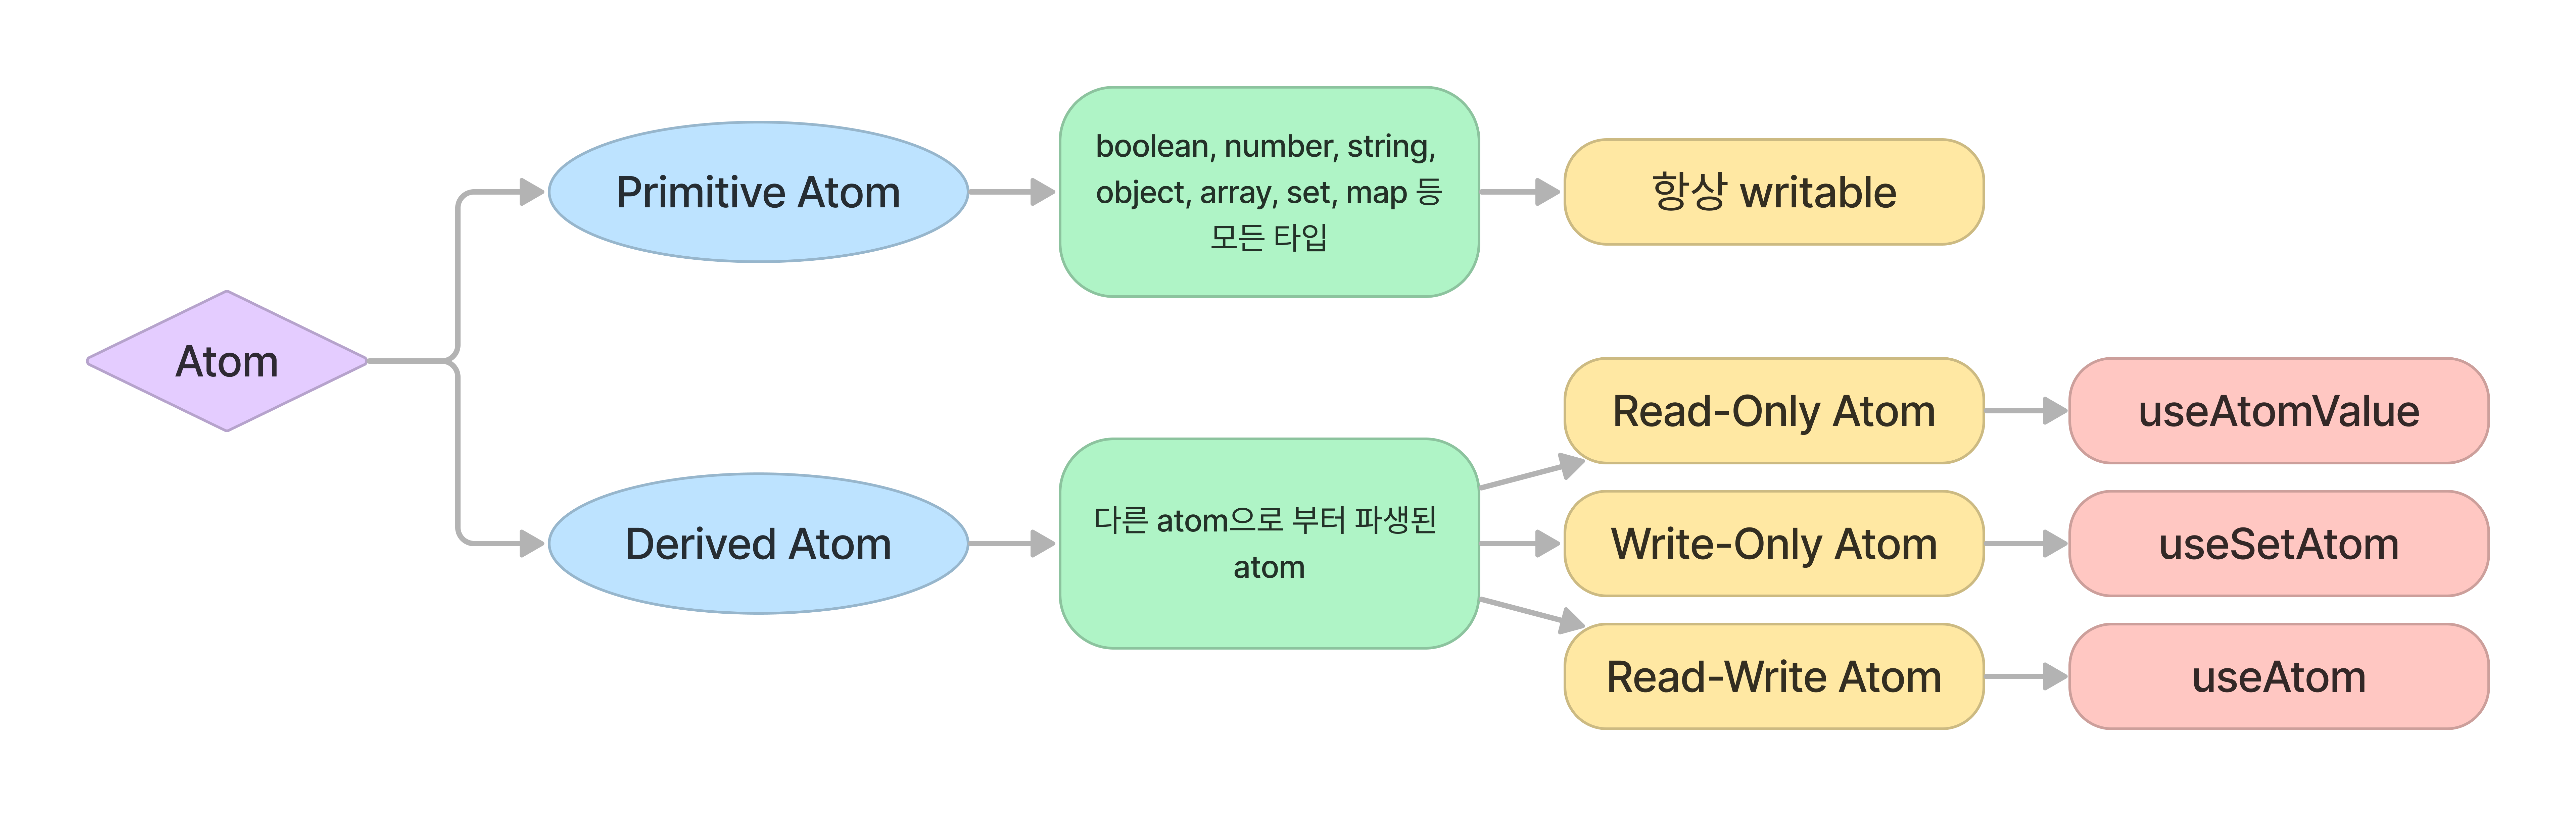
Primitive Atom
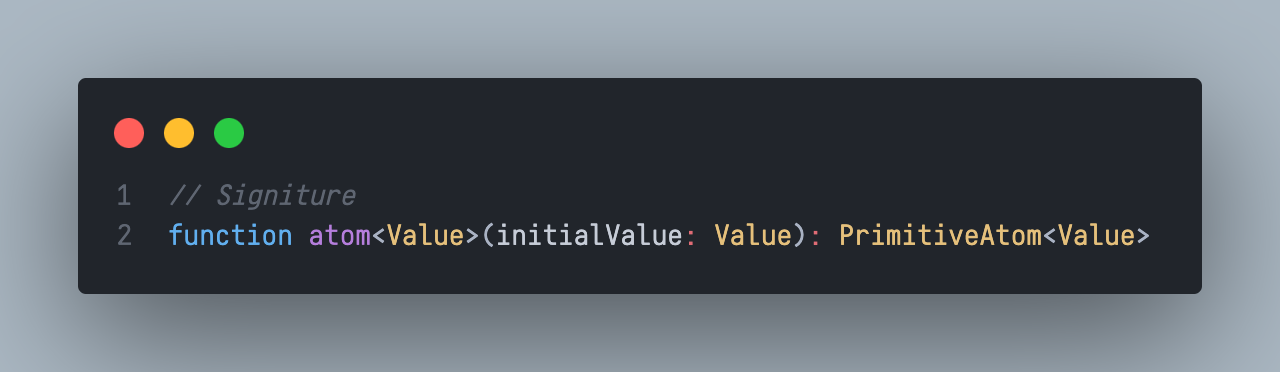
const primitiveAtom = atom(initialValue) // initialValue : atom 값이 변경될 때까지 atom이 반환할 초기값-
boolean, number, string, object, array, set, map 등 모든 타입이 될 수 있다.
-
항상 writable
-
예시
import { atom } from 'jotai'

const countAtom = atom(0)

const countryAtom = atom('Japan')

const citiesAtom = atom(['Tokyo', 'Kyoto', 'Osaka'])

const animeAtom = atom([
  {
    title: 'Ghost in the Shell',
    year: 1995,
    watched: true
  },
  {
    title: 'Serial Experiments Lain',
    year: 1998,
    watched: false
  }
])
Derived Atom
다른 atom으로 부터 파생된 atom
-
derived atom을 생성하려면 read 함수와 optional write 함수를 전달한다.
-
derived atom의 3가지 패턴
- Read-Write atom —
useAtom - Read-only atom —
useAtomValue - Write-only atom —
useSetAtom
- Read-Write atom —
-
Signiture
-
Read-Write atom
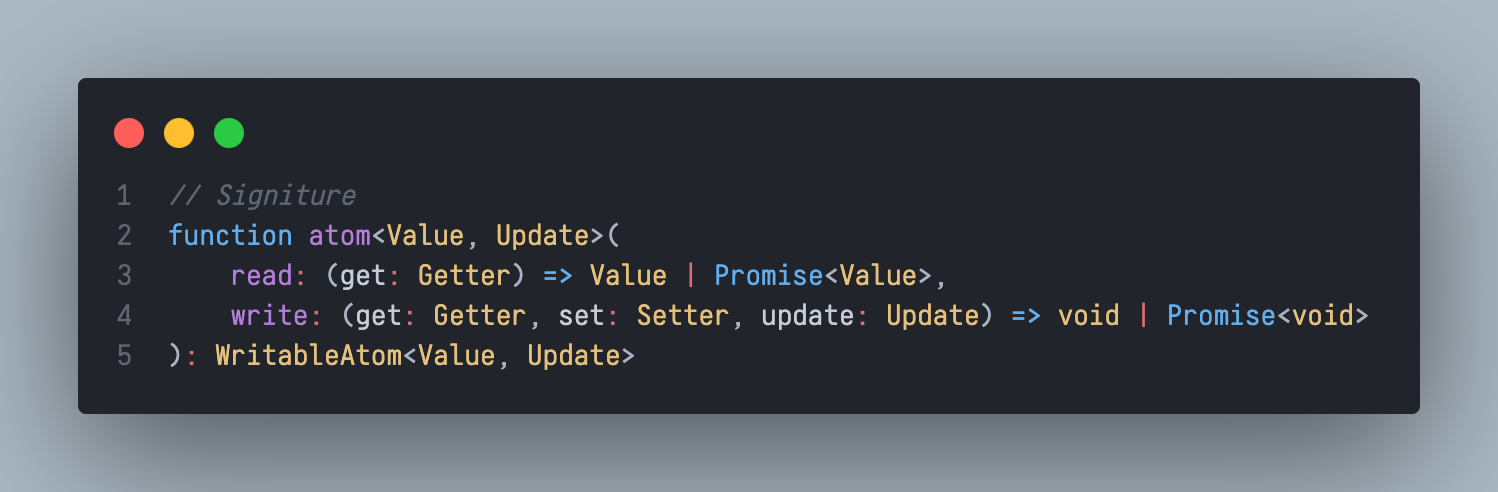
const derivedAtomWithReadWrite = atom(read, write)write: 아톰의 값을 변경하는데 사용되는 함수 -useAtom()[1]- primitive atom이 변경되면
set: atom config와 new value를 받은 다음 Provider의 atom 값을 업데이트하는 함수update:useAtom()[1]이 반환한 업데이트 함수가 인자로 받은 임의의 값
-
Read-only atom
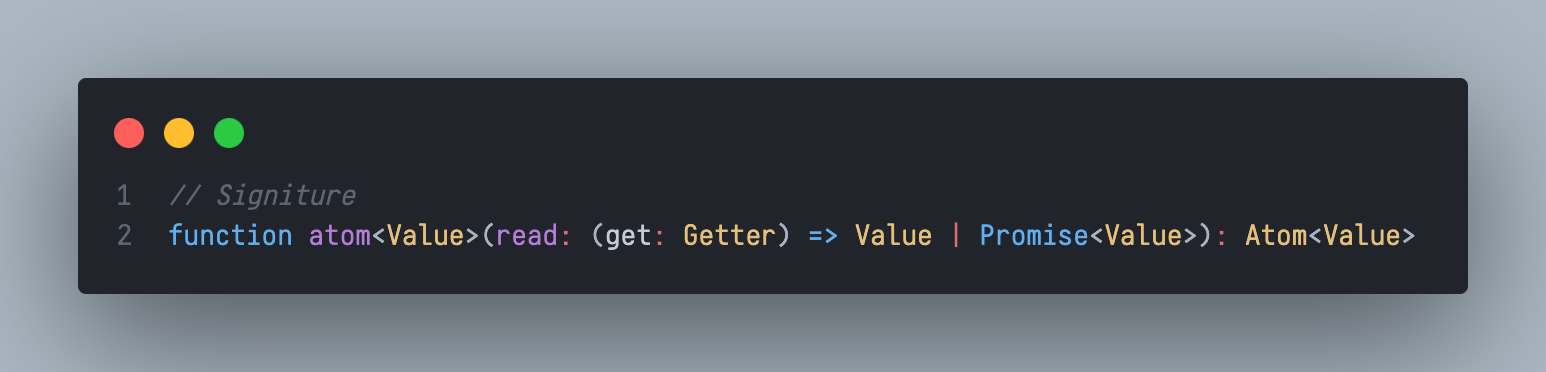
const derivedAtomWithRead = atom(read)read: 렌더링할 때 마다 호출되는 함수get: atom config를 받아 프로바이더에 저장된 값을 반환하는 함수- 종속성이 추적되므로, 한 원자에서 get이 한 번 이상 사용되면 원자 값이 변경될 때마다 read 한 값이 재평가된다.
-
Write-only atom
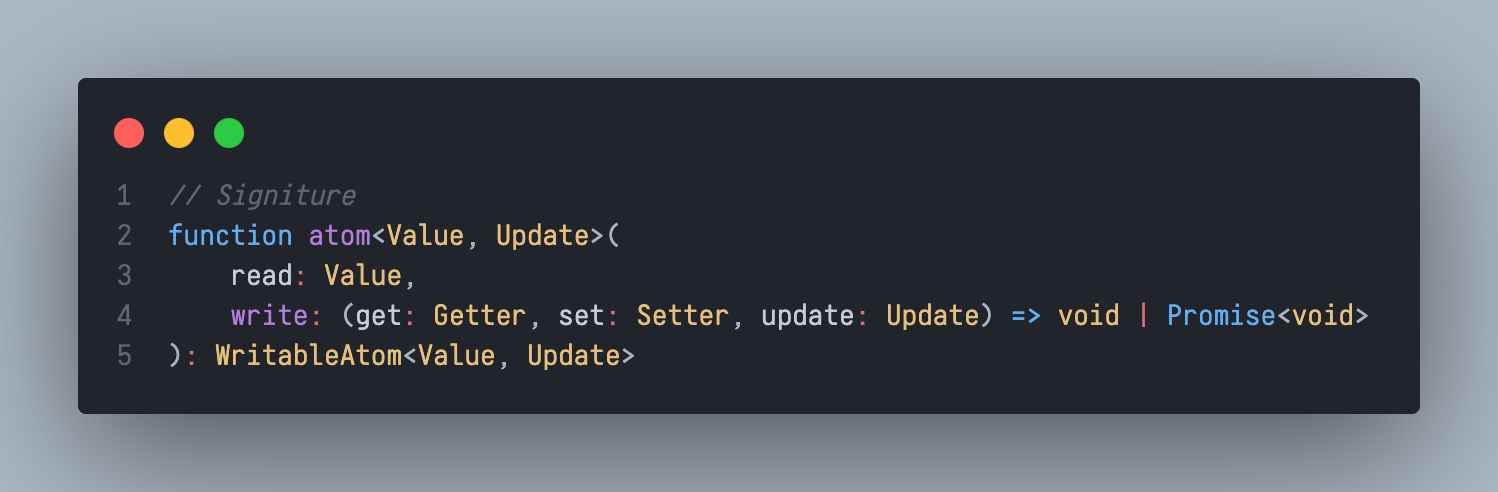
const derivedAtomWithWriteOnly = atom(null, write)- 첫번째 인자로
null을 넣어주는 것을 컨벤션으로 함 write함수에서의get은 읽기 위한 것이지만, 추적되지 않는다.set은 atom 을write하기 위한 것이다. 타겟 atom의write함수를 호출한다.
- 첫번째 인자로
-
⛳ render 함수에서 아톰 생성 시 주의 사항
atom config 는 어디서나 생성할 수 있지만, referential equality가 중요하다. 동적으로 생성할 수도 있다. 렌더 함수에서 아톰을 생성하려면 안정적인 참조를 얻기 위해useMemo나useRef를 사용해야 한다. Memoization을 위해useMemo와useRef중 어떤 것을 사용해야 할지 확실하지 않다면useMemo를 사용해라. 그렇지 않으면useAtom으로 인해 무한 루프가 발생할 수 있다.const Component = ({ value }) => { const valueAtom = useMemo(() => atom({ value }), [value]) // ... }
Atom 사용
- Read-Write —
useAtom - Read-only —
useAtomValue - Write-only —
useSetAtom
아톰 값을 읽거나 쓰기만 하는 경우, 리렌더링을 최적화하기 위해 별도의
useAtomValue및useSetAtom훅을 사용합니다.
Read-Write atom — useAtom
// atom.js
import { atom, useAtom } from 'jotai';

const countAtom = atom(0)

const Counter = () => {
  const [count, setCount] = useAtom(countAtom)

  return (
    <>
      <div>count: {count}</div>
      <button onClick={() => setCount(count + 1)}>+1</button>
    </>
  )
}useAtom은 리액트의useState와 비슷하게 사용 가능하고 값과 update function로 구성된 튜플로 전달된다.- state는 atom config와 atom value의 WeakMap으로 볼 수 있다.
- 처음에는 atom과 연관된 값이 없다.
useAtom을 통해 atom이 사용된 후에만 initial value가 state에 저장된다. 만약 그 atom이 derived atom이라면, read 함수가 호출되어 초기값을 계산한다. - atom이 더 이상 사용되지 않을 때(아톰을 사용하는 컴포넌트들이 언마운트될 때) atom config가 더 이상 존재하지 않게 되고, 상태값이 GC(Garbage Collected)된다. -- WeakMap이기 때문에 가능하다.
const [value, setValue] = useAtom(anAtom)- setValue는 한 개의 인자만 받는다.
- 이 인수는 atom의 write함수의 3번째 인자로 전달된다.
Read-only — useAtomValue
import { atom, useAtomValue } from 'jotai';

const countAtom = atom(0)

const Counter = () => {
  const count = useAtomValue(countAtom)

  return (
    <>
      <div>count: {count}</div>
    </>
  )
}useAtomValue- 읽기 전용
- 렌더링 최적화를 위해 만들어진 별도의 훅
Write-only — useSetAtom
import { atom, useSetAtom } from 'jotai';

const countAtom = atom(0)

const Counter = () => {
  const setCount = useSetAtom(countAtom)

  return (
    <>
      <button onClick={() => setCount(count + 1)}>+1</button>
    </>
  )
}
🤔 참고 - Map & WeakMap
-
Map
key와 value로 이루어지는 자료구조
- map의 key에는 string, number, boolean, object등 다양한 자료형을 사용할 수 있다.
- 그 중 객체를 key로 가지는 경우, 객체가 Map과의 참조를 잃더라도 Map이 메모리에 남아있는 한 객체도 메모리에 남아, GC 대상이 되지 않는다.
-
WeakMap
- key로 쓰인 객체가 GC 대상이 된다.
- key는 반드시 객체여야 한다.
- key로 사용된 객체를 참조하는 것이 아무것도 없다면 해당 객체는 메모리와 WeakMap에서 자동으로 삭제된다.
Utils
atomWithStorage
import { useAtom } from 'jotai'
import { atomWithStorage } from 'jotai/utils'

const darkModeAtom = atomWithStorage('darkMode', false)

const Page = () => {
  const [darkMode, setDarkMode] = useAtom(darkModeAtom)

  return (
    <>
      <h1>Welcome to {darkMode ? 'dark' : 'light'} mode!</h1>
      <button onClick={() => setDarkMode(!darkMode)}>toggle theme</button>
    </>
  )
}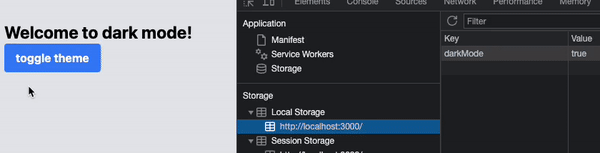
로컬스토리지나 세션스토리지에 상태를 저장하고 사용할 수 있다.
Async
모든 아톰은 비동기 읽기 또는 비동기 쓰기와 같은 비동기 동작을 지원한다.
-
loadable
- async atom들이 suspend 되거나 에러 바운더리로 throw되는 것을 원하지 않는 경우loadable유틸을 사용할 수 있다.-
사용 방법:
loadable유틸로 atom을 감싼다. -
이 함수는
loading/hasData/hasError세 가지 상태 중 하나를 반환한다.import { loadable } from "jotai/utils" const asyncAtom = atom(async (get) => ...) const loadableAtom = loadable(asyncAtom) // Does not need to be wrapped by a <Suspense> element const Component = () => { const [value] = useAtom(loadableAtom) if (value.state === 'hasError') return <Text>{value.error}</Text> if (value.state === 'loading') { return <Text>Loading...</Text> } console.log(value.data) // Results of the Promise return <Text>Value: {value.data}</Text> }
-
다른 라이브러리와 Integration
Immer
import { useAtom } from 'jotai'
import { atomWithImmer } from 'jotai-immer'

const countAtom = atomWithImmer(0)

const Counter = () => {
  const [count] = useAtom(countAtom)
  return <div>count: {count}</div>
}

const Controls = () => {
  const [, setCount] = useAtom(countAtom)
  // setCount === update : (draft: Draft<Value>) => void
  const inc = () => setCount((c) => (c = c + 1))
  return <button onClick={inc}>+1</button>
}
react-query
import { atom, useAtom } from 'jotai'
import { atomsWithQuery } from 'jotai-tanstack-query'

const idAtom = atom(1)
const [userAtom] = atomsWithQuery((get) => ({
  queryKey: ['users', get(idAtom)],
  queryFn: async ({ queryKey: [, id] }) => {
    const res = await fetch(`https://jsonplaceholder.typicode.com/users/${id}`)
    return res.json()
  },
}))

const UserData = () => {
  const [data] = useAtom(userAtom)
  return <div>{JSON.stringify(data)}</div>
}atomsWithQueryfor QueryObserveratomsWithInfiniteQueryfor InfiniteQueryObserveratomsWithMutationfor MutationObserver
그 외에도
라이브러리와의 Integration을 지원한다.
참고자료