사진이 여러장 있을때, 넘기는(paging) 기능 구현하기
😓 일단 너무나도 힘들었다.. 오늘 하루종일 이것만 찾아보고 → 구현하고 → 다시 찾아보고의 연속이었다.
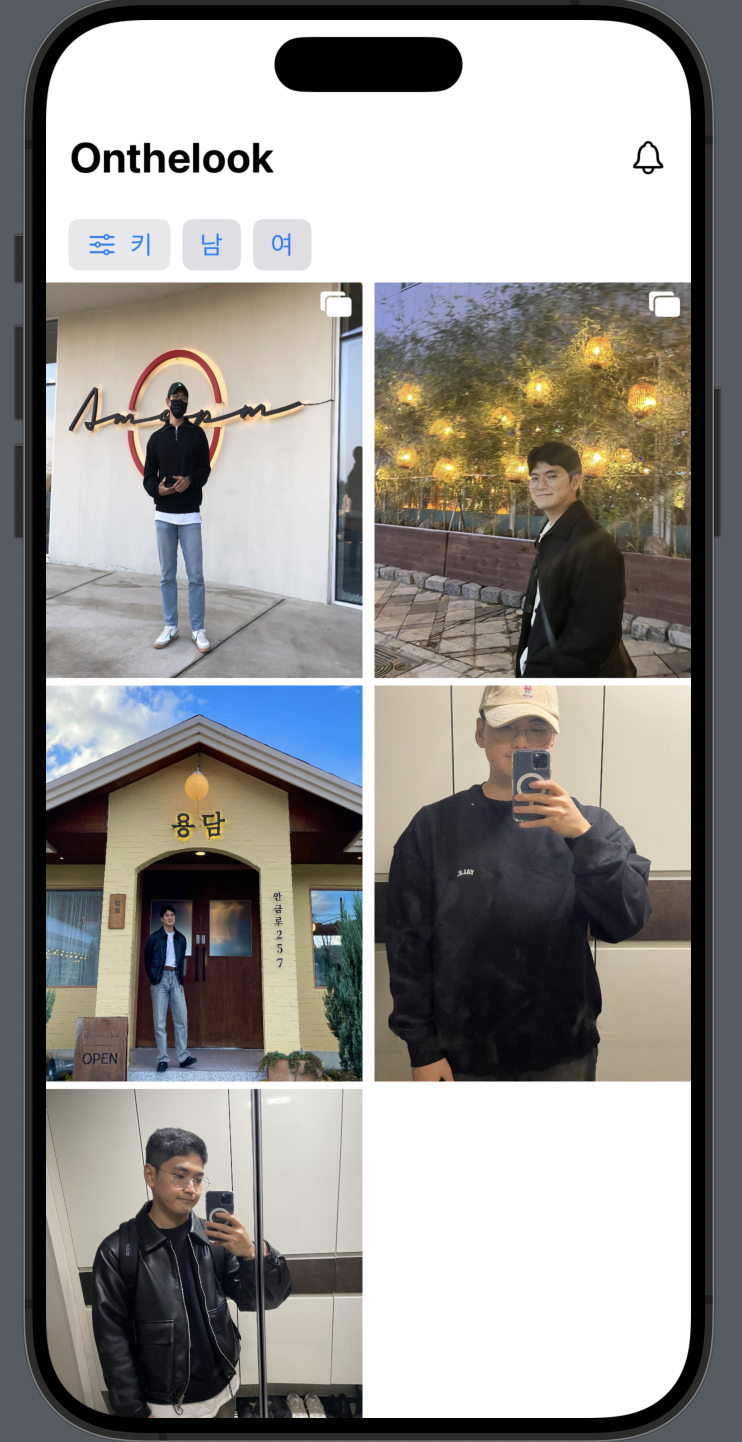
1. 사진이 여러 장 있을 때 게시물 우측 상단에 아이콘 표시하기
- ZStack 을 통해 구현했다. overlay를 썼었는데 사진이 길어질 경우 우측 끝으로 아이콘이 배치되어서 HomeView에서 보이지 않는 오류가 발생해서 ZStack으로 바꾸었더니 해결..? (ZStack과 overlay의 차이점이 뭘까..?)
ZStack(alignment: .topTrailing) { Image(image[0]) .resizable() .aspectRatio(0.8, contentMode: .fill) if image.count > 1 { Image(systemName: "rectangle.fill.on.rectangle.fill") .foregroundStyle(.white) .padding(5) } } - 구현사진
2. 스크롤 구현하기
- ScrollView와 LazyHStack으로 구현하였다.
- 핵심코드
containerRelativeFrame(axis, count:, span:, spacing)- scrollview를 구현할때 늘어난 container에 대해서 사용자가 볼 수 있는 view에 얼만큼 할당할 건지를 도와준다.
- count는 해당 scrollview를 count만큼 나누는 것을 의미한다.
- span은 각 view에 얼만큼 할당할 것인지를 나타낸다.
- 결과적으로 한 컷에 span/count만큼의 뷰를 보여주게 된다.
- 예) count: 5, span: 2라면 한 컷당 약 5/2만큼의 뷰를 보여주게 된다.
scrollTargetBehavior(.paging)- scrollView를 넘길때 페이지처럼 넘길 수 있게 해준다.
- ios17 이상부터 쓸 수 있다. 그 이전 버전으로는 UIScrollView.appearence.ispagingEnabled()를 사용해야 하는 것 같다. (참고)
- 구현 코드
ScrollView(.horizontal, showsIndicators: false) { LazyHStack(spacing: 0) { ForEach(card.image, id:\\.self) { image in ZStack { Image(image) .resizable() .overlay(alignment: .topTrailing, content: { NavigationLink { ZoomCardView(image: image) } label: { Image(systemName: "square.arrowtriangle.4.outward") .padding() .foregroundStyle(.white) } }) .scaledToFit() .containerRelativeFrame(.horizontal, count: card.image.count, span: card.image.count, spacing: 0) .onTapGesture(count: 2, perform: { ... }) if showHeart { ... } } } } } .scrollIndicators(.hidden) .scrollTargetBehavior(.paging) - 구현영상

3. 추가적인 구현사항
-
scroll을 할때, 각 페이지의 높이에 따라 HStack의 높이를 조절하는 것..
(결국 구현 못했다)- 이 부분은 솔직하게 말하면 욕심이었다. 이미지를 넘길때 크기가 다른 이미지에 대해서 페이지 높이 차이가 나게 되는데, 각 페이지 마다 HStack의 높이를 실시간으로 변경해주는 걸 구현하고 싶었다.
→ 실제 앱에서 그렇게 구현되어있다. - 구글링을 하다보니
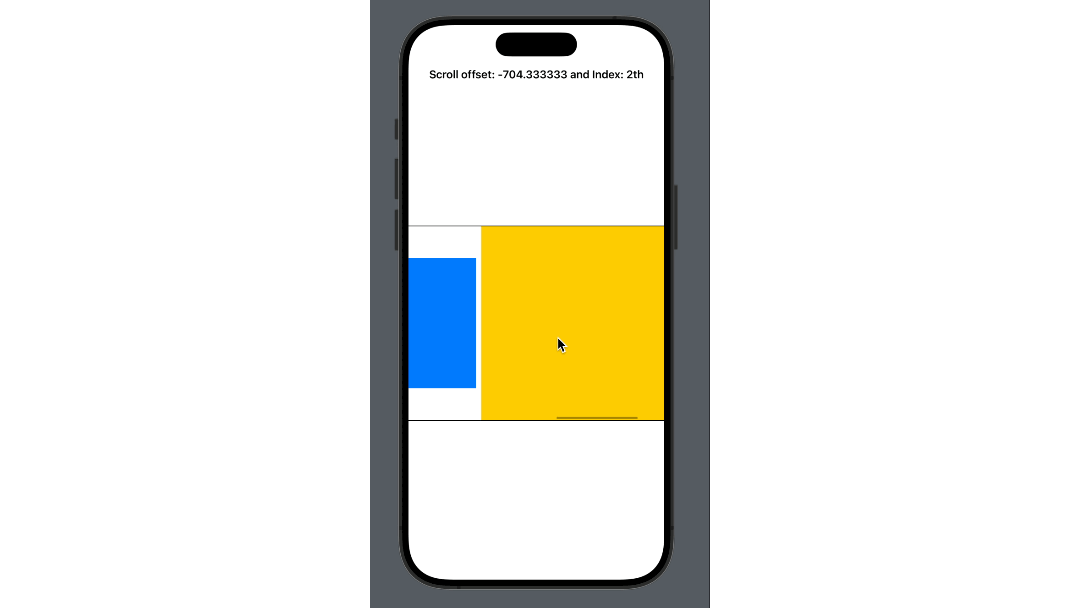
geometryReader와.coordinateSpace,preferenceKey를 사용해서 scrollView에서 사용자의 스크롤 offset을 실시간으로 구할 수 있는 걸 알아냈다..! - 구한 scroll offset을 활용해서 사용자가 보고 있는 스크롤 페이지가 몇번째 페이지인지를 표현할 수 있었다.
→ scrollIndex - 여기에 각 페이지의 높이를 미리 알고 있다고 했을때, scrollIndex 마다 HStack의 높이를 페이지의 높이로 바꾸는 것에 성공했다.
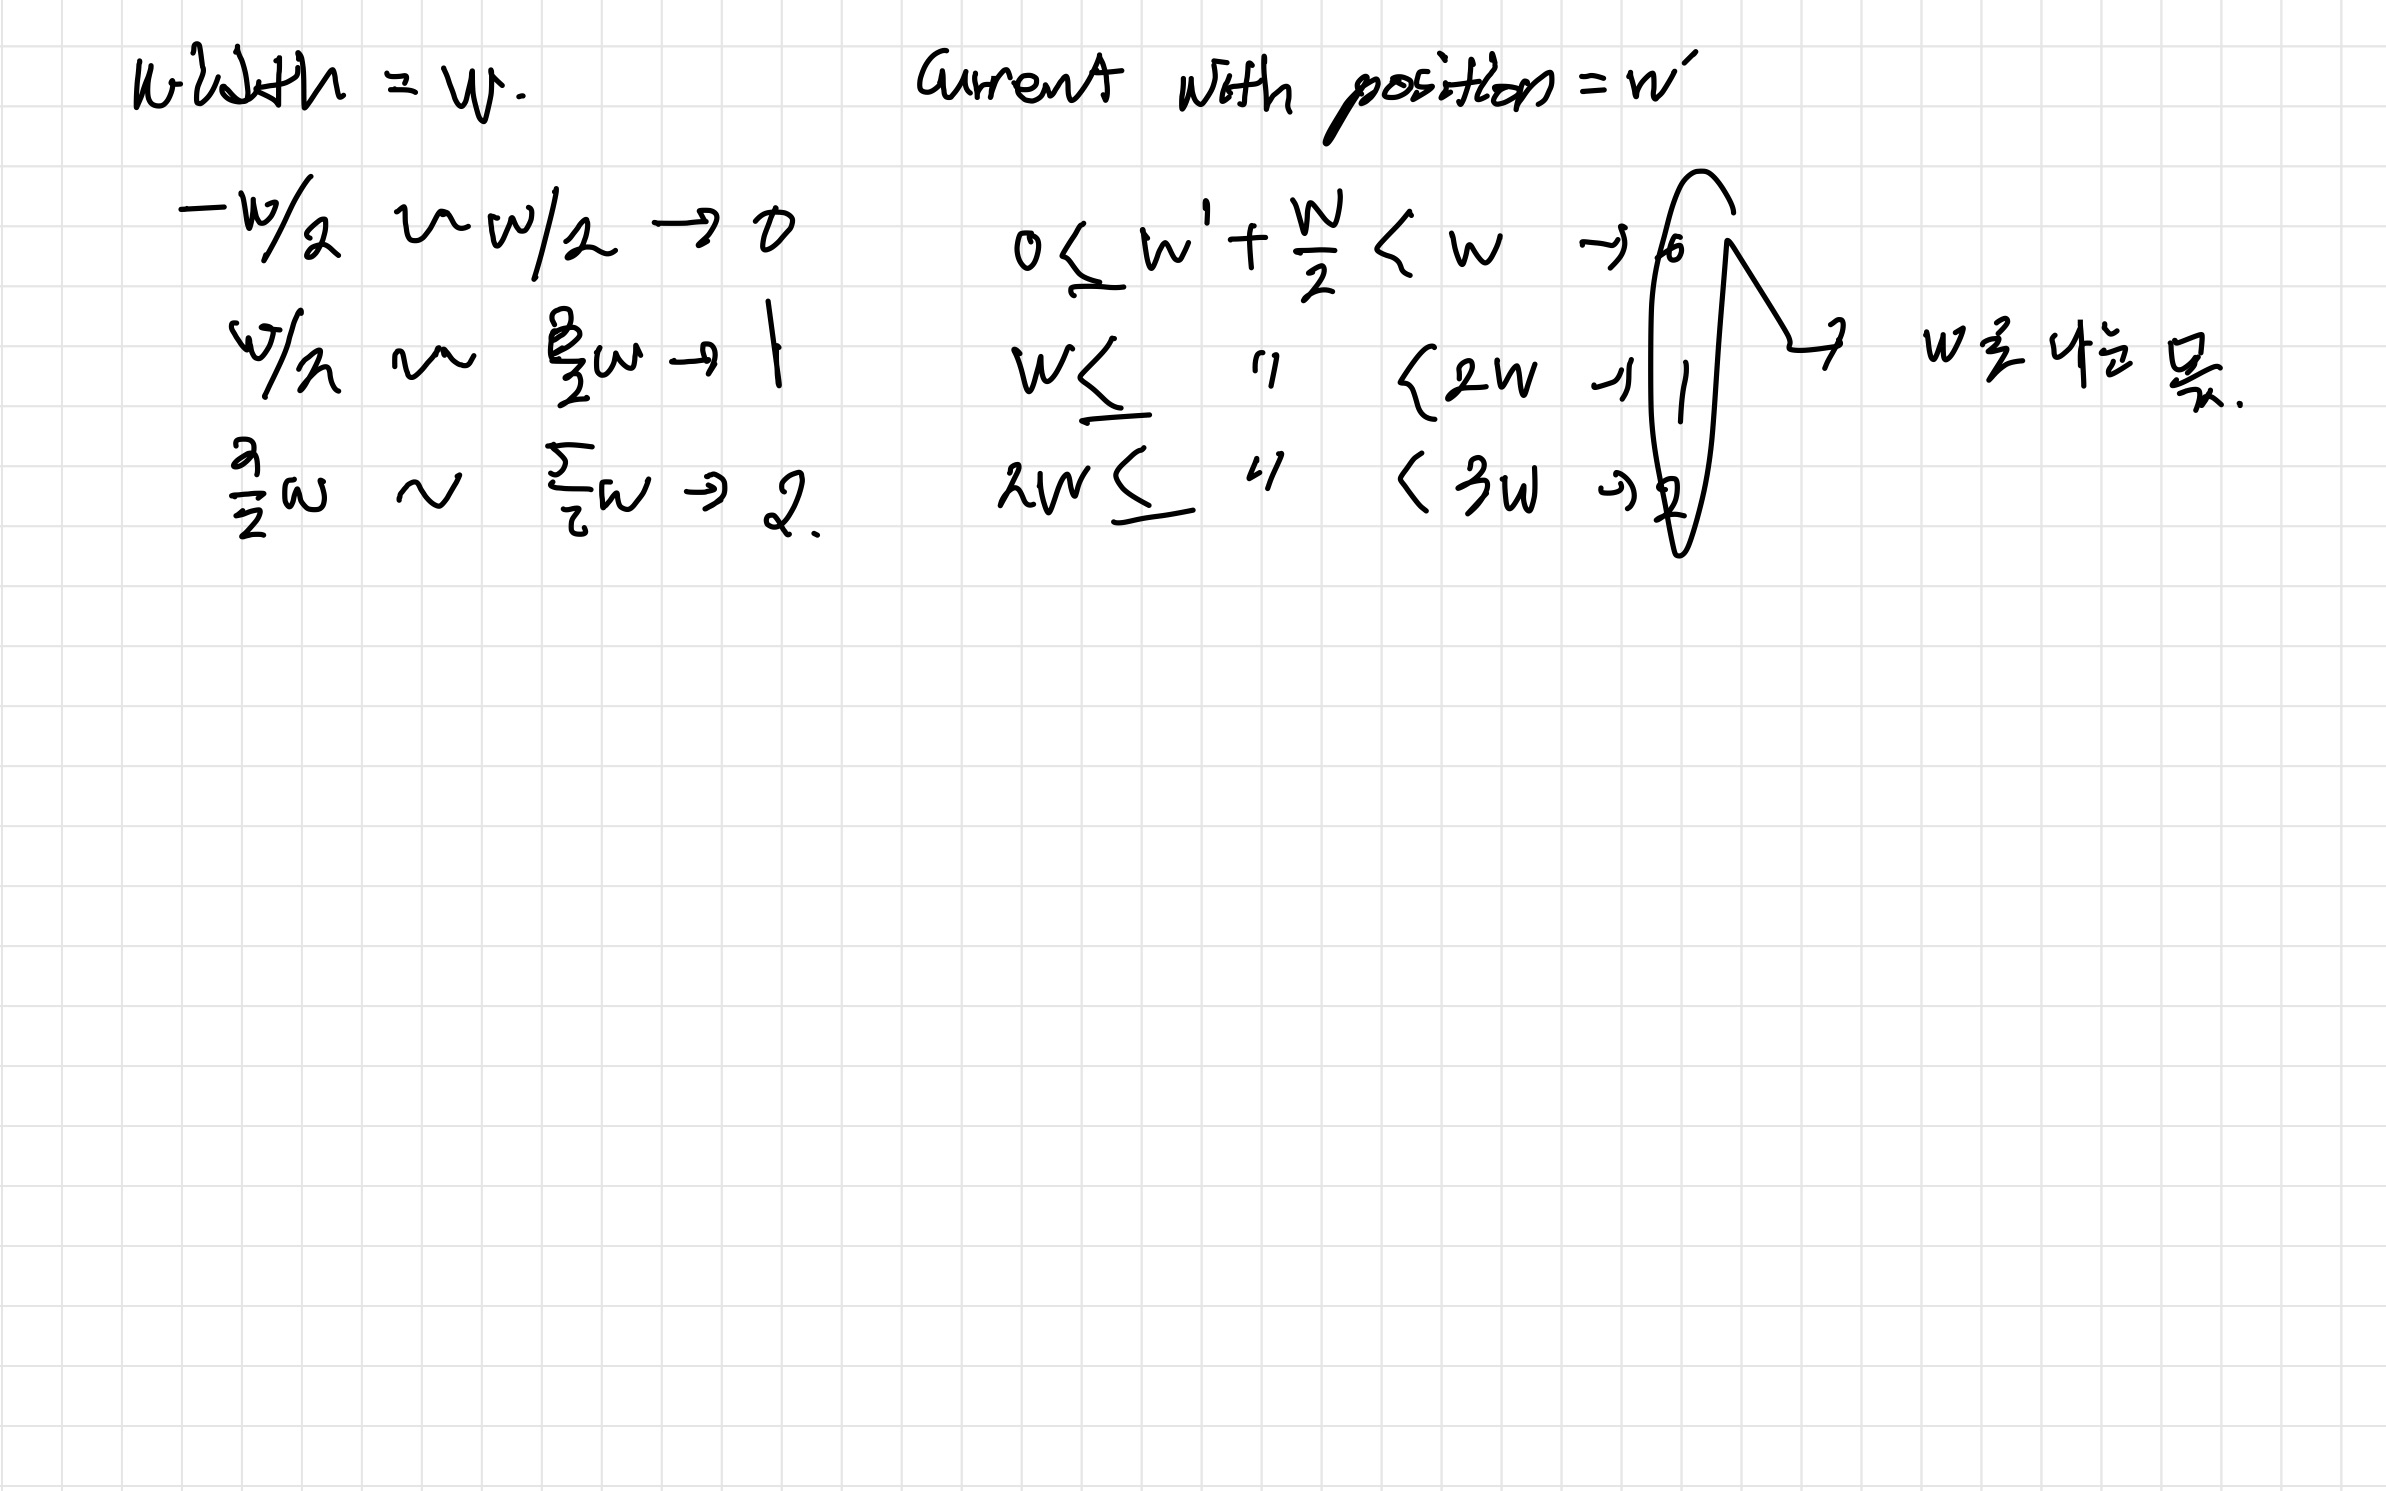
- 그리고 이건 페이지의 너비가 W일때(너비는 고정이다), 현재 스크롤 너비 position이 이면 현재 몇번째 index인지를 알 수 있는 공식이다.
- 를 더하고 로 나누면 된다
- 전체 구현 코드
import SwiftUI struct DetectScrollPosition: View { @State private var scrollPosition: CGPoint = .zero @State private var scrollIndex: Int = 0 var box: [(Color, CGFloat)] = [(.red, 100), (.blue, 200), (.yellow, 300)] var body: some View { NavigationView { ScrollView(.horizontal) { HStack { ForEach(box.indices) { index in Rectangle() .fill(box[index].0) .frame(width: 400, height: box[index].1) .id(index) } } .frame(height: box[scrollIndex].1) .border(Color.black) .background(GeometryReader { geometry in Color.clear .preference(key: ScrollOffsetPreferenceKey.self, value: geometry.frame(in: .named("scroll")).origin) }) .onPreferenceChange(ScrollOffsetPreferenceKey.self) { value in self.scrollPosition = value scrollIndex = Int((abs(value.x) + 200) / 400) print(scrollIndex) } } .coordinateSpace(name: "scroll") .navigationTitle("Scroll offset: \(scrollPosition.x)") .navigationBarTitleDisplayMode(.inline) } } } struct DetectScrollPosition_Previews: PreviewProvider { static var previews: some View { DetectScrollPosition() } } struct ScrollOffsetPreferenceKey: PreferenceKey { static var defaultValue: CGPoint = .zero static func reduce(value: inout CGPoint, nextValue: () -> CGPoint) { } } - 구현 영상
- 이 부분은 솔직하게 말하면 욕심이었다. 이미지를 넘길때 크기가 다른 이미지에 대해서 페이지 높이 차이가 나게 되는데, 각 페이지 마다 HStack의 높이를 실시간으로 변경해주는 걸 구현하고 싶었다.
참고
https://saeedrz.medium.com/detect-scroll-position-in-swiftui-3d6e0d81fc6b

대규의 개발로그