이전 노션 블로그의 소나큐브와 Jacoco로 코드를 깨끗하게 유지하기 (2023.09.07)로부터 마이그레이션된 글입니다.
Setup
EC2 서버에 SonarQube 설치 및 설정
1. 메모리 증가를 위한 Swap 설정
- 파일 생성 및 설치
touch ~/swapfile
sudo fallocate -l 2G ~/swapfile
sudo chmod 600 ~/swapfile
sudo mkswap ~/swapfile
sudo swapon ~/swapfile

sudo yum install java-17-amazon-corretto-headless- 아래 파일들을 열어서 가장 아래에 추가
/etc/fstab
~/swapfile swap swap defaults 0 0/etc/sysctl.conf
vm.max_map_count=524288
fs.file-max=131072
ulimit -n 131072
ulimit -u 8192
/etc/security/limits.conf
*   -   nofile  131072
*   -   nproc   8192
수동 설치 및 설정
비효율적임을 느끼고, 도커 기반 자동화 설정 시작
2. Docker 기반 자동 설치 및 설정
- Docker와 Docker-compose 설치
sudo yum install docker
sudo service docker start
sudo usermod -a -G docker ec2-user

// auto-start에 docker 등록
sudo chkconfig docker on

sudo yum install docker-compose
sudo chmod +x /usr/local/bin/docker-compose- docker-compose.yml 생성
sckwon770/sonarqube:9.9.1-community: SonarQube + PR decoration 플러그인이 합쳐진 커스텀 도커 이미지
version: "3"

services:
  sonarqube:
    image: sckwon770/sonarqube:9.9.1-community
    container_name: sonar
    ports:
      - "8080:9000"
    ulimits:
      nofile:
        soft: "262144"
        hard: "262144"
    networks:
      - sonarnet
    environment:
      SONAR_JDBC_URL: jdbc:postgresql://db:5432/sonar
      SONAR_JDBC_USERNAME: sonar
      SONAR_JDBC_PASSWORD: sonar
    volumes:
      - sonarqube_conf:/opt/sonarqube/conf
      - sonarqube_data:/opt/sonarqube/data
      - sonarqube_extensions:/opt/sonarqube/extensions
      - sonarqube_logs:/opt/sonarqube/logs

  db:
    image: postgres:13
    container_name: postgres
    ports:
      - "5432:5432"
    networks:
      - sonarnet
    environment:
      - POSTGRES_USER=sonar
      - POSTGRES_PASSWORD=sonar
    volumes:
      - postgresql:/var/lib/postgresql
      - postgresql_data:/var/lib/postgresql/data

networks:
  sonarnet:
    driver: bridge

volumes:
  sonarqube_conf:
  sonarqube_data:
  sonarqube_extensions:
  sonarqube_logs:
  postgresql:
postgresql_data:- SonarQube와 PostgreSQL 시작
docker-compose up -d
docker logs sonarqube -f
Github App 등록
1. Github App 생성
- https://github.com/settings/apps/new에서 Github App 생성
- Github App은 SonarQube와 연동하여 PR에 코멘트를 작성할 수 있는 권한을 부여하는 데 사용됨
- callback URL과 webhook URL은 SonarQube 서버 주소를 입력 (ex: http://10.0.0.1:8080)
- Repository permissions 설정
- Checks에 Read and write
- Commit statuses 에 Read-only
- Metadata에 Read-only
- Pull requests 에 Read and write
- Account는 Any account 체크
2. SonarQube에 Githhub App 등록
- SonarQube 페이지 > Create project > Github > Github Action
- 지시사항에 맞게 build.gradle에 추가, Github Action의
flow.yaml에 추가build.gradle에서plugins부분은 지시사항과 다르게 아래의 버전으로 추가해야 함. SonarQube 3버전이 최근 버전인 Gradle 8에서 deprecated된 그루비 문법을 사용하고 있기 때문에, Github Actions에서 빌드 오류 발생함
- SONAR_TOKEN과 SONAR_HOST_URL은 Github action secret에 저장
flow.yaml에 있는secrets.GITHUB_TOKEN은 신경쓰지 않아도 됨
- SonarQube 페이지 > Administration > Configuration > General > Server base URL에 소나큐브 URL 설정 (ex: http://10.0.0.1:8080)
- PR Decoration에 링크 주소로 사용
3. 분석 및 PR 코멘트 등록이 완료될 때, 슬랙 알림 받기
- 슬랙에서 알림을 받을 채널 생성
- https://api.slack.com/apps 에서 Create New App > App Home > Edit name
- 이 설정을 하지 않을 경우, Webhook URL을 생성하는 과정에서
앱에 설치할 봇 사용자가 없습니다.이 발생함. 주의
- 이 설정을 하지 않을 경우, Webhook URL을 생성하는 과정에서
- Incoming Webhooks > Add New Webhook to Workspace에서 발행한 URL을 Github action secret 에 저장 (ex.
SLACK_BE_PR_ANALYSIS_ALARM_WEBHOOK)
action-slack:
    if: ${{ always() }}
    needs: build
    runs-on: ubuntu-latest
    steps:
        - name: Slack Alarm
          uses: 8398a7/action-slack@v2
          with:
              status: ${{ job.status }}
              author_name: GitHub-Actions development automation
              fields: repo,message,commit,author,ref,job,took
          env:
              SLACK_WEBHOOK_URL: ${{ secrets.SLACK_BE_PR_ANALYSIS_ALARM_WEBHOOK }}
          if: always() # Pick up events even if the job fails or is canceled.
Jacoco 등록
Jacoco가 없으면 SonarQube PR Comment에서 테스트 커버리지가 첨부되지 않기 때문에, Jacoco로 디펜던시에 추가해야 함.
Jacoco를 추가하면 jacocoTestReport 과 jacocoTestCoverageVerification 가 추가되는데, 테스트 실행과 함께 진행되야 하므로 실행할 테스크가 너무 많다. 커스텀 그레이들 테스크 testCoverage로 한 번에 실행할 수 있다. Jacoco 빌드 결과 HTML은 build/jacocoHtml/index.html 에 있다.
plugins {
    id "jacoco"
}

jacoco {
    toolVersion = '0.8.7'
}

jacocoTestReport {
    dependsOn test
    mustRunAfter test

    reports {
        xml.required = false
        csv.required = false
        html.outputLocation = layout.buildDirectory.dir('jacocoHtml')
    }

    afterEvaluate {
        classDirectories.setFrom(
                files(classDirectories.files.collect {
                    fileTree(dir: it, excludes: [
                            '**/ReviewMateApplication*',
                            '**/*Formatter*',
                            '**/*Interceptor*',
                            '**/GlobalControllerAdvice*',
                            '**/SwaggerConfig*',
                            '**/MultipartJackson2HttpMessageConverter*',
                            '**/StaticRoutingConfiguration*',
                            '**/*BaseEntity*'
                    ])
                })
        )
    }
}

jacocoTestCoverageVerification {
    mustRunAfter jacocoTestReport

    violationRules {
        rule {
            element = 'CLASS'

            limit {
                counter = 'BRANCH'
                value = 'COVEREDRATIO'
                minimum = 0.0
            }

            limit {
                counter = 'LINE'
                value = 'COVEREDRATIO'
                minimum = 0.00
            }

            limit {
                counter = 'METHOD'
                value = 'COVEREDRATIO'
                minimum = 0.0
            }
        }

        rule {
            element = 'METHOD'

            excludes = [
                    "*"
            ]

            limit {
                counter = 'LINE'
                value = 'TOTALCOUNT'
                maximum = 200
            }
        }
    }
}

task testCoverage(type: Test) {
    group 'verification'
    description 'Runs the unit tests with coverage'

    dependsOn('test',
            'jacocoTestReport',
            'jacocoTestCoverageVerification')
}
1. 테스트 커버리지에서 제외할 클래스 설정
⚠️ 주의할 점: 개발 블로그에 올라와 있는 많은 양의 Jacoco 포스팅이 Jacoco 혹은 그레이들 최근 버전들과 호환되지 않음. 특히, 테스트 커버리지에서 제외 할 클래스 설정하는 것은 아래를 따라야 함.
jacocoTestReport {

    afterEvaluate {
        classDirectories.setFrom(
                files(classDirectories.files.collect {
                    fileTree(dir: it, excludes: [
                            '**/ReviewMateApplication*',
                            '**/*Formatter*',
                            '**/*Interceptor*',
                            '**/GlobalControllerAdvice*',
                            '**/SwaggerConfig*',
                            '**/MultipartJackson2HttpMessageConverter*',
                            '**/StaticRoutingConfiguration*',
                            '**/*BaseEntity*'
                    ])
                })
        )
    }
}
2. 테스트 커버리지에서 제외할 함수 설정
https://sungsan.oopy.io/1d6e3f0c-7a3e-48f2-bb62-ad0e37e3c888
3. Lombok이 생성한 함수들 제외
프로젝트의 루트 경로에 lombok.config 파일을 생성하고 다음 내용을 추가하면 된다.
lombok.addLombokGeneratedAnnotation = true적용 결과
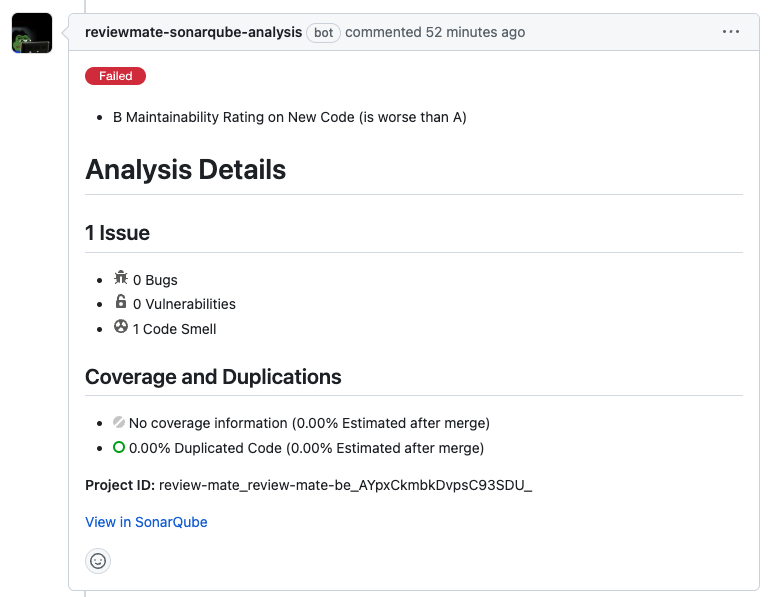
슬픈 개구리가 분석이 완료되면, 해당 PR의 변경점을 한정으로 통과 여부와 코드 퀄리티, 테스트 커버리지를 작성해준다. 사진에서 Failed된 이유는 사용하지 않는 import문 하나가 있어서 발생했다. 이 정도로 빡빡하므로, 애초에 IDE에서 SonarLint를 설치해서 Push하기도 전에 미리 체크해두는 것이 좋을듯 싶다.
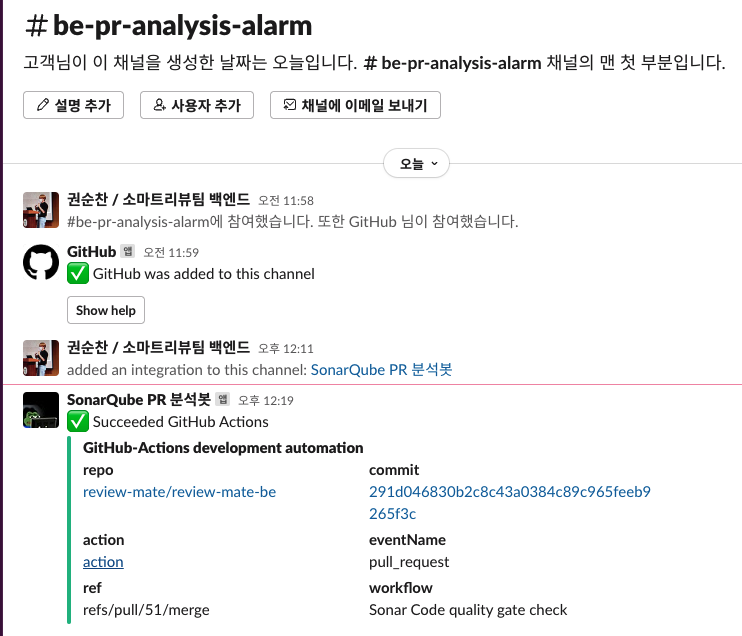
분석하고 PR 코멘트가 생성되는데 시간이 꽤 걸리므로, 아래처럼 슬랙 알림을 설정하는 것도 좋다.
🚀 트러블슈팅
1. Docker 관련 명령어 실행 중, /var/run/docker.sock의 permission denied 발생
$ docker ps -a
Got permission denied while trying to connect to the Docker daemon socket at unix:///var/run/docker.sock: Get http://%2Fvar%2Frun%2Fdocker.sock/v1.40/containers/json?all=1: dial unix /var/run/docker.sock: connect: permission denied
원인
Docker 명령어 사용에 필요한 docker.sock을 실행할 권한이 없는 상태
해결 방법
/var/run/docker.sock파일의 권한을 666으로 변경하여 그룹 내 다른 사용자도 접근 가능하게 변경
sudo chmod 666 /var/run/docker.sock- 또는 chown 으로 group ownership 변경
sudo chown root:docker /var/run/docker.sock2. SonarQube가 정상적으로 실행되었고 네트워크에서 포트 열었지만, 연결이 거부됨
원인
docker-compose.yml 에서 포트 설정이 잘못외었음
(ex. 포트포워딩이 잘못된 경우)
services:
  sonarqube:
    ports:
      - "8080:8080"
해결방법
posts 설정은 다음과 같이 이루어져 있음
services:
  sonarqube:
    ports:
      - "컨테이너가_요청받는_포트:요청을_포트포워딩_할_포트"
그리고 소나큐브의 기본 접속 포트는 9000 입니다. 따라서 외부에서 8080포트로 들어오기로 설정했다면, 그 포트를 9000 포트로 포워딩해줘야 됨.
(ex. 정상 설정)
services:
  sonarqube:
    ports:
      - "8080:9000"
3. max virtual memory areas vm.max_map_count is too low. ~

docker-compose.yml 에서 vm.max_map_count 늘리는 부분이 빠졌거나, 가상 메모리 설정이 잘못될 경우 발생
해결방법
docker-compose.yml 에 해당 부분이 빠졌다면, 추가
ulimits:
      nofile:
        soft: "262144"
        hard: "262144"
그래도 되지 않는 경우, EC2 커널의 메모리 설정 재시도
참고 자료
https://creampuffy.tistory.com/196
https://gblee1987.tistory.com/105