Assignment#1
- Node.js에서 제공하는 built-in 모듈인 http를 사용해서 API를 구현해봅니다.
- 먼저, app.js라는 파일을 만들고, 위스타그램 회원들의 정보를 저장할 수 있는 배열(users)과, 회원들이 작성한 게시물을 저장할 수 있는 배열(posts)을 파일 상단에 작성합니다.
// app.js
const users = []
const posts = []
- 위에서 선언한 빈 배열에 미션 진행에 필요한 테스트 데이터를 추가합니다.
// app.js
const users = [
  {
    id: 1,
    name: "Rebekah Johnson",
    email: "Glover12345@gmail.com",
    password: "123qwe",
  },
  {
    id: 2,
    name: "Fabian Predovic",
    email: "Connell29@gmail.com",
    password: "password",
  },
];
const posts = [
  {
    id: 1,
    title: "간단한 HTTP API 개발 시작!",
    content: "Node.js에 내장되어 있는 http 모듈을 사용해서 HTTP server를 구현.",
    userId: 1,
  },
  {
    id: 2,
    title: "HTTP의 특성",
    content: "Request/Response와 Stateless!!",
    userId: 1,
  },
];
// 아래에 코드를 작성해 주세요.
- app.js 파일에 회원가입 엔드포인트 구현 코드를 작성해주세요.
- 알맞은 API 호출 URL을 설정하여서 클라이언트와(httpie/postman) 통신을 성공해주세요. 데이터를 새롭게 저장하는 요청을 보낼때는 http method 중에 POST를 사용합니다.
$ http -v POST 127.0.0.1:8000- 알맞은 http 메소드를 선정하여서 유저의 정보를 백엔드 서버에 전달해주세요.
- 전달받은 데이터를 users 배열에 추가해서 회원정보를 API 시스템 내에 저장한 후에, 생성 됐을 때에 알맞는 http 상태코드를 반환해주세요.
- http response로 반환하는 JSON 데이터의 형태가 다음과 같은 구조를 갖도록 만들어주세요.
{
	"message" : "userCreated"
}
Assignment#2
Assignment 1에서 만들었던 app.js 파일에 이어서 과제를 진행해주세요.
app.js 파일에 게시글 생성 엔드포인트 구현 코드를 작성해주세요.
알맞은 API 호출 URL을 설정하여서 클라이언트와(httpie/postman) 통신을 성공해주세요. 데이터를 새롭게 저장하는 요청을 보낼때는 http method 중에 POST를 사용합니다.$ http -v POST 127.0.0.1:8000
- 알맞은 http 메소드를 선정하여서 게시글 내용 및 유저의 id 값을 백엔드 서버에 전달해주세요.
- 전달받은 데이터를 posts 배열에 추가해서 게시물 정보를 API 시스템 내에 저장한 후에, 생성됬을 때에 알맞는 http 상태코드를 반환해주세요.
- http response로 반환하는 JSON 데이터의 형태가 다음과 같은 구조를 갖도록 만들어주세요.
{
  "message" : "postCreated"
}
test 01
1. 소스코드:
const http = require("http");
// http모듈을 가져와서
const server = http.createServer();
// 그 모듈의 메소드를 server에 할당하고

const httpRequestListener = function (request, response) {
    response.writeHead(200, { "Content-Type": "application/json" });
    response.end(JSON.stringify({ message: "userCreated" }));
  };

server.on("request", httpRequestListener);
const IP = '127.0.0.1';
const PORT = 8000;
server.listen(PORT, IP, function(){
    console.log(`Listening to request on ip ${IP} & port ${PORT}`);
})- API서버를 켠다.
- 이 서버는 request 이벤트를 받으면 실행되는
httpRequestListener함수를 가지고 있다.
server.on("request", httpRequestListener); // API서버 켜기// request를 받으면 실행되는 함수:
const httpRequestListener = function (request, response) {
// response의 header에는 상태코드 200, 요청 내용을 json 타입으로 변환
response.writeHead(200, { "Content-Type": "application/json" });
response.end(
JSON.stringify(
// response의 body에는 다음 내용이 표시된다
// 객체 형태지만 JSON.stringify()에 의해 string으로~
{ message: "userCreated" }
)
);
};
- 특정IP, 특정PORT에 대해 요청의 수신을 계속 기다린다.(계속 듣고 있음)
server.listen(PORT, IP, function(){
    console.log(`Listening to request on ip ${IP} & port ${PORT}`);
})
2. 터미널 리스닝 대기중:
node apiServer1.js
3. 터미널 요청/응답:
http -v POST 127.0.0.1:8000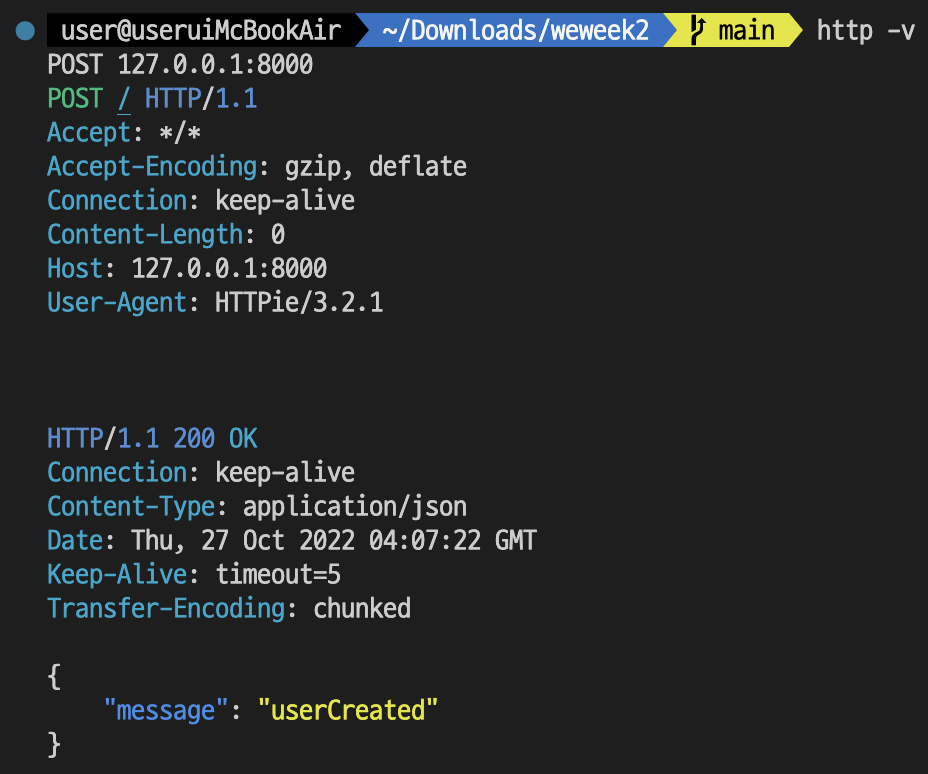
test 02
1. 소스코드:
const http = require("http");
const server = http.createServer();
const users = [
    {
      id: 1,
      name: "Rebekah Johnson",
      email: "Glover12345@gmail.com",
      password: "123qwe",
    },
    {
      id: 2,
      name: "Fabian Predovic",
      email: "Connell29@gmail.com",
      password: "password",
    },
];

const posts = [
    {
      id: 1,
      title: "간단한 HTTP API 개발 시작!",
      content: "Node.js에 내장되어 있는 http 모듈을 사용해서 HTTP server를 구현.",
      userId: 1,
    },
    {
      id: 2,
      title: "HTTP의 특성",
      content: "Request/Response와 Stateless!!",
      userId: 1,
    },
];
const httpRequestListener =  function(request, response){
    const { url, method } = request;

    if(method === "POST"){
        // url이 /users/signup 이면 회원가입을 실행:
        if (url === "/users/signup") {
            let body = "";

            //콜백함수: 데이터를 모아서 하나의 스트링으로
            request.on("data", (data) => {
                body += data;
            });

            //콜백함수:
            request.on("end", ()=>{
                // 하나의 스트링으로 만든 body를 파싱해서 user에 할당
                const user = JSON.parse(body);

                // 전역변수 users에 입력받은 객체를 추가
                users.push({
                    id: user.id,
                    name: user.name,
                    email: user.email,
                    password: user.password,
                });

                // 데이터타입은 json으로
                response.writeHead(200, {'Content-Type':'appliction/json'});

                // json으로 작성된 stringify(...)의 ...을 응답'body'에 표시
                response.end(JSON.stringify({
                    message : "userCreated",
                    "users" : users
                }));
            });
        // url이 /posts/signup 이면 게시글 입력을 실행:
        }else if(url === "/posts/signup"){
            let body = "";

            //콜백함수: 데이터를 모아서 하나의 스트링으로
            request.on("data", (data) => {
                body += data;
            });

            //콜백함수:
            request.on("end", ()=>{
                // 하나의 스트링으로 만든 body를 파싱해서 post에 할당
                const post = JSON.parse(body);

                 // 전역변수 posts에 입력받은 객체를 추가
                posts.push({
                    id: post.id,
                    title: post.title,
                    content: post.content,
                    userId: post.userId
                });
                // header데이터타입은 json으로
                response.writeHead(200, {'Content-Type':'appliction/json'});

                // json으로 작성된 stringify()의 객체 내용을 응답'body'에 표시
                response.end(JSON.stringify({
                    message : "postCreated",
                    "posts" : posts }));
            });
        }
    }
}

server.on("request", httpRequestListener);

const IP = '127.0.0.1';
const PORT = 8000;

server.listen(PORT, IP, function(){
    console.log(`Listening to request on ip ${IP} & port ${PORT}`);
})
2. 터미널 리스닝 대기중:
node apiServer1.js
3. 터미널 요청/응답:
회원가입 추가하기
http -v POST http://127.0.0.1:8000/users/signup id:=3 name='고길동' email='hong@gmail.com' password='1q2w3e433r'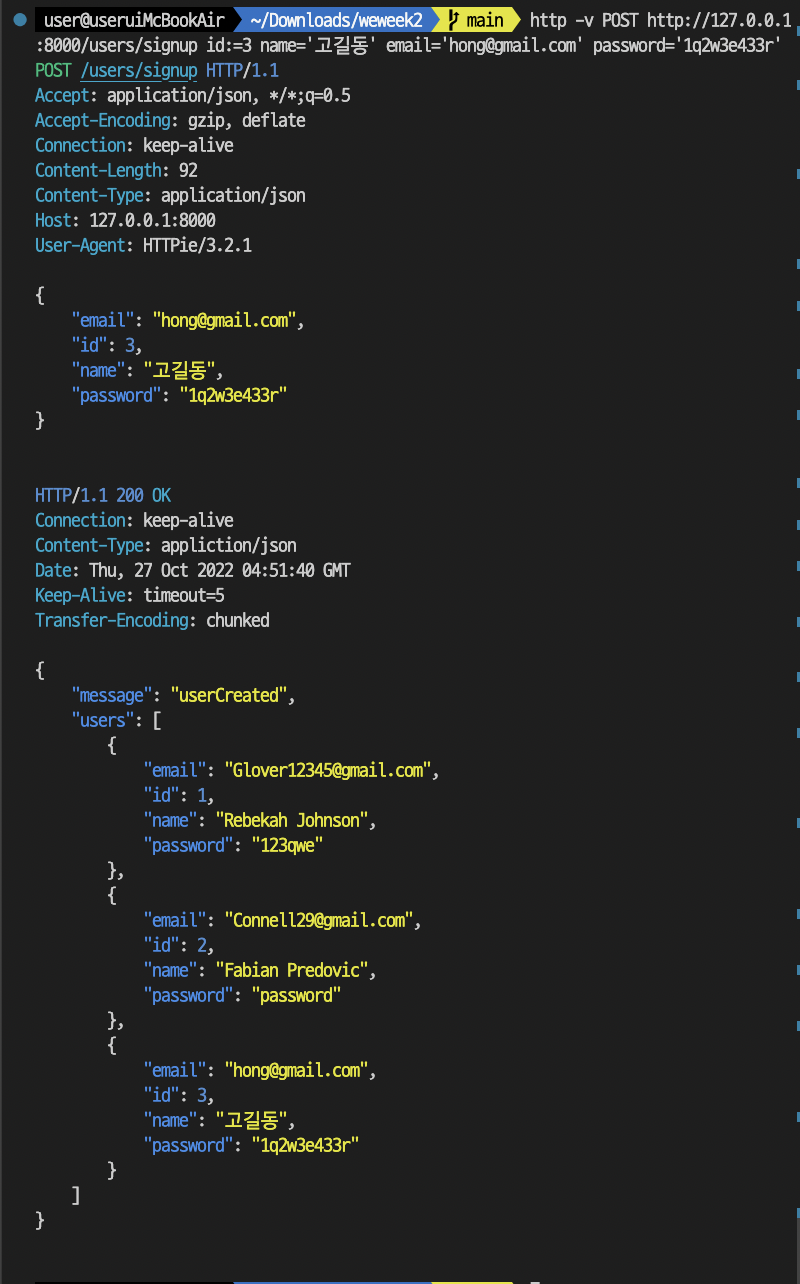
포스트 추가하기
http -v POST http://127.0.0.1:8000/posts/signup id:=3 title='HTTP methods' content='GET,POST,DELETE' userId:=3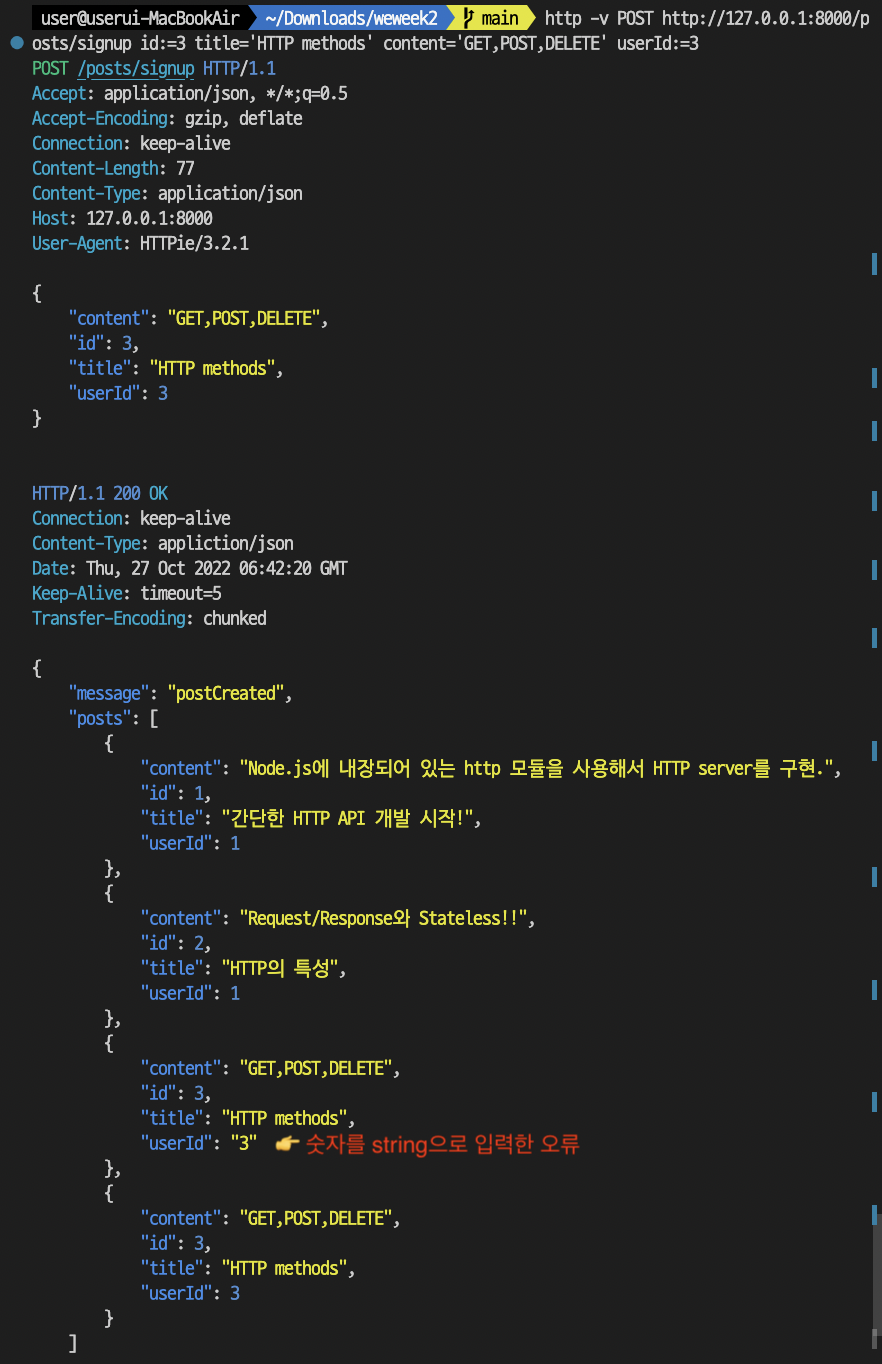
터미널 명령어
string 타입: (변수명)=1 👉 "1"
number타입: (변수명):=1 👉 1(숫자는
콜론(:)을 쓰자!)

검색하고 기록하며 학습하는 백엔드 개발자