interface | 타입스크립트, 코딩앙마
https://youtu.be/OIMPLNICzoc
interface
프로퍼티의 타입을 정의해서 객체(object)를 표현하려면?
interface를 쓴다
interface User {
  name : string;
  age : number;
}

// 변수 user를 위에서 선언한 User타입으로 명시하고 프로퍼티 값을 할당
let user: User = {
  name : "홍길동",
  age : 30
}

user.age = 10; // 프로퍼티의 값을 변경할 수 있음
user.gender = "male" // Error! gender는 User타입에 명시되지 않음
? : 단일 프로퍼티 optional
?를 쓰면 있어도 되고 없어도 되는 optional한 property로 설정해 줄 수 있다
interface User {
  name : string;
  age : number;
  gender? : string;
}readonly를 쓰면 최초 할당만 가능하고 이후에는 수정할 수 없다
interface User {
  readonly birthYear : number;
}

let user: User = {
  birthYear : 1810
}

user.birthYear = 1990; // Error!
여러 프로퍼티 optional
여러 프로퍼티를 optional하게 설정해야 할 때 ?를 사용할 수도 있지만
아래와 같이 간단하게 써줄 수 있다.
interface User {
  // 1? : string;
  // 2? : string;
  // 3? : string;
  [학년: number] : string;
}

let user: User = {
  1 : "수",
  2 : "우"
  // 3은 작성하지 않음
}
프로퍼티 타입 범위
프로퍼티의 타입 범위를 선언해줄 수도 있다
기존의 string은 문자열타입은 무엇이든지 할당할 수 있었지만 이제 type Score에 해당하는 값만 넣어줄 수 있다
type Score = "수" | "우" | "미" | "양" | "가";

interface User {
  [학년: number] : Score;
}

let user: User = {
  1 : "수",
  2 : "우",
  3 : "A" // Error!
}
Function의 타입
Add타입의 첫번째 인자, 두번째 인자의 타입을 number로 정의하고, 반환되는 값도 number로 정의한다.(참고: 반환값이 없으면 void)
- 정의한 인자가 타입에서는 num1, num2 <-> 함수에서는 x,y 로 서로 다르지만 동작하는데 상관없음
interface Add {
    (num1: number, num2: number): number;
}

const add : Add = function (x, y){
    return x + y;
}

console.log(add(10,20)) // 30
성인이면 true를 반환하는 함수를 만들어보자( + 화살표 함수)
interface isAdult {
    (age:number) : boolean;
}

const a:isAdult = (age) => {
    return age > 19;
}

console.log(a(20)); // true
Class의 타입
implements를 사용해 클래스도 타입을 정의할 수 있다
interface Car {
    color : string;
    wheels : number;
    start() : void; // 함수의 반환값이 없으므로 void로 설정
}

class Bmw implements Car {
    color;
    wheels = 4;
    constructor(c:string){
        this.color = c;
    }
    start(){
        console.log("go...")
    }
}

const b = new Bmw("green");
console.log(b)
b.start();
class, constructor 👉 JS레플릿 25.Class 링크 참조
extends : Class 확장
extends를 사용해 클래스를 확장해줄 수 있다
interface Car {
    color : string;
    wheels : number;
    start() : void;
}

interface Benz extends Car {
    door: number;
    stop(): void;
}

const benz : Benz = {
    color : "red",
    wheels : 4,
    start(){
        console.log('Go~~~!')
    },
    door : 4,
    stop(){
        console.log('stop!!!')
    }
}

console.log(benz)
benz.start();
benz.stop();
Class 다중 확장
클래스는 여러개를 확장시킬 수도 있다
interface Toy {
    name: string;
}

interface Car {
    color: string;
    wheels: number;
    start(): void;
}

interface ToyCar extends Toy, Car {
    price: number;
}

class Tobot implements ToyCar {
    name;
    color;
    wheels;
    price;
    constructor(n:string, c:string, w:number, p:number){
        this.name = n;
        this.color = c;
        this.wheels = w;
        this.price = p;
    }
    start(){
        console.log("가보자고~~")
    }

}

const t = new Tobot("또봇 X", "orange", 4, 39800);
console.log(t)
t.start();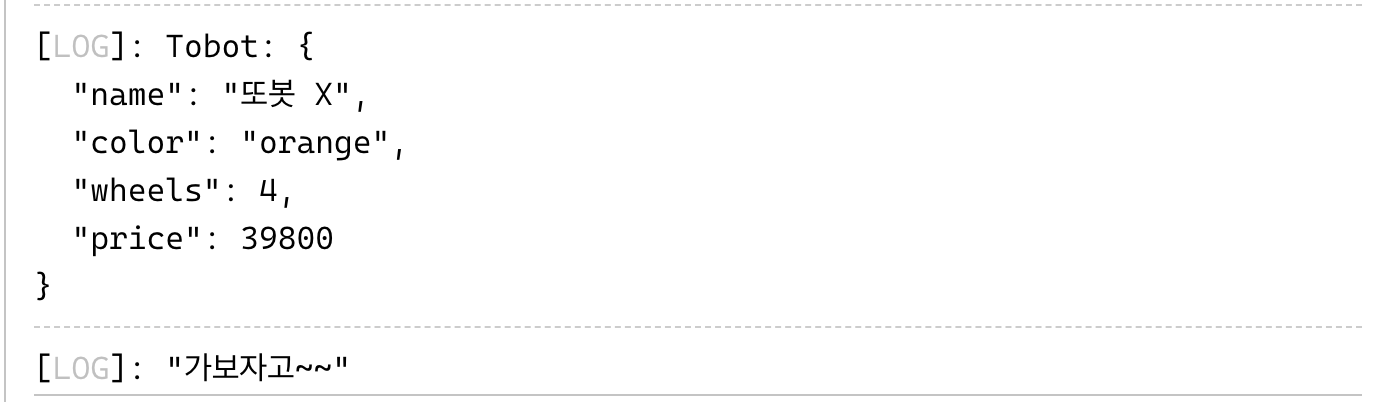

검색하고 기록하며 학습하는 백엔드 개발자