들어가기에 앞서..
평소 무언가를 파고 들어가는걸 좋아해서 프론트엔드 개발자로서 언젠가는 React를 직접 개발해보고 싶다는 생각을 가지고 있었다.
그러다 최근에, 우연한 기회가 겹쳐 좋은 개발자 분들과 스터디를 하게 되는 기회가 생겼고, React에 대해 보다 깊게 공부해보고자 TypeScript를 기반으로 React를 직접 개발해보고자 했다. 그리고 TypeScript로 React 직접 개발하기 시리즈를 통해 직접 React를 밟았던 과정을 적어보고자 한다.
Webpack & Babel 설정
본격적으로 React 개발을 시작하기에 앞서, 개발 편의성을 위해 몇 가지를 설정하고 개발을 시작하기로 했다. 번들링과 개발 서버 설정을 통한 원할한 개발을 위해 Webpack을, 조금 더 React와 유사한 스타일의 JSX 문법의 사용을 위해 Babel을 사용하기로 결정했다.
Webpack 설정
// webpack.common.js

const path = require('path');
const HtmlWebpackPlugin = require('html-webpack-plugin');

module.exports = {
  entry: {
    main: './src/index.tsx',
  },
  output: {
    publicPath: '/',
    path: path.join(__dirname, '../dist'),
    filename: '[name].[chunkhash].js',
    clean: true,
  },
  resolve: {
    extensions: ['.js', '.jsx', '.ts', '.tsx'],
    modules: [
      path.resolve(__dirname, '../src'),
      'node_modules',
    ],
    alias: {
      "@core": path.resolve(__dirname, "../src/core"),
    },
  },
  plugins: [
    new HtmlWebpackPlugin({
      template: "./public/index.html",
    })
  ],
  devServer: {
    historyApiFallback: true,
    host: 'localhost',
    port: 3000,
    open: true,
  },
};


// webpack.dev.js

const { merge } = require("webpack-merge");
const common = require("./webpack.common");

module.exports = merge(common, {
  mode: "development",
  devtool: 'eval-cheap-module-source-map',
  cache: {
    type: "filesystem",
  },
  module: {
    rules: [
      {
        test: /\.(js|jsx|ts|tsx)$/,
        exclude: /node_modules/,
        loader: 'babel-loader',
        options: {
          cacheCompression: false,
          cacheDirectory: true,
          presets: [
            '@babel/preset-env',
            [
              '@babel/preset-react',
              {
                runtime: 'classic'
              }
            ],
          ],
          plugins: [],
        }
      },
    ]
  },
  optimization: {
    runtimeChunk: {
      name: entrypoint => `runtime-${entrypoint.name}`,
    },
  },
});
개발 서버 실행을 위한 기본적인 설정과 JSX 문법을 처리하기 위해 Babel을 연결했다. 특히, '@babel/preset-react'을 설정하여 JSX 문법을 바벨을 통해 React.createElement를 활용한 결과로 변경할 수 있게 했다. 특히, 직접 구현한 React 객체를 JSX 파일 상단에 직접 import 해줘야 하므로 runtime: 'automatic'이 아닌 runtime: 'classic'으로 설정했다.
Babel 설정
// babel.config.js

module.exports = {
  presets: [
    ["@babel/preset-env", { targets: "defaults" }],
    "@babel/preset-typescript",
    ["@babel/preset-react", { runtime: "classic" }]
  ],
  plugins: ["@babel/plugin-transform-react-jsx"]
};
역시 앞서 설명한대로 '@babel/preset-react'를 통해 JSX 문법을 React.createElement로 변경할 수도록 Babel을 설정했다.
Custom React 객체 구현
앞서 '@babel/preset-react'를 사용하여 JSX 문법을 처리하도록 설정했기 때문에 React 객체를 직접 구현할 필요가 있었다.
// src/core/react.ts

export function createElement(type: any, props: any, ...children: any[]) {
  if (typeof type === "function") {
    return type({ ...props, children });
  }

  return {
    type,
    props: {
      ...props,
      children: children.map((child) =>
        typeof child === "string"
          ? { type: "TEXT_ELEMENT", props: { nodeValue: child, children: [] } }
          : child
      ),
    },
  };
}

export const Fragment = (props: { children: any }) => {
   return {
     type: "Fragment",
     props: {
       ...props,
       children: props.children.map((child: FiberNode) =>
         typeof child === "string"
           ? { type: "TEXT_ELEMENT", props: { nodeValue: child } }
           : child
       ),
     },
   }
 };

const React = {
  createElement,
  Fragment,
};

export default React;
이렇게 React 객체를 직접 만들어 Babel에서 JSX 렌더링에 필요한 최소한의 함수인 React.createElement와 React.Fragment에 접근할 수 있게 해주었다.
Renderer 클래스 구현
Babel에서 createElement로 변환된 내용을 처리하기에 앞서, React가 어떻게 렌더링을 수행하는지 짚고 넘어갈 필요가 있다. 이 글에서는 React 16버전 이후를 기준으로 설명한다.
Virtual DOM과 Fiber Node
우선 React에서는 Virtual DOM을 활용하여 효율적으로 UI를 업데이트한다.
Virtual DOM
Virtual DOM은 React가 자체적으로 메모리 상에서 관리하는 가상의 DOM 트리다. React는 이 가상의 DOM을 통해 변경 사항을 먼저 계산한 뒤, 실제 DOM에 최소한의 업데이트만 반영한다. 일반적으로 브라우저가 웹페이지를 렌더링하는 과정은 복잡하고 많은 비용 발생하지만 사용자 인터렉션등에 따른 실제 DOM 수정을 최소화하고, 브라우저 렌더링에 필요한 비용을 줄일 수 있다는 장점이 있다.
이러한 Virtual DOM과 렌더링 최적화를 가능하게 해주는 것이 React Fiber이다.
React Fiber
React Fiber는 React에서 컴포넌트의 업데이트 및 렌더링 과정을 효율적으로 수행할 수 있도록 설계된 아키텍처이다. React 16 이후, Virtual DOM은 Fiber Tree 기반으로 관리되며, Fiber Node 단위로 변경 사항을 추적하며, 만약 이 둘 사이에 차이가 있으면 변경에 관련된 정보를 가지고 있는 Fiber Node를 기준으로 화면에 렌더링을 요청하는 역할을 한다.
Fiber Node
React Fiber는 하나의 작업 단위(Fiber Node)로 구성되며 재조정 과정을 통해 변경된 Fiber Node를 찾아 실제 DOM에 반영하는 방식으로 동작한다. 이를 통해 보다 부드러운 UI 업데이트와 렌더링 최적화를 가능하게 한다.
Fiber Node는 다음과 같은 속성들을 가진다.
function FiberNode(tag, pendingProps, key, mode) {
    // Instance
    this.tag = tag
    this.key = key
    this.elementType = null
    this.type = null
    this.stateNode = null

    // Fiber
    this.return = null
    this.child = null
    this.sibling = null
    this.index = 0

    this.ref = null
    this.refCleanup = null

    this.pendingProps = pendingProps
    this.memoizedProps = null
    this.updateQueue = null
    this.memoizedState = null
    this.dependencies = null

    this.mode = mode

    // Effects
    this.flags = NoFlags
    this.subtreeFlags = NoFlags
    this.deletions = null

    this.lanes = NoLanes
    this.childLanes = NoLanes

    this.alternate = null

    // 이하 프로파일러, __DEV__ 코드는 생략
  }
지금 단계에서는 렌더링에 필요한 부분들만 간략화하여 구현하고 점차 기능이 늘어감에 따라 관련 로직을 개선할 계획이다.
React에서의 Rendering
React에서 렌더링은 브라우저의 렌더링과 구분된다. React에서의 렌더링이란 Fiber Tree 안에 있는 모든 Fiber Node들이 각자의 props와 state 값을 기반으로 어떻게 UI를 구성할지 계산하는 과정이다. 이 과정을 통해 어떤 DOM 결과물을 브라우저에 전달할지 결정하게 된다.
React에서 렌더링 프로세스가 시작되면, React는 Fiber Tree의 루트부터 시작하여 각 Fiber Node를 탐색하면서, 업데이트가 필요한 Fiber Node를 발견하면 해당 이를 재호출하여 새로운 렌더링 결과를 계산하고, 이 결과를 각 Fiber Node에 저장한다. 이후, 실제 DOM에 대응되는 Fiber Tree와 비교하여 변경 사항을 수집하고, 이를 반영하기 위해 필요한 모든 변경 작업을 처리한다. 이러한 과정을 재조정이라고 한다.
이러한 React에서의 렌더링은 렌더 단계와 커밋 단계로 분리되어 실행된다.
렌더 단계
렌더 단계는 Fiber Node를 렌더링하고 변경 사항을 계산하는 모든 작업을 포함한다. 이 단계에서는 각 Fiber Node의 type, props, key를 비교하여 변경이 필요한지 체크하고, 변경이 필요한 Fiber Node를 추적하여 업데이트할 항목들을 결정한다.
커밋 단계
커밋 단계는 렌더 단계에서 계산된 변경 사항을 실제 DOM에 반영하는 과정이다. 이 과정에서 React는 계산된 변경 사항을 실제 DOM에 적용하고, 이후 후속 작업(useEffect 등)을 실행한다. 이 단계가 끝나야만 브라우저에서 실제 렌더링이 발생한다.
Renderer 클래스 구현
지금까지 살펴본 기본적인 내용을 기반으로, 렌더링을 처리하기 위한 Renderer 클래스를 간단하게 구현하고, 문제없이 렌더링되는지 결과를 확인했다.
이를 위한 핵심적인 부분들은 다음과 같다.
타입 정의
우선 렌더링을 처리하기 위한 Fiber Node의 최소한의 타입을 다음과 같이 정의했다.
// src/core/type.ts

export type FiberNode = {
  type: string;
  props: Record<string, any>;
  dom?: HTMLElement | Text | undefined | null;
  child?: FiberNode | null;
  sibling?: FiberNode | null;
  parent?: FiberNode;
  alternate?: FiberNode | null;
};
각각의 타입에 대한 설명은 다음과 같다.
- type: 현재 Fiber Node가 나타내는 타입 (컴포넌트, HTML 태그 등)
- props: 해당 Fiber Node의 속성들 (className, style, children 등)
- dom: 해당 Fiber Node에 대응하는 실제 DOM 객체 (렌더링된 결과)
- child, sibling, parent: 트리 구조에서 이 노드의 자식, 형제, 부모 노드들 (트리 구조로 렌더링 상태를 추적)
- alternate: 이전 렌더링과 비교할 수 있는 이전 상태의 Fiber Node (React의 재조정에 사용)
이를 통해 렌더링에 필요한 최소한의 속성들을 정의하고, 활용할 수 있게 했다.
필드 정의
protected container: HTMLElement;
protected currentFiberTree: FiberNode | null = null;
protected workingFiberTree: FiberNode | null = null;
container는 root 요소를, currentFiberTree와 workingFiberTree는 각각 실제 DOM에 대응되는 Fiber Tree (이전 상태), 재조정 과정의 결과로 생성된 새로운 Fiber Tree이다.
render 메서드 구현
render(element: any) {
  this.workingFiberTree = {
    type: "ROOT",
    props: { children: [element] },
    dom: this.container,
    alternate: this.currentFiberTree,
  };

  this.commitNode();
}
React 렌더링을 수행하기 위한 render 메서드를 구현했다. 새로운 Fiber Tree(workingFiberTree)를 생성하고 최상위 루트 노드(type: "ROOT")로 설정했다. 그리고 인자로 전달받은 요소를 자식(props.children)으로 연결하고 현재 DOM 컨테이너(this.container)와 연결했으며 이전 상태의 Fiber Tree(this.currentFiberTree)와 연결하여 비교할 수 있도록 설정했다.
그리고 새로운 Fiber Tree를 갱신하고, 실제 DOM에 반영하는 commitNode 메서드를 호출했다. 원래 React 렌더링은 렌더 단계와 커밋 단계로 구분되지만, 지금은 단순히 Babel이 JSX 문법을 잘 파싱하고, 파싱된 결과가 렌더링되는지 확인하기 위해 별도로 구분하지 않았다.
commitWork 메서드 구현
private commitWork(fiber: FiberNode | null) {
  if (!fiber) {
    return;
  }

  if (fiber.type === "Fragment") {
    this.handleFragment(fiber);

    return;
  }

  fiber.dom = this.createDomElement(fiber);

  this.checkProps(fiber);
  this.appendNewNode(fiber);
  this.updateFiberNode(fiber);

  if (fiber.child) {
    this.commitWork(fiber.child);
  }

  if (fiber.sibling) {
    this.commitWork(fiber.sibling);
  }
}
commitWork 메서드는 Fiber Tree를 순회하면서 각 노드를 실제 DOM에 반영하는 역할을 한다. 먼저 Fragment 타입이면 별도로 처리한다. 해당 노드에 대응하는 DOM 요소를 생성하고, 속성을 적용한 뒤 부모 노드에 추가한다. 이후 Fiber Tree의 상태를 갱신한 후, 자식 노드와 형제 노드를 재귀적으로 처리하여 전체 Fiber Tree가 DOM에 반영될 수 있도록 한다.
전체 코드 & 결과
지금까지의 구현 내용을 포함한 전체 코드는 아래와 같다.
// src/core/type.ts

export type FiberNode = {
  type: string;
  props: Record<string, any>;
  dom?: HTMLElement | Text | undefined | null;
  child?: FiberNode | null;
  sibling?: FiberNode | null;
  parent?: FiberNode;
  alternate?: FiberNode | null;
};


// src/core/renderer.ts

import { FiberNode } from "./types";

export class Renderer {
  protected container: HTMLElement;
  protected currentFiberTree: FiberNode | null = null;
  protected workingFiberTree: FiberNode | null = null;

  constructor(container: HTMLElement | null) {
    if (!container) {
      throw new Error("Root not exists!");
    }

    this.container = container;
  }

  render(element: any) {
    this.workingFiberTree = {
      type: "ROOT",
      props: { children: [element] },
      dom: this.container,
      alternate: this.currentFiberTree,
    };

    this.commitNode();
  }

  protected commitNode() {
    if (this.workingFiberTree) {
      this.commitWork(this.workingFiberTree);
      this.currentFiberTree = this.workingFiberTree;
    }
  }

  private createDomElement(fiber: FiberNode) {
    let dom: HTMLElement | Text | undefined | null = fiber.dom;

    if (!dom) {
      if (fiber.type === "TEXT_ELEMENT") {
        dom = document.createTextNode(fiber.props.nodeValue);
      } else if (typeof fiber.type === "string") {
        dom = document.createElement(fiber.type);
      }
    }

    return dom;
  }

  private checkProps(fiber: FiberNode) {
    if (fiber.dom instanceof HTMLElement) {
      Object.keys(fiber.props)
        .filter((key) => key !== "children")
        .forEach((name) => {
          if (fiber.dom && fiber.dom instanceof HTMLElement && fiber.dom.getAttribute(name) !== fiber.props[name]) {
            fiber.dom.setAttribute(name, fiber.props[name]);
          }
        });
    }
  }

  private appendNewNode(fiber: FiberNode) {
    if (fiber.parent?.dom instanceof HTMLElement && fiber.dom) {
      if (!fiber.alternate) {
        fiber.parent.dom.appendChild(fiber.dom);
      }
    }
  }

  private updateFiberNode(fiber: FiberNode) {
    let prevSibling: FiberNode | null = null;

    if (fiber.dom instanceof HTMLElement) {
      fiber.props.children.forEach((child: any, index: number) => {
        const oldChild = fiber.alternate?.child;

        const newFiber: FiberNode = {
          type: child.type,
          props: child.props,
          parent: fiber,
          dom: oldChild?.dom || null,
          alternate: oldChild || null,
        };

        if (index === 0) {
          fiber.child = newFiber;
        } else if (prevSibling) {
          prevSibling.sibling = newFiber;
        }

        prevSibling = newFiber;
      });
    }
  }

  private handleFragment(fiber: FiberNode) {
    let parent = fiber.parent;

    while (parent?.type && parent.type === 'Fragment') {
      parent = parent.parent;
    }

    if (fiber?.props?.children) {
      fiber.props.children.forEach((child: FiberNode) => {
        child.parent = parent;

        this.commitWork(child);
      })
    }

    if (fiber.sibling) {
      this.commitWork(fiber.sibling);
    }
  }

  private commitWork(fiber: FiberNode | null) {
    if (!fiber) {
      return;
    }

    if (fiber.type === "Fragment") {
      this.handleFragment(fiber);

      return;
    }

    fiber.dom = this.createDomElement(fiber);

    this.checkProps(fiber);
    this.appendNewNode(fiber);
    this.updateFiberNode(fiber);

    if (fiber.child) {
      this.commitWork(fiber.child);
    }

    if (fiber.sibling) {
      this.commitWork(fiber.sibling);
    }
  }
}
결과
직접 구현한 Renderer 클래스를 통해 다음 코드를 제대로 파싱하고, 결과를 렌더링하는지 확인했다.
// src/index.tsx

import React from '@core/react';

import { Renderer } from '@core';

function createRoot(container: HTMLElement | null) {
  return new Renderer(container);
}

const ChildComponent = () => {
  return (
    <div style="background-color: aqua">
      <p>Test Child</p>
      <>test</>
    </div>
  )
}

const App = () => {
  return (
    <div>
      <h1>Test Parent</h1>
      <ChildComponent />
    </div>
  );
}

const root = createRoot(document.getElementById("root"));
root.render(<App />);
결과는 다음과 같다.
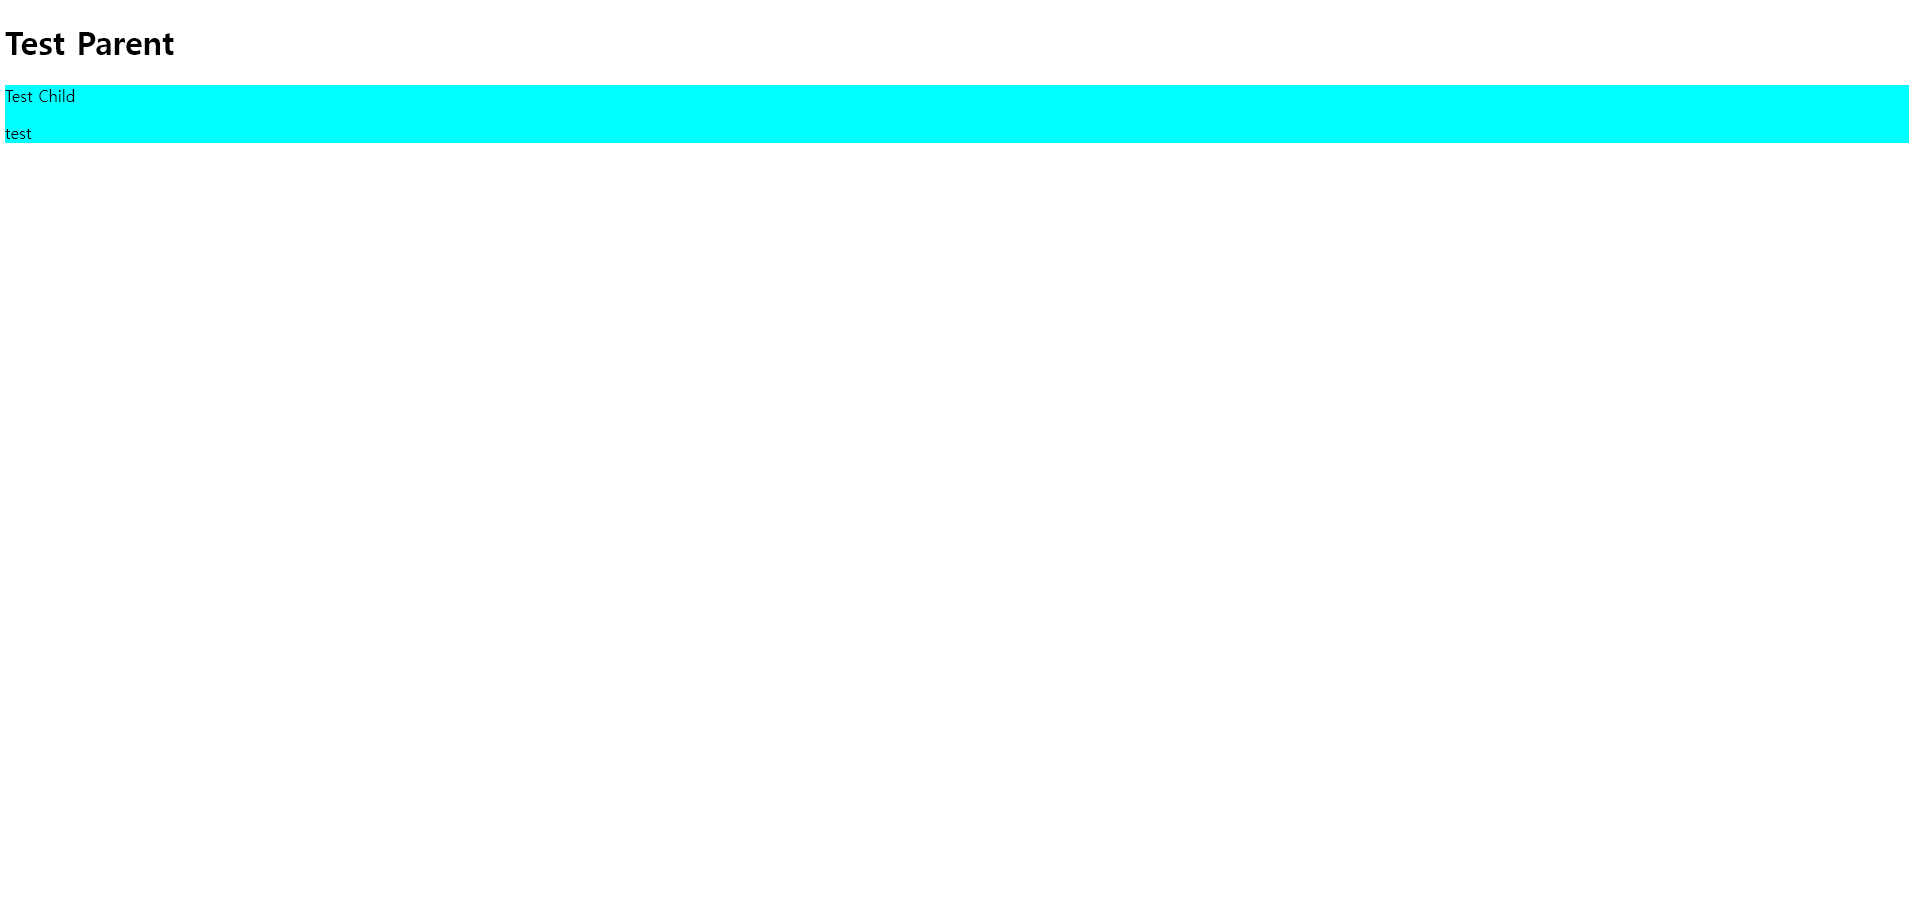
의도한대로 JSX 코드가 화면에 제대로 출력되는 것을 확인할 수 있다.