요구사항
나만의 @Transactional 만들기 위해선 2가지 문제를 해결해야 한다.
- 프록시 적용
- (실제 객체 대신) 프록시 객체를 IoC 컨테이너에 등록
Spring에서는 2가지 문제는 각각 ProxyFactory(리플렉션, CGLIB)와 BeanPostProcessor가 해결한다.
두 기술을 자세히 알아보면서 프록시를 적용하는 방법과 IoC 컨테이너에 프록시 객체를 등록하는 방법을 배울 것이다.
그리고 다음 글에서 @Transactional을 구현을 한다.
프록시 적용
리플렉션 > 동적 프록시 > CGLIB > ProxyFactory 순으로 알아볼 것이다.
일단 문제가 되는 코드를 확인하자.
코드가 많아보이지만 전부 반복이다. 사용하는 기술만 계속 바뀐다.
샘플 클래스
	public interface AAAInter { void helloA(String prefix); }
    public class AAAImpl implements AAAInter {
        public String helloA(String prefix) {
            System.out.println(prefix+"_Hello AAA!");
            return "AAA";
        }
    }

	// 메소드명이 다르다
    public interface BBBInter { void printB(); }
    public class BBBImpl implements BBBInter {
        public void printB() {
        	System.out.println("BBB!");
            return "BBB";
        }
    }
문제 코드
AAA.helloA();와 BBB.printB()만 바꿔가며 쓸 순 없을까?
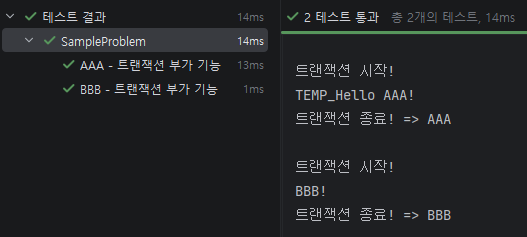
public class SampleProblem {
    @Test
    @DisplayName("AAA - 트랜잭션 부가 기능")
    void sample1() {
        AAAInter AAA = new AAAImpl();

		System.out.println();
        System.out.println("트랜잭션 시작!");
        String result = AAA.helloA();
        System.out.println("트랜잭션 종료! => " + result);
    }

    @Test
    @DisplayName("BBB - 트랜잭션 부가 기능")
    void sample2() {
        BBBInter BBB = new BBBImpl();

		System.out.println();
        System.out.println("트랜잭션 시작!");
        String result = BBB.printB();
        System.out.println("트랜잭션 종료! => " + result);
    }
}
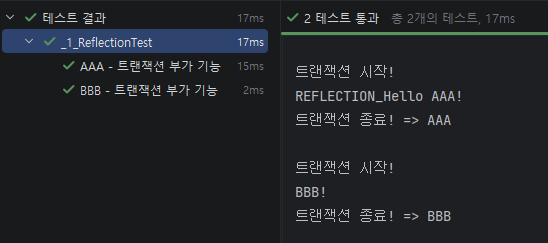
리플렉션 적용
리플렉션은 구체적인 클래스 타입을 알지 못하더라도 그 클래스의 메서드, 타입, 변수들에 접근하는 기술을 의미한다.
그래서 리플렉션을 활용해서 동적으로 호출하는 메서드를 변경할 수 있다.
// 리플렉션 활용
public class _1_ReflectionTest {
    @Test
    @DisplayName("AAA - 트랜잭션 부가 기능")
    void sample1() throws Exception {
        AAAInter AAA = new AAAImpl();

        // 클래스 메타정보 불러오기
        Class targetClass = Class.forName("com.example.my_spring_server.tutorial.proxy.sample.AAAImpl");
        Method method = targetClass.getMethod("helloA", String.class); // 클레스 > 메소드 메타정보 불러오기
        process(AAA, method, new Object[]{"REFLECTION"});
    }

    @Test
    @DisplayName("BBB - 트랜잭션 부가 기능")
    void sample2() throws Exception {
        BBBInter BBB = new BBBImpl();

        Class targetClass = Class.forName("com.example.my_spring_server.tutorial.proxy.sample.BBBImpl");
        Method method = targetClass.getMethod("printB");
        process(BBB, method, new Object[]{});
    }

	// java.lang.reflect.Method
    // 부가기능을 한 곳으로!
    // 클래스랑 메소드를 뽑아내는 것도 분리할 수 있지만 동적 프록시와 비교를 위해...
    void process(Object target, Method method, Object[] args) throws Exception {
        System.out.println();
        System.out.println("트랜잭션 시작!");

        Object result = method.invoke(target, args); // (메타정보를 기반으로) Object target의 메소드 실행

        System.out.println("트랜잭션 종료! => " + result);
    }
}
주의할 점) 리플렉션은 최대한 사용 X
프레임워크를 만들거나, 많은 공통 코드를 줄일 수 있는 경우에만 제한적으로 사용하라.
리플렉션은 컴파일 오류로는 안잡히고, 런타임 오류로만 잡히므로 디버깅하기 너무 어렵다.
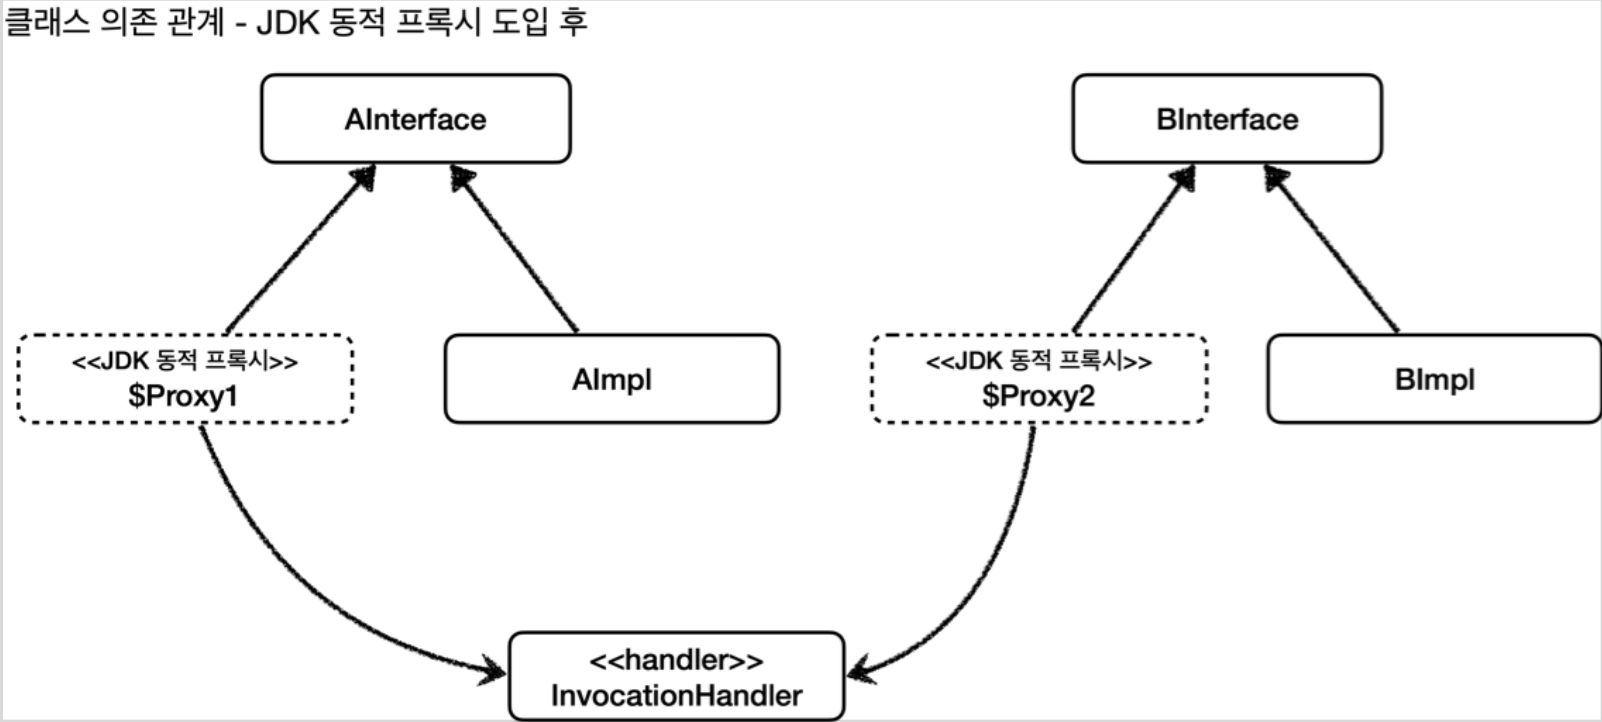
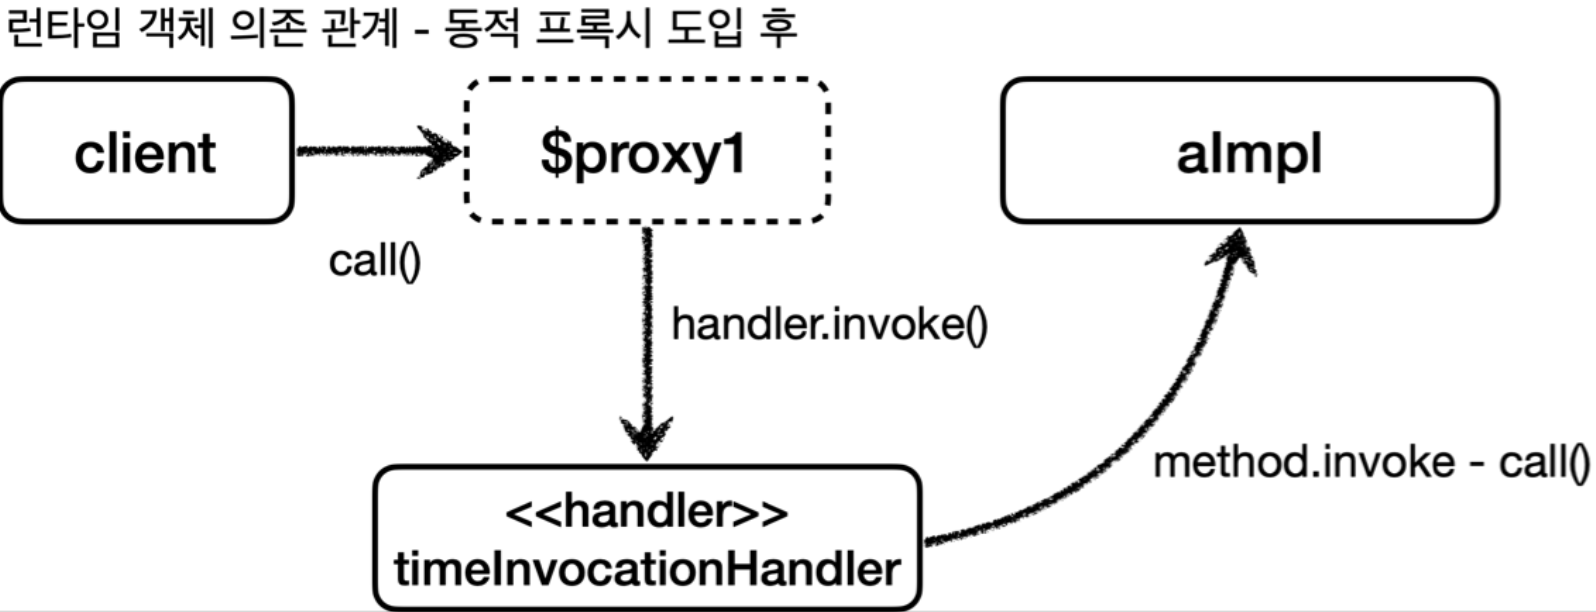
동적 프록시 적용
앞서 프록시 코드를 메서드로 뽑아놨다.
일반적으로 사용하기 위해선 프록시 클래스를 직접 작성해야하지만,
JDK 동적 프록시 기술을 활용해서 클래스 생성없이 프록시를 생성할 수 있다.
// 동적 프록시 활용
public class _2_DynamicProxyTest {

    @Test
    @DisplayName("AAA - 트랜잭션 부가 기능")
    void sample1() throws Exception {
        AAAInter AAA = new AAAImpl();
        StringTransactionHandler handler = new StringTransactionHandler(AAA);

		// java.lang.reflect.Proxy
        AAAInter AAAProxy = (AAAInter) Proxy.newProxyInstance( // 동적 프록시 생성
                AAAInter.class.getClassLoader(),
                new Class[]{AAAInter.class}, // 어떤 인터페이스를 기반으로 프록시를 만들지
                handler // 프록시에 사용할 로직
        );

        AAAProxy.helloA("동적_프록시");

        System.out.println("\nAAA 클래스=" + AAA.getClass()); // class com...AAAImpl
        System.out.println("AAAProxy 클래스=" + AAAProxy.getClass()); // class jdk.proxy3.$Proxy13
    }

    @Test
    @DisplayName("BBB - 트랜잭션 부가 기능")
    void sample2() throws Exception {
        ...
    }

    static class StringTransactionHandler implements InvocationHandler {
        private final Object target;

        public StringTransactionHandler(Object target) { this.target = target; }

        // 동적 프록시에 제공할 핸들러 로직
        @Override
        public Object invoke(Object proxy, Method method, Object[] objects) throws Throwable {
            System.out.println();
            System.out.println("트랜잭션 시작!");

            Object result = method.invoke(target, objects);

            System.out.println("트랜잭션 종료! => " + result);
            return result;
        }
    }

}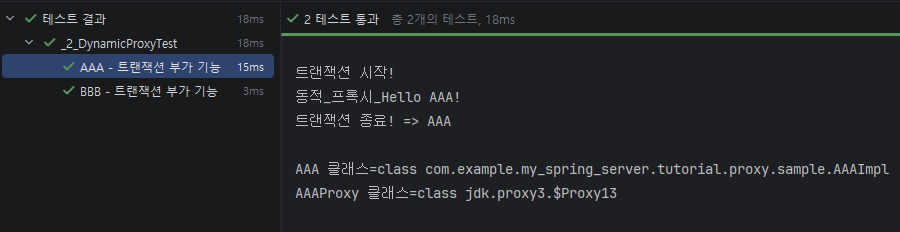
AAAProxy.getClass()는 Proxy로 출력된다.
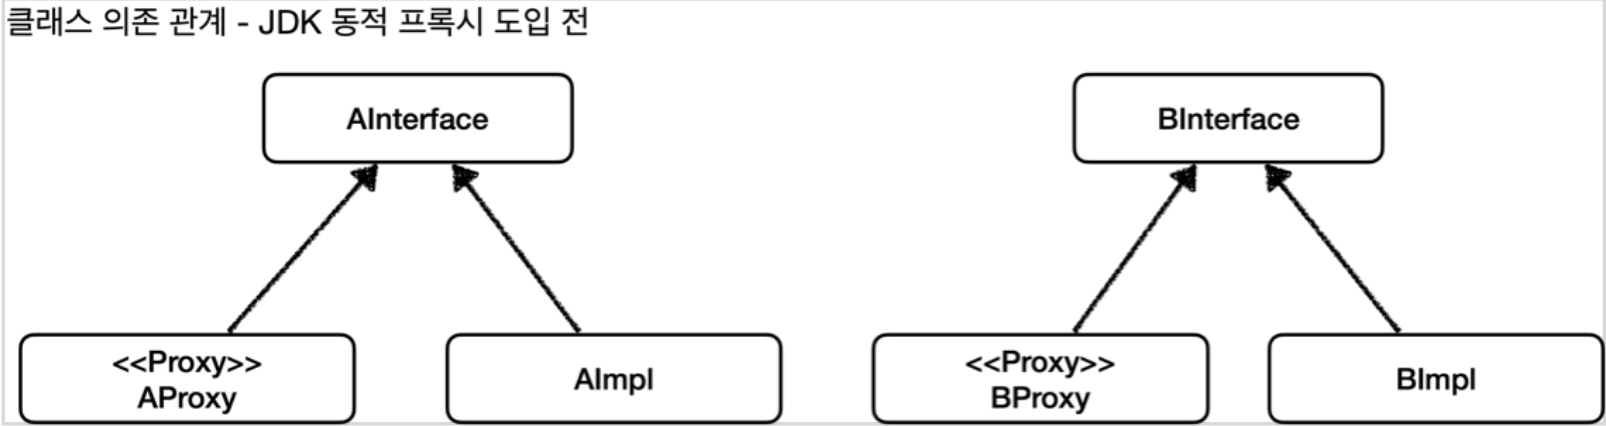
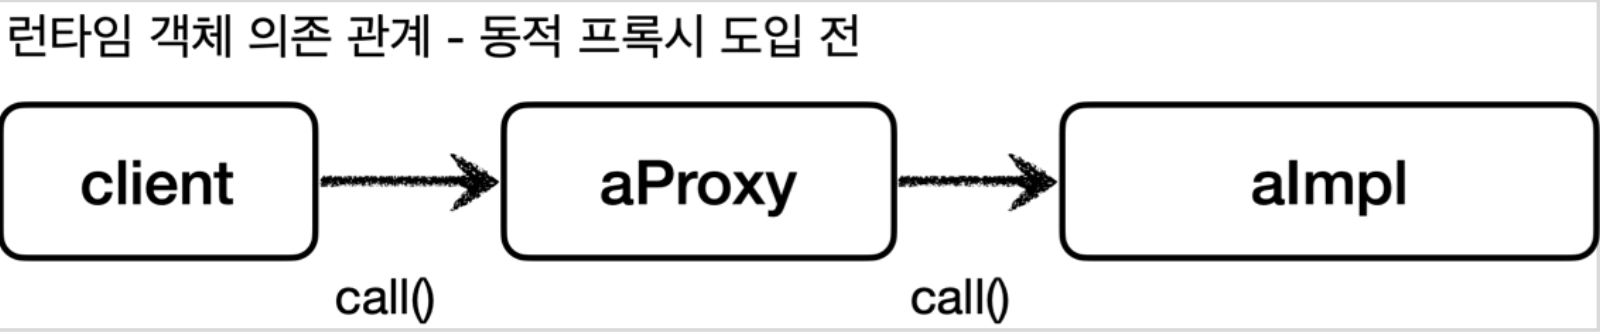
동적 프록시 적용 전
동적 프록시 적용 후
CGLIB
리플렉션은 인터페이스가 필수다.
인터페이스 없이 쓰려면 오픈소스인 CGLIB를 사용하라.
(외부 라이브러리지만 Spring 자체적으로 CGLIB를 지원한다.)
CGLIB는 바이트코드를 조작해서 동적으로 클래스를 생성해주는 라이브러리이다.
사실 스프링의 ProxyFactory라는게 CGLIB를 사용하는 것을 도와줘서, CGLIB를 직접 쓸 일이 많지는 않다.
// 인터페이스를 구현하지 않는 클래스
public class OnlyClass {
public String service(String prefix) {
System.out.println(prefix + "_인터페이스가 없어요!");
return "OnlyClass";
}
public void hello() {
System.out.println("안녕하세요.");
}
}
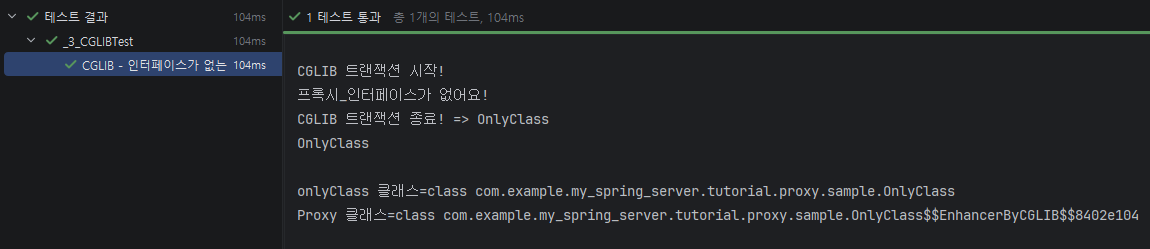
public class _3_CGLIBTest {
@Test
@DisplayName("CGLIB - 인터페이스가 없는 클래스")
void sample1() throws Exception {
OnlyClass onlyClass = new OnlyClass();
// org.springframework.cglib.proxy.Enhancer
Enhancer enhancer = new Enhancer();
enhancer.setSuperclass(OnlyClass.class); // 해당 클래스를 상속받아 프록시를 생성할 것임
enhancer.setCallback(new StringTransactionInterceptor(onlyClass)); // 프록시 실행 로직
OnlyClass proxy = (OnlyClass) enhancer.create(); // 생성
String result = proxy.service("프록시");
// proxy.hello()도 적용되지만 생략
System.out.println(result);
System.out.println("\nonlyClass 클래스=" + onlyClass.getClass()); // class com...OnlyClass
System.out.println("Proxy 클래스=" + proxy.getClass()); // class com...OnlyClass$$EnhancerByCGLIB$$8402e104
}
// Spring 제공 CGLIB
// import org.springframework.cglib.proxy.MethodInterceptor;
static class StringTransactionInterceptor implements MethodInterceptor {
private final Object target;
public StringTransactionInterceptor(Object target) { this.target = target; }
@Override
public Object intercept(Object obj, Method method, Object[] args, MethodProxy proxy) throws Throwable {
System.out.println();
System.out.println("CGLIB 트랜잭션 시작!");
// Object result = method.invoke(target, args); <= 이렇게 할 수 있지만
// MethodProxy를 쓰는게 내부적으로 최적화가 돼있어 조금 더 빠르다.
Object result = proxy.invoke(target, args);
System.out.println("CGLIB 트랜잭션 종료! => " + result);
return result;
}
}
}
동적 프록시는 인터페이스를 implements해서 만들어주고,
CGLIB는 클래스를 extends해서 만들어준다는 차이가 있다.
CGLIB 제약사항
상속을 해서 프록시를 만드는 기술이기 때문에 제약이 있다.
- 기본 생성자가 존재해야 한다.
- 클래스에 final이 붙어있으면 안된다. (예외 발생)
- 메소드에 final이 붙어있으면 해당 메서드를 오버라이딩할 수 없다. (프록시 로직 동작 x
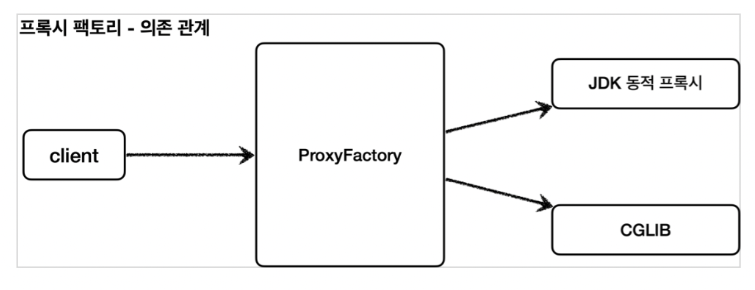
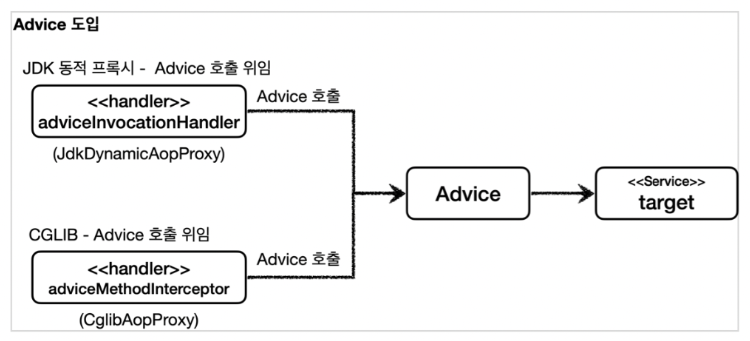
Spring - ProxyFactory
인터페이스가 없다 -> CGLIB 쓴다. -> MethodInterceptor 구현한다.
인터페이스가 있다 -> 동적 프록시를 쓴다. -> InvocationHandler 구현한다.
Spring을 쓴다 -> 구현 신경쓰지말고 ProxyFactory를 쓴다. -> Advice를 구현한다.
ProxyFactory는 상황에 따라 알아서 만들어준다.
코드 비교
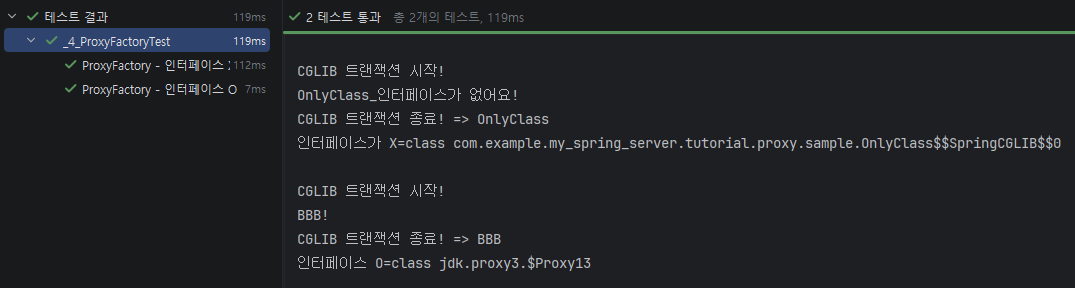
public class _4_ProxyFactoryTest {

    @Test
    @DisplayName("ProxyFactory - 인터페이스 X")
    void sample1() throws Exception {
        OnlyClass onlyClass = new OnlyClass();
        ProxyFactory proxyFactory = new ProxyFactory(onlyClass);

        proxyFactory.addAdvice(new StringTransactionAdvice());
        OnlyClass proxy = (OnlyClass) proxyFactory.getProxy();
        proxy.service("OnlyClass");

		// class com.example...OnlyClass$$SpringCGLIB$$0
        System.out.println("인터페이스가 X="+ proxy.getClass());
    }

    @Test
    @DisplayName("ProxyFactory - 인터페이스 O")
    void sample2() throws Exception {
        BBBInter BBB = new BBBImpl();
        ProxyFactory proxyFactory = new ProxyFactory(BBB);

        proxyFactory.addAdvice(new StringTransactionAdvice());
        BBBInter proxy = (BBBInter) proxyFactory.getProxy();
        proxy.printB();

		// class jdk.proxy3.$Proxy13
        System.out.println("인터페이스 O="+ proxy.getClass());
    }


    // import org.aopalliance.intercept.MethodInterceptor - CGLIB에서 쓴 것과는 다르다
    // MethodInterceptor > Interceptor >  Advice
    static class StringTransactionAdvice implements MethodInterceptor {
        // private final Object target; 이제 필요없다.

        @Override
        public Object invoke(MethodInvocation invocation) throws Throwable {
            System.out.println();
            System.out.println("CGLIB 트랜잭션 시작!");

            // 프록시 생성 과정에서 target을 받기 때문에 invocation.proceed를 호출하면 끝
            Object result = invocation.proceed();

            System.out.println("CGLIB 트랜잭션 종료! => " + result);
            return result;
        }
    }

}
proxyFactory.setProxyTargetClass(true);로 설정하면 항상 CGLIB를 쓰도록 만들 수도 있다.
스프링 부트는 기본으로 CGLIB를 쓰도록 설정해놓음.
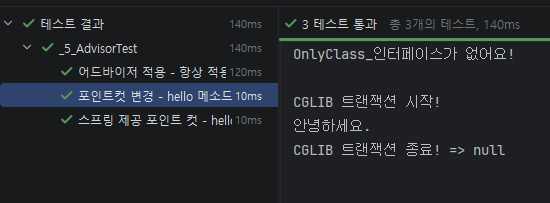
포인트컷, 어드바이스, 어드바이저
- 포인트컷 : 어디에 적용할 것인가? (필터링 로직)
- 어드바이스 : 부가기능 (프록시 로직)
- 어드바이저 : 포인트컷 1개 + 어드바이스 1개
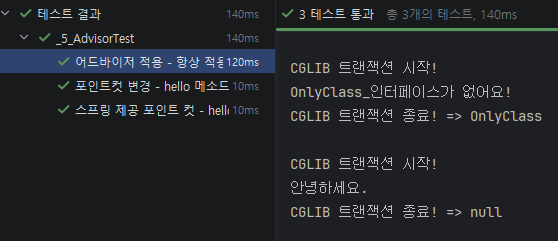
public class _5_AdvisorTest {
    @Test
    @DisplayName("어드바이저 적용 - 항상 적용 포인트컷 + String 트랜잭션 어드바이스")
    void sample1() throws Exception {
        OnlyClass onlyClass = new OnlyClass();
        ProxyFactory proxyFactory = new ProxyFactory(onlyClass);

        // proxyFactory.addAdvice(new StringTransactionAdvice()); 내부 코드를 보면 아래 코드와 똑같다.
        proxyFactory.addAdvisor(
                new DefaultPointcutAdvisor(
                        Pointcut.TRUE, // 항상 적용한다.
                        new StringTransactionAdvice()
                )
        );

        OnlyClass proxy = (OnlyClass) proxyFactory.getProxy();

        proxy.service("OnlyClass");
        proxy.hello();
    }

    @Test
    @DisplayName("포인트컷 변경 - hello 메소드에만 프록시 로직 적용")
    void sample2() throws Exception {
        OnlyClass onlyClass = new OnlyClass();
        ProxyFactory proxyFactory = new ProxyFactory(onlyClass);

        proxyFactory.addAdvisor(
                new DefaultPointcutAdvisor(
                        new MyPointcut(), // 메소드명이 hello일 경우에만 true를 반환한다.
                        new StringTransactionAdvice()
                )
        );

        OnlyClass proxy = (OnlyClass) proxyFactory.getProxy();

        proxy.service("OnlyClass");
        proxy.hello();
    }

    /*
    직접 구현할 일은 별로 없다. Spring에서 제공하는게 있다. 하지만 학습용으로 한 번 만 구현한다
    포인트 컷은 ClassFilter, MethodFilter가 둘 다 true를 반환해야한다.
    */
    static class MyPointcut implements Pointcut {

        // 클래스 조건으로 필터링
        @Override
        public ClassFilter getClassFilter() {
            return ClassFilter.TRUE; // 항상 true를 반환하는 ClassFilter
        }

        // 메소드 조건으로 필터링
        @Override
        public MethodMatcher getMethodMatcher() {
            return new MyMethodMatcher();
        }

        // 메소드명이 hello일 경우에만 true를 반환한다.
        static class MyMethodMatcher implements MethodMatcher {

            @Override
            public boolean matches(Method method, Class<?> targetClass) {
                return method.getName().equals("hello");
            }

            @Override
            public boolean isRuntime() { return false; }
            // isRuntime이 True라면 아래 matches가 호출된다. - 참고만 해라. 직접 구현할 일 없다
            @Override
            public boolean matches(Method method, Class<?> targetClass, Object... args) { return false; }
        }
    }

    @Test
    @DisplayName("스프링 제공 포인트 컷 - hello 메소드에만 프록시 로직 적용")
    void sample3() throws Exception {
        OnlyClass onlyClass = new OnlyClass();
        ProxyFactory proxyFactory = new ProxyFactory(onlyClass);

		// Spring 제공 포인트컷
        NameMatchMethodPointcut pointcut = new NameMatchMethodPointcut();
        pointcut.addMethodName("hello");
        proxyFactory.addAdvisor(
                new DefaultPointcutAdvisor(
                        pointcut,
                        new StringTransactionAdvice()
                )
        );

        OnlyClass proxy = (OnlyClass) proxyFactory.getProxy();

        proxy.service("OnlyClass");
        proxy.hello();
    }
}
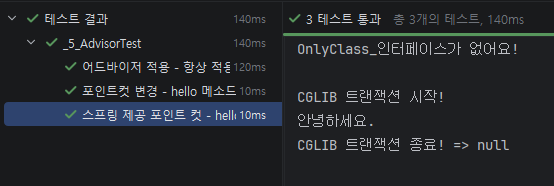
Spring은 이외에도 어노테이션기반, AspectJ 표현식 기반 등등 무수히 많은 포인트컷을 제공해준다.
가장 중요한게 AspectJ 표현식 기반 -> AspectJExpressionPointcut
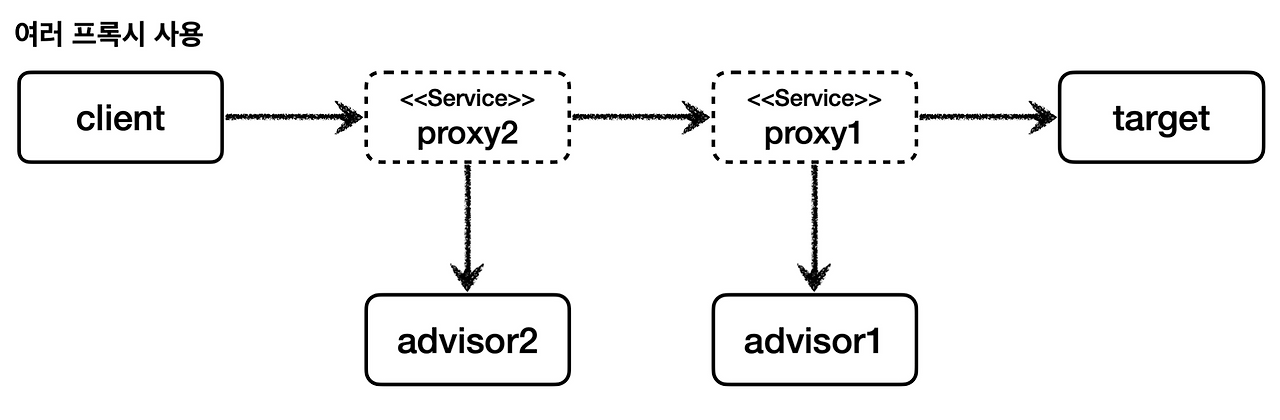
주의) 여러 어드바이저 적용
public class _6_MultiAdvisorTest {
    Advisor advisor1;
    Advisor advisor2;


    @BeforeEach
    void setup() {
        advisor1 = new DefaultPointcutAdvisor(new Advice1());
        advisor2 = new DefaultPointcutAdvisor(new Advice2());
    }

    @Test
    @DisplayName("수동 - 멀티 어드바이저 프록시 -> N개의 프록시 필요")
    void test1() {
        // 프록시를 2번 생성해야 함
        // client -> Advisor2 -> Advisor1 -> target
        BBBInter target = new BBBImpl();

        ProxyFactory proxyFactory1 = new ProxyFactory(target);
        proxyFactory1.addAdvisor(advisor1);
        BBBInter proxy1 = (BBBInter) proxyFactory1.getProxy();

        ProxyFactory proxyFactory2 = new ProxyFactory(proxy1);
        proxyFactory2.addAdvisor(advisor2);
        BBBInter proxy2 = (BBBInter) proxyFactory2.getProxy();

        proxy2.printB();
        /*
        Advisor2
        Advisor1
        BBB!
         */
    }

    @Test
    @DisplayName("스프링 방식 - 멀티 어드바이저 프록시 -> 1개의 프록시에서 Advisor를 직접 호출")
    void test2() {
        // client -> [ Advisor2, Advisor1 ] -> target
        BBBInter target = new BBBImpl();

        ProxyFactory proxyFactory1 = new ProxyFactory(target);
        proxyFactory1.addAdvisor(advisor2); // 순서 주의
        proxyFactory1.addAdvisor(advisor1);
        BBBInter proxy = (BBBInter) proxyFactory1.getProxy();

        proxy.printB();
        /*
        Advisor2
        Advisor1
        BBB!
         */
    }

    static class Advice1 implements MethodInterceptor {
        @Override
        public Object invoke(MethodInvocation invocation) throws Throwable {
            System.out.println("Advisor1");
            return invocation.proceed();
        }
    }

    static class Advice2 implements MethodInterceptor {
        @Override
        public Object invoke(MethodInvocation invocation) throws Throwable {
            System.out.println("Advisor2");
            return invocation.proceed();
        }
    }
}
스프링은 N개의 프록시를 만들지 않고 한 개의 프록시에서 전부 처리한다.
차이를 알아야 한다.
수동으로 만든 프록시
스프링이 만드는 프록시
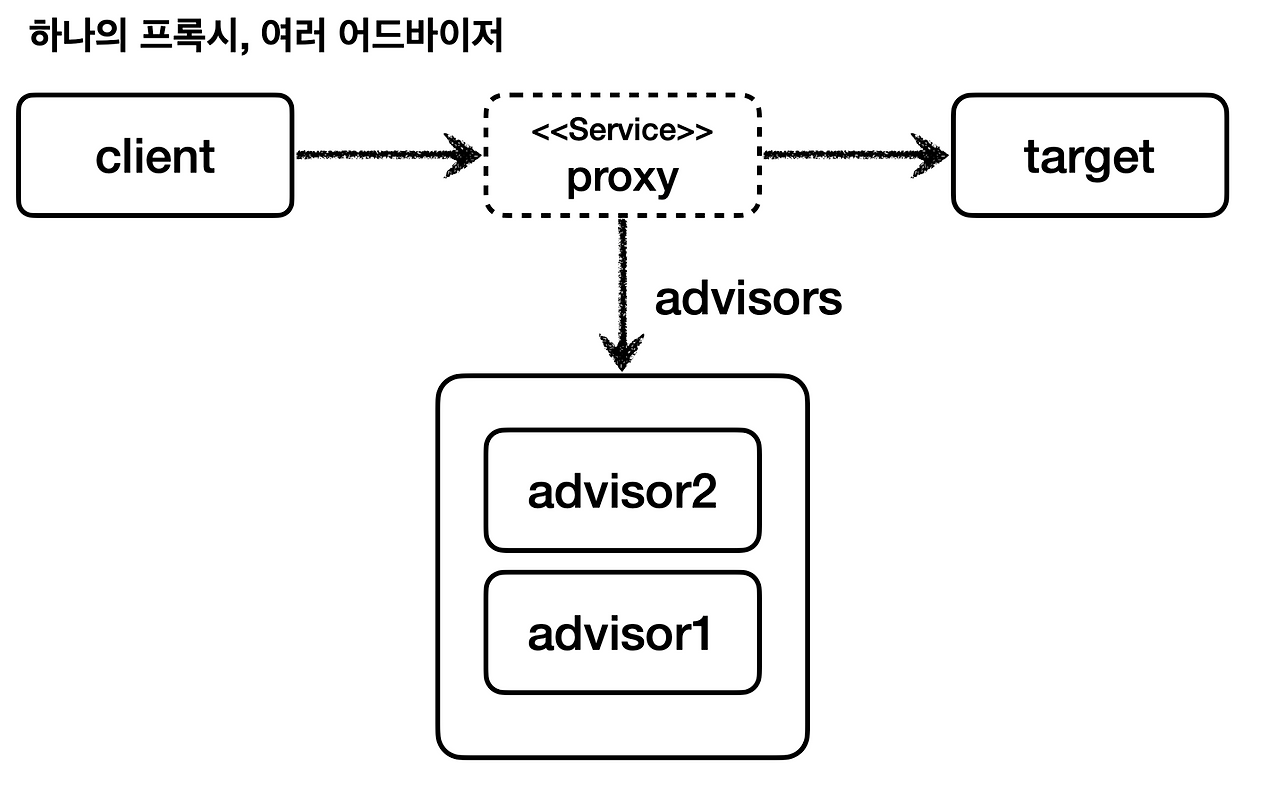
결과는 같지만 성능은 스프링이 더 좋다.
적용된 AOP만큼 프록시가 생성된다고 생각하면 안된다.
하나의 프록시에 여러 어드바이스를 적용한다.
BeanPostProcessor : 객체 바꿔치기
프록시 객체를 만드는데 성공했다면, 이제 실제 객체가 아닌 프록시 객체를 대신 IoC 컨테이너에 등록해야 한다.
이런 작업은 BeanPostProcessor를 통해서 할 수 있다.
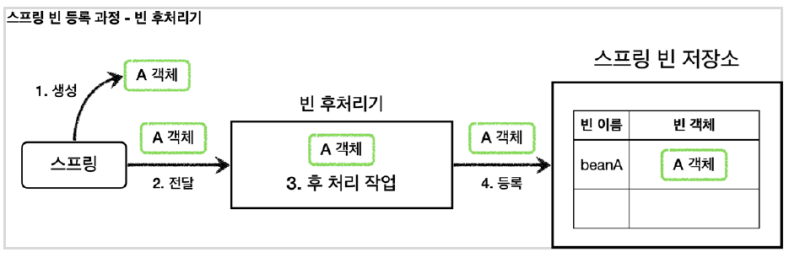
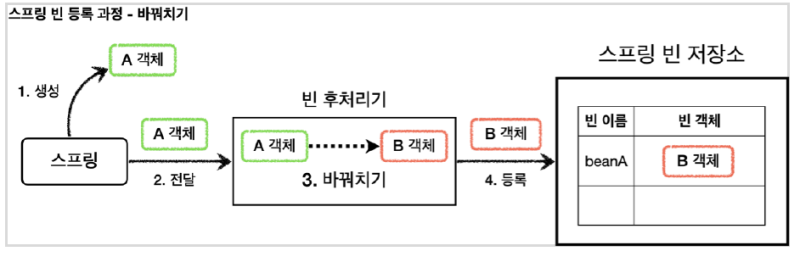
A객체안에 값을 더 넣거나, A객체를 B객체로 바꾸거나 등등 실제 IoC 컨테이너에 넣기 전 작업들을 할 수 있다.
기본 Bean 등록
public class _1_BasicTest {
    @Test
    void test() {
    	// Spring 컨테이너 생성
        ApplicationContext ac =
                new AnnotationConfigApplicationContext(BasicConfig.class);

        A beanA = ac.getBean("beanA", A.class);
        beanA.helloA();

        assertThrows(NoSuchBeanDefinitionException.class, () -> ac.getBean(B.class));

        // hello A
    }

    static class BasicConfig {
        @Bean("beanA")
        public A a() {
            return new A();
        }
    }

    static class A {
        public void helloA() {
            System.out.println("hello A");
        }
    }

    static class B {
        public void helloB() {
            System.out.println("hello B");
        }
    }
}
Bean 객체 바꿔치기
public class _2_AToBTest {
    @Test
    void test() {
        ApplicationContext ac =
                new AnnotationConfigApplicationContext(BasicConfig.class);

        // B로 바꿔치기 됨
        B beanA = ac.getBean("beanA", B.class);
        beanA.helloB();

        // A는 스프링 Bean으로 등록 조차 되지 않음. 그림 참고
        assertThrows(NoSuchBeanDefinitionException.class, () -> ac.getBean(A.class));

        /*
        AToB 프로세서 - 빈 초기화 콜백 전 : beanName=beanA
        A - 빈 초기화 콜백
        AToB 프로세서 - 빈 초기화 콜백 후 : beanName=beanA
        hello B
         */
    }

    static class BasicConfig {
        @Bean("beanA")
        public A a() {
            return new A();
        }

        // 후처리기 로직을 사용하려면 Bean으로 등록하면 된다.
        @Bean
        public AToBBeanPostProcessor beanAToBBeanPostProcessor() {
            return new AToBBeanPostProcessor();
        }
    }

    static class A implements InitializingBean {

        // 지금 의존성에는 @PostConstruct가 없어서 인터페이스를 직접 사용
        @Override
        public void afterPropertiesSet() throws Exception {
            System.out.println("A - 빈 초기화 콜백");
        }

        public void helloA() {
            System.out.println("hello A");
        }
    }

    static class B {
        public void helloB() {
            System.out.println("hello B");
        }
    }

    // org.springframework.beans.factory.config.BeanPostProcessor
    static class AToBBeanPostProcessor implements BeanPostProcessor {
        @Override
        public Object postProcessBeforeInitialization(Object bean, String beanName) throws BeansException {
            System.out.println("AToB 프로세서 - 빈 초기화 콜백 전 : beanName=" + beanName);
            return bean;
        }

        @Override
        public Object postProcessAfterInitialization(Object bean, String beanName) throws BeansException {
            System.out.println("AToB 프로세서 - 빈 초기화 콜백 후 : beanName=" + beanName);
            if(bean instanceof A)
                return new B(); // beanName 그대로 B 객체로 교체됨
            return bean;
        }
    }
}
컴포넌트 스캔 대상의 빈들을 조작할 방법이 없었지만 빈 후처리기를 사용하면 얼마든지 조작할 수 있다. (프록시로...)
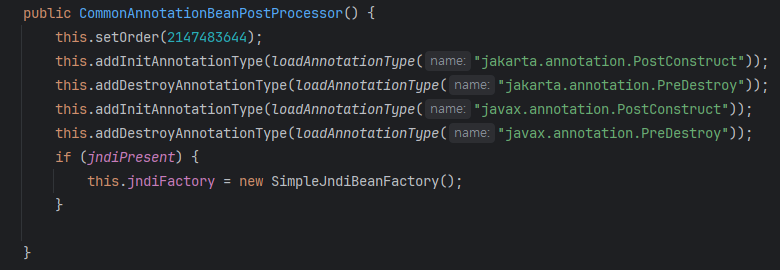
@PostConstruct의 비밀
@PostConstruct가 붙은 메소드를 컨테이너에 등록하기 전에 한 번 호출해주면 된다.
Spring은 CommonAnnotationBeanPostProcessor라는 빈 후처리기를 컨테이너에 등록한다.
그리고 이 빈 후처리기는 @PostConstruct가 붙은 메소드들을 한 번 씩 호출해준다.
즉 @PostConstruct의 작동 비밀은 빈 후처리기다.
org.springframework.context.annotation.CommonAnnotationBeanPostProcessor코드
내용 출처
