지금 진행하고 있는 프로젝트에서는 slack을 사용하지 않고
간단하게 디스코드로 프로젝트를 진행하고 있습니다.
젠킨스의 파이프라인 실행 결과를 디스코드로 확인할 수 있도록 만들어보겠습니다.
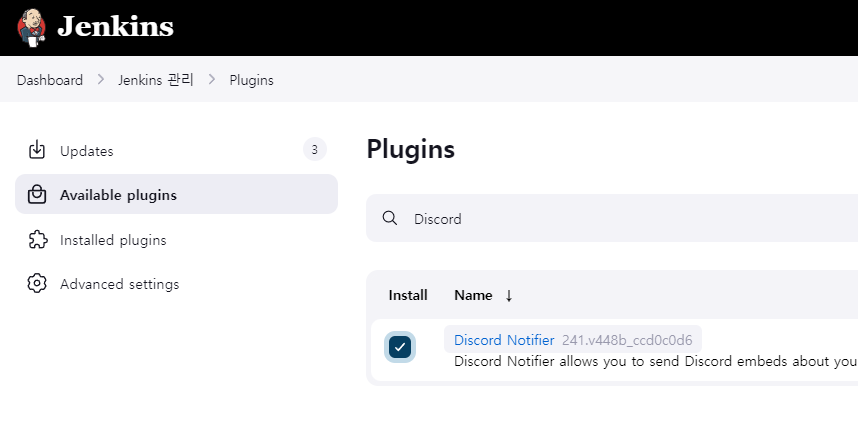
디스코드 플러그인 설치
먼저 젠킨스에 디스코드 플러그인을 설치해줍니다.
Discord Notifier를 설치해주면 됩니다.
디스코드 설정
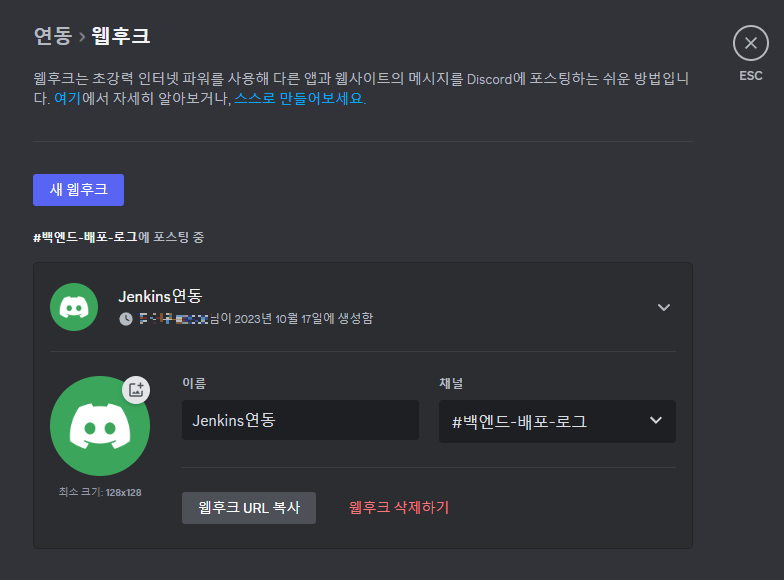
디스코드 연동을 테스트할 디코 젠킨스 연동 테스트 서버를 만들었습니다.
그리고 채팅 채널 백엔드-배포-로그 채널을 만들었습니다.
서버를 우클릭 한 후 서버설정 > 연동을 누른다.

웹훅을 만들어준다.
젠킨스에 웹훅 추가
젠킨스에 들어가서 디스코드에서 만든 웹훅을 Credentials를 추가하면됩니다.
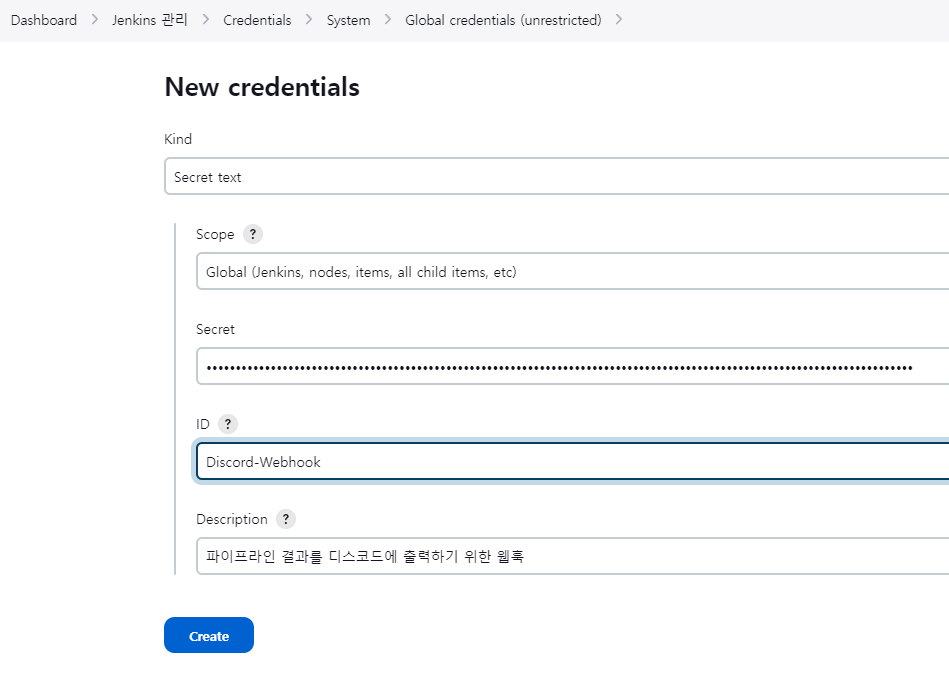
Kind : Secret text
Secret : 복사한 디스코드 웹훅
ID : 파이프라인에서 사용할 임의의 ID(마음대로 적기)
젠킨스 설정
이러한 젠킨스의 빌드 결과를 전송하기 위해서는 post를 사용하면 됩니다.
post
post는 파이프라인이나 stage에서 조건부로 사용할 수 있는 하나의 섹션을 말합니다.
젠킨스에서 Job의 빌드 후처리 동작과 비슷하게 생각하면 됩니다.
pipeline {
    ...
    stages {
        ...
    }
    post {
        always {
            echo '항상 실행'
        }
        success {
            echo '빌드가 성공한 경우 실행'
        }
        failure {
            echo '빌드 실패한 경우 실행'
        }
        unstable {
            echo '빌드 상태 불안한 경우 실행'
        }
        changed {
            echo '현재 빌드상태가 이전 빌드상태와 달라진 경우 실행'
        }
        unsuccessful {
        	echo '성공" 상태가 아닌 경우 실행'
        }
    }
}
이 중에서 필요한 부분만 골라 쓰면 됩니다.
다른 조건들도 있으니 다음 링크를 참고해주세요.
https://www.jenkins.io/doc/book/pipeline/syntax/#post
Discord Notifier 사용법
파이프라인 동작 결과에 따라 디스코드에 출력하기 위해
success, failure, unstable로 디스코드에 출력해보겠습니다.
pipeline {
    agent any

    stages {
		...
    }
    post {
        success {
        	// credentialsId - 아까 설정한 웹훅 ID | variable - 변수명(마음대로 설정)
            withCredentials([string(credentialsId: 'Discord-Webhook', variable: 'DISCORD')]) {
                discordSend description: "설명표시",
                footer: "footer 표시",
                link: env.BUILD_URL, result: currentBuild.currentResult,
                title: "젠킨스 JOB",
                webhookURL: "$DISCORD"
            }
        }
    }
}
Discord Notifier에서는 위와 같이 설정하면 다음과 같은 메시지를 볼 수 있습니다.
이것을 이용해서 보여질 메시지를 설정하면 됩니다.

Discord Notifier에는 이외에도 다른 옵션들도 있으니 다음 링크를 참고해주세요.
https://plugins.jenkins.io/discord-notifier/
최종 파이프라인 설정
pipeline {
    agent any

    stages {
        ...
    }
    post {
        success {
            withCredentials([string(credentialsId: 'Discord-Webhook', variable: 'DISCORD')]) {
                        discordSend description: """
                        제목 : ${currentBuild.displayName}
                        결과 : ${currentBuild.result}
                        실행 시간 : ${currentBuild.duration / 1000}s
                        """,
                        link: env.BUILD_URL, result: currentBuild.currentResult,
                        title: "${env.JOB_NAME} : ${currentBuild.displayName} 성공",
                        webhookURL: "$DISCORD"
            }
        }
        failure {
            withCredentials([string(credentialsId: 'Discord-Webhook', variable: 'DISCORD')]) {
                        discordSend description: """
                        제목 : ${currentBuild.displayName}
                        결과 : ${currentBuild.result}
                        실행 시간 : ${currentBuild.duration / 1000}s
                        """,
                        link: env.BUILD_URL, result: currentBuild.currentResult,
                        title: "${env.JOB_NAME} : ${currentBuild.displayName} 실패",
                        webhookURL: "$DISCORD"
            }
        }
    }
}
Github 관련 정보도 출력 내용에 추가하려 했으나
설정 방법을 찾기 어려워서 지금은 하지 않고 나중에 추가하겠습니다.
출처
https://malwareanalysis.tistory.com/353
https://www.jenkins.io/doc/pipeline/tour/post/
https://velog.io/@seunghyeon/Jenkins-%EC%84%A0%EC%96%B8%EC%A0%81Declarative-%ED%8C%8C%EC%9D%B4%ED%94%84%EB%9D%BC%EC%9D%B8#-post
