DNS 제어하기/웹서버 제어하기/ yum을 이용한 패키지 설치하기/ -j target 사용하기/NAT 설정하기/ comment 모듈/iprange 모듈 (교육 42일차)

체크리스트
o iptables에서 제공하는 테이블과 체인의 종류는 무엇이 있는가?
테이블: filter, nat, mangle, raw, security
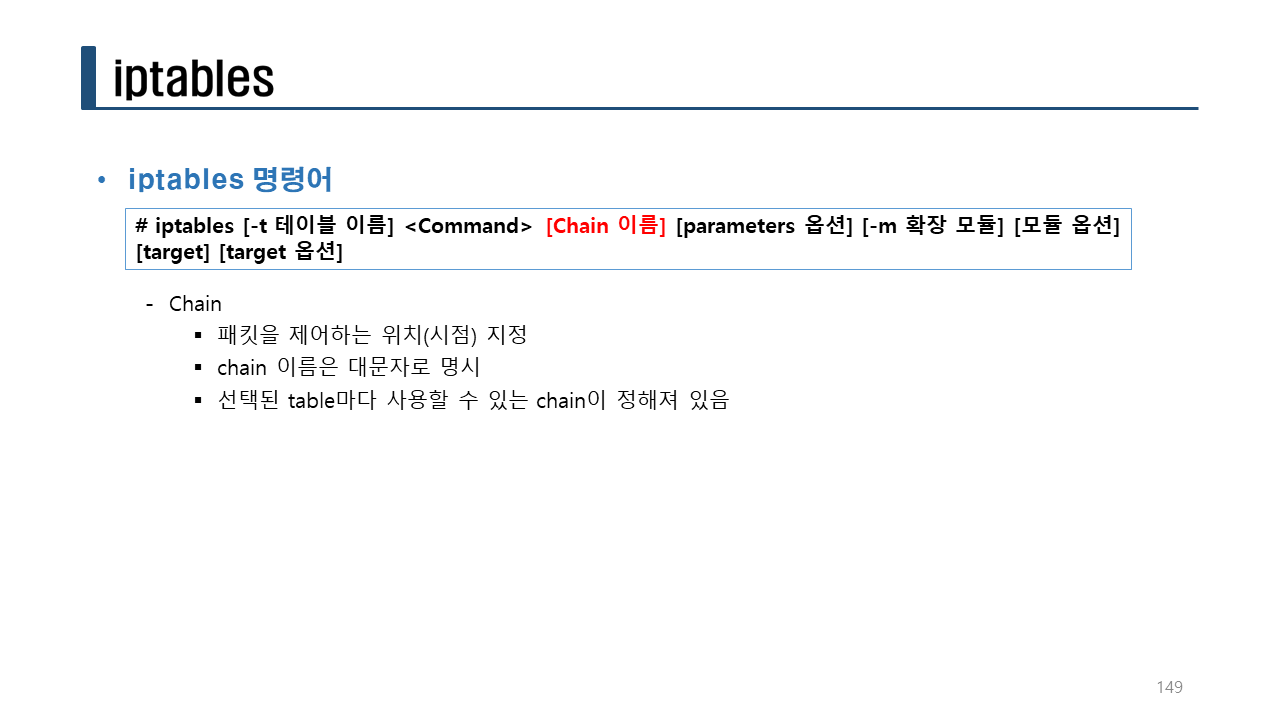
체인: PREROUTING, POSTROUTING, INPUT, FOWARD, OUTPUT
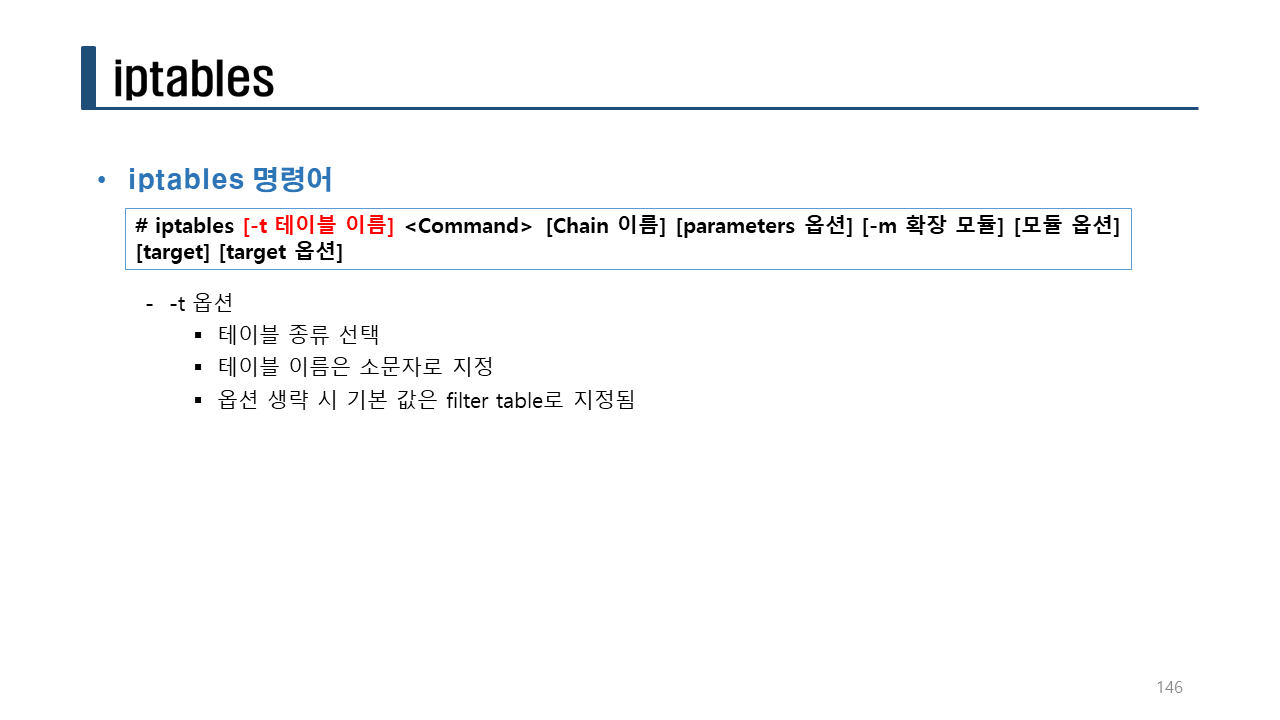
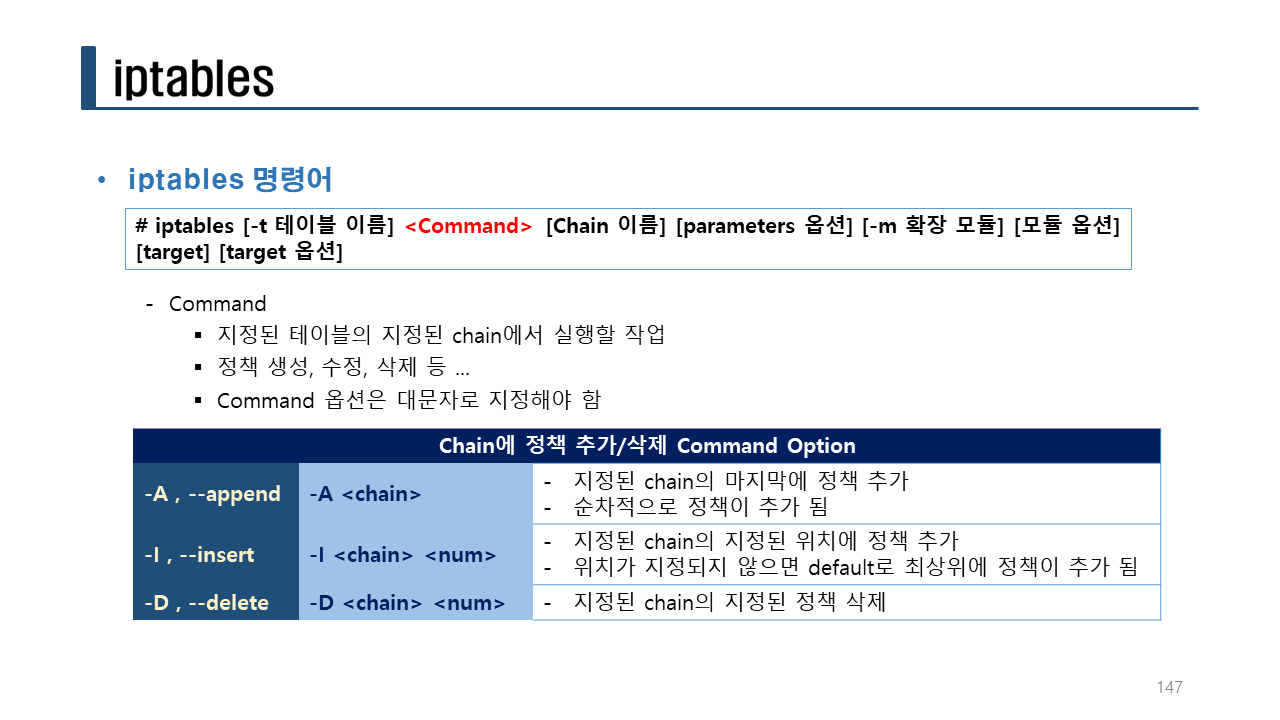
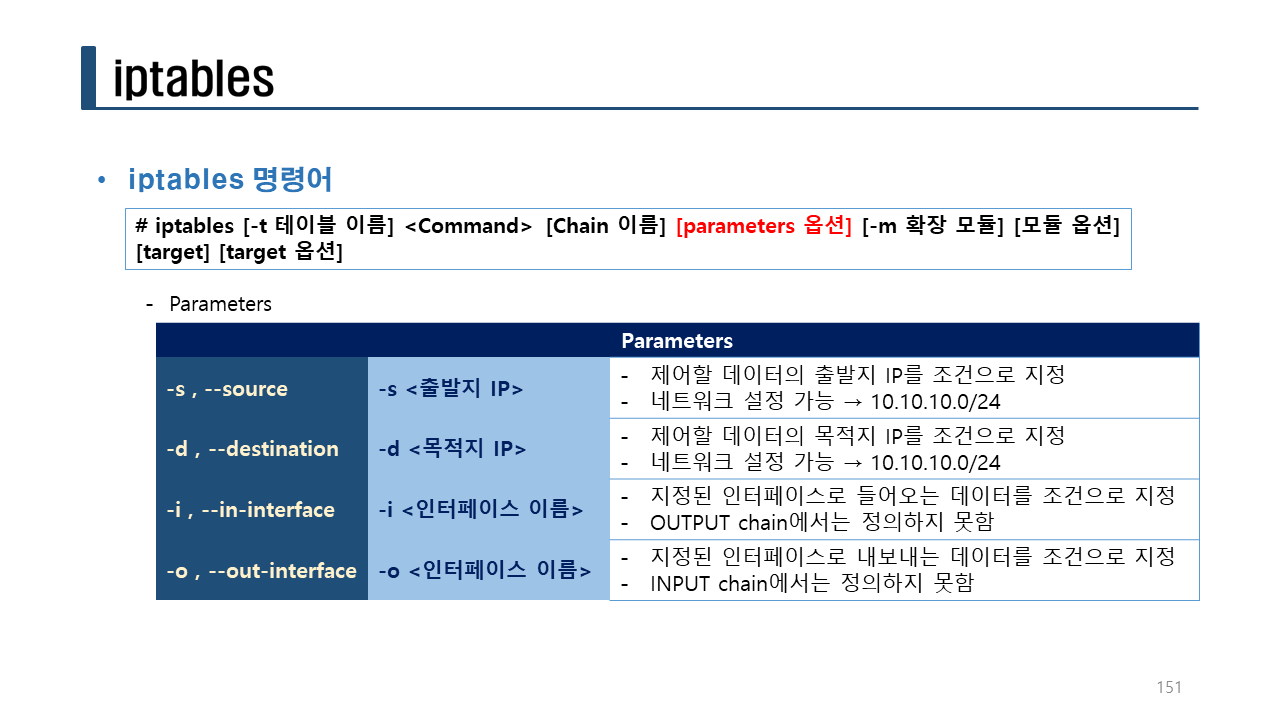
o iptables 에서 룰을 설정하는 명령어 옵션 중 아래 명령어는 무엇인가 ?
-A: 룰 추가 (룰의 마지막에 추가)
-C: 룰 체크
-D: 룰 삭제
-S: 룰 확인
-F: 룰 초기화
-I: 룰 삽입
-N: 사용자 정의 체인 생성
-X: 사용자 정의 체인 삭제
-E: 사용자 정의 체인 이름 변경
-L: 룰 설정 확인
o 외부에서 서버로 패킷이 들어왔을 때 패킷을 필터링하는 테이블은 무엇인가?
filter
o 200.200.200.1에서 ping(echo request)을 거부하는 방화벽 룰 설정은 무엇인가?
iptables -A INPUT -s 200.200.200.1 -p icmp --icmp-type 8 -j DROP
o ssh 서비스를 200.200.200.1만 허용하고 나머지 호스트는 모두 거부하는 방화벽 룰 설정은 무엇인가?
iptables -A INPUT -p tcp --dport 22 -s 200.200.200.1 -j ACCEPT
iptables -A INPUT -p tcp --dport 22 -j DROP
iptables -A INPUT -p tcp --dport 22 ! -s 200.200.200.1 -j DROP
iptables -A INPUT -p tcp --dport 22 -j ACCEPT
o 10.10.10.0/24 전체 네트워크에서 들어오는 패킷을 허용하는 방화벽 룰 설정은 무엇인가?
iptables -A INPUT -s 10.10.10.0/24 -j ACCEPT
실습> DNS 제어하기
1. 네임서버 설정
200.200.200.3에서 네임서버 패키지를 설치하고 설정한다.
200.200.200.3# yum -y install bind bind-chroot net-tools
200.200.200.3# systemctl enable named
200.200.200.3# vi /etc/named.conf
listen-on port 53 { any; };
allow-query { any; };
dnssec-enable no;
dnssec-validation no;
200.200.200.3# systemctl start named
netstat 명령어 옵션
-n: numeric
-l: listening
-t: tcp
-u: udp
-p: program
200.200.200.3# netstat -nltup
200.200.200.3# iptables -F
2. DNS Client 설정
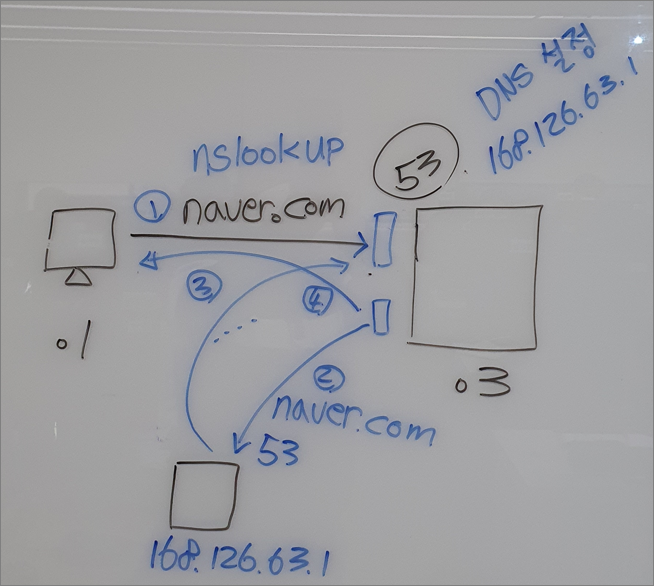
nslookup: 도메인 질의 명령어
nslookup을 실행해서 DNS 서버를 200.200.200.3으로 설정하고 naver.com의 도메인을 검색한다.
C:\Users\user>nslookup
> server 200.200.200.3권한 없는 응답:
이름: naver.com
Addresses: 223.130.195.200
223.130.200.107
223.130.200.104
223.130.195.95
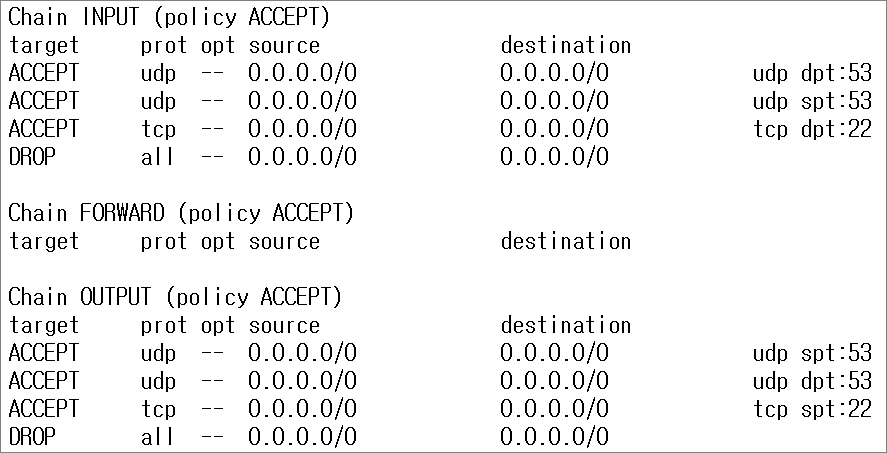
3. 방화벽 설정
200.200.200.3에서 방화벽 룰을 설정한다.
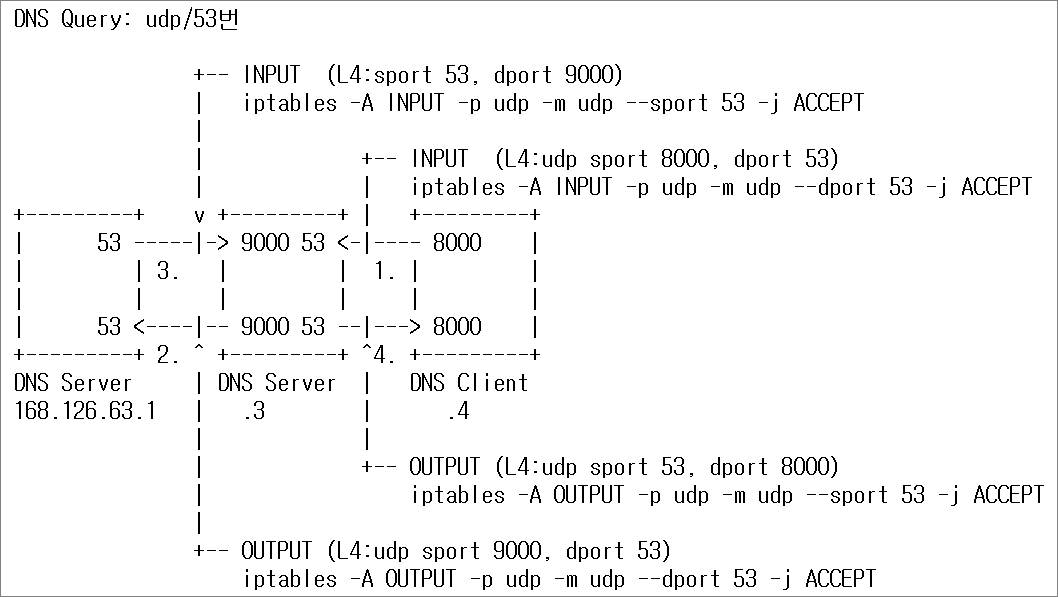
200.200.200.3# iptables -A INPUT -p udp -m udp --dport 53 -j ACCEPT
200.200.200.3# iptables -A INPUT -p udp -m udp --sport 53 -j ACCEPT
200.200.200.3# iptables -A INPUT -p tcp -m tcp --dport 22 -j ACCEPT
200.200.200.3# iptables -A INPUT -j DROP
4. DNS Client 설정
200.200.200.4에서 bind-utils 패키지를 설치한다.
nslookup 명령어는 bind-utils 패키지를 설치해야 사용할 수 있다.
200.200.200.4# yum -y install bind-utils
200.200.200.4# nslookup
> server 200.200.200.3
> naver.com
Server:		200.200.200.3
Address:	200.200.200.3#53
Non-authoritative answer:
Name: naver.com
Address: 223.130.195.95
Name: naver.com
Address: 223.130.200.107
Name: naver.com
Address: 223.130.195.200
Name: naver.com
Address: 223.130.200.104
> daum.net
Server:		200.200.200.3
Address:	200.200.200.3#53
Non-authoritative answer:
Name: daum.net
Address: 121.53.224.15
Name: daum.net
Address: 121.53.105.210
5. 방화벽 설정
서버에서 방화벽 룰을 설정한다.
200.200.200.3# iptables -A OUTPUT -p udp -m udp --sport 53 -j ACCEPT
200.200.200.3# iptables -A OUTPUT -p udp -m udp --dport 53 -j ACCEPT
200.200.200.3# iptables -A OUTPUT -p tcp -m tcp --sport 22 -j ACCEPT
200.200.200.3# iptables -A OUTPUT -j DROP
200.200.200.3# iptables -nL
6. 도메인 질의
200.200.200.4에서 nslookup을 실행해서 nate.com 도메인의 IP주소를 알아올 때
IP 주소가 잘 나오면 방화벽을 잘 설정한 것이다.
200.200.200.4# nslookup
> server 200.200.200.3
Default server: 200.200.200.3
Address: 200.200.200.3#53

> nate.com
Server:		200.200.200.3
Address:	200.200.200.3#53
Non-authoritative answer:
Name: nate.com
Address: 120.50.131.112
실습> 웹서버 제어하기
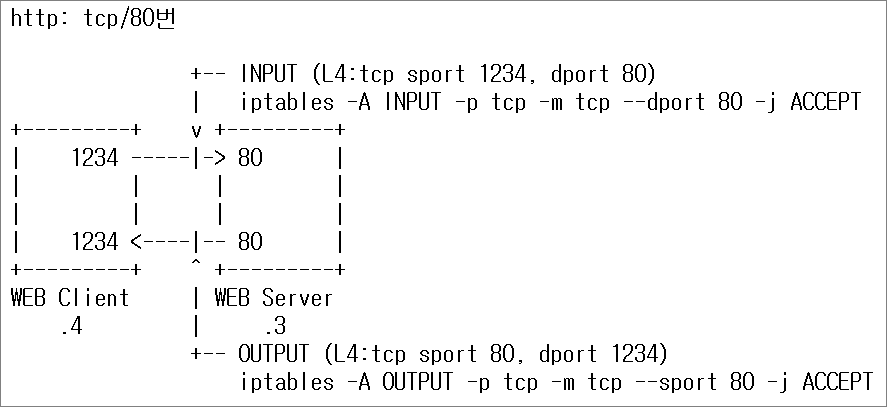
1. 웹서버 설정
200.200.200.3서버에서 설정한다.
iptables -F
yum -y install httpd
systemctl enable httpd
systemctl start httpd
echo Welcome to linux server. > /var/www/html/index.html
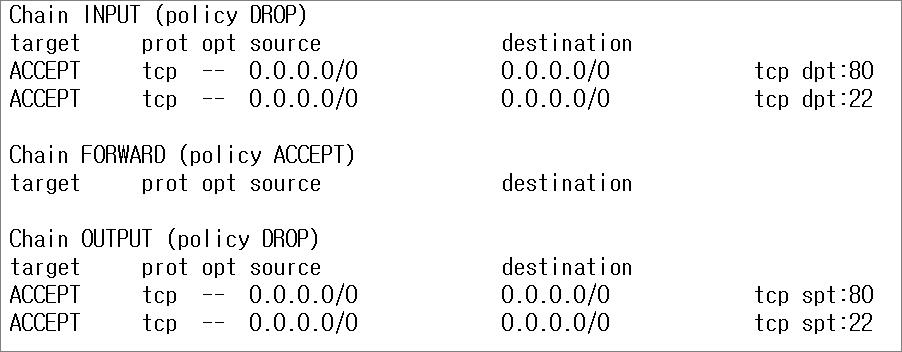
2. 방화벽 설정
INPUT/OUTPUT 체인에 설정한다.
iptables -A INPUT -p tcp -m tcp --dport 80 -j ACCEPT
iptables -A INPUT -p tcp -m tcp --dport 22 -j ACCEPT
iptables -P INPUT DROP
iptables -A OUTPUT -p tcp -m tcp --sport 80 -j ACCEPT
iptables -A OUTPUT -p tcp -m tcp --sport 22 -j ACCEPT
iptables -P OUTPUT DROP
200.200.200.3# iptables -S
-P INPUT DROP
-P FORWARD ACCEPT
-P OUTPUT DROP
-A INPUT -p tcp -m tcp --dport 80 -j ACCEPT
-A INPUT -p tcp -m tcp --dport 22 -j ACCEPT
-A OUTPUT -p tcp -m tcp --sport 80 -j ACCEPT
-A OUTPUT -p tcp -m tcp --sport 22 -j ACCEPT
200.200.200.3# iptables -nL
3. 웹서버 접속
200.200.200.4(WEB Client)에서 WEB Server로 접속해서 웹페이지가 잘 나오는지 확인한다.
200.200.200.4# yum -y install lynx
200.200.200.4# lynx --dump 200.200.200.3
Welcome to linux server.
실습> yum을 이용한 패키지 설치하기
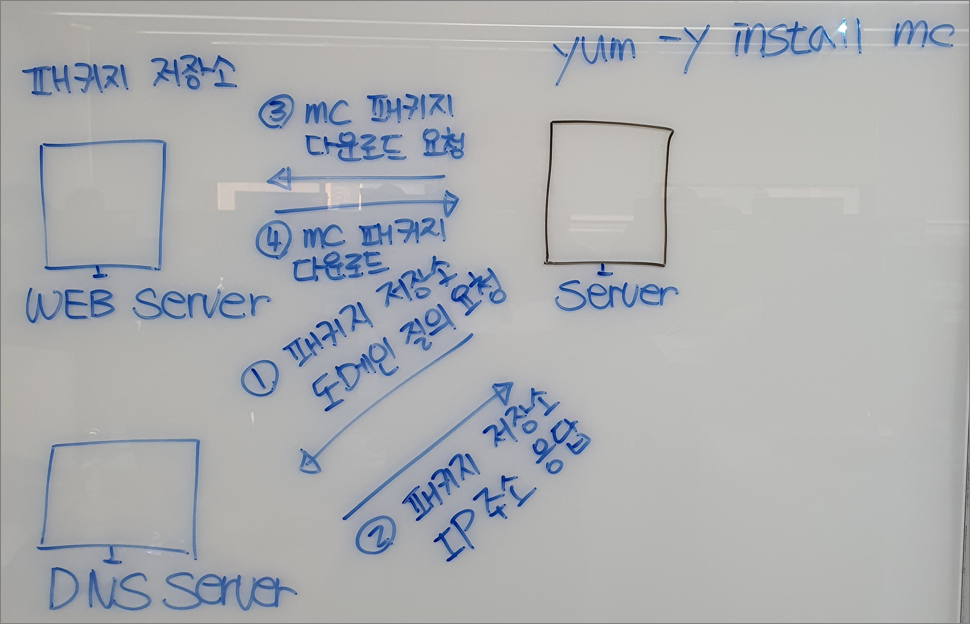
조건
1. 실습> 웹서버 제어하기 이후에 바로 진행한다.
2. 실습> 웹서버 제어하기에서 설정한 방화벽 룰은 그대로 둔다.
3. yum을 이용해서 mc 패키지를 설치할 수 있게 방화벽 룰을 추가로 설정한다.
패키지 저장소는 도메인으로 되어 있다.
-그러므로 DNS 서버에 도메인에 대한 IP주소를 얻어와야 한다.
패키지 저장소는 웹서버로 되어 있다.
-그러므로 웹서버에 접속해서 패키지를 다운로드 받아야 한다.
1. 패키지 설치
mc 패키지를 삭제하고 설치하면 방화벽 때문에 설치가 안된다.
200.200.200.3# rpm -e mc
200.200.200.3# yum -y install mc
2. 방화벽 룰 설정
DNS 요청과 응답에 대한 방화벽 룰을 설정한다.
200.200.200.3# iptables -F
200.200.200.3# iptables -I OUTPUT -p udp --dport 53 -j ACCEPT
200.200.200.3# iptables -I INPUT -p udp --sport 53 -j ACCEPT
웹서버 패키지 요청과 응답에 대한 방화벽 룰을 설정한다.
200.200.200.3# iptables -I OUTPUT -p tcp --dport 80 -j ACCEPT
200.200.200.3# iptables -I INPUT -p tcp --sport 80 -j ACCEPT
3. 방화벽 룰 확인
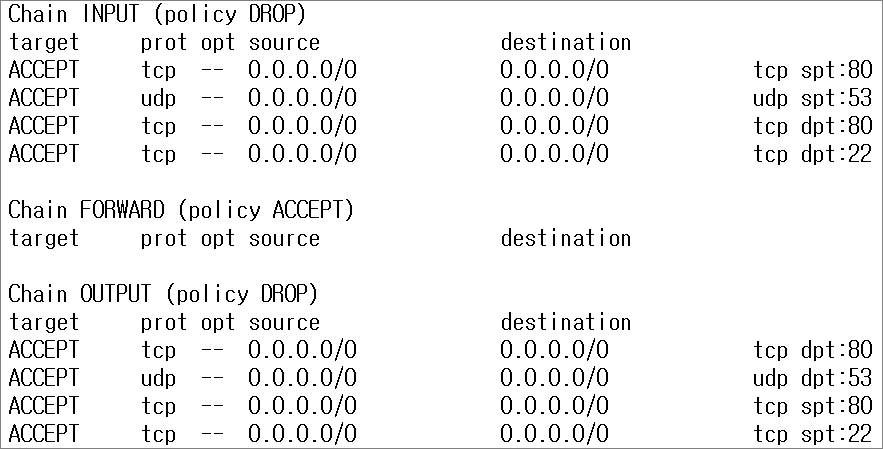
200.200.200.3# iptables -S
-P INPUT DROP
-P FORWARD ACCEPT
-P OUTPUT DROP
-A INPUT -p tcp -m tcp --sport 80 -j ACCEPT
-A INPUT -p udp -m udp --sport 53 -j ACCEPT
-A INPUT -p tcp -m tcp --dport 80 -j ACCEPT
-A INPUT -p tcp -m tcp --dport 22 -j ACCEPT
-A OUTPUT -p tcp -m tcp --dport 80 -j ACCEPT
-A OUTPUT -p udp -m udp --dport 53 -j ACCEPT
-A OUTPUT -p tcp -m tcp --sport 80 -j ACCEPT
-A OUTPUT -p tcp -m tcp --sport 22 -j ACCEPT
200.200.200.3# iptables -nL
4. 패키지 설치
방화벽 룰이 잘 설정되어 있으므로 패키지가 잘 설치된다.
200.200.200.3# yum -y install mc
Loaded plugins: fastestmirror
Loading mirror speeds from cached hostfile
- base: mirror.navercorp.com
- epel: mirror.dimensi.cloud
- extras: mirror.navercorp.com
- updates: mirror.navercorp.com
Resolving Dependencies
--> Running transaction check
---> Package mc.x86_64 1:4.8.7-11.el7 will be installed
--> Finished Dependency Resolution
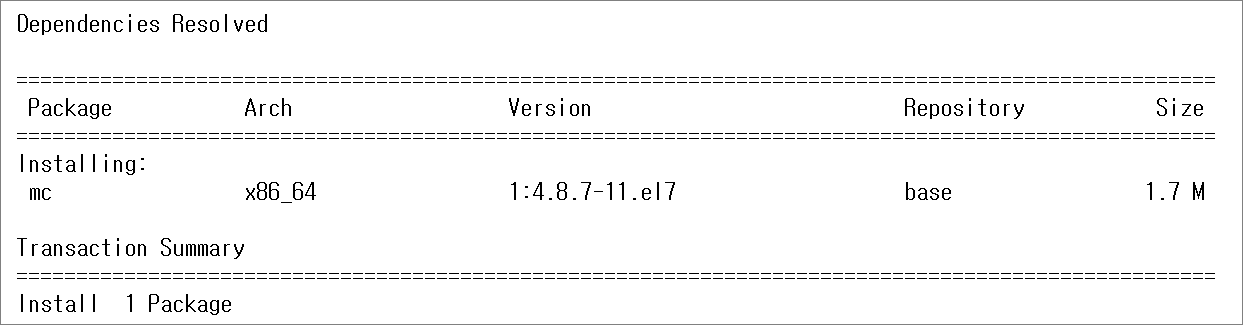
Total download size: 1.7 M
Installed size: 5.6 M
Downloading packages:
Delta RPMs disabled because /usr/bin/applydeltarpm not installed.
mc-4.8.7-11.el7.x86_64.rpm | 1.7 MB 00:00:00
Running transaction check
Running transaction test
Transaction test succeeded
Running transaction
Warning: RPMDB altered outside of yum.
Installing : 1:mc-4.8.7-11.el7.x86_64 1/1
Verifying : 1:mc-4.8.7-11.el7.x86_64 1/1
Installed:
mc.x86_64 1:4.8.7-11.el7
Complete!
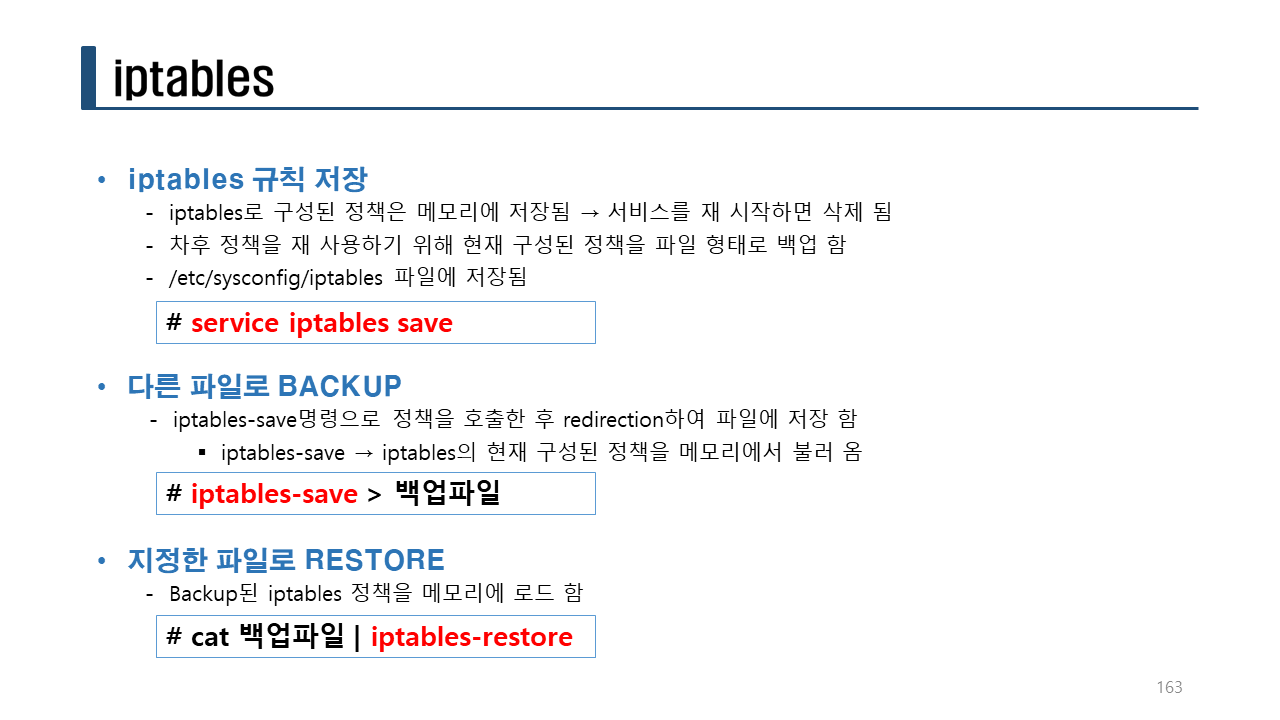
5. 방화벽 룰 저장
현재 설정된 방화벽룰을 패키지설치.rules 파일에 저장한다.
패키지설치.rules 파일에 저장하는 의미는 나중에 활용하기 위해서 저장하는 것이다.
200.200.200.3# iptables-save > 패키지설치.rules
6. 방화벽 룰 초기화
200.200.200.3# iptables -P INPUT ACCEPT
200.200.200.3# iptables -P OUTPUT ACCEPT
200.200.200.3# iptables -F
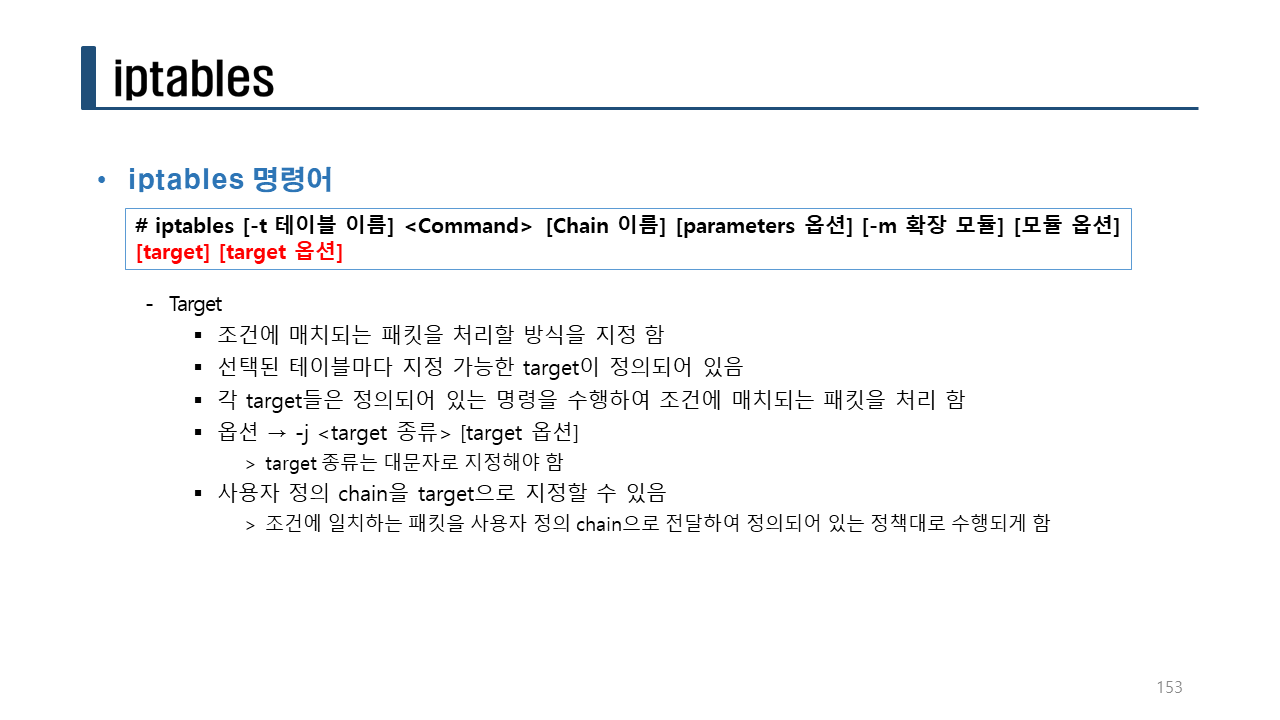
실습> -j target 사용하기
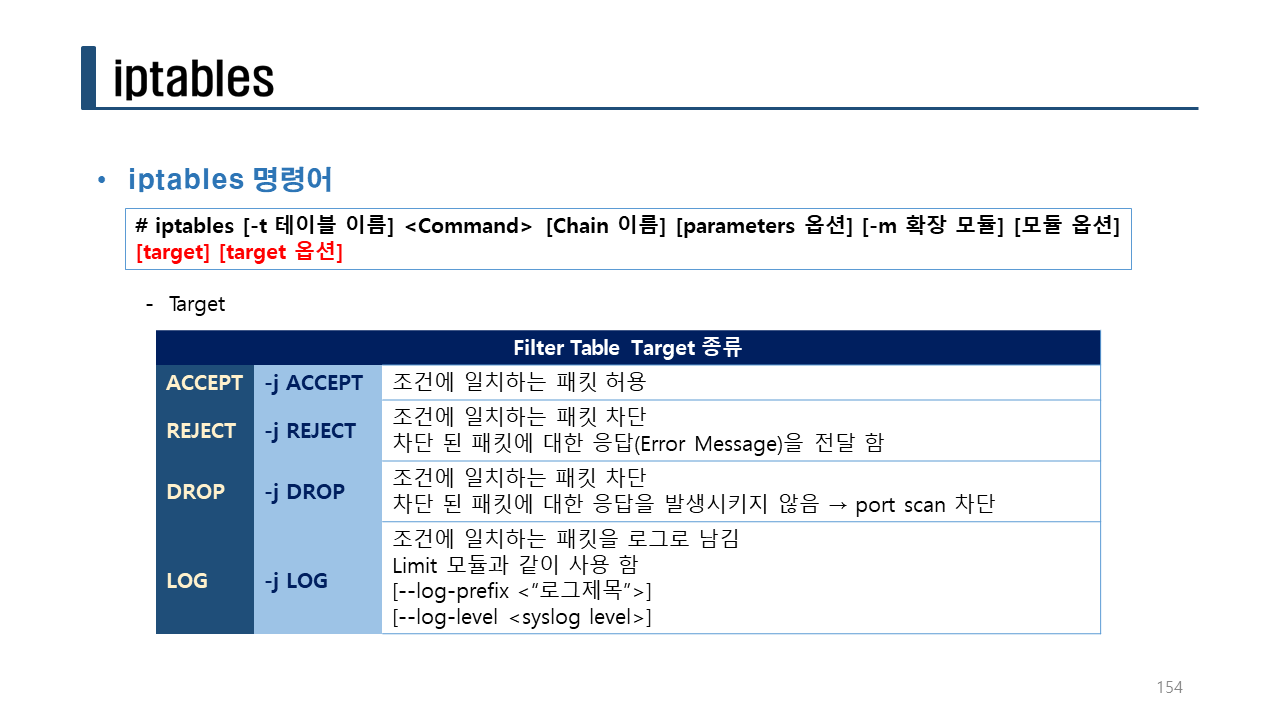
-j ACCEPT: 패킷 허용
-j DROP : 패킷 거부 (REJECT 보다 DROP을 많이 사용한다.)
-j REJECT: 패킷 거부 (응답을 전송)
-j LOG : 로그 기록 (패킷을 거부하지 않고 다음 룰로 진행한다.)
-j <사용자 정의 체인명>: 사용자 정의 체인으로 이동한다.
-j LOG
--log-prefix '로그기록문자열'
--log-level 4 <-- 기본값
💥💥💥 중요!!! -j LOG 는 패킷을 허용/거부를 하지 않고 로그만 기록한다.
💥💥💥 그러므로 -j LOG 다음 줄에 패킷의 허용/거부 룰을 설정한다.
1. LOG 설정
target을 LOG로 설정한다.
200.200.200.3# iptables -F
3 way handshaking
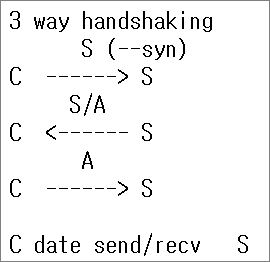
ssh로 처음 접속하는(SYN) 패킷을 로그로 기록한다.
iptables -A INPUT -p tcp -m tcp --dport 22 --syn -j LOG --log-prefix 'SSH SYN PACKET: '

로그파일 /var/log/messages 를 초기화 시키고 실시간 모니터링을 한다.
200.200.200.3# > /var/log/messages
200.200.200.3# tail -f /var/log/messages
C:\Users\user>ssh root@200.200.200.3
root@200.200.200.3's password: ^C
룰에 매칭되면 아래처럼 로그가 기록된다.
200.200.200.3# tail -f /var/log/messages
Jan 17 21:09:28 localhost kernel: SSH SYN PACKET: IN=ens33 OUT= MAC=00:0c:29:cc:b0:b0:00:50:56:c0:00:08:08:00 SRC=200.200.200.1 DST=200.200.200.3 LEN=52 TOS=0x00 PREC=0x00 TTL=128 ID=44806 DF PROTO=TCP SPT=3199 DPT=22 WINDOW=64240 RES=0x00 SYN URGP=0
2. DROP 설정
target을 DROP으로 설정한다.
200.200.200.3# iptables -F
200.200.200.3# iptables -A INPUT -p icmp --icmp-type 8 -j DROP
200.200.200.3# iptables -nvL INPUT

Host OS에서 Server로 ping test를 실시한다.
C:\Users\user>ping 200.200.200.3
Ping 200.200.200.3 32바이트 데이터 사용:
요청 시간이 만료되었습니다.
요청 시간이 만료되었습니다.
요청 시간이 만료되었습니다.
요청 시간이 만료되었습니다.
200.200.200.3에 대한 Ping 통계:
패킷: 보냄 = 4, 받음 = 0, 손실 = 4 (100% 손실),

3. REJECT 설정
target을 REJECT로 설정한다.
Target 을 DROP -> REJECT 로 변경한다.
200.200.200.3# iptables -R INPUT 1 -p icmp --icmp-type 8 -j REJECT
200.200.200.3# iptables -nvL INPUT

C:\Users\user>ping 200.200.200.3
Ping 200.200.200.3 32바이트 데이터 사용:
200.200.200.3의 응답: 대상 포트에 연결할 수 없습니다.
200.200.200.3의 응답: 대상 포트에 연결할 수 없습니다.
200.200.200.3의 응답: 대상 포트에 연결할 수 없습니다.
200.200.200.3의 응답: 대상 포트에 연결할 수 없습니다.
200.200.200.3에 대한 Ping 통계:
패킷: 보냄 = 4, 받음 = 4, 손실 = 0 (0% 손실),
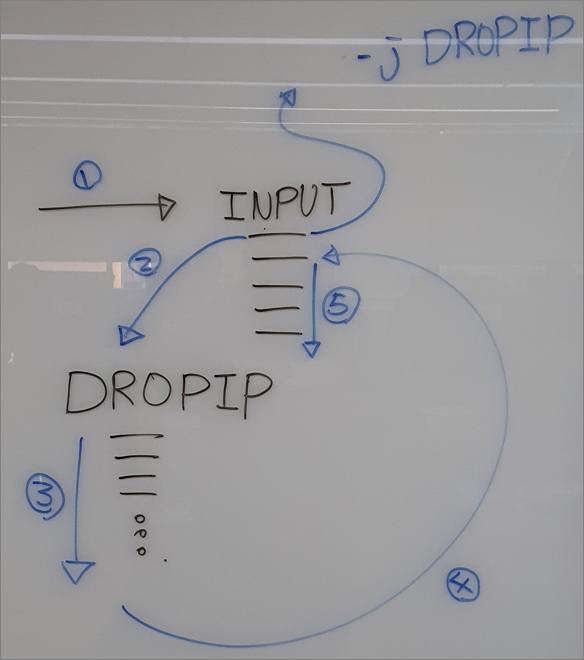
4. 사용자 정의 체인 설정
target을 사용자 정의 체인인 DROPICMP로 설정한다.
원래의 패킷의 흐름
[Host OS] ---> [filter INPUT] ---> [filter OUTPUT]
사용자 정의 체인의 수정된 패킷의 흐름
[Host OS] ---> [filter INPUT] ---> [filter DROPICMP] ---> [filter INPUT] ---> [filter OUTPUT]
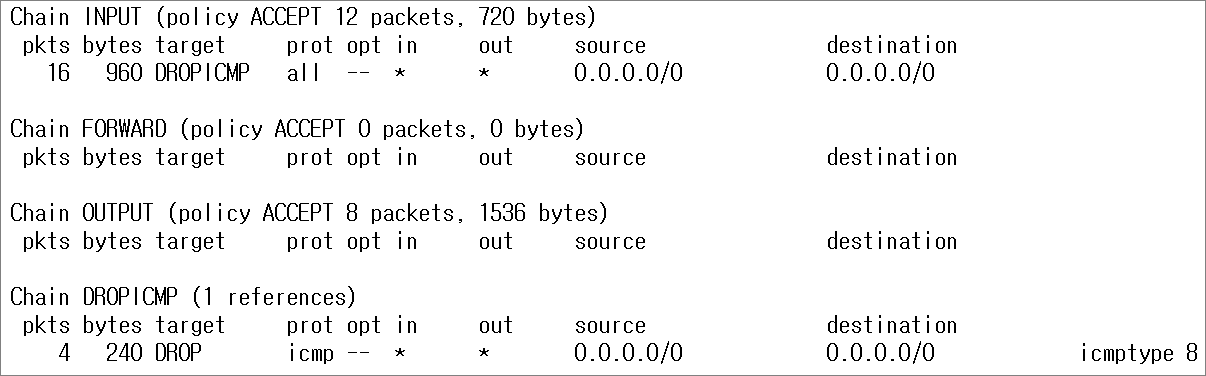
200.200.200.3# iptables -F
200.200.200.3# iptables -N DROPICMP
200.200.200.3# iptables -A INPUT -j DROPICMP
200.200.200.3# iptables -A DROPICMP -p icmp --icmp-type 8 -j DROP
200.200.200.3# iptables -nvL

C:\Users\user>ping 200.200.200.3
Ping 200.200.200.3 32바이트 데이터 사용:
요청 시간이 만료되었습니다.
요청 시간이 만료되었습니다.
요청 시간이 만료되었습니다.
요청 시간이 만료되었습니다.
200.200.200.3에 대한 Ping 통계:
패킷: 보냄 = 4, 받음 = 0, 손실 = 4 (100% 손실),

200.200.200.3# iptables -nvL
200.200.200.3# iptables -F
200.200.200.3# iptables -X DROPICMP
5. LOG 설정2
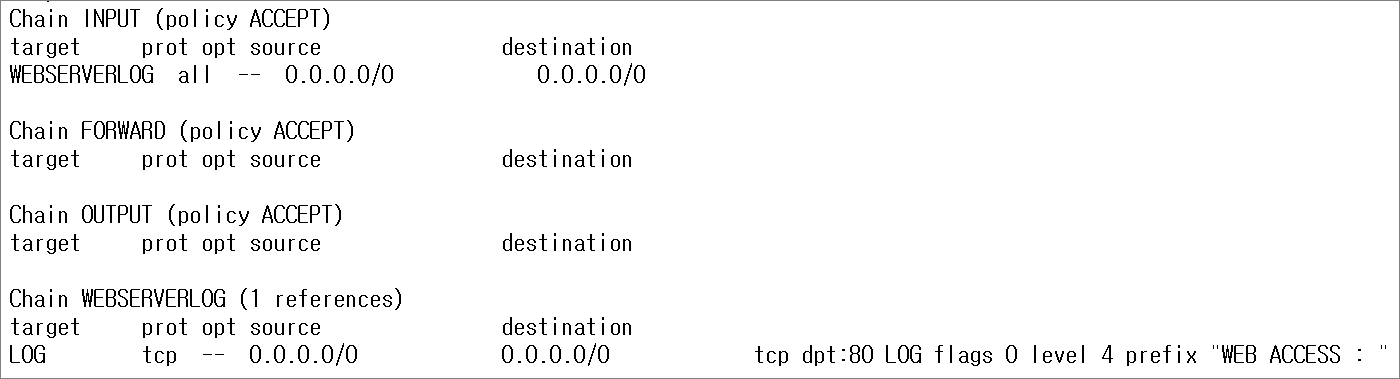
200.200.200.3# iptables -N WEBSERVERLOG
200.200.200.3# iptables -j WEBSERVERLOG -A INPUT
200.200.200.3# iptables -A WEBSERVERLOG -p tcp --dport 80 -j LOG --log-prefix 'WEB ACCESS : '
200.200.200.3# iptables -nL
로그를 실시간 모니터링한다.
200.200.200.3# > /var/log/messages
200.200.200.3# tail -f /var/log/messages
200.200.200.4(WEB Client)에서 WEB Server(200.200.200.3)로 접속한다.
200.200.200.4# lynx --dump 200.200.200.3
Welcome to linux server.
iptables 로그는 아래처럼 /var/log/messages 파일에 저장된다.
200.200.200.3# tail -f /var/log/messages
Jan 17 21:59:09 localhost kernel: WEB ACCESS : IN=ens33 OUT= MAC=00:0c:29:cc:b0:b0:00:50:56:2f:26:e4:08:00 SRC=200.200.200.4 DST=200.200.200.3 LEN=60 TOS=0x00 PREC=0x00 TTL=64 ID=47607 DF PROTO=TCP SPT=42414 DPT=80 WINDOW=29200 RES=0x00 SYN URGP=0
Jan 17 21:59:09 localhost kernel: WEB ACCESS : IN=ens33 OUT= MAC=00:0c:29:cc:b0:b0:00:50:56:2f:26:e4:08:00 SRC=200.200.200.4 DST=200.200.200.3 LEN=52 TOS=0x00 PREC=0x00 TTL=64 ID=47608 DF PROTO=TCP SPT=42414 DPT=80 WINDOW=229 RES=0x00 ACK URGP=0
Jan 17 21:59:09 localhost kernel: WEB ACCESS : IN=ens33 OUT= MAC=00:0c:29:cc:b0:b0:00:50:56:2f:26:e4:08:00 SRC=200.200.200.4 DST=200.200.200.3 LEN=254 TOS=0x00 PREC=0x00 TTL=64 ID=47609 DF PROTO=TCP SPT=42414 DPT=80 WINDOW=229 RES=0x00 ACK PSH URGP=0
Jan 17 21:59:09 localhost kernel: WEB ACCESS : IN=ens33 OUT= MAC=00:0c:29:cc:b0:b0:00:50:56:2f:26:e4:08:00 SRC=200.200.200.4 DST=200.200.200.3 LEN=52 TOS=0x00 PREC=0x00 TTL=64 ID=47610 DF PROTO=TCP SPT=42414 DPT=80 WINDOW=237 RES=0x00 ACK URGP=0
Jan 17 21:59:09 localhost kernel: WEB ACCESS : IN=ens33 OUT= MAC=00:0c:29:cc:b0:b0:00:50:56:2f:26:e4:08:00 SRC=200.200.200.4 DST=200.200.200.3 LEN=52 TOS=0x00 PREC=0x00 TTL=64 ID=47611 DF PROTO=TCP SPT=42414 DPT=80 WINDOW=237 RES=0x00 ACK FIN URGP=0
설정이 완료되면 방화벽 룰을 모두 초기화 한다.
200.200.200.3# iptables -F
200.200.200.3# iptables -X WEBSERVERLOG
실습> NAT 설정하기
이 실습을 진행하기 위해서는 최소 리눅스 2대가 필요하다.
nat 테이블
-POSTROUTING : Source NAT(SNAT) 타겟과 매칭되어 내부 네트워크에서 방화벽을 통해 외부로 나갈 때 사용
-PREROUTING : Destination NAT(DNAT)타겟과 매칭되어 주로 외부에서 방화벽 내부 서버로 향하는 패킷을 포워딩 할 때 사용
-OUTPUT : nat 테이블을 빠져 나갈때 사용
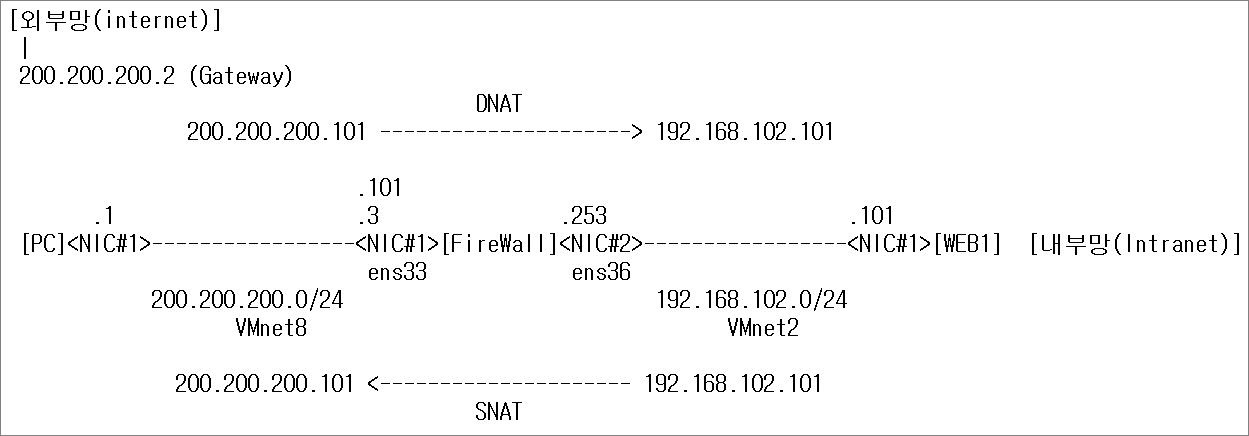
1. 네트워크 설정
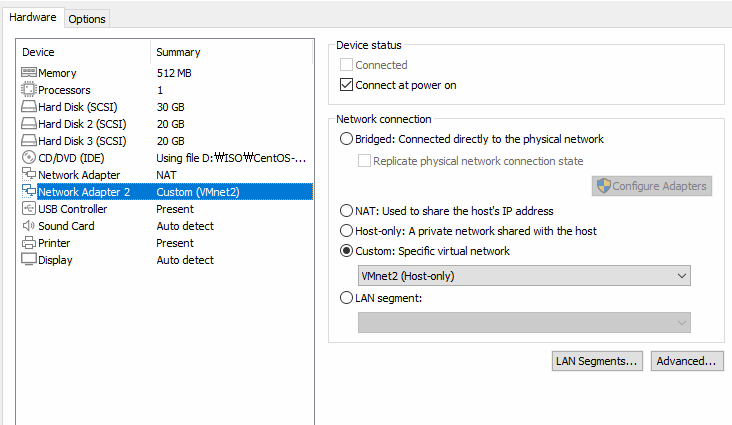
NIC 1개를 추가해서 아래와 같이 설정한다.
방화벽의 리눅스 서버를 설정한다.
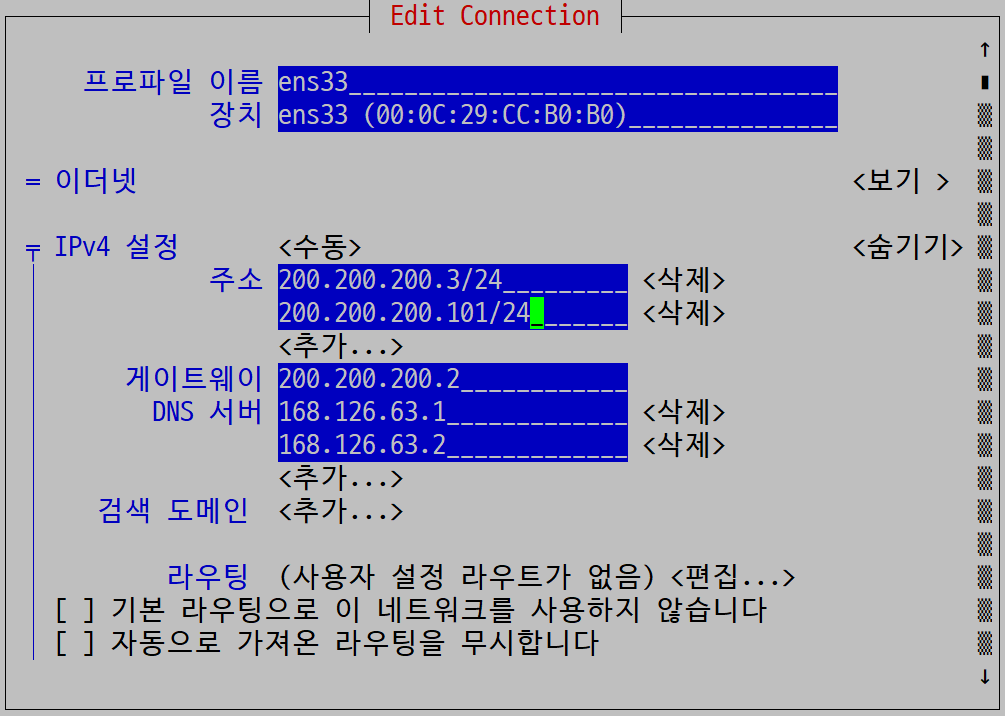
Firewall Hostname: firewall.server.com
VMname: firewall
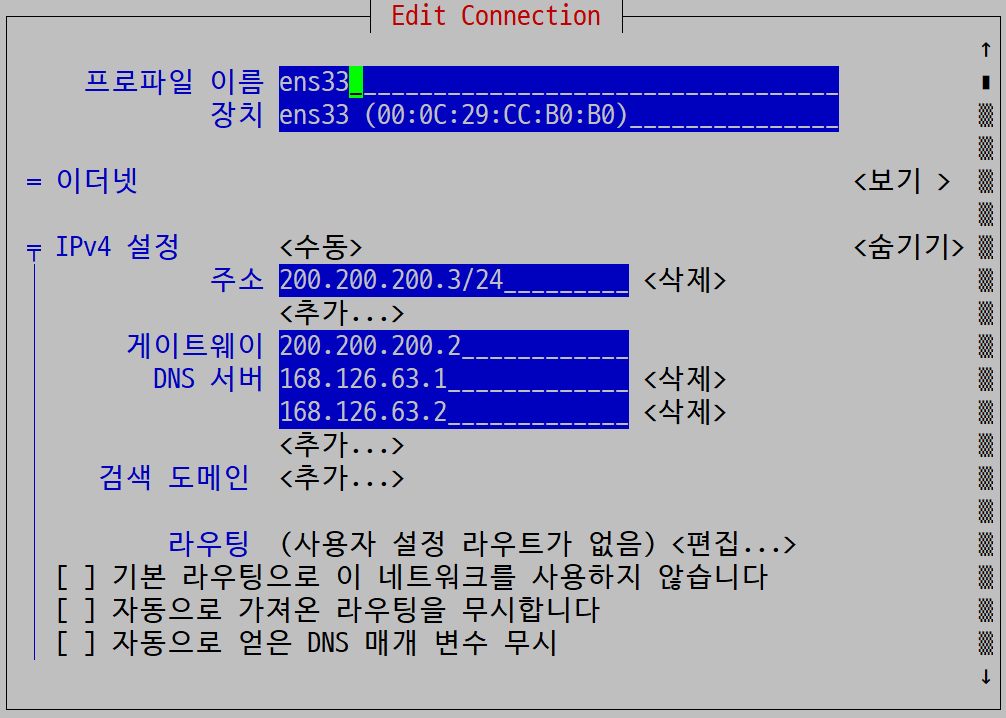
ens33 (VMnet8)
IPv4 CONFIGURATION: Manual
IP Addresses: 200.200.200.3/24, 200.200.200.101/24
Gateway: 200.200.200.2
DNS Servers: 168.126.63.1, 168.126.63.2
[x]Automatically connect
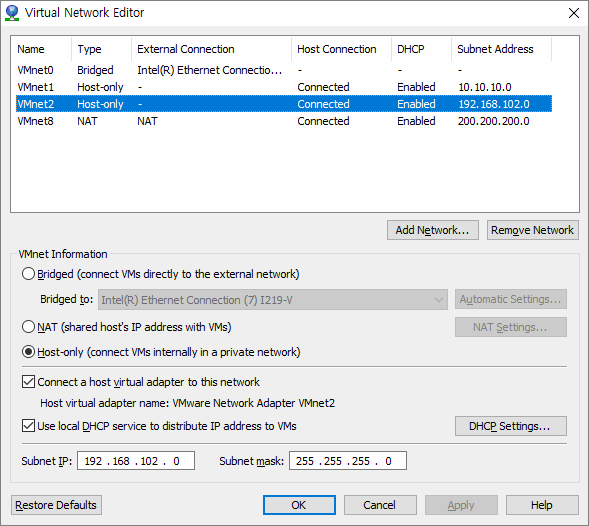
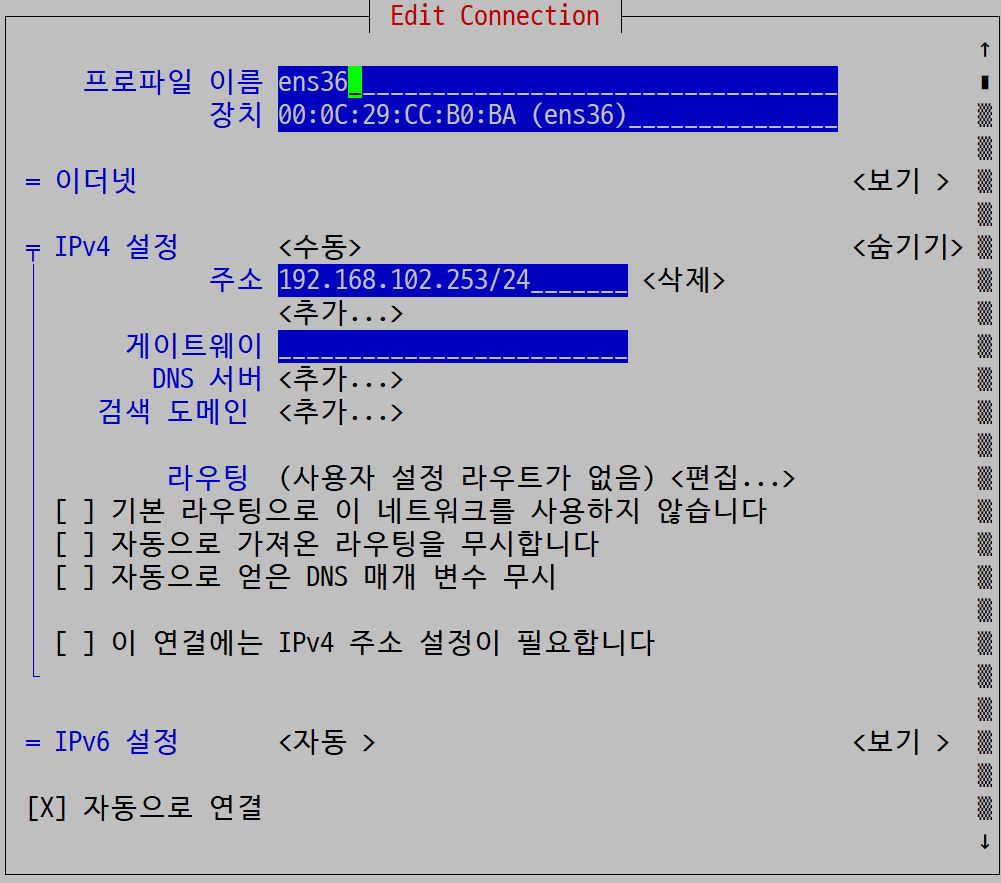
ens36 (VMnet2)
IPv4 CONFIGURATION: Manual
IP Addresses: 192.168.102.253/24
Gateway: X
DNS Servers:X
[x]Automatically connect
네트워크를 재시작하고 로그아웃하고 다시 로그인한다.
[root@localhost ~]# systemctl restart network
[root@localhost ~]# exit
[root@firewall ~]# ip a
[root@firewall ~]# ip r
방화벽 내부의 리눅스 서버를 설정한다.
WEB1 Hostname: web1.server.com
VMname: web1
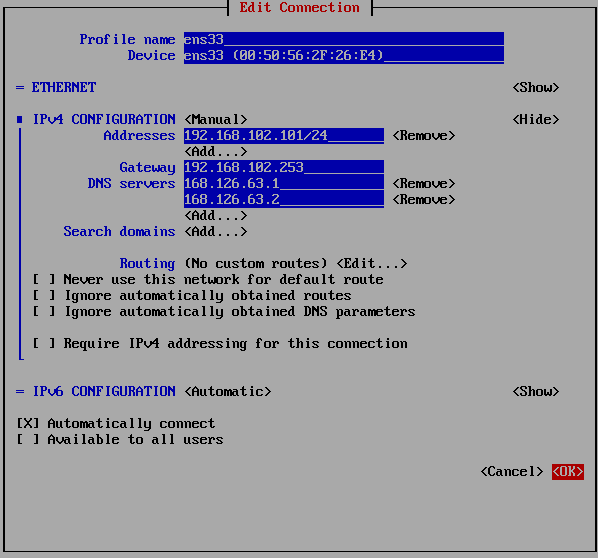
ens33 (VMnet2)
IPv4 CONFIGURATION: Manual
IP Addresses: 192.168.102.101/24
Gateway: 192.168.102.253
DNS Servers: 168.126.63.1, 168.126.63.2
[x]Automatically connect
네트워크를 재시작하고 로그아웃하고 다시 로그인한다.
[root@localhost ~]# systemctl restart network
[root@localhost ~]# exit
[root@web1 ~]# ip a
[root@web1 ~]# ip r
2. 추가 설정
호스트명에 해당하는 IP주소를 /etc/hosts 파일에 설정한다.
[root@firewall ~]# vi /etc/hosts
127.0.0.1 localhost localhost.localdomain localhost4 localhost4.localdomain4
::1 localhost localhost.localdomain localhost6 localhost6.localdomain6
200.200.200.3 firewall.server.com
200.200.200.1 hostos
호스트명에 해당하는 IP주소를 /etc/hosts 파일에 설정한다.
[root@web1 ~]# vi /etc/hosts
127.0.0.1 localhost localhost.localdomain localhost4 localhost4.localdomain4
::1 localhost localhost.localdomain localhost6 localhost6.localdomain6
192.168.102.101 web1.server.com
192.168.102.1 hostos
200.200.200.1 hostos
3. 방화벽 설정
firewall 에서 아래 방화벽 설정을 한다.
systemctl stop firewalld
systemctl disable firewalld
yum -y install iptables-services
systemctl enable iptables
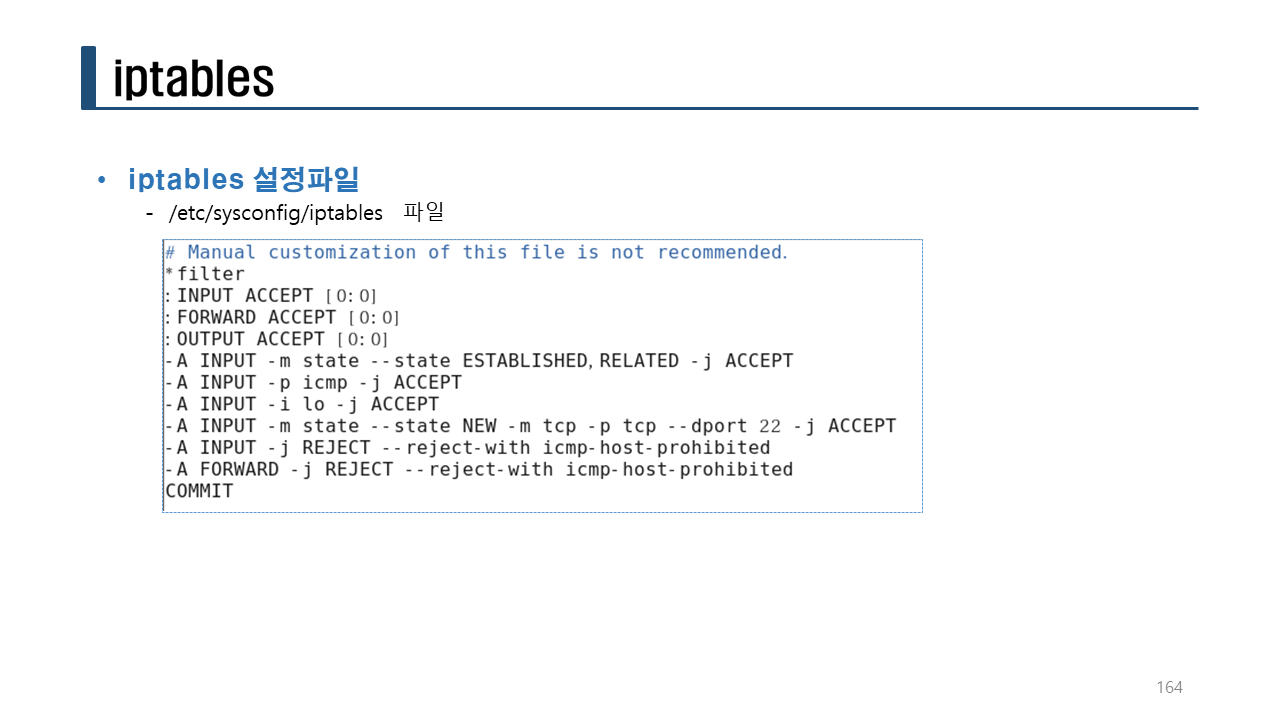
> /etc/sysconfig/iptablessystemctl start iptables
systemctl status iptables
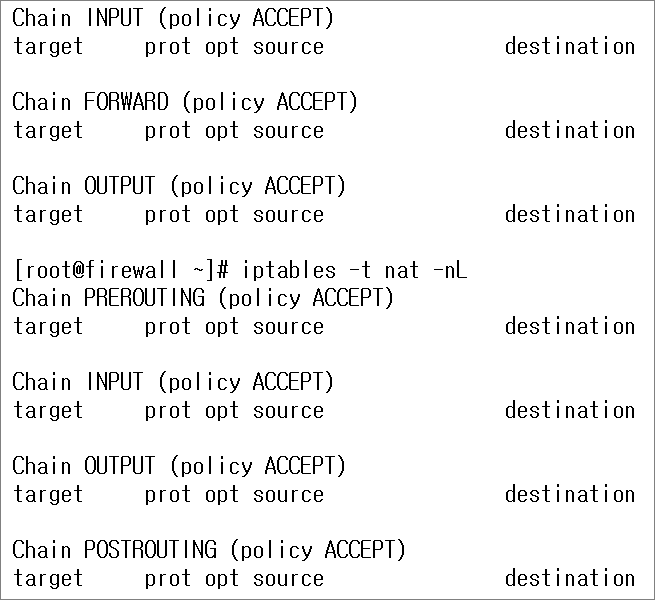
iptables -F
[root@firewall ~]# iptables -t filter -nL
4. NAT 설정 1 (내부망 -> 외부망)
외부망에서 200.200.200.101 서버로 접속을 하면 방화벽 안쪽에 내부망에 있는 웹서버(WEB1)로 돌려주는 설정이다.
NAT(Network Address Translation)는 주소 변환 기술이다.
iptables에서 NAT를 설정하기 위해서는 nat 테이블에서 설정한다.
방화벽에서 NAT기술을 사용하기 위해서는 아래 2가지를 설정한다.
1. 주소 변환
-출발지 주소 변환 : SNAT, MASQUERADE (내부망 -> 외부망)
-목적지 주소 변환 : DNAT (외부망 -> 내부망)
2. 포워딩 설정
-/proc/sys/net/ipv4/ip_forward : 커널 파라미터를 이용해서 1로 설정한다.
-0: 포워딩 거부, 1: 포워딩 허용
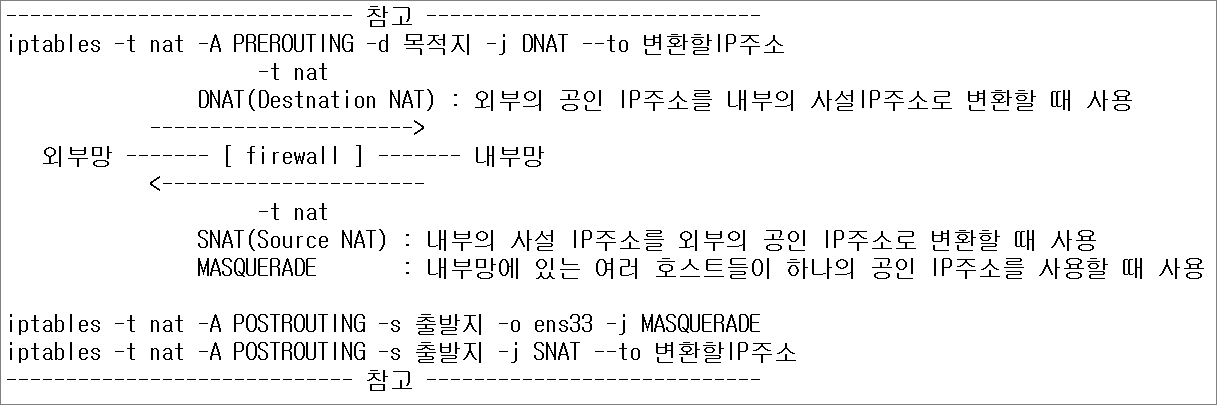
포트 포워딩 형식 :
iptables -t nat -A PREROUTING -d 목적지 -p tcp --dport 포트번호 -j DNAT --to 포워딩IP:포트
iptables -t nat -A PREROUTING -d 목적지 -j DNAT --to 포워딩IP
ex)
iptables -t nat -A PREROUTING -d 200.200.200.101 -p tcp --dport 80 -j DNAT --to 192.168.102.101:80
설명 :
-t nat : 주소변환 테이블인 nat 테이블을 사용한다.
-A PREROUTING : 외부에서 내부로 들어오는 패킷은 nat 테이블의 PREROUTING 체인을 사용한다.
-d : 목적지 IP주소는 200.200.200.101 을 사용한다.
-p tcp : 프로토콜은 tcp 프로토콜을 사용한다.
--dport 80 : 목적지 포트는 80번으로 사용한다.
-j DNAT : 목적지를 주소를 변경한다.
--to(--to-destination) 192.168.102.101:80 : 변경할 목적지는 192.168.102.101의 80포트로 설정한다.
nat 테이블
-POSTROUTING : Source NAT(SNAT) 타겟과 매칭되어 내부 네트워크에서 방화벽을 통해 외부로 나갈 때 사용
-PREROUTING : Destination NAT(DNAT)타겟과 매칭되어 주로 외부에서 방화벽 내부 서버로 향하는 패킷을 포워딩 할 때 사용
-OUTPUT : nat 테이블을 빠져 나갈때 사용
ping test로 확인한다.
[root@firewall ~]# ping -c 4 8.8.8.8
PING 8.8.8.8 (8.8.8.8) 56(84) bytes of data.
64 bytes from 8.8.8.8: icmp_seq=1 ttl=128 time=46.1 ms
64 bytes from 8.8.8.8: icmp_seq=2 ttl=128 time=46.6 ms
64 bytes from 8.8.8.8: icmp_seq=3 ttl=128 time=46.3 ms
64 bytes from 8.8.8.8: icmp_seq=4 ttl=128 time=46.0 ms
--- 8.8.8.8 ping statistics ---
4 packets transmitted, 4 received, 0% packet loss, time 3005ms
rtt min/avg/max/mdev = 46.037/46.314/46.662/0.320 ms
[root@web1 ~]# ping -c 4 192.168.102.101
PING 192.168.102.101 (192.168.102.101) 56(84) bytes of data.
64 bytes from 192.168.102.101: icmp_seq=1 ttl=64 time=0.030 ms
64 bytes from 192.168.102.101: icmp_seq=2 ttl=64 time=0.052 ms
64 bytes from 192.168.102.101: icmp_seq=3 ttl=64 time=0.064 ms
64 bytes from 192.168.102.101: icmp_seq=4 ttl=64 time=0.086 ms
--- 192.168.102.101 ping statistics ---
4 packets transmitted, 4 received, 0% packet loss, time 2999ms
rtt min/avg/max/mdev = 0.030/0.058/0.086/0.020 ms
[root@web1 ~]# ping -c 4 200.200.200.3
PING 200.200.200.3 (200.200.200.3) 56(84) bytes of data.
64 bytes from 200.200.200.3: icmp_seq=1 ttl=64 time=0.824 ms
64 bytes from 200.200.200.3: icmp_seq=2 ttl=64 time=0.312 ms
64 bytes from 200.200.200.3: icmp_seq=3 ttl=64 time=0.324 ms
64 bytes from 200.200.200.3: icmp_seq=4 ttl=64 time=0.322 ms
--- 200.200.200.3 ping statistics ---
4 packets transmitted, 4 received, 0% packet loss, time 3001ms
rtt min/avg/max/mdev = 0.312/0.445/0.824/0.219 ms
[root@web1 ~]# ping -c 4 8.8.8.8
PING 8.8.8.8 (8.8.8.8) 56(84) bytes of data.
<-- 통신이 안된다.
--- 8.8.8.8 ping statistics ---
4 packets transmitted, 0 received, 100% packet loss, time 2999ms
방화벽의 NAT 룰을 설정한다.
내부망에 WEB1이 외부망에 있는 8.8.8.8 과 통신이 되기 위해서는 firewall에서 NAT 변환을 해야 한다.
형식: iptables -t nat -A POSTROUTING -s 출발지 -o ens33 -j MASQUERADE
출발지 주소가 192.168.102.101 이면 외부로 나갈 수 있도록 주소를 변환(MASQUERADE)해서 ens33쪽 인터페이스로 내보낸다.
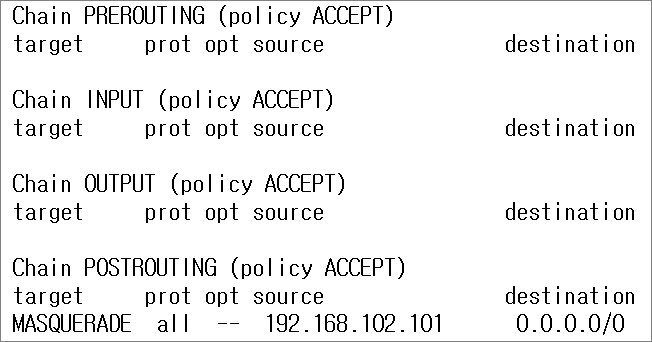
[root@firewall ~]# iptables -t nat -A POSTROUTING -s 192.168.102.101 -o ens33 -j MASQUERADE
[root@firewall ~]# iptables -t nat -nL
패킷 포워딩한다.
임시적으로 포워딩 설정: echo 1 > /proc/sys/net/ipv4/ip_forward
영구적으로 포워딩 설정: /etc/sysctl.conf 수정
패킷을 포워딩하는 임시적으로 설정한다.
[root@firewall ~]# echo 1 > /proc/sys/net/ipv4/ip_forward
NAT 설정 후 8.8.8.8에 ping 통신을 하면 통신이 잘되는 것을 확인할 수 있다.
[root@web1 ~]# ping -c 4 8.8.8.8
PING 8.8.8.8 (8.8.8.8) 56(84) bytes of data.
64 bytes from 8.8.8.8: icmp_seq=1 ttl=127 time=47.5 ms
64 bytes from 8.8.8.8: icmp_seq=2 ttl=127 time=48.0 ms
64 bytes from 8.8.8.8: icmp_seq=3 ttl=127 time=46.5 ms
64 bytes from 8.8.8.8: icmp_seq=4 ttl=127 time=47.1 ms
--- 8.8.8.8 ping statistics ---
4 packets transmitted, 4 received, 0% packet loss, time 3006ms
rtt min/avg/max/mdev = 46.558/47.336/48.002/0.595 ms
5. NAT 설정 2 (외부망 -> 내부망)
외부망에서 목적지 주소가 200.200.200.101로 firewall로 패킷이 들어오면
라우팅하기 수행하기 전에 목적지 주소를 192.168.102.101로 IP주소를 변환(L3헤더를 수정)한다.
[root@firewall ~]# iptables -t nat -F
[root@firewall ~]# iptables -t nat -A PREROUTING -d 200.200.200.101 -j DNAT --to 192.168.102.101
[root@firewall ~]# iptables -t nat -A POSTROUTING -s 192.168.102.101 -j SNAT --to 200.200.200.101
[root@firewall ~]# iptables -t nat -nL
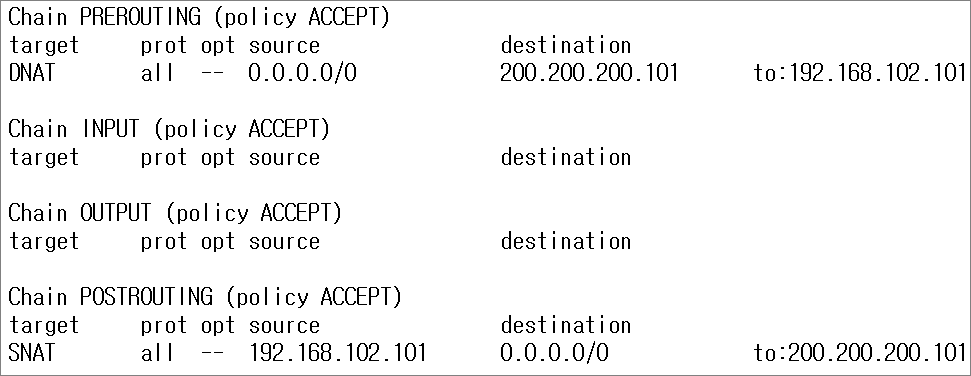
[root@firewall ~]# iptables -t nat -S
-P PREROUTING ACCEPT
-P INPUT ACCEPT
-P OUTPUT ACCEPT
-P POSTROUTING ACCEPT
-A PREROUTING -d 200.200.200.101/32 -j DNAT --to-destination 192.168.102.101
-A POSTROUTING -s 192.168.102.101/32 -j SNAT --to-source 200.200.200.101
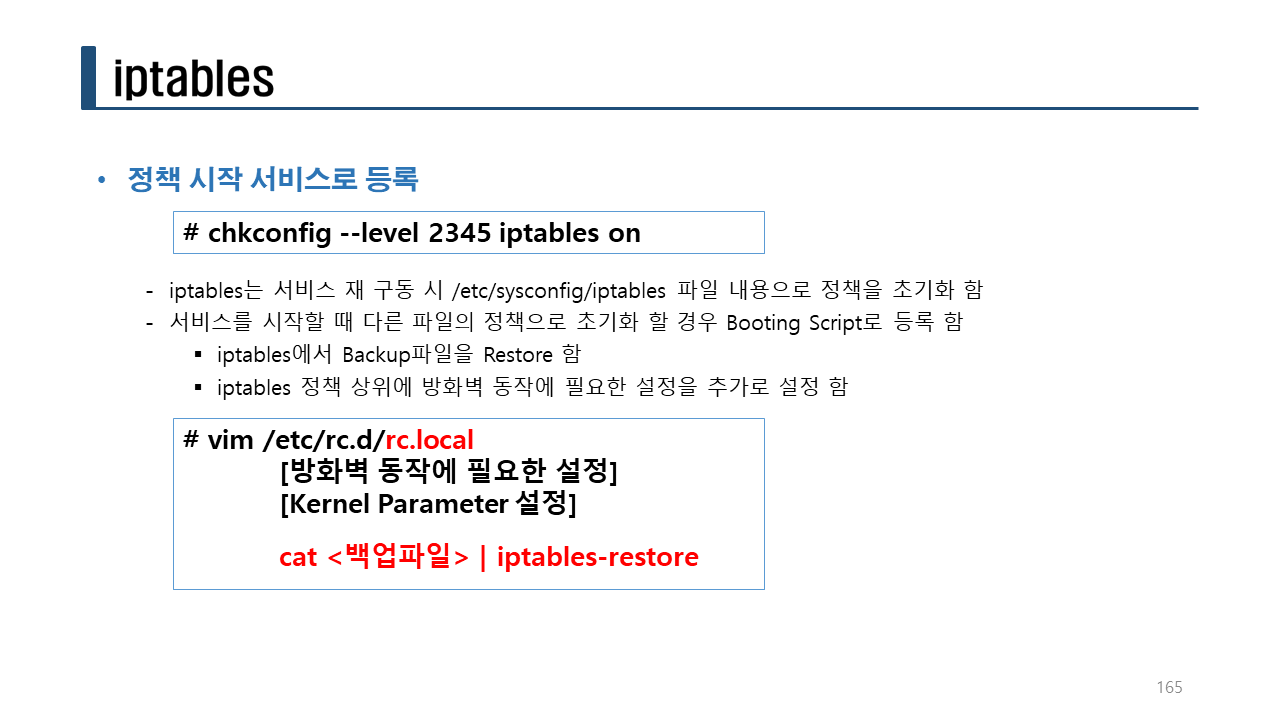
현재 설정된 방화벽 룰(정책)을 부팅 후에도 자동으로 설정될 수 있도록 설정파일에 저장한다.
[root@firewall ~]# iptables-save > /etc/sysconfig/iptables
패킷을 포워딩하는 영구적으로 설정한다.
[root@firewall ~]# vi /etc/sysctl.conf
net.ipv4.ip_forward=1
[root@firewall ~]# sysctl -p
net.ipv4.ip_forward = 1
[root@firewall ~]# cat /proc/sys/net/ipv4/ip_forward
1
6. 웹서버 설치
외부망과 통신이 되는지 확인한다.
만약에 통신이 안되면 설정을 확인해야 한다.
[root@web1 ~]# ping -c 4 8.8.8.8
PING 8.8.8.8 (8.8.8.8) 56(84) bytes of data.
64 bytes from 8.8.8.8: icmp_seq=1 ttl=127 time=47.1 ms
64 bytes from 8.8.8.8: icmp_seq=2 ttl=127 time=46.8 ms
64 bytes from 8.8.8.8: icmp_seq=3 ttl=127 time=46.8 ms
64 bytes from 8.8.8.8: icmp_seq=4 ttl=127 time=47.4 ms
--- 8.8.8.8 ping statistics ---
4 packets transmitted, 4 received, 0% packet loss, time 3006ms
rtt min/avg/max/mdev = 46.803/47.067/47.478/0.344 ms
firewall이 네트워크 방화벽 역할을 하므로 WEB1 서버의 자체 호스트 방화벽은 모두 중지한다.
[root@web1 ~]# systemctl stop firewalld
[root@web1 ~]# systemctl disable firewalld
웹서버를 설치한다.
[root@web1 ~]# yum -y install httpd
[root@web1 ~]# systemctl enable httpd
[root@web1 ~]# systemctl start httpd
[root@web1 ~]# echo Welcome to 192.168.102.101 server. > /var/www/html/index.html
7. 웹서버 접속
웹서버로 접속해서 내부망의 WEB1의 내용이 나오면 성공이다.
http://200.200.200.101/
Welcome to 192.168.102.101 server.
###################
📌 iptables moule 📌
###################
iptables 모듈 디렉터리: /usr/lib64/xtables
실습> comment 모듈
방화벽 룰에 설명문을 설정하는 모듈
형식:
-m comment --comment 설명문
-m comment --comment '설명문 입니다'
1. 모듈 확인
[root@firewall ~]# ls /usr/lib64/xtables/
libxt_comment.so
[root@firewall ~]# iptables -m comment --help
:
:(생략)
comment match options:
--comment COMMENT Attach a comment to a rule
2. 모듈을 이용한 룰 설정
comment 모듈을 사용한다.
/usr/lib64/xtables/ 디렉터리에 comment 모듈 파일이 있기 때문에 룰이 정상적으로 설정된다.
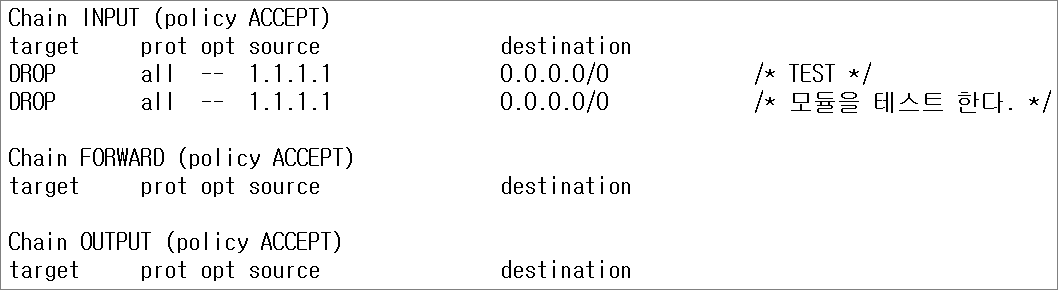
[root@firewall ~]# iptables -F
[root@firewall ~]# iptables -A INPUT -s 1.1.1.1/32 -m comment --comment TEST -j DROP
[root@firewall ~]# iptables -nL
실습> iprange 모듈
방화벽 룰에 IP주소의 범위를 설정하는 모듈
형식:
-m iprange --src-range ip[-ip]
-m iprange --dst-range ip[-ip]
1. 모듈 확인
[root@firewall ~]# ls /usr/lib64/xtables/
libxt_iprange.so
[root@firewall ~]# iptables -m iprange --help
:
:(생략)
iprange match options:
[!] --src-range ip[-ip] Match source IP in the specified range
[!] --dst-range ip[-ip] Match destination IP in the specified range
2. 모듈을 이용한 룰 설정
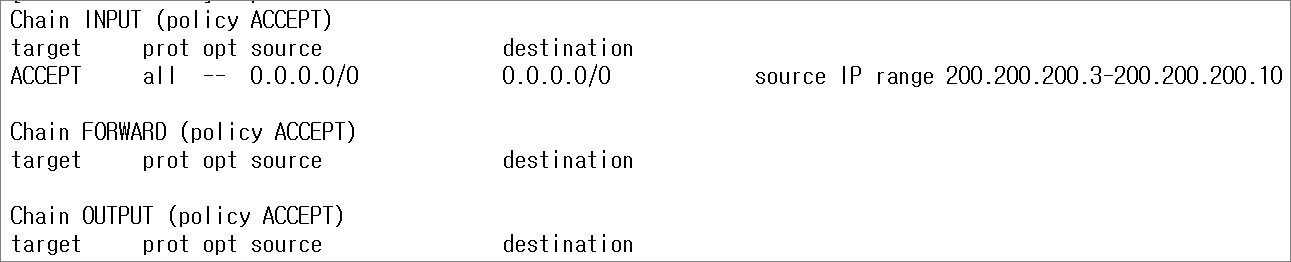
200.200.200.3 ~ 200.200.200.10 까지 ip주소를 등록한다.
[root@firewall ~]# iptables -F
[root@firewall ~]# iptables -A INPUT -m iprange --src-range 200.200.200.3-200.200.200.10 -j ACCEPT
[root@firewall ~]# iptables -nL
3. hping3 설치
[root@firewall ~]# yum -y install epel-release
[root@firewall ~]# yum -y install hping3
[root@firewall ~]# hping3 200.200.200.3 -a 200.200.200.10 -c 1 -1
HPING 200.200.200.3 (ens33 200.200.200.3): icmp mode set, 28 headers + 0 data bytes
--- 200.200.200.3 hping statistic ---
1 packets transmitted, 0 packets received, 100% packet loss
round-trip min/avg/max = 0.0/0.0/0.0 ms
[root@firewall ~]# iptables -nvL

