방화벽 이해하기 (iptables, ACL) (교육 17일차)
실습> 방화벽 이해하기
CentOS 7 에서 방화벽 패키지
iptables-service
firewalld
1. firewalld 중지
firewalld를 중지하고 재부팅을 해도 다시 올라오지 못하게 비활성화 한다.
[root@www2 ~]# systemctl stop firewalld
[root@www2 ~]# systemctl disable firewalld
2. iptables-service 패키지 설치
iptables-services 패키지를 설치하고 재부팅을 해도 다시 올라오게 활성화 한다.
[root@www2 ~]# yum -y install iptables-services
[root@www2 ~]# systemctl enable iptables
3. 방화벽 룰 설정
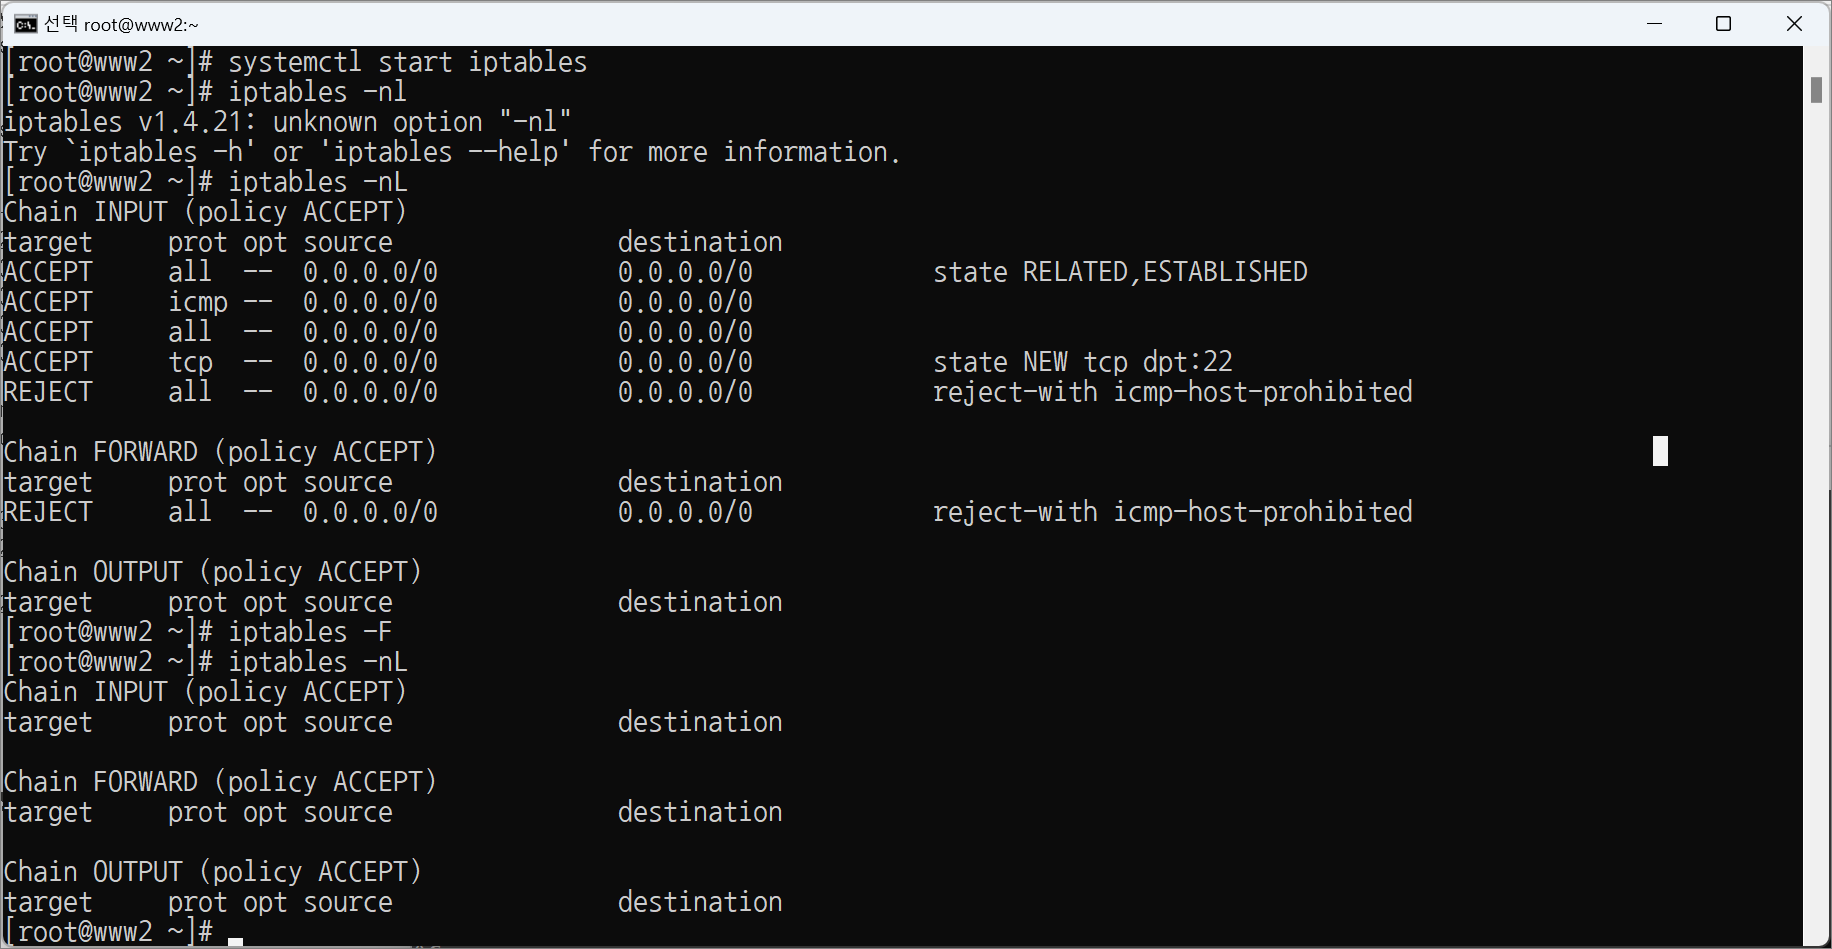
[root@www2 ~]# systemctl start iptables
[root@www2 ~]# iptables -nL
Chain INPUT (policy ACCEPT)
target prot opt source destination
ACCEPT all -- 0.0.0.0/0 0.0.0.0/0 state RELATED,ESTABLISHED
ACCEPT icmp -- 0.0.0.0/0 0.0.0.0/0
ACCEPT all -- 0.0.0.0/0 0.0.0.0/0
ACCEPT tcp -- 0.0.0.0/0 0.0.0.0/0 state NEW tcp dpt:22
REJECT all -- 0.0.0.0/0 0.0.0.0/0 reject-with icmp-host-prohibited
Chain FORWARD (policy ACCEPT)
target prot opt source destination
REJECT all -- 0.0.0.0/0 0.0.0.0/0 reject-with icmp-host-prohibited
Chain OUTPUT (policy ACCEPT)
target prot opt source destination
iptables -F 명령어를 이용해서 설정된 방화벽룰을 모두 삭제한다.
[root@www2 ~]# iptables -F
iptables -nL 명령어를 이용해서 방화벽에 설정된 룰을 확인한다.
[root@www2 ~]# iptables -nL
Chain INPUT (policy ACCEPT)
target prot opt source destination
Chain FORWARD (policy ACCEPT)
target prot opt source destination
Chain OUTPUT (policy ACCEPT)
target prot opt source destination
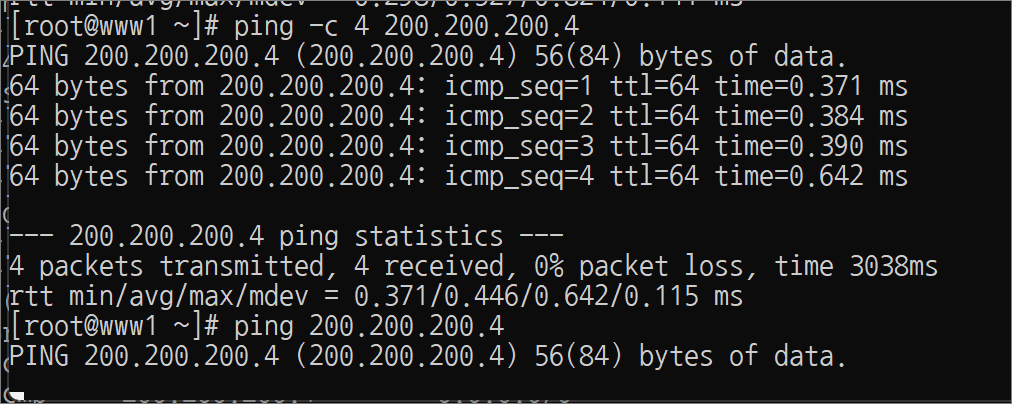
Guest OS 200.200.200.3번에서 ping test를 하면 통신이 잘 된다.
[root@www1 ~]# ping -c 4 200.200.200.4
PING 200.200.200.4 (200.200.200.4) 56(84) bytes of data.
64 bytes from 200.200.200.4: icmp_seq=1 ttl=64 time=0.268 ms
64 bytes from 200.200.200.4: icmp_seq=2 ttl=64 time=0.904 ms
64 bytes from 200.200.200.4: icmp_seq=3 ttl=64 time=2.59 ms
64 bytes from 200.200.200.4: icmp_seq=4 ttl=64 time=0.378 ms
--- 200.200.200.4 ping statistics ---
4 packets transmitted, 4 received, 0% packet loss, time 3038ms
rtt min/avg/max/mdev = 0.268/1.037/2.599/0.933 ms
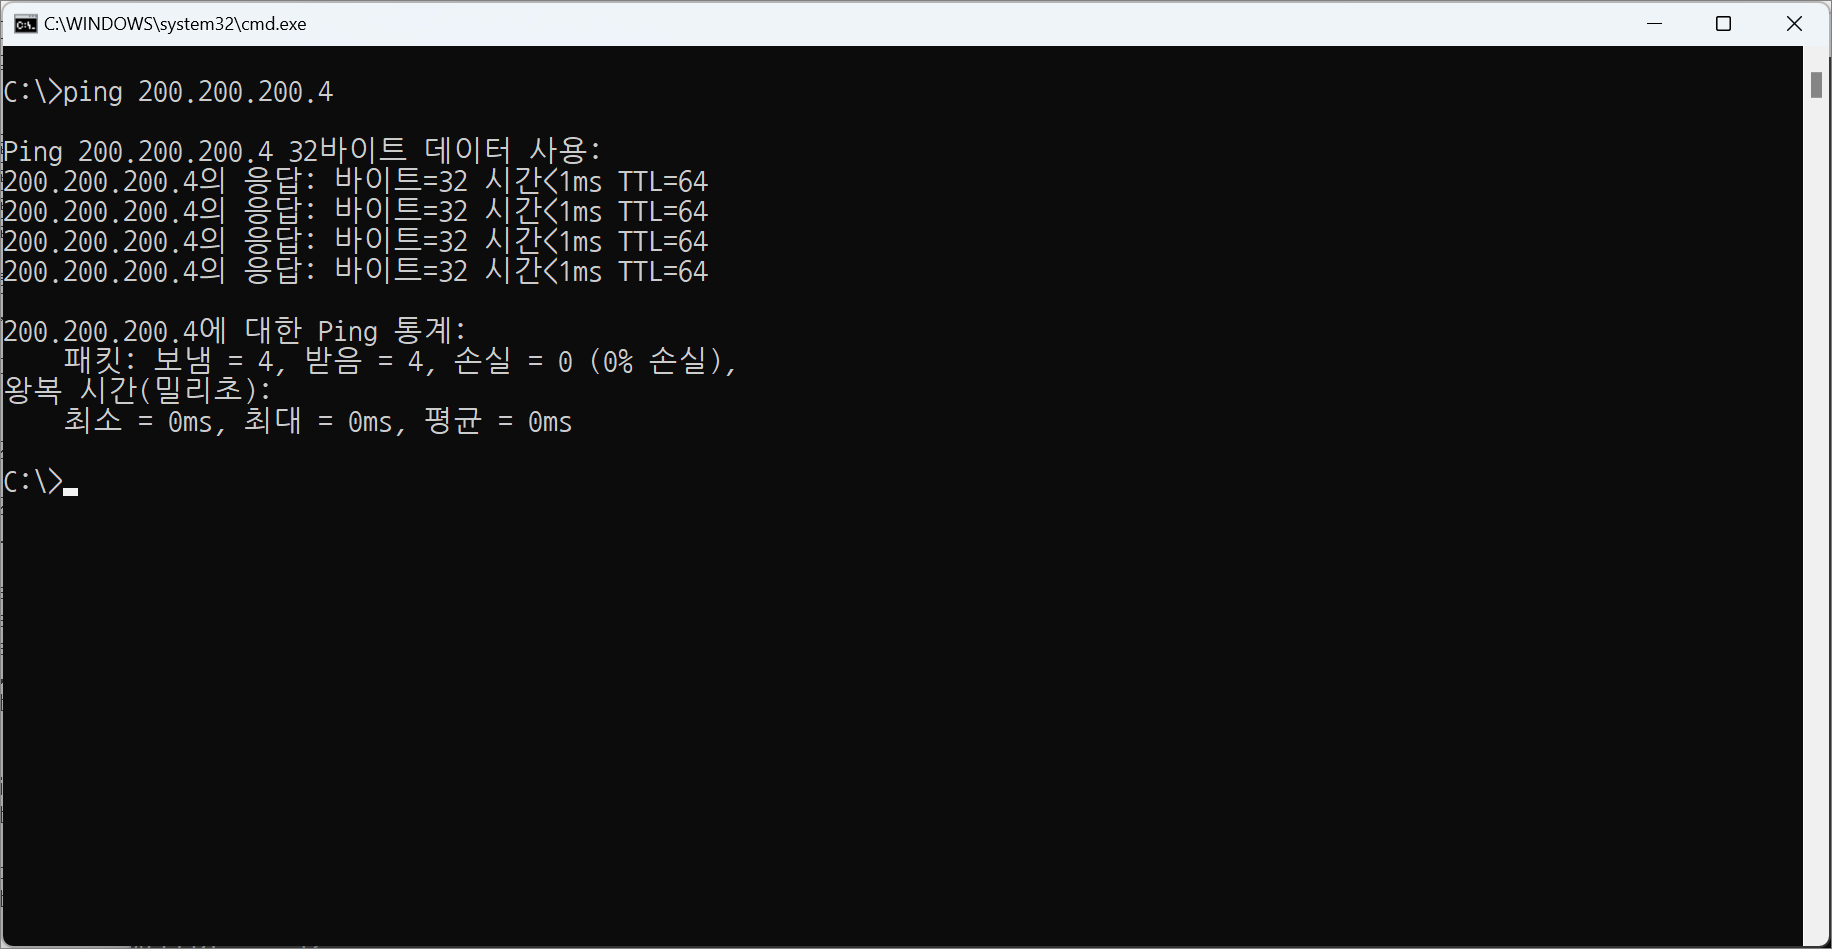
Host OS 200.200.200.3번에서 ping test를 하면 통신이 잘 된다.
C:\ > ping 200.200.200.4
Ping 200.200.200.4 32바이트 데이터 사용:
200.200.200.4의 응답: 바이트=32 시간<1ms TTL=64
200.200.200.4의 응답: 바이트=32 시간=1ms TTL=64
200.200.200.4의 응답: 바이트=32 시간<1ms TTL=64
200.200.200.4의 응답: 바이트=32 시간=1ms TTL=64
200.200.200.4에 대한 Ping 통계:
패킷: 보냄 = 4, 받음 = 4, 손실 = 0 (0% 손실),
왕복 시간(밀리초):
최소 = 0ms, 최대 = 1ms, 평균 = 0ms
-> iptables -F로 방화벽 룰을 전부 삭제하였기 때문에 policy ACCEPT 적용되어 ping 허용됨.
4. 방화벽 룰 설정 2
정책
- Host OS(200.200.200.1)는 ping을 허용하도록 설정한다.
- Guest OS(200.200.200.3)는 ping을 거부하도록 설정한다.
-F: 방화벽 룰을 초기화한다.
-A: 방화벽 룰을 추가한다.
-L: 방화벽 룰을 확인한다.
-s: 출발지 주소
-p: 프로토콜
-j: 패킷의 ACCEPT(허용)/DROP(거부)를 결정한다.
📌 iptables 출력 📌
iptables -L : 기본 출력
iptables -nL : 상세한 네트워크 정보까지 모두 출력
iptables -nL –line-numbers : 룰셋의 적용 순서 까지 확인
iptables -nvL --line
iptables -L -v : 적용된 룰셋을 통한 인입 패킷 및 bytes 출력
설정되어 있는 방화벽 룰을 모두 초기화(설정되어 있는 룰을 모두 삭제)한다.
[root@www2 ~]# iptables -F
(참고)
iptables 특정 룰 삭제 : # iptables -D INPUT 2 (넘버)
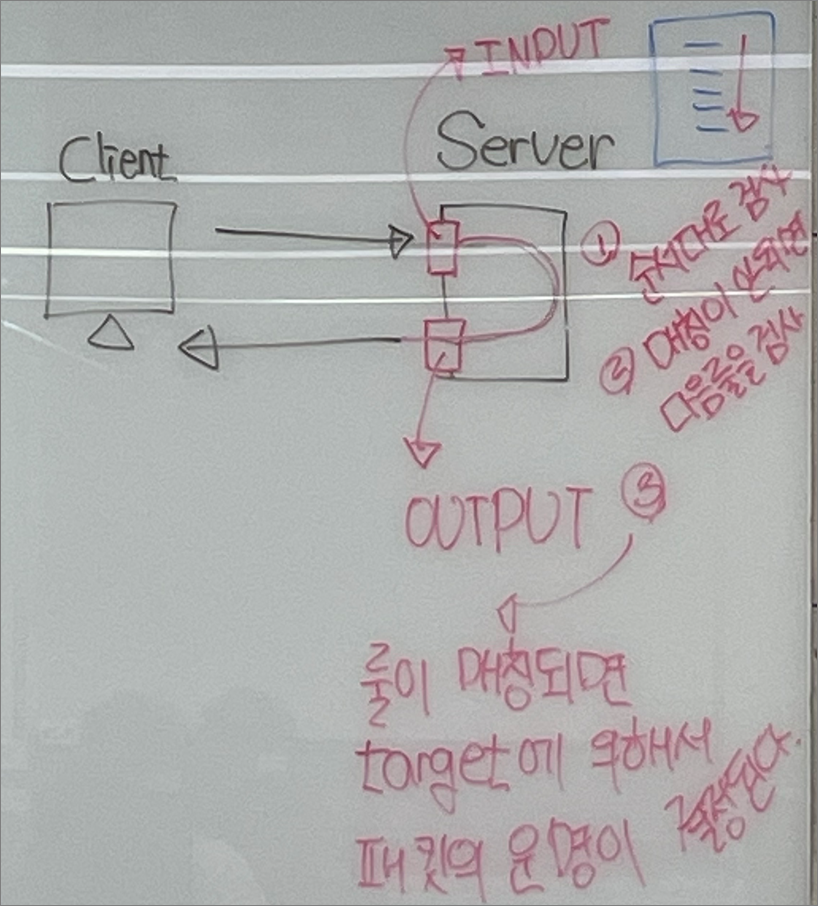
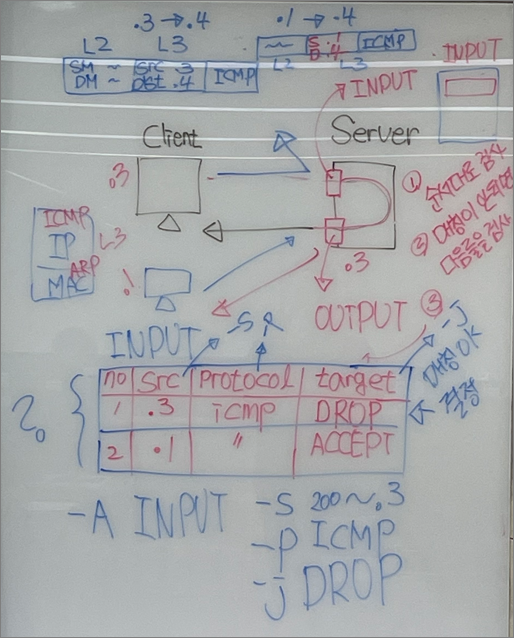
외부에서 패킷이 들어오면 검사를 하는데 출발지 IP주소가 200.200.200.3이고 ICMP 프로토콜이면 패킷을 거부한다.
[root@www2 ~]# iptables -A INPUT -s 200.200.200.3 -p icmp -j DROP
[root@www2 ~]# iptables -nL
Chain INPUT (policy ACCEPT)
target prot opt source destination
DROP icmp -- 200.200.200.3 0.0.0.0/0
Chain FORWARD (policy ACCEPT)
target prot opt source destination
Chain OUTPUT (policy ACCEPT)
target prot opt source destination
외부에서 패킷이 들어오면 검사를 하는데
출발지 IP주소가 200.200.200.1이고 ICMP 프로토콜이면 패킷을 허용한다.
[root@www2 ~]# iptables -A INPUT -s 200.200.200.1 -p icmp -j ACCEPT
[root@www2 ~]# iptables -nL
Chain INPUT (policy ACCEPT)
target prot opt source destination
DROP icmp -- 200.200.200.3 0.0.0.0/0
ACCEPT icmp -- 200.200.200.1 0.0.0.0/0
Chain FORWARD (policy ACCEPT)
target prot opt source destination
Chain OUTPUT (policy ACCEPT)
target prot opt source destination
5. ping 테스트
Guest OS 200.200.200.3번에서 ping test를 하면 통신이 안된다.
이유는 서버에서 패킷을 모두 거부했기 때문에 패킷이 모두 버려지기 때문이다.
[root@www1 ~]# ping -c 4 200.200.200.4
PING 200.200.200.4 (200.200.200.4) 56(84) bytes of data.
<-- 아무 반응도 없다.
--- 200.200.200.4 ping statistics ---
4 packets transmitted, 0 received, 100% packet loss, time 3002ms
C:>ping 200.200.200.4
Ping 200.200.200.4 32바이트 데이터 사용:
200.200.200.4의 응답: 바이트=32 시간<1ms TTL=64
200.200.200.4의 응답: 바이트=32 시간<1ms TTL=64
200.200.200.4의 응답: 바이트=32 시간<1ms TTL=64
200.200.200.4의 응답: 바이트=32 시간<1ms TTL=64
200.200.200.4에 대한 Ping 통계:
패킷: 보냄 = 4, 받음 = 4, 손실 = 0 (0% 손실),
왕복 시간(밀리초):
최소 = 0ms, 최대 = 0ms, 평균 = 0ms
-> .3번 외 방화벽에서 거부하지 않았기 때문에 ping 통신이 된다.
실습> 방화벽 룰 설정 2
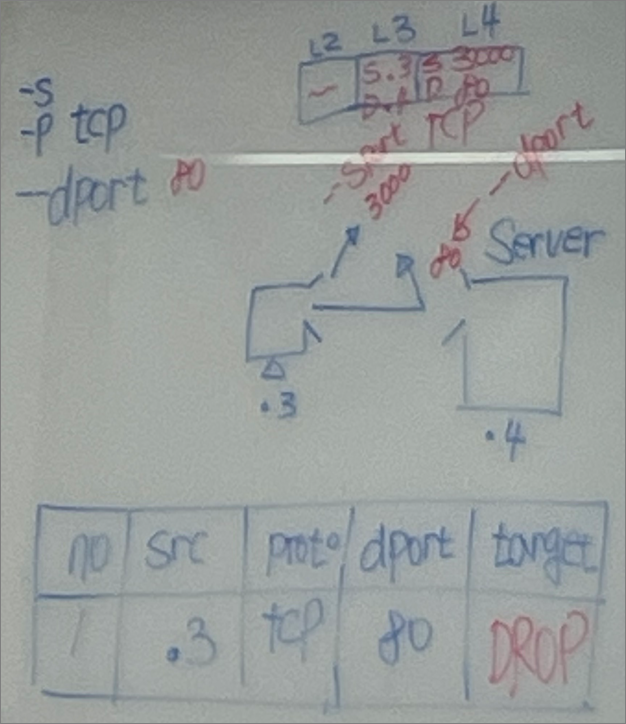
-> L4에서는 3가지를 다 검사한다. (src, protocol, dport)
[root@www2 ~]# iptables -F
[root@www1 ~]# lynx --dump 200.200.200.4
Welcome to my server.
[root@www2 ~]# iptables -A INPUT -s 200.200.200.3 \
-p tcp --dport 80 -j DROP
방화벽 룰에 의해서 패킷이 버려졌기 때문에 접속이 안된다.
[root@www1 ~]# lynx --dump 200.200.200.4
<-- 계속 멈춰있다.
^C <-- Ctrl + C를 눌러서 종료한다.

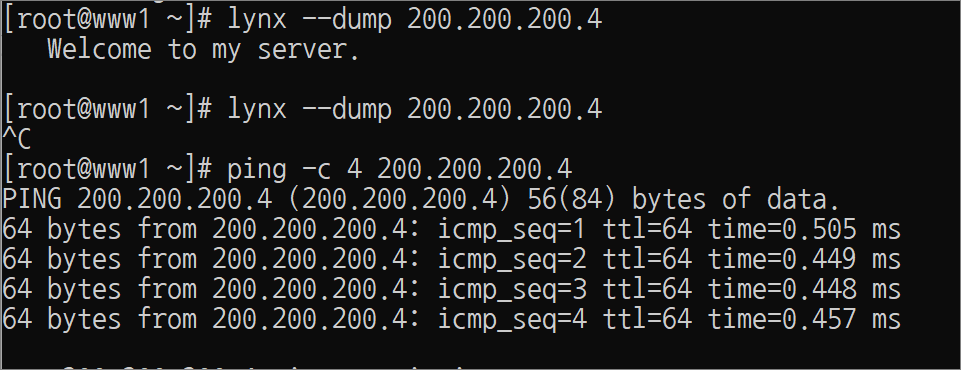
-> ping은 허용되어있다. why? icmp는 허용되어있기 때문이다.
실습> 방화벽 룰 설정 3
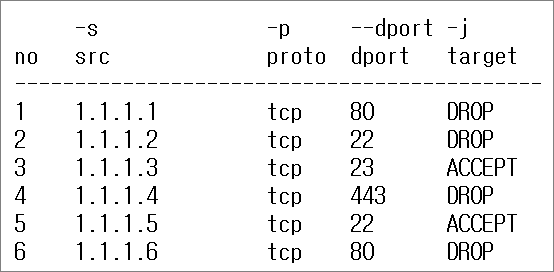
아래 룰을 iptables에서 설정하시오.
[root@www2 ~]# iptables -F
[root@www2 ~]# iptables -A INPUT -s 1.1.1.1 -p tcp --dport 80 -j DROP
[root@www2 ~]# iptables -A INPUT -s 1.1.1.2 -p tcp --dport 22 -j DROP
[root@www2 ~]# iptables -A INPUT -s 1.1.1.3 -p tcp --dport 23 -j ACCEPT
[root@www2 ~]# iptables -A INPUT -s 1.1.1.4 -p tcp --dport 443 -j DROP
[root@www2 ~]# iptables -A INPUT -s 1.1.1.5 -p tcp --dport 22 -j ACCEPT
[root@www2 ~]# iptables -A INPUT -s 1.1.1.6 -p tcp --dport 80 -j DROP
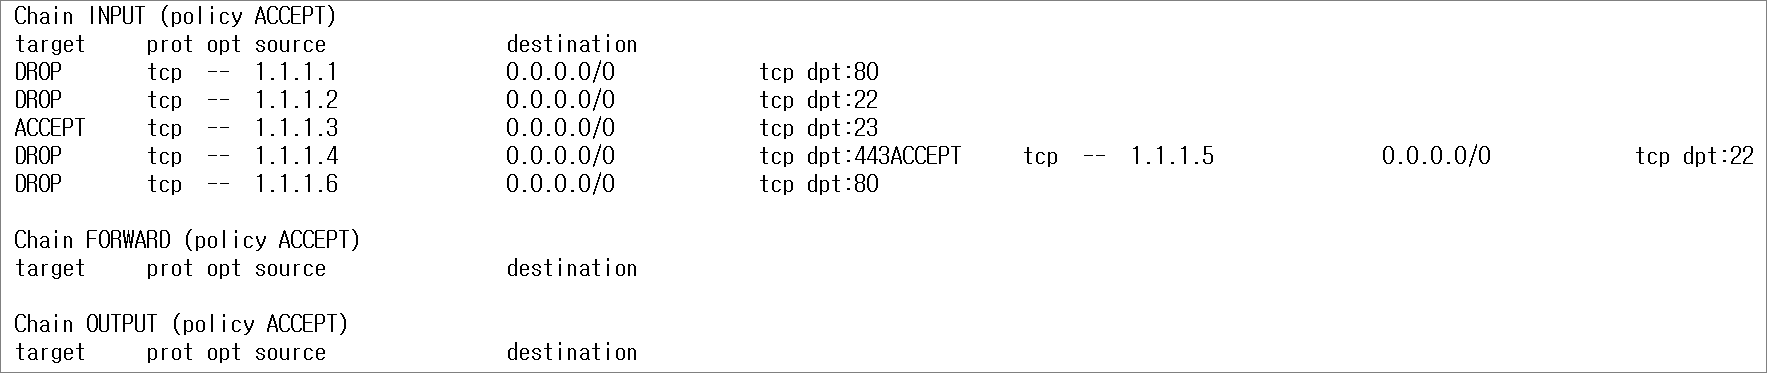
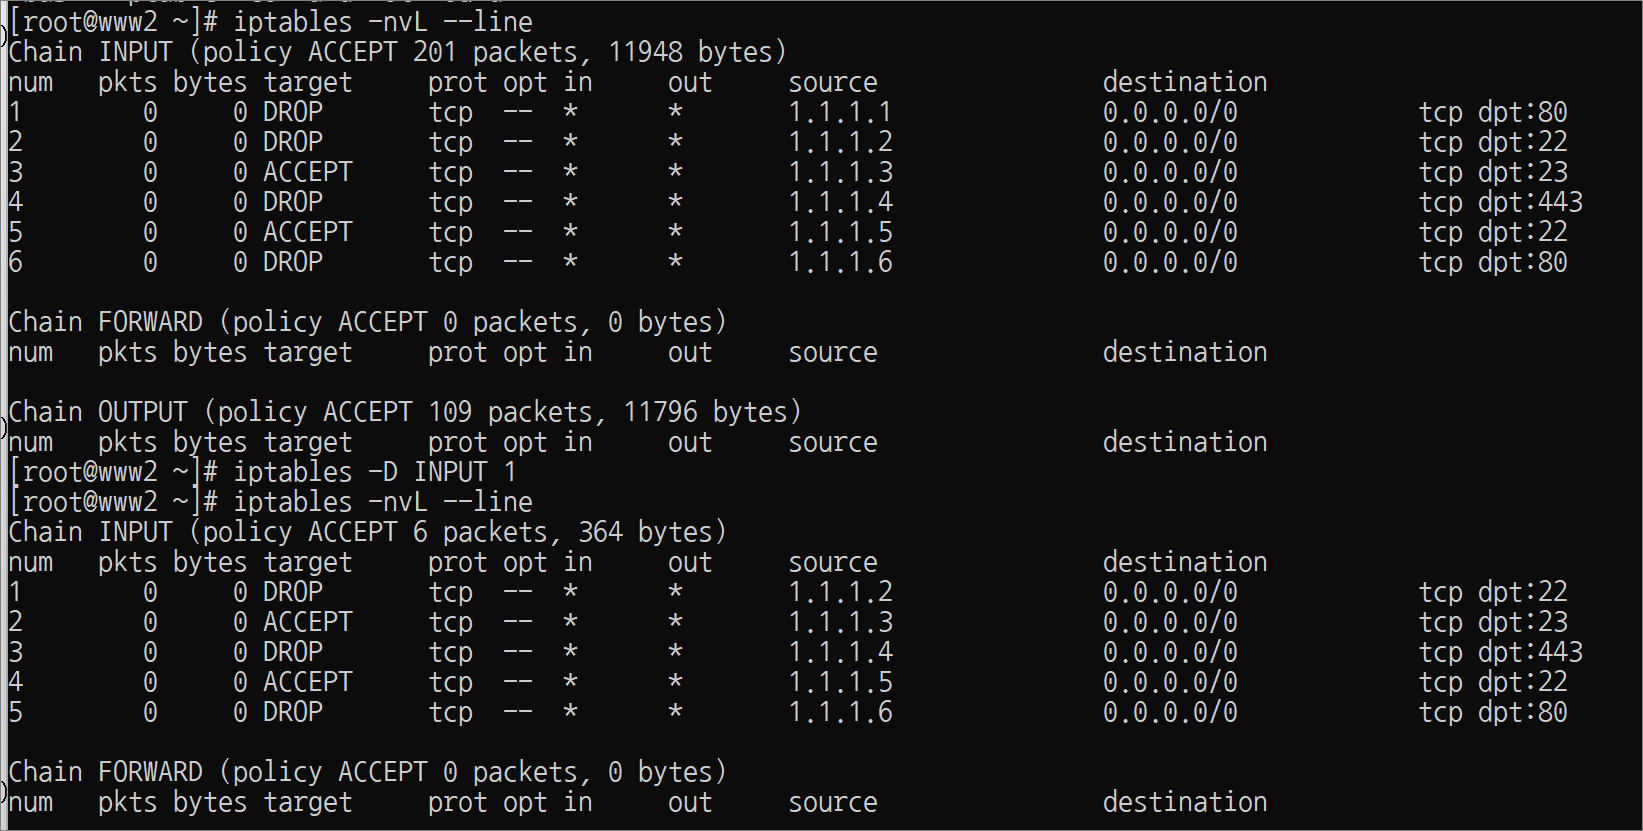
[root@www2 ~]# iptables -nL
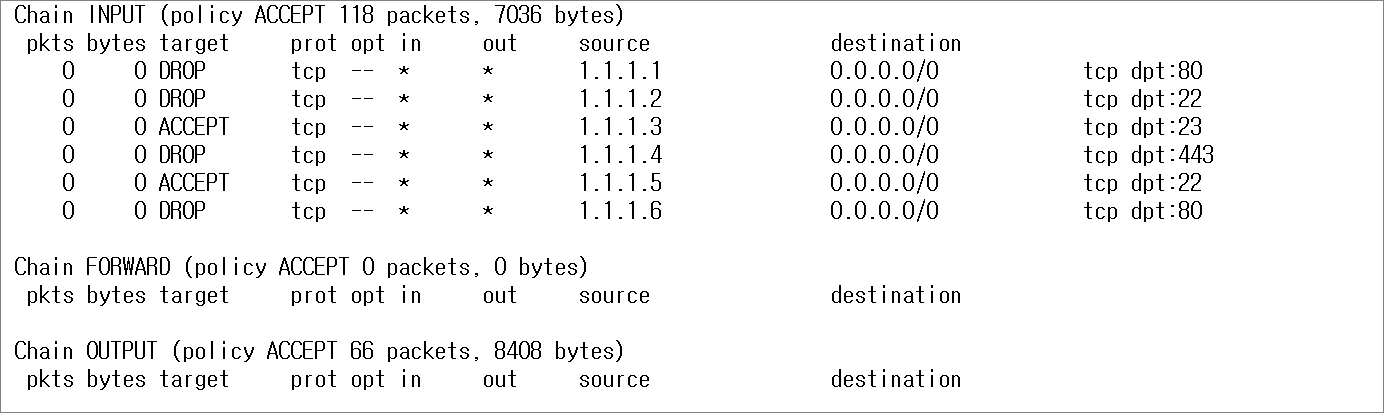
[root@www2 ~]# iptables -nvL
-D: 방화벽 룰을 삭제한다.
형식: -D INPUT 룰번호
1번 룰을 삭제한다.
[root@www2 ~]# iptables -D INPUT 6
[root@www2 ~]# iptables -nvL --line
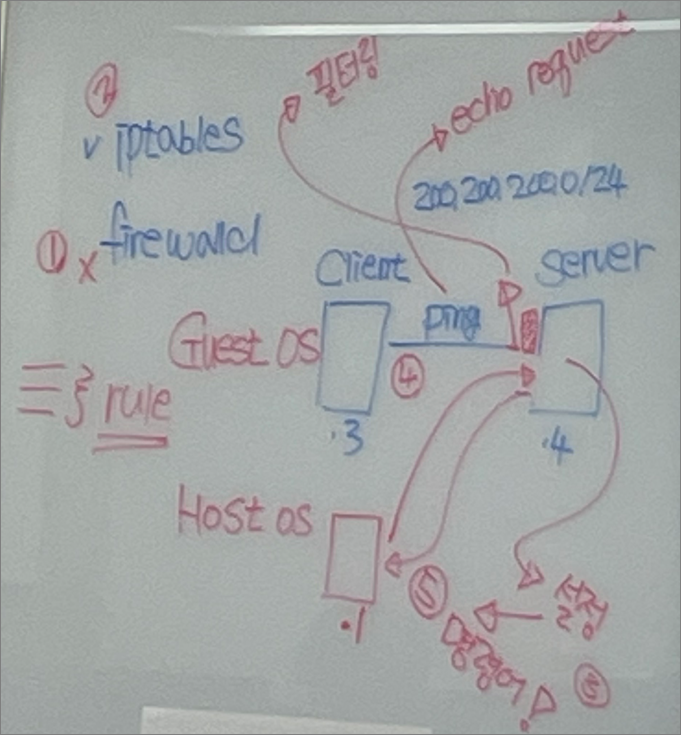
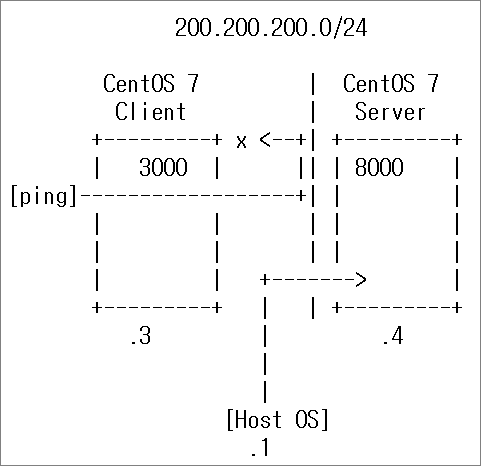
실습> 아래 조건에 맞는 iptables 방화벽 룰을 설정하시오.
-- 조건 --
o iptables 설정 서버: 200.200.200.4
o 웹 서비스가 실행되어야 한다.
- systemctl start httpd <-- 설치해야 한다.
o 원격접속 서비스가 실행되어야 한다.
- 원격 접속 서비스는 telnet이 아닌 ssh이다.
- systemctl start sshd <-- 기본으로 설정되어 있다.
o 패킷이 들어오는 INPUT Chain(들어오는 문)에 설정한다.
o 웹 클라이언트를 설정한다.
- 200.200.200.1은 Chrome에서 테스트한다.
- 200.200.200.1은 lynx에서 테스트한다.
o 방화벽 룰을 설정한다.
- 방화벽에 설정된 룰을 모두 초기화 한다.
- 룰 번호 1. 200.200.200.1에서 웹서비스에 접근할 수 있도록 허용한다.
- 룰 번호 2. 200.200.200.3에서 웹서비스에 접근할 수 없도록 거부한다.
- 룰 번호 3. 200.200.200.1에서 원격 접속 서비스를 접근할 수 있도록 허용한다.
- 룰 번호 4. 200.200.200.3에서 원격 접속 서비스를 접근할 수 없도록 거부한다.
- 룰 번호 5. 200.200.200.1에서 ping(echo request)을 거부한다.
- 룰 번호 6. 200.200.200.3에서 ping(echo request)을 허용한다.
-- 풀이 --
-
룰 번호 1. 200.200.200.1에서 웹서비스에 접근할 수 있도록 허용한다.
[root@www2 ~]# iptables -A INPUT -s 200.200.200.1 -p tcp --dport 80 -j ACCEPT -
룰 번호 2. 200.200.200.3에서 웹서비스에 접근할 수 없도록 거부한다.
[root@www2 ~]# iptables -A INPUT -s 200.200.200.3 -p tcp --dport http -j DROP -
룰 번호 3. 200.200.200.1에서 원격 접속 서비스를 접근할 수 있도록 허용한다.
[root@www2 ~]# iptables -A INPUT -s 200.200.200.1 -p tcp --dport 22 -j ACCEPT -
룰 번호 4. 200.200.200.3에서 원격 접속 서비스를 접근할 수 없도록 거부한다.
[root@www2 ~]# iptables -A INPUT -s 200.200.200.3 -p tcp --dport 22 -j DROP -
룰 번호 5. 200.200.200.1에서 ping(echo request)을 거부한다.
[root@www2 ~]# iptables -A INPUT -s 200.200.200.1 -p icmp -j DROP -
룰 번호 6. 200.200.200.3에서 ping(echo request)을 허용한다.
[root@www2 ~]# iptables -A INPUT -s 200.200.200.3 -p icmp -j ACCEPT
1. 방화벽 룰 설정
조건에 맞게 방화벽 룰을 설정한다.
[root@www2 ~]# iptables -nvL INPUT
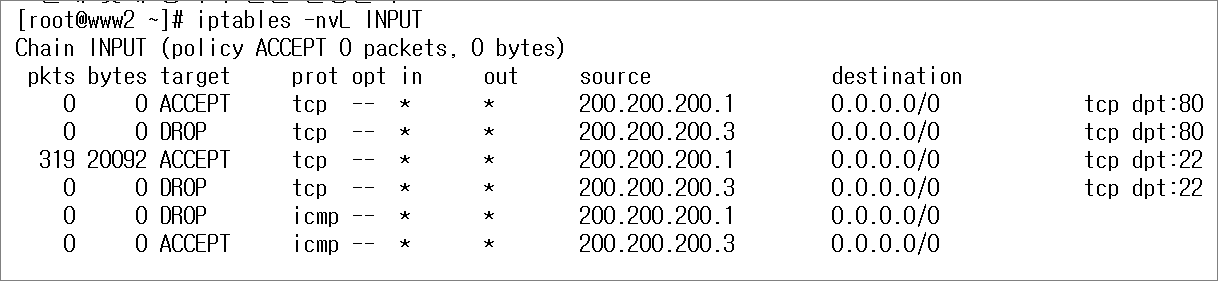
2. 확인
룰 번호 1. 확인
Host OS에서 Chrome을 열어서 접속한다.
http://200.200.200.4/
Welcome to my server.

룰 번호 2. 확인
Guest OS에서 lynx로 접속한다.
[root@www1 ~]# lynx --dump 200.200.200.4
<-- 접속이 안되고 멈춰있다.
^C

룰 번호 3. 확인
C:\ > ssh root@200.200.200.4
root@200.200.200.4's password:
Last login: Tue Dec 13 22:02:36 2022 from 200.200.200.1
[root@www2 ~]# exit
logout
Connection to 200.200.200.4 closed.

룰 번호 4. 확인
[root@www1 ~]# ssh root@200.200.200.4
<-- 접속이 안되고 멈춰있다.
^C

[root@www2 ~]# iptables -nvL INPUT

[root@www2 ~]# iptables -nvL INPUT

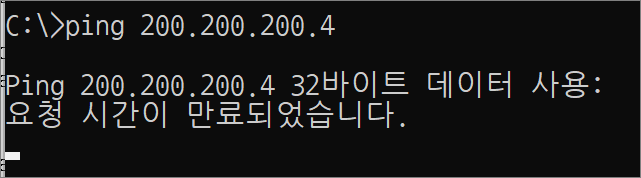
룰 번호 5. 확인
C:>ping 200.200.200.4
<-- ping이 날라가지 않고 멈춰있다.
^C
룰 번호 6.
[root@www1 ~]# ping -c 4 200.200.200.4
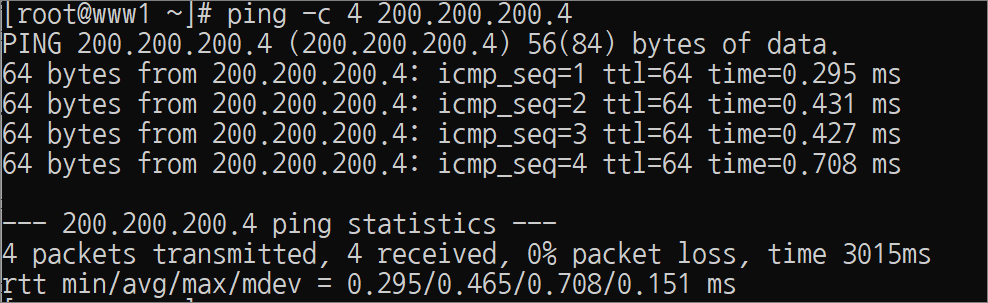
--- 200.200.200.4 ping statistics ---
4 packets transmitted, 4 received, 0% packet loss, time 3021ms
rtt min/avg/max/mdev = 0.277/0.567/0.699/0.171 ms
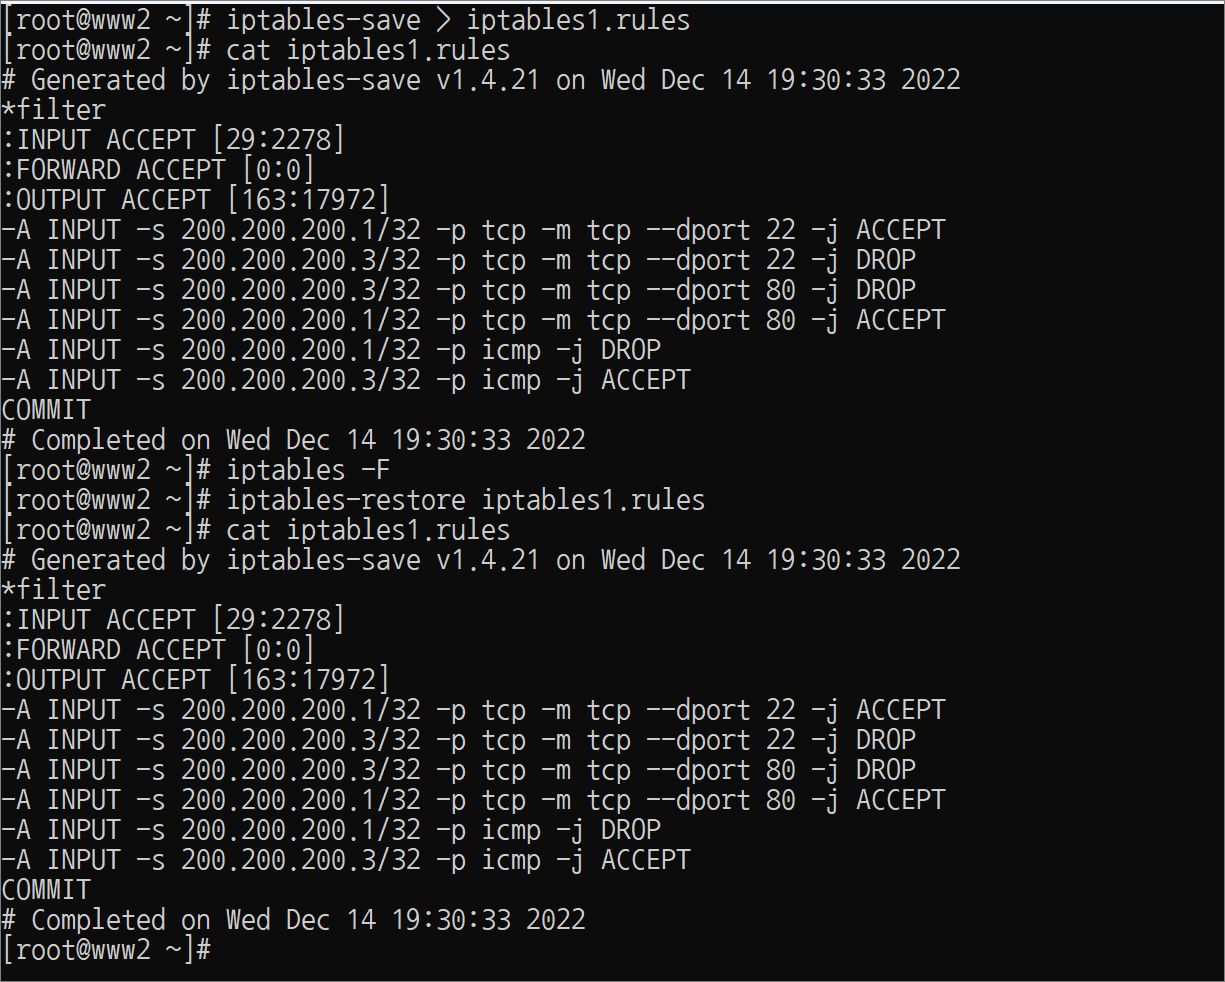
iptables-save: 현재 설정된 방화벽 룰을 저장하는 명령어
형식: iptables-save > 파일명
[root@www2 ~]# iptables-save > iptables1.rules
[root@www2 ~]# cat iptables1.rules
[root@www2 ~]# iptables -F
[root@www2 ~]# iptables -nL
Chain INPUT (policy ACCEPT)
target prot opt source destination
Chain FORWARD (policy ACCEPT)
target prot opt source destination
Chain OUTPUT (policy ACCEPT)
target prot opt source destination
iptables-restore: 파일에 저장된 방화벽 룰을 복구하는 명령어
형식: iptables-restore 파일명
[root@www2 ~]# iptables-restore iptables1.rules
[root@www2 ~]# iptables -nL
Chain INPUT (policy ACCEPT)
target prot opt source destination
ACCEPT tcp -- 200.200.200.1 0.0.0.0/0 tcp dpt:80
DROP tcp -- 200.200.200.3 0.0.0.0/0 tcp dpt:80
ACCEPT tcp -- 200.200.200.1 0.0.0.0/0 tcp dpt:22
DROP tcp -- 200.200.200.3 0.0.0.0/0 tcp dpt:22
DROP icmp -- 200.200.200.1 0.0.0.0/0
ACCEPT icmp -- 200.200.200.3 0.0.0.0/0
Chain FORWARD (policy ACCEPT)
target prot opt source destination
Chain OUTPUT (policy ACCEPT)
target prot opt source destination
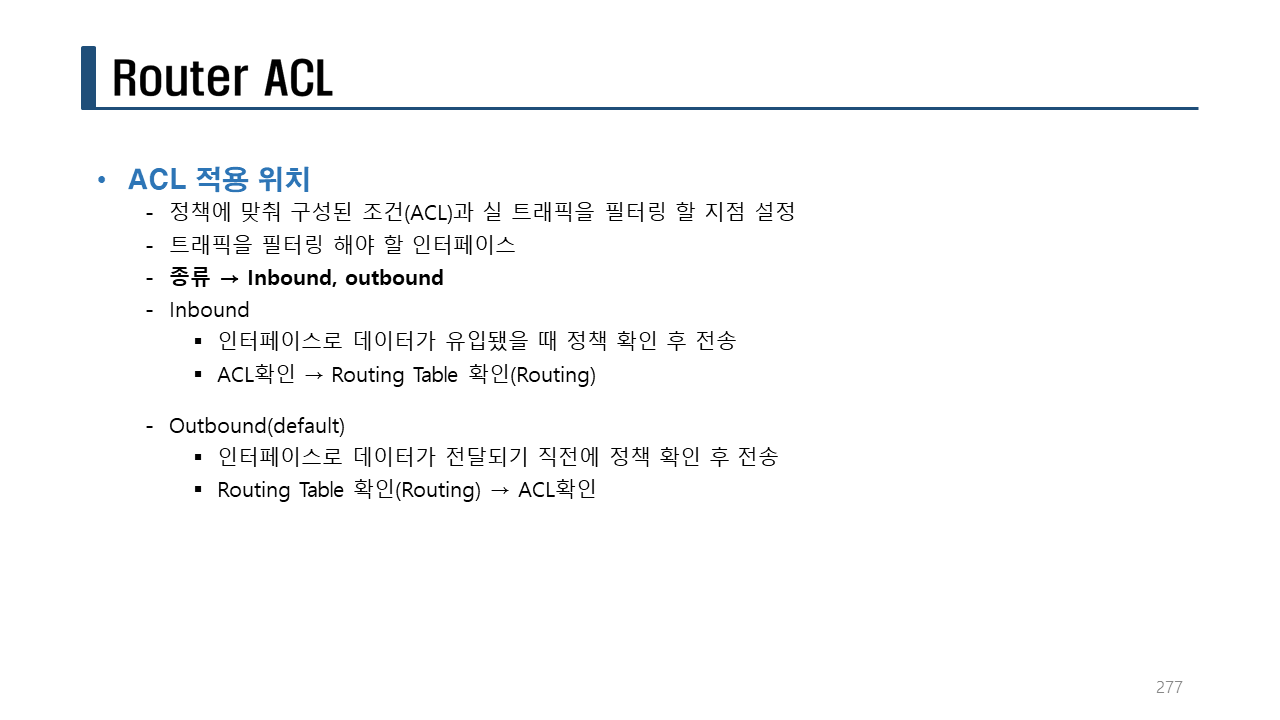
실습> ACL 설정하기
패킷트레이서로 실습을 진행한다.
파일명: acl1.pkt
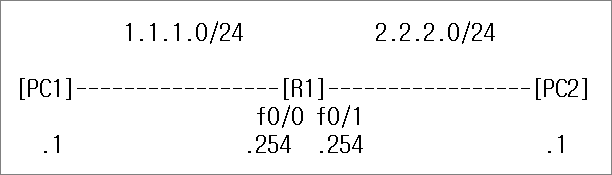
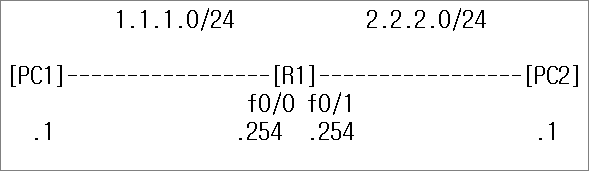
1. PC 설정
PC1:
IPv4 Address: 1.1.1.1
Subnet Mask: 255.255.255.0
Default Gateway: 1.1.1.254
DNS Server: X
PC2:
IPv4 Address: 2.2.2.1
Subnet Mask: 255.255.255.0
Default Gateway: 2.2.2.254
DNS Server: X
2. R1 설정
!R1
en
conf t
hostname R1
int f0/0
ip add 1.1.1.254 255.255.255.0
no sh
int f0/1
ip add 2.2.2.254 255.255.255.0
no sh
end
sh ip int b
!
3. 통신 확인
PC1의 CMD창에서 R1, PC2에 ping test를 실시한다.
C:>ping 1.1.1.254
C:>ping 2.2.2.254
C:>ping 2.2.2.1
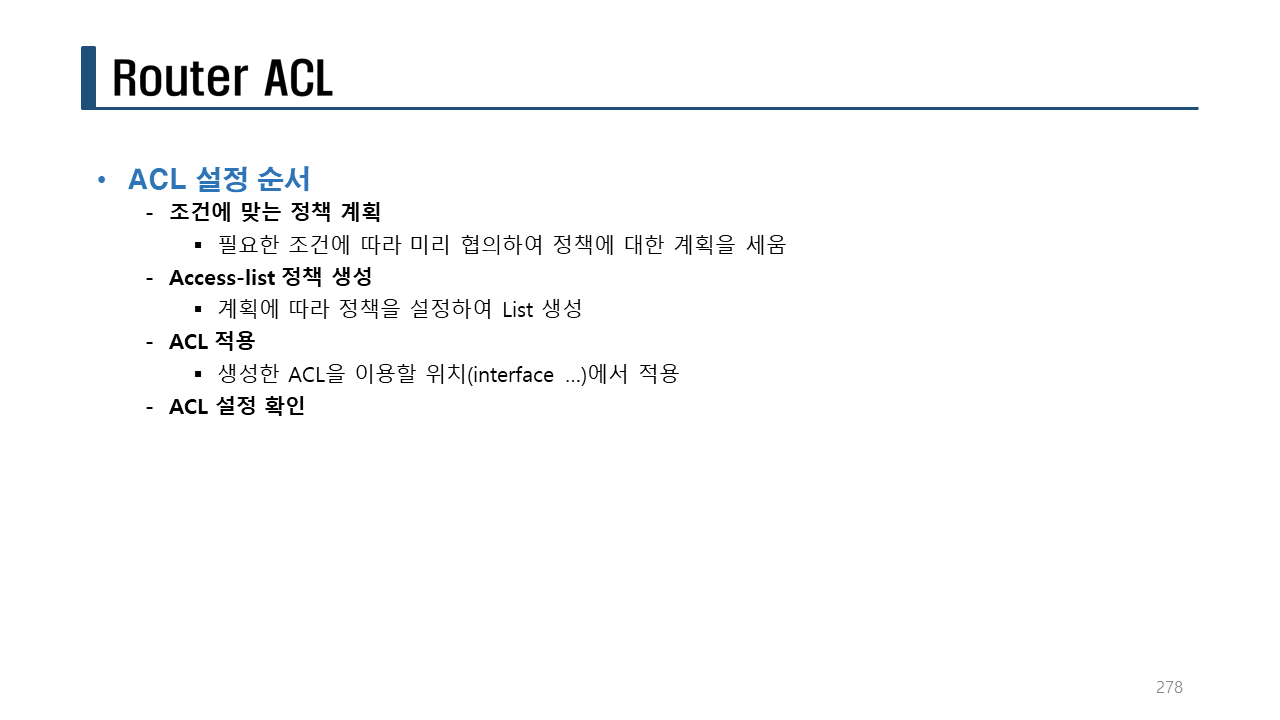
4. ACL 설정
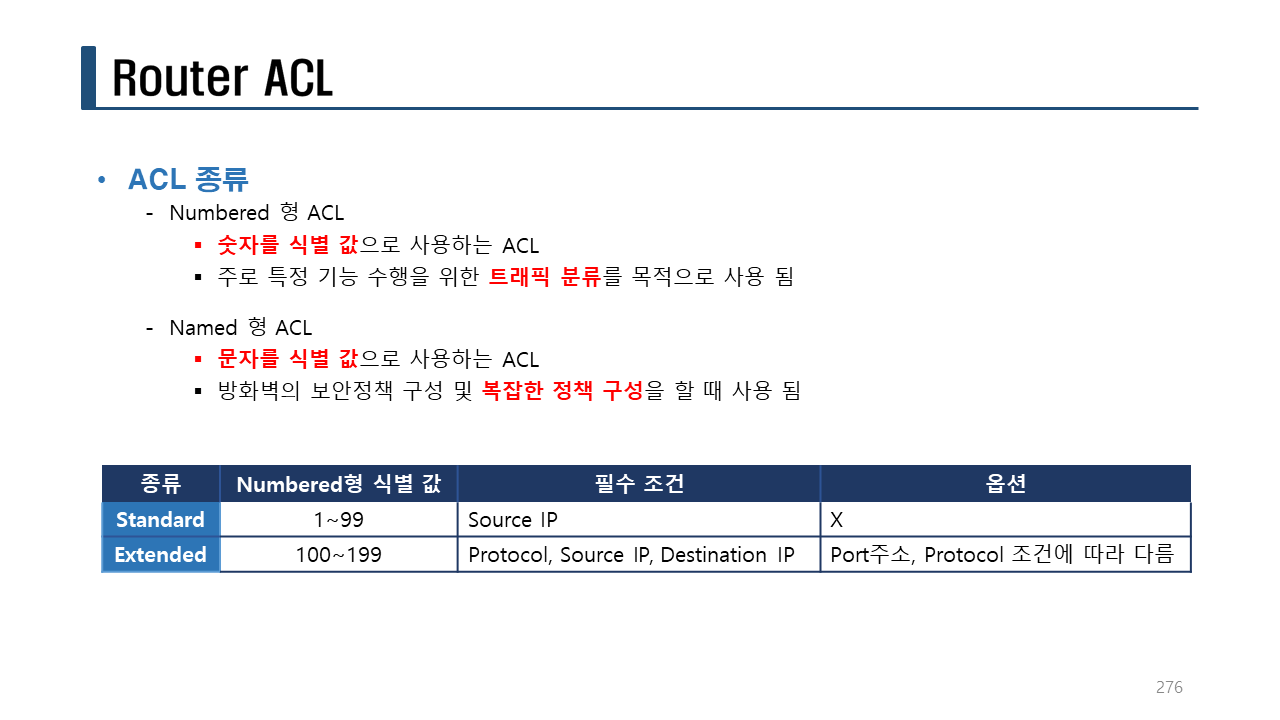
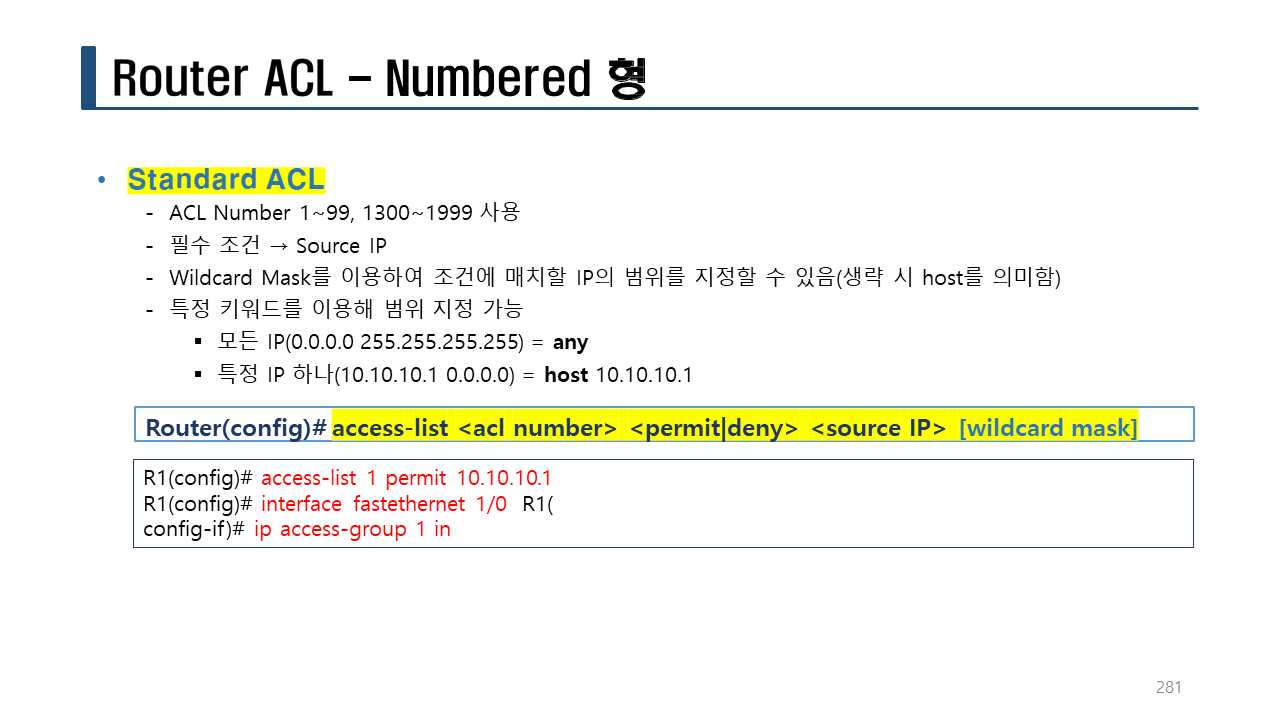
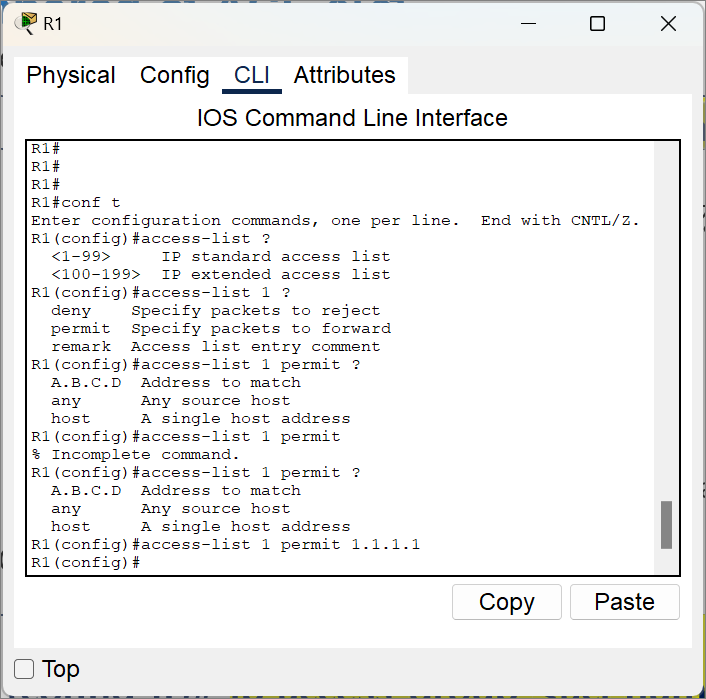
access-list 명령어를 사용한다.
conf t 로 들어가서 global configuration 에서 사용한다.
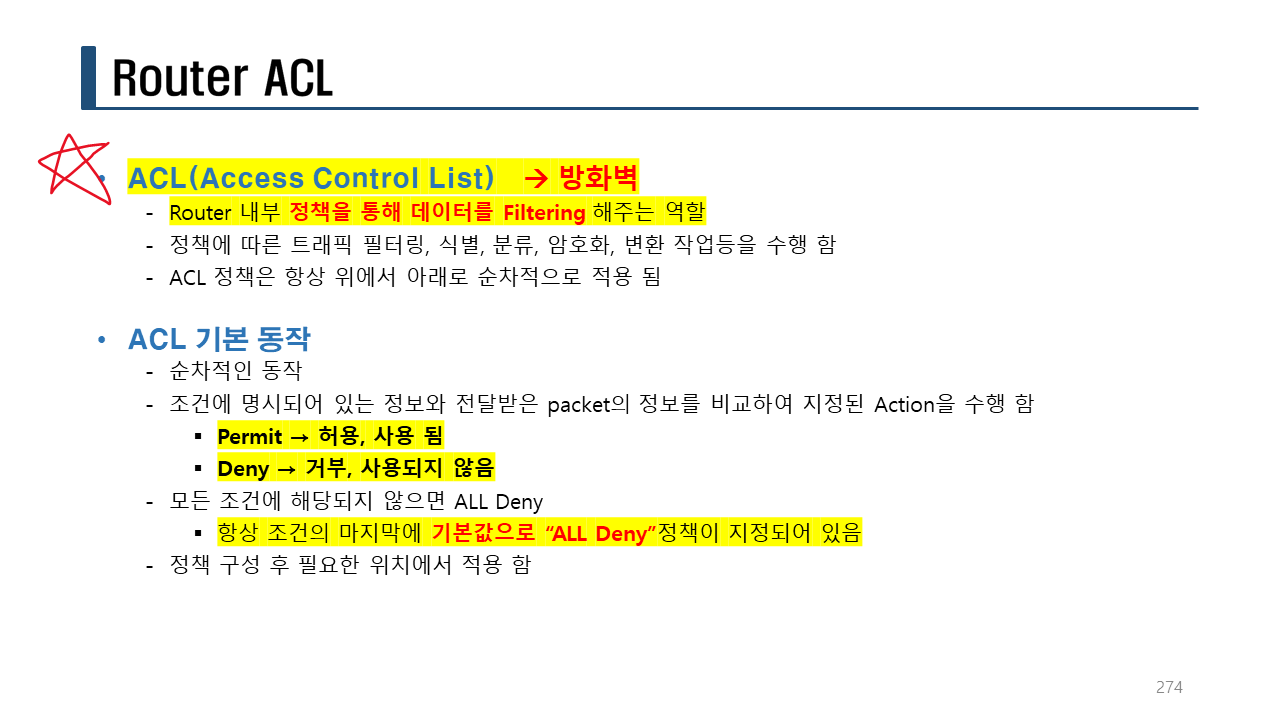
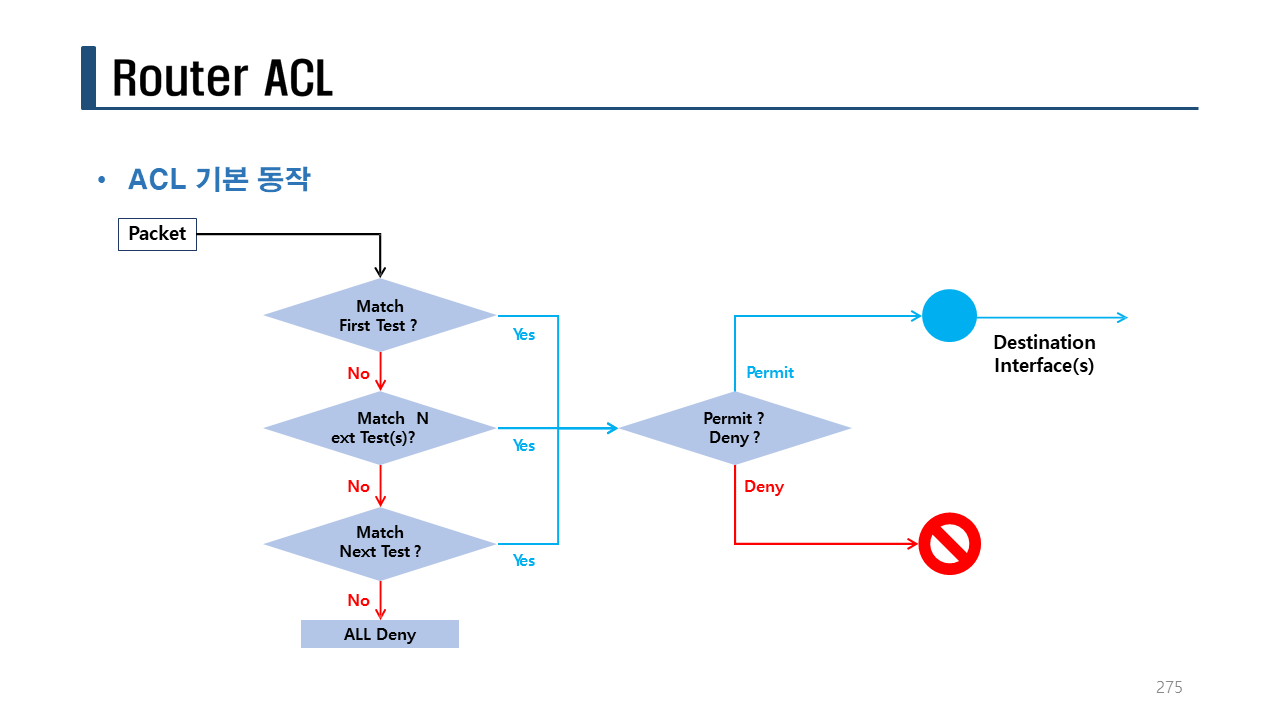
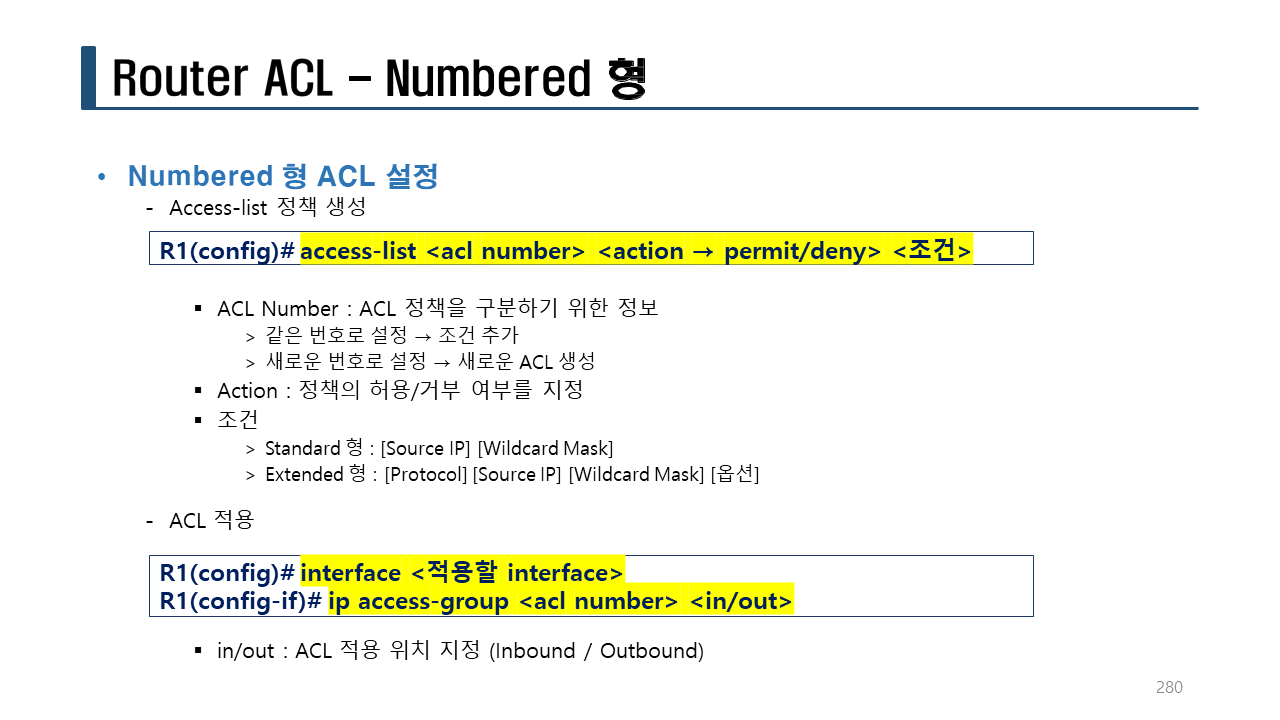
o ACL(액세스리스트) 정책(룰)을 설정한다.
형식: access-list <action → permit/deny> <조건>
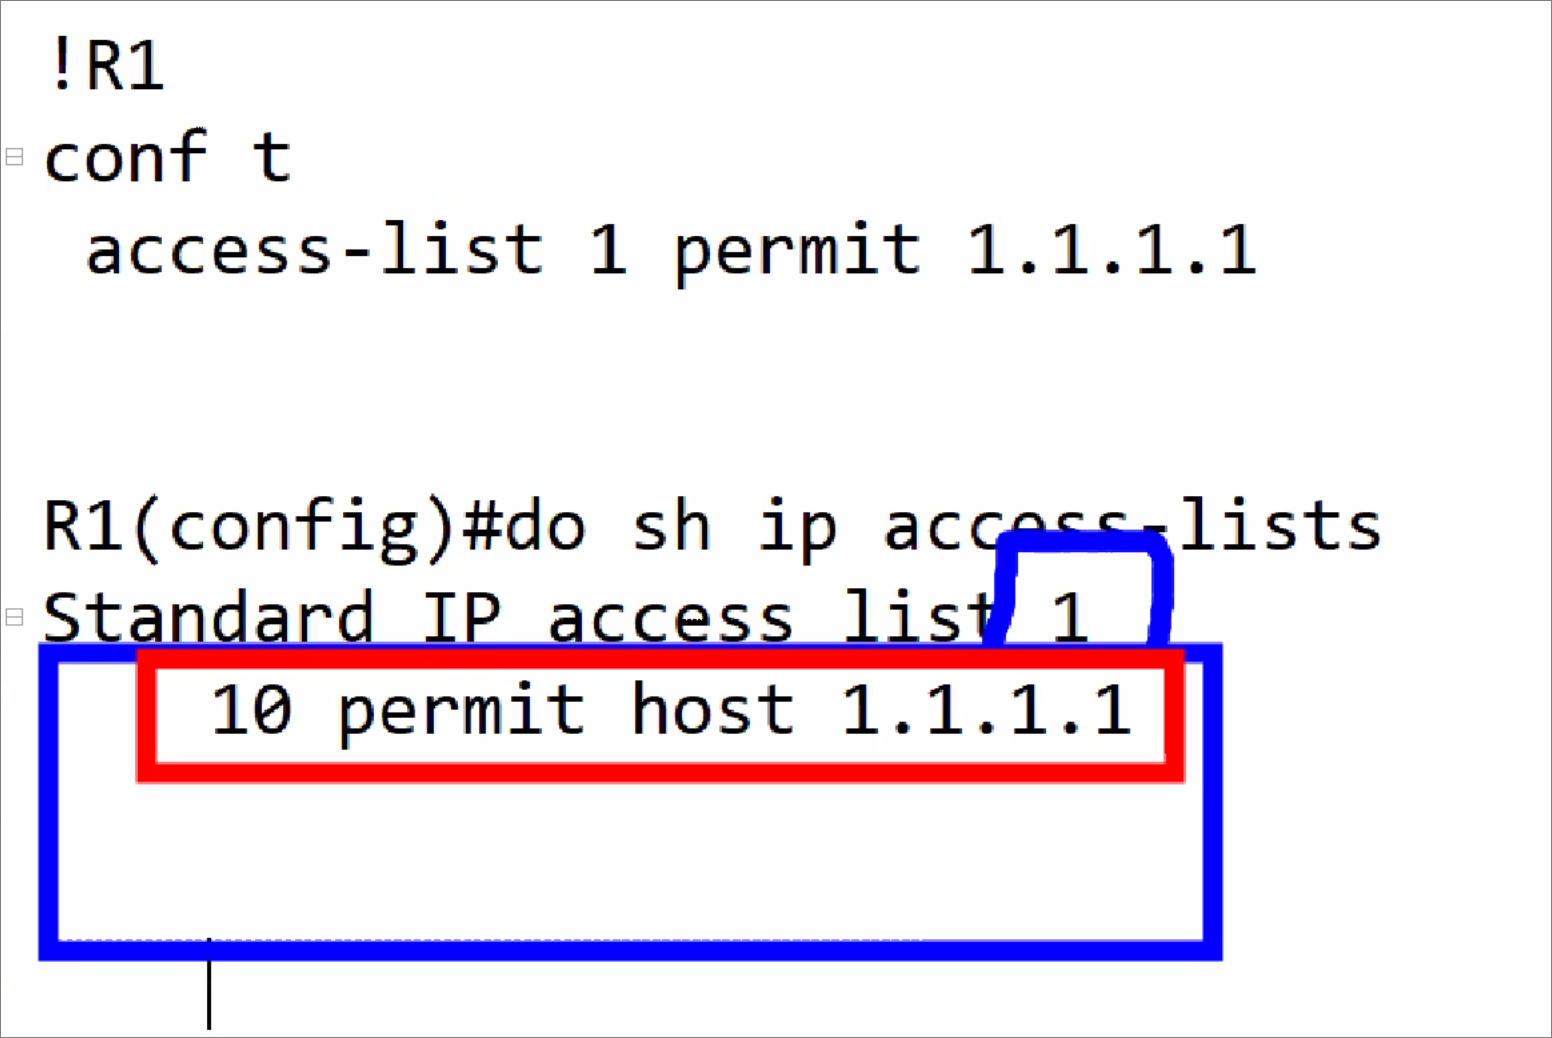
!R1
conf t
access-list 1 permit 1.1.1.1
access-list 1 permit host 1.1.1.2
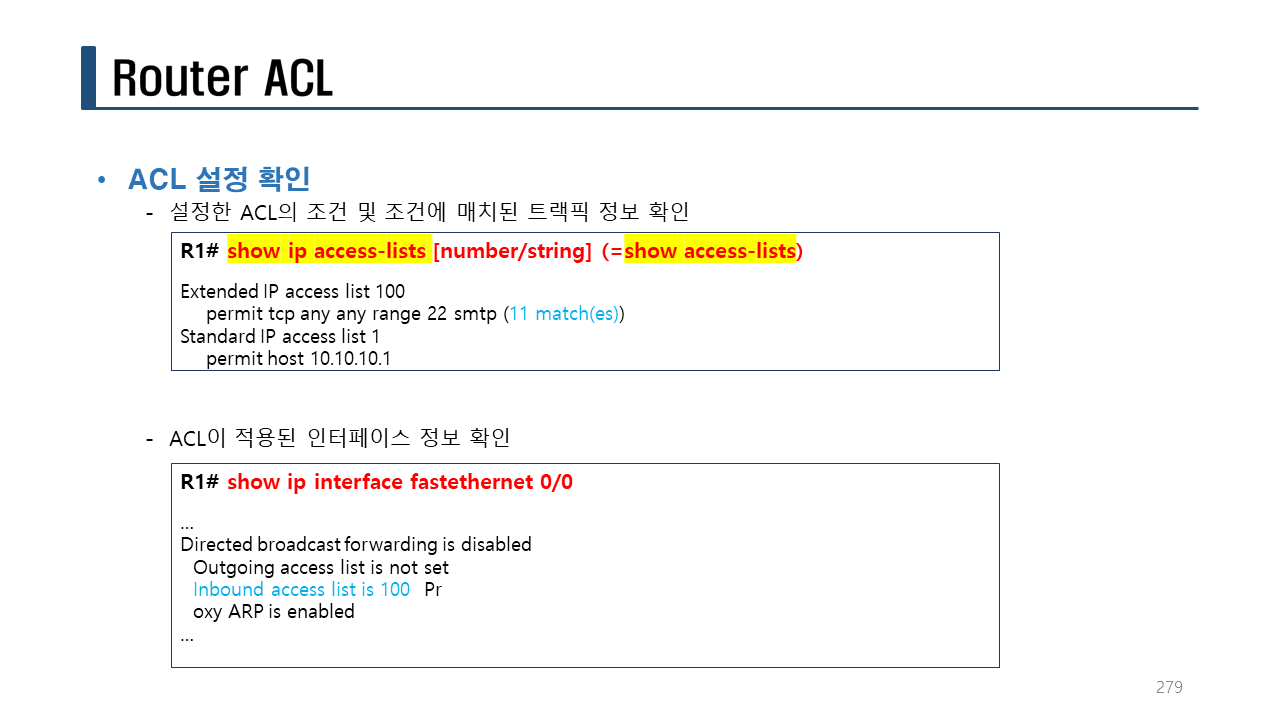
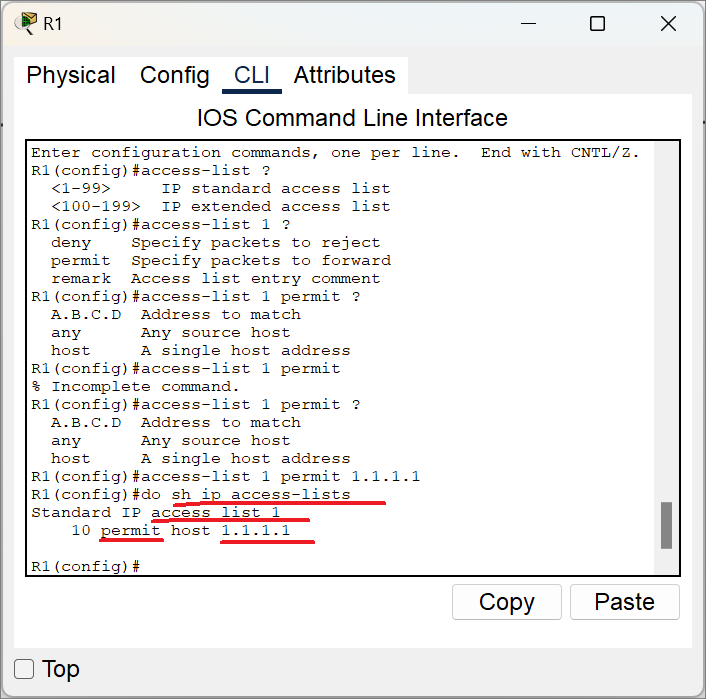
o ACL(액세스리스트) 정책(룰)을 확인한다.
형식: sh ip access-lists or sh access-lists
end
sh ip access-lists ( == sh access-lists)
o ACL(액세스리스트) 정책(룰)을 인터페이스에 적용한다.
형식: 인터페이스 선택 후 ip access-group <acl번호> <in|out>
conf t
int fa0/0
ip access-group 1 in
!R1
conf t
access-list 1 permit 1.1.1.1
access-list 1 permit host 1.1.1.2
int fa0/0
ip access-group 1 in
end
sh ip access-lists ( == sh access-lists)
C:>ping 2.2.2.1
Pinging 2.2.2.1 with 32 bytes of data:
Request timed out.
Request timed out.
Reply from 2.2.2.1: bytes=32 time<1ms TTL=127
Reply from 2.2.2.1: bytes=32 time<1ms TTL=127
Ping statistics for 2.2.2.1:
Packets: Sent = 4, Received = 2, Lost = 2 (50% loss),
Approximate round trip times in milli-seconds:
Minimum = 0ms, Maximum = 0ms, Average = 0ms
!R1
conf t
no access-lists 1
no ip access-group 1 in
do sh access-lists
!
[PC1] --------------> X [R1]
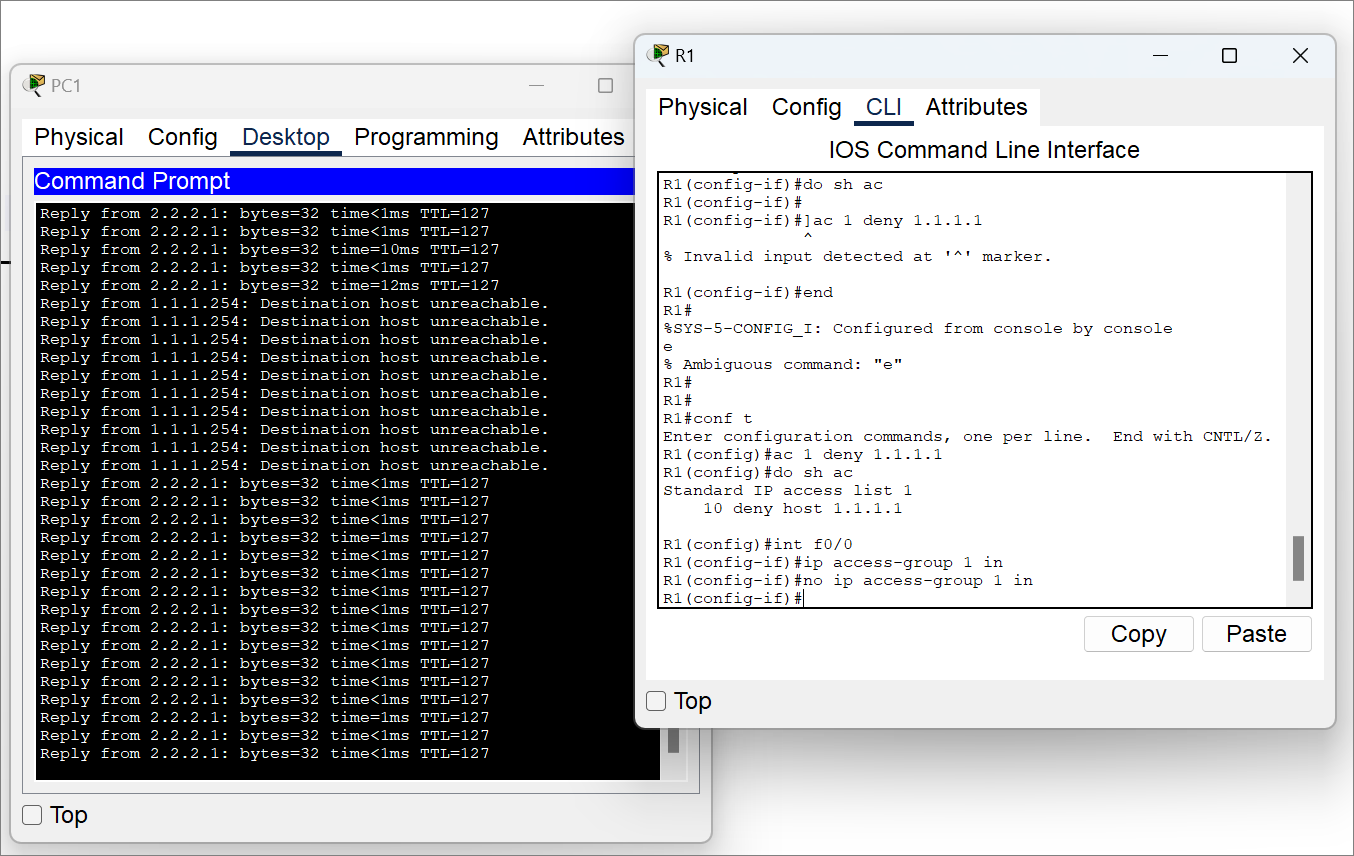
!R1
conf t
access-list 1 deny 1.1.1.1
do sh access-lists
C:>ping -t 2.2.2.1
Pinging 2.2.2.1 with 32 bytes of data:
Reply from 2.2.2.1: bytes=32 time<1ms TTL=127
Reply from 2.2.2.1: bytes=32 time<1ms TTL=127
Reply from 2.2.2.1: bytes=32 time=1ms TTL=127
int f0/0
ip access-group 1 in
Reply from 1.1.1.254: Destination host unreachable.
Reply from 1.1.1.254: Destination host unreachable.
Reply from 1.1.1.254: Destination host unreachable.
Reply from 1.1.1.254: Destination host unreachable.
!R1
conf t
access-list 1 deny 1.1.1.1
int f0/0
ip access-group 1 in
end
sh access-lists
sh ip int fa0/0
!
R1#sh ip int fa0/0
FastEthernet0/0 is up, line protocol is up (connected)
Internet address is 1.1.1.254/24
Broadcast address is 255.255.255.255
Address determined by setup command
MTU is 1500 bytes
Helper address is not set
Directed broadcast forwarding is disabled
Outgoing access list is not set
Inbound access list is 1
:
:(생략)
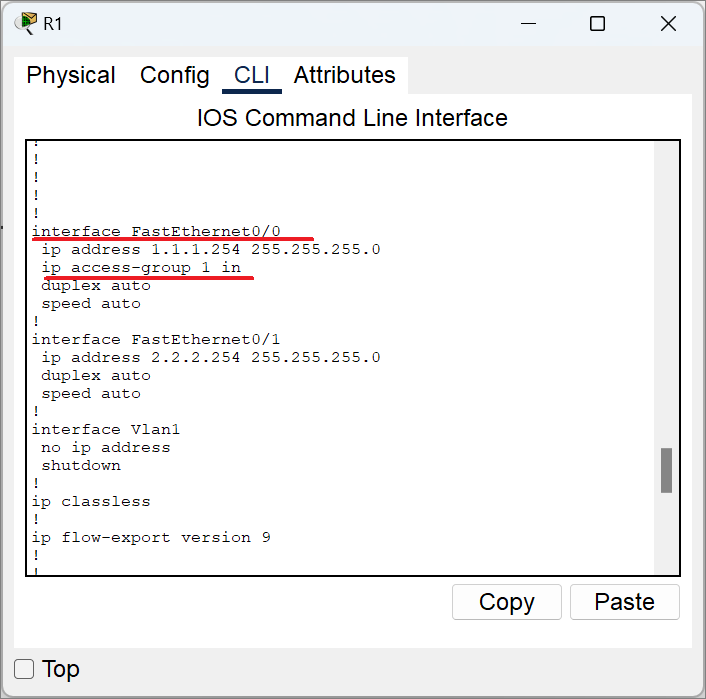
R1#sh run
:
:(생략)
!
interface FastEthernet0/0
ip address 1.1.1.254 255.255.255.0
ip access-group 1 in <-- 2. 인터페이스 적용
duplex auto
speed auto
!
:
:(생략)
!
access-list 1 deny host 1.1.1.1 <-- 1. 정책 설정
!
실습> ACL 설정하기
패킷트레이서로 실습을 진행한다.
파일명: acl2.pkt
R1 라우터에 비밀번호 설정
telnet 설정
console: cisco
enable: cisco
telnet: cisco
PC1에서 R1으로 telnet을 접속하면 허용한다.
PC2에서 R1으로 telnet을 접속하면 거부한다.
1. PC 설정
PC1:
IPv4 Address: 1.1.1.1
Subnet Mask: 255.255.255.0
Default Gateway: 1.1.1.254
DNS Server: X
PC2:
IPv4 Address: 2.2.2.1
Subnet Mask: 255.255.255.0
Default Gateway: 2.2.2.254
DNS Server: X
2. R1 설정
!R1
en
conf t
hostname R1
no ip domain-lookup
enable secret cisco
username admin privilege 1 password cisco
!
int f0/0
ip add 1.1.1.254 255.255.255.0
no sh
int f0/1
ip add 2.2.2.254 255.255.255.0
no sh
!
line con 0
password cisco
login
logging synchronous
!
line vty 0 4
login local
exit
!
access-list 1 permit 1.1.1.1
access-list 2 deny 2.2.2.1
int f0/0
ip access-group 1 in
int f0/1
ip access-group 2 in
!
end
sh ip int b
sh ip ac
sh ip int f0/0
sh ip int f0/1
!
3. 확인
PC1에서 R1으로 telnet 접속을 한다.
C:>telnet 1.1.1.254
Trying 1.1.1.254 ...Open
User Access Verification
Username: admin
Password:
R1>en
Password:
R1#exit
[Connection to 1.1.1.254 closed by foreign host]
PC2에서 R1으로 telnet 접속을 한다.
C:>telnet 2.2.2.254
Trying 2.2.2.254 ...
% Connection timed out; remote host not responding
