Router 직접 접근/간접 접근/패스워드/사용자 설정, 동적 라우팅 실습. (교육 12일차)

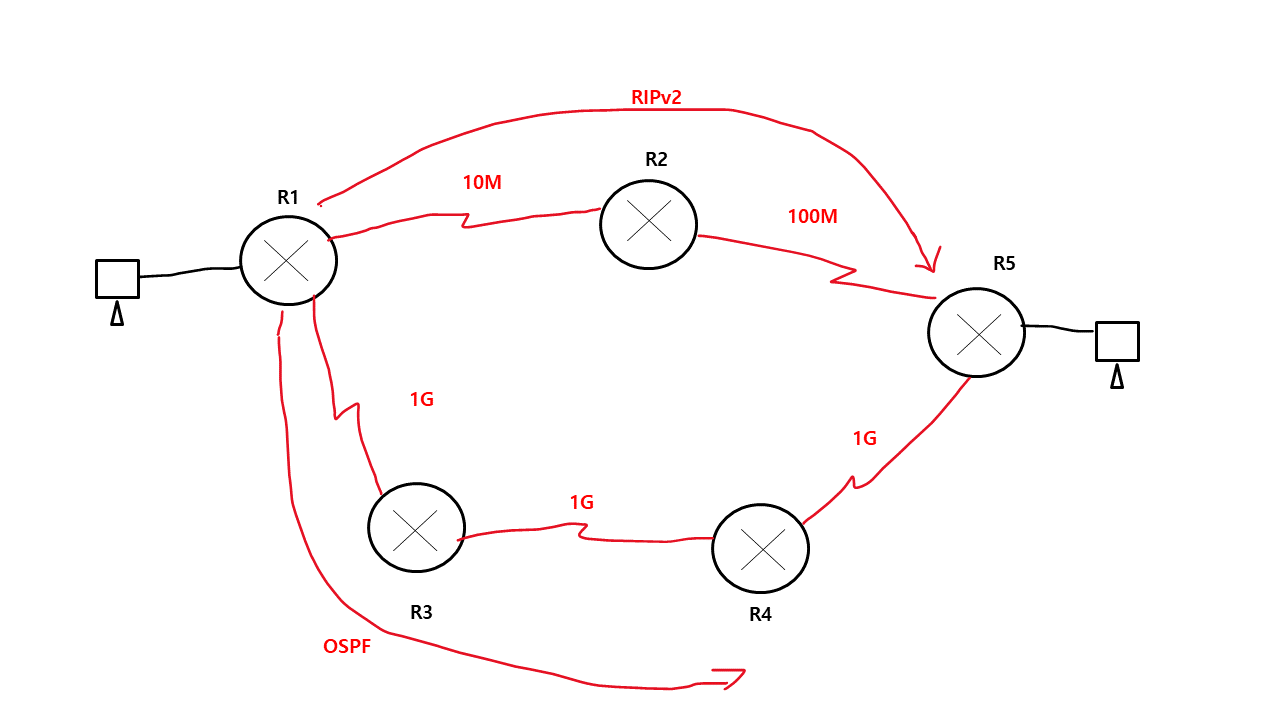
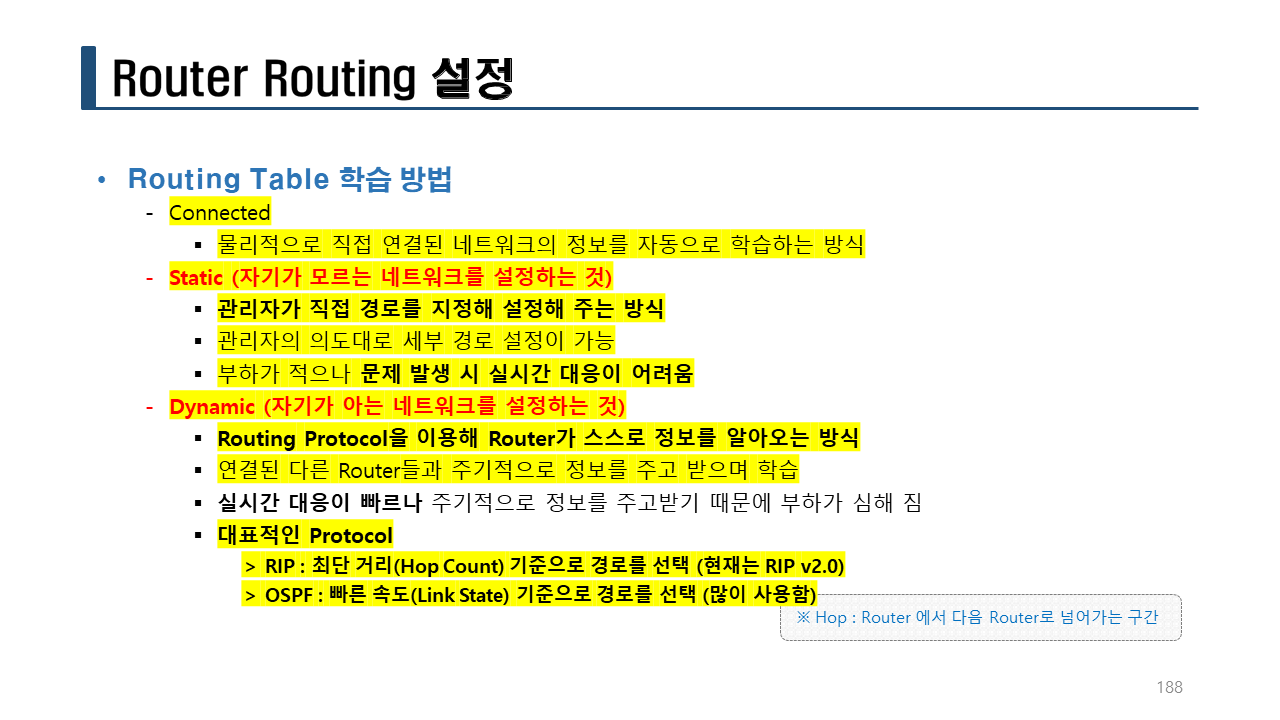
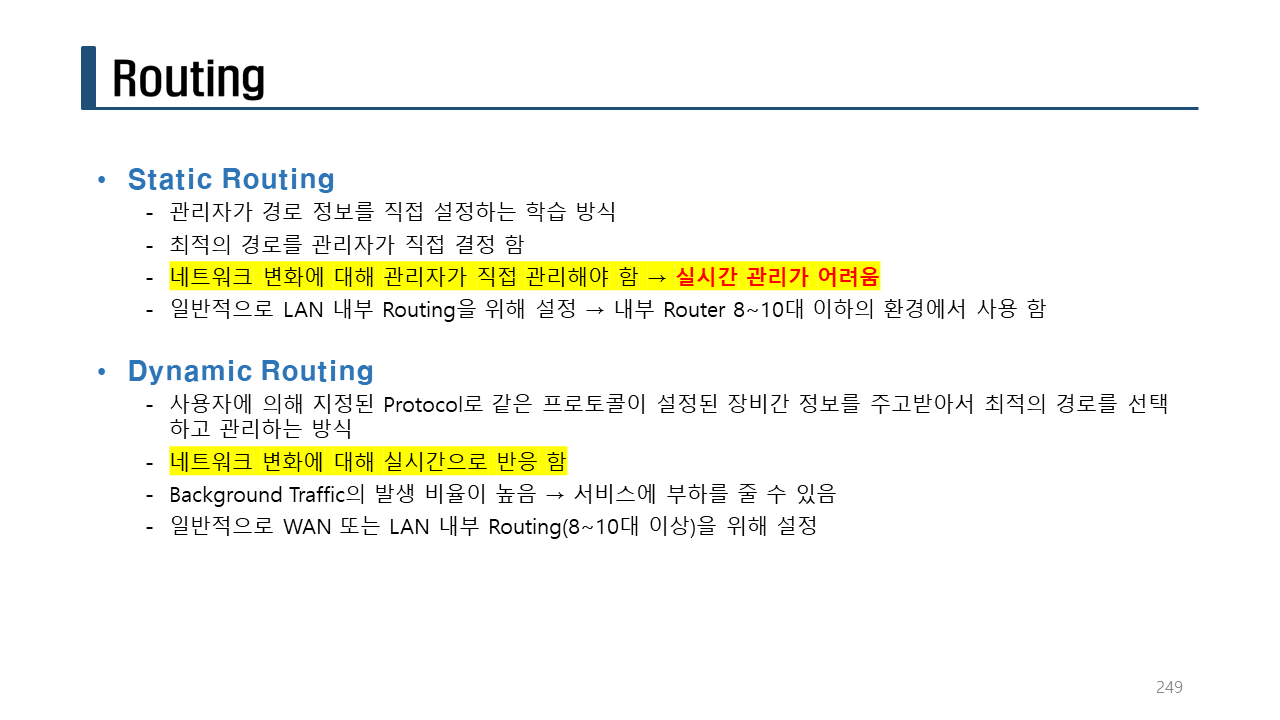
Static 설정의 단점인 문제 발생시 실시간 대응이 어려운 점을 보완키 위해 Dynamic 방식으로 진행 할 수 있다.
- 대표적인 Protocol : RIPv2, OSPF (주로 사용함)
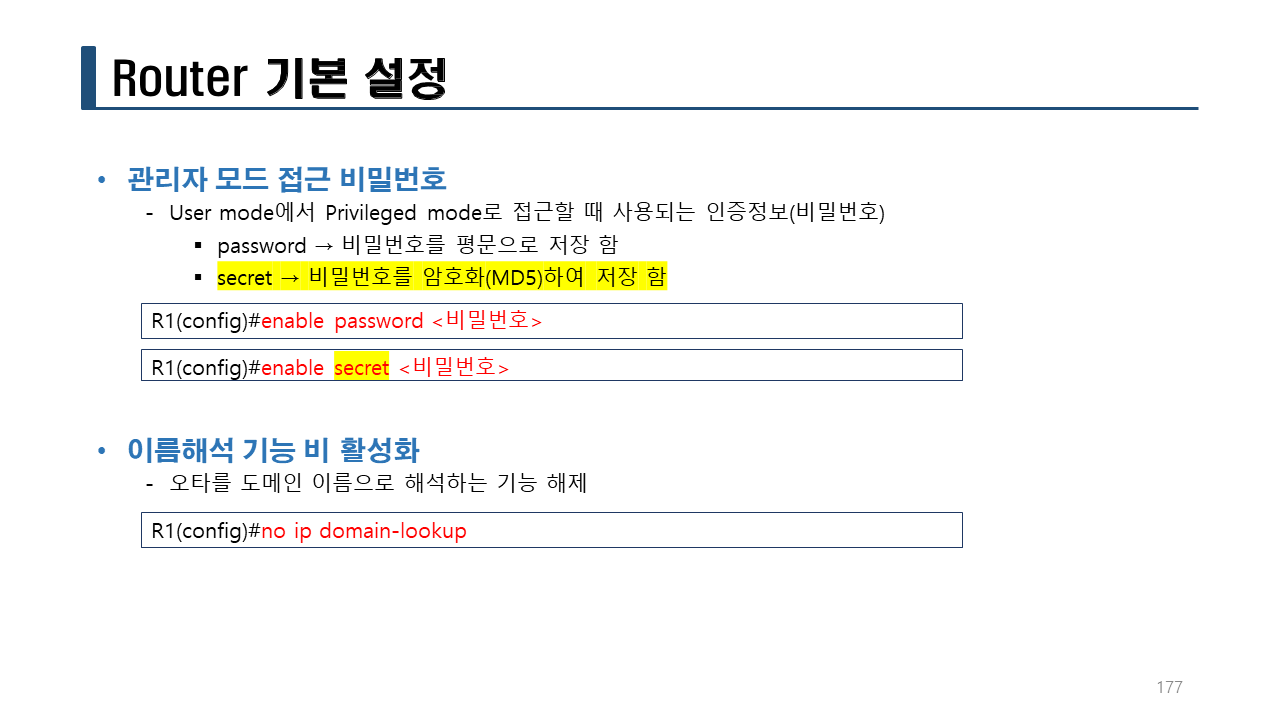
실습> enable password 설정하기
💥💥💥
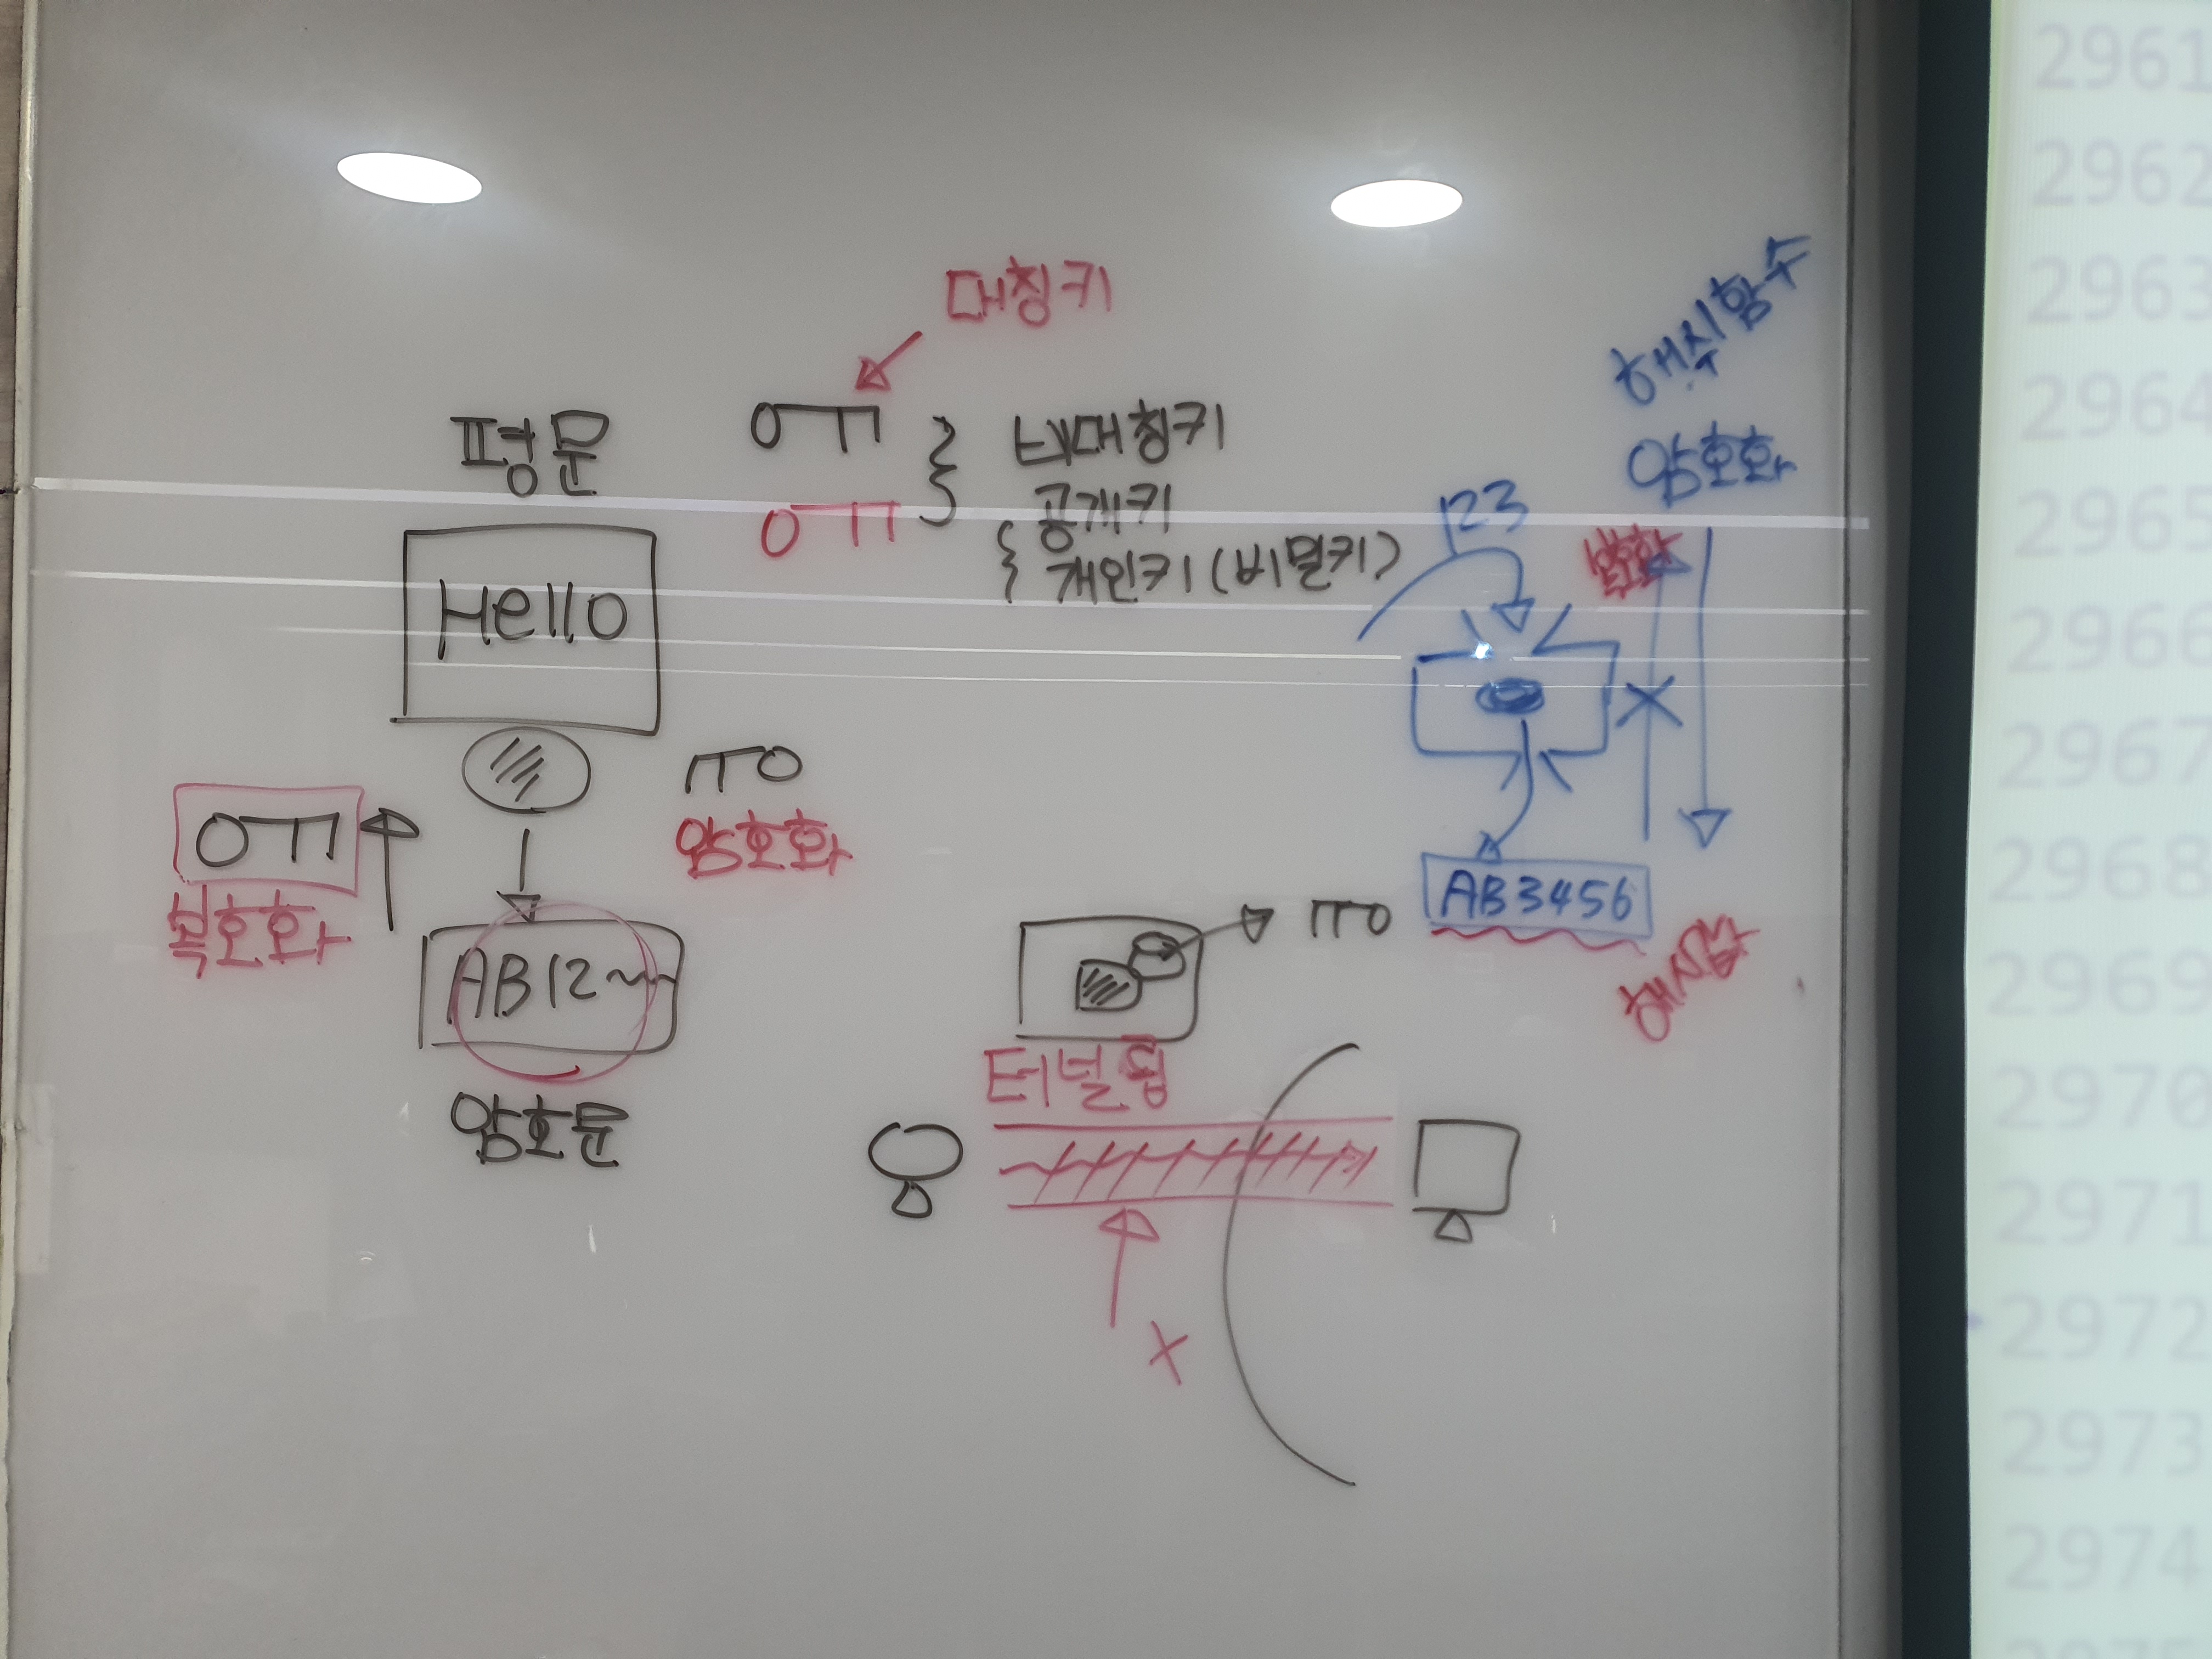
enable password <비밀번호> : 평문으로 비밀번호를 설정한다.
enable secret <비밀번호> : 암호문으로 비밀번호를 설정한다.
no enable password 비밀번호 : 평문으로 설정된 비밀번호를 삭제한다.
no enable secret 비밀번호 : 암호문으로 설정된 비밀번호를 삭제한다.
👉 관리자 모드로 아무나 접근할 수 없게 하기 위해서 설정한다.
--> 인가된 사용자만 관리자 모드로 변경할 수 있도록 한다.
💥💥💥
!R1
en
conf t
enable password cisco <-- 평문으로 enable 비밀번호를 설정한다.
end
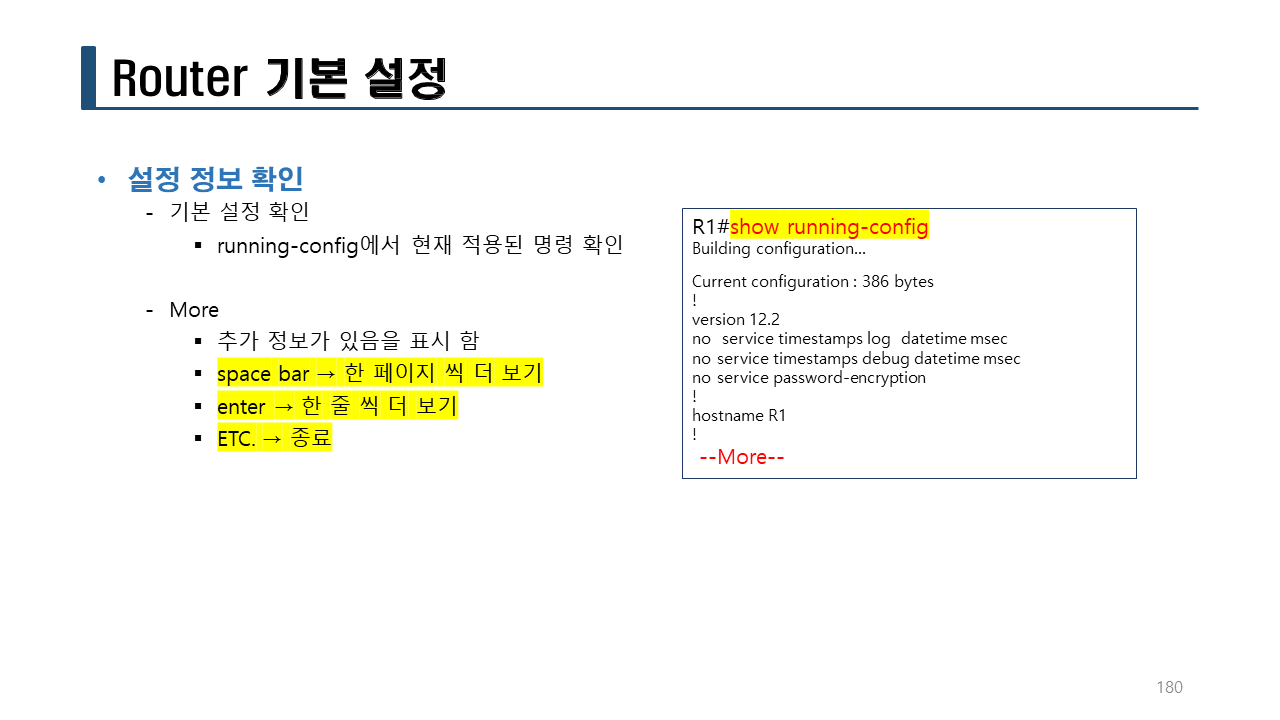
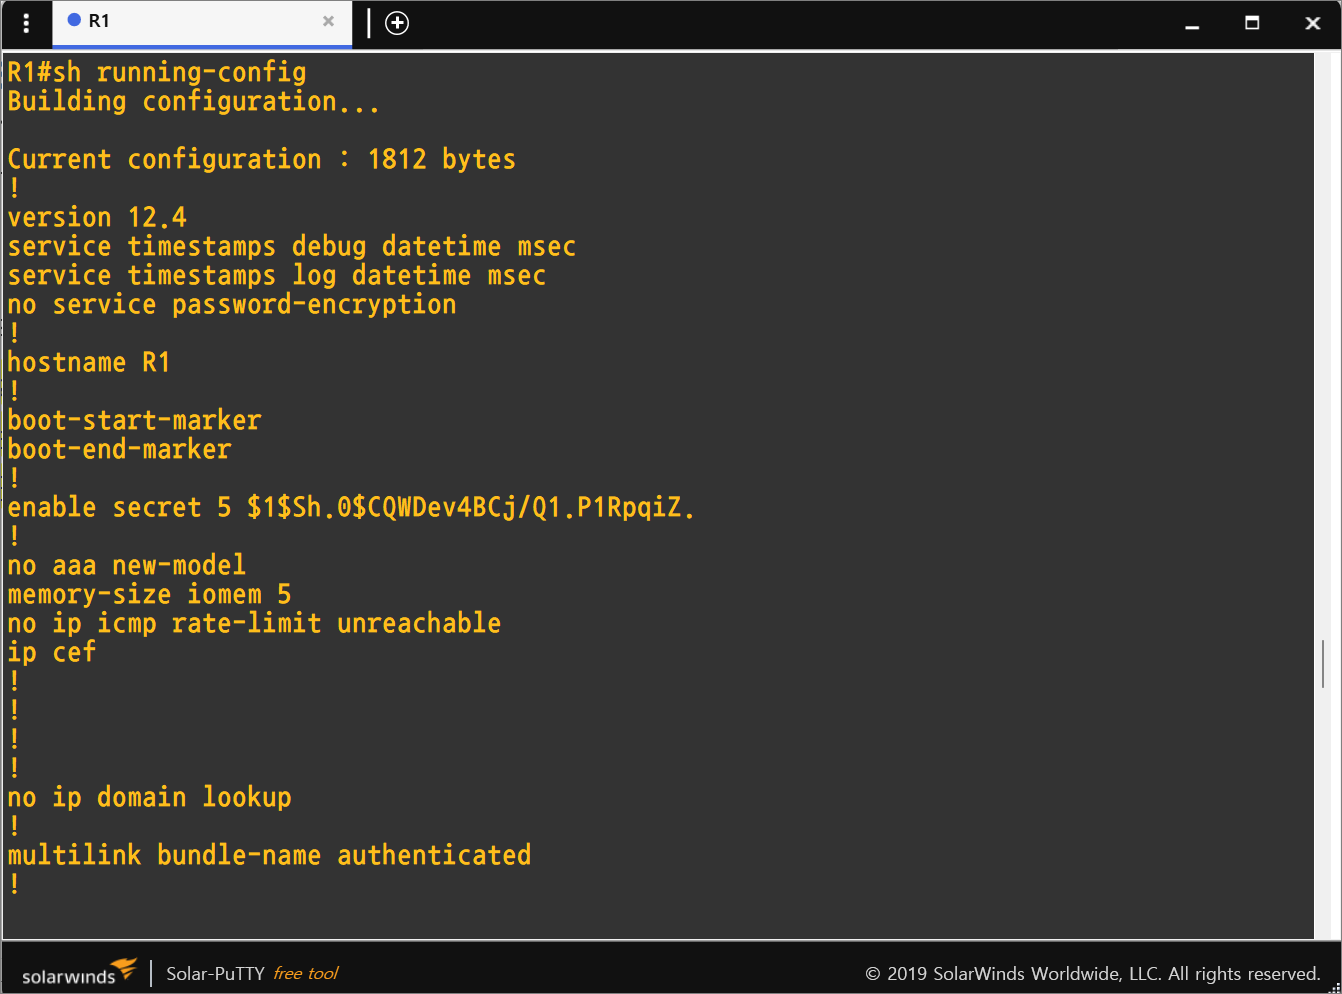
sh run
!
Router#sh run
Building configuration...
Current configuration : 626 bytes
!
version 15.1
no service timestamps log datetime msec
no service timestamps debug datetime msec
no service password-encryption
!
hostname Router
!
!
!
enable password cisco <-- 비밀번호가 평문으로 저장된다.
!
!
Router#exit
Router>en
Password:
Router#conf t
Router(config)#enable secret cisco
The enable secret you have chosen is the same as your enable password.
This is not recommended. Re-enter the enable secret.
Router(config)#do sh run
:
:
!
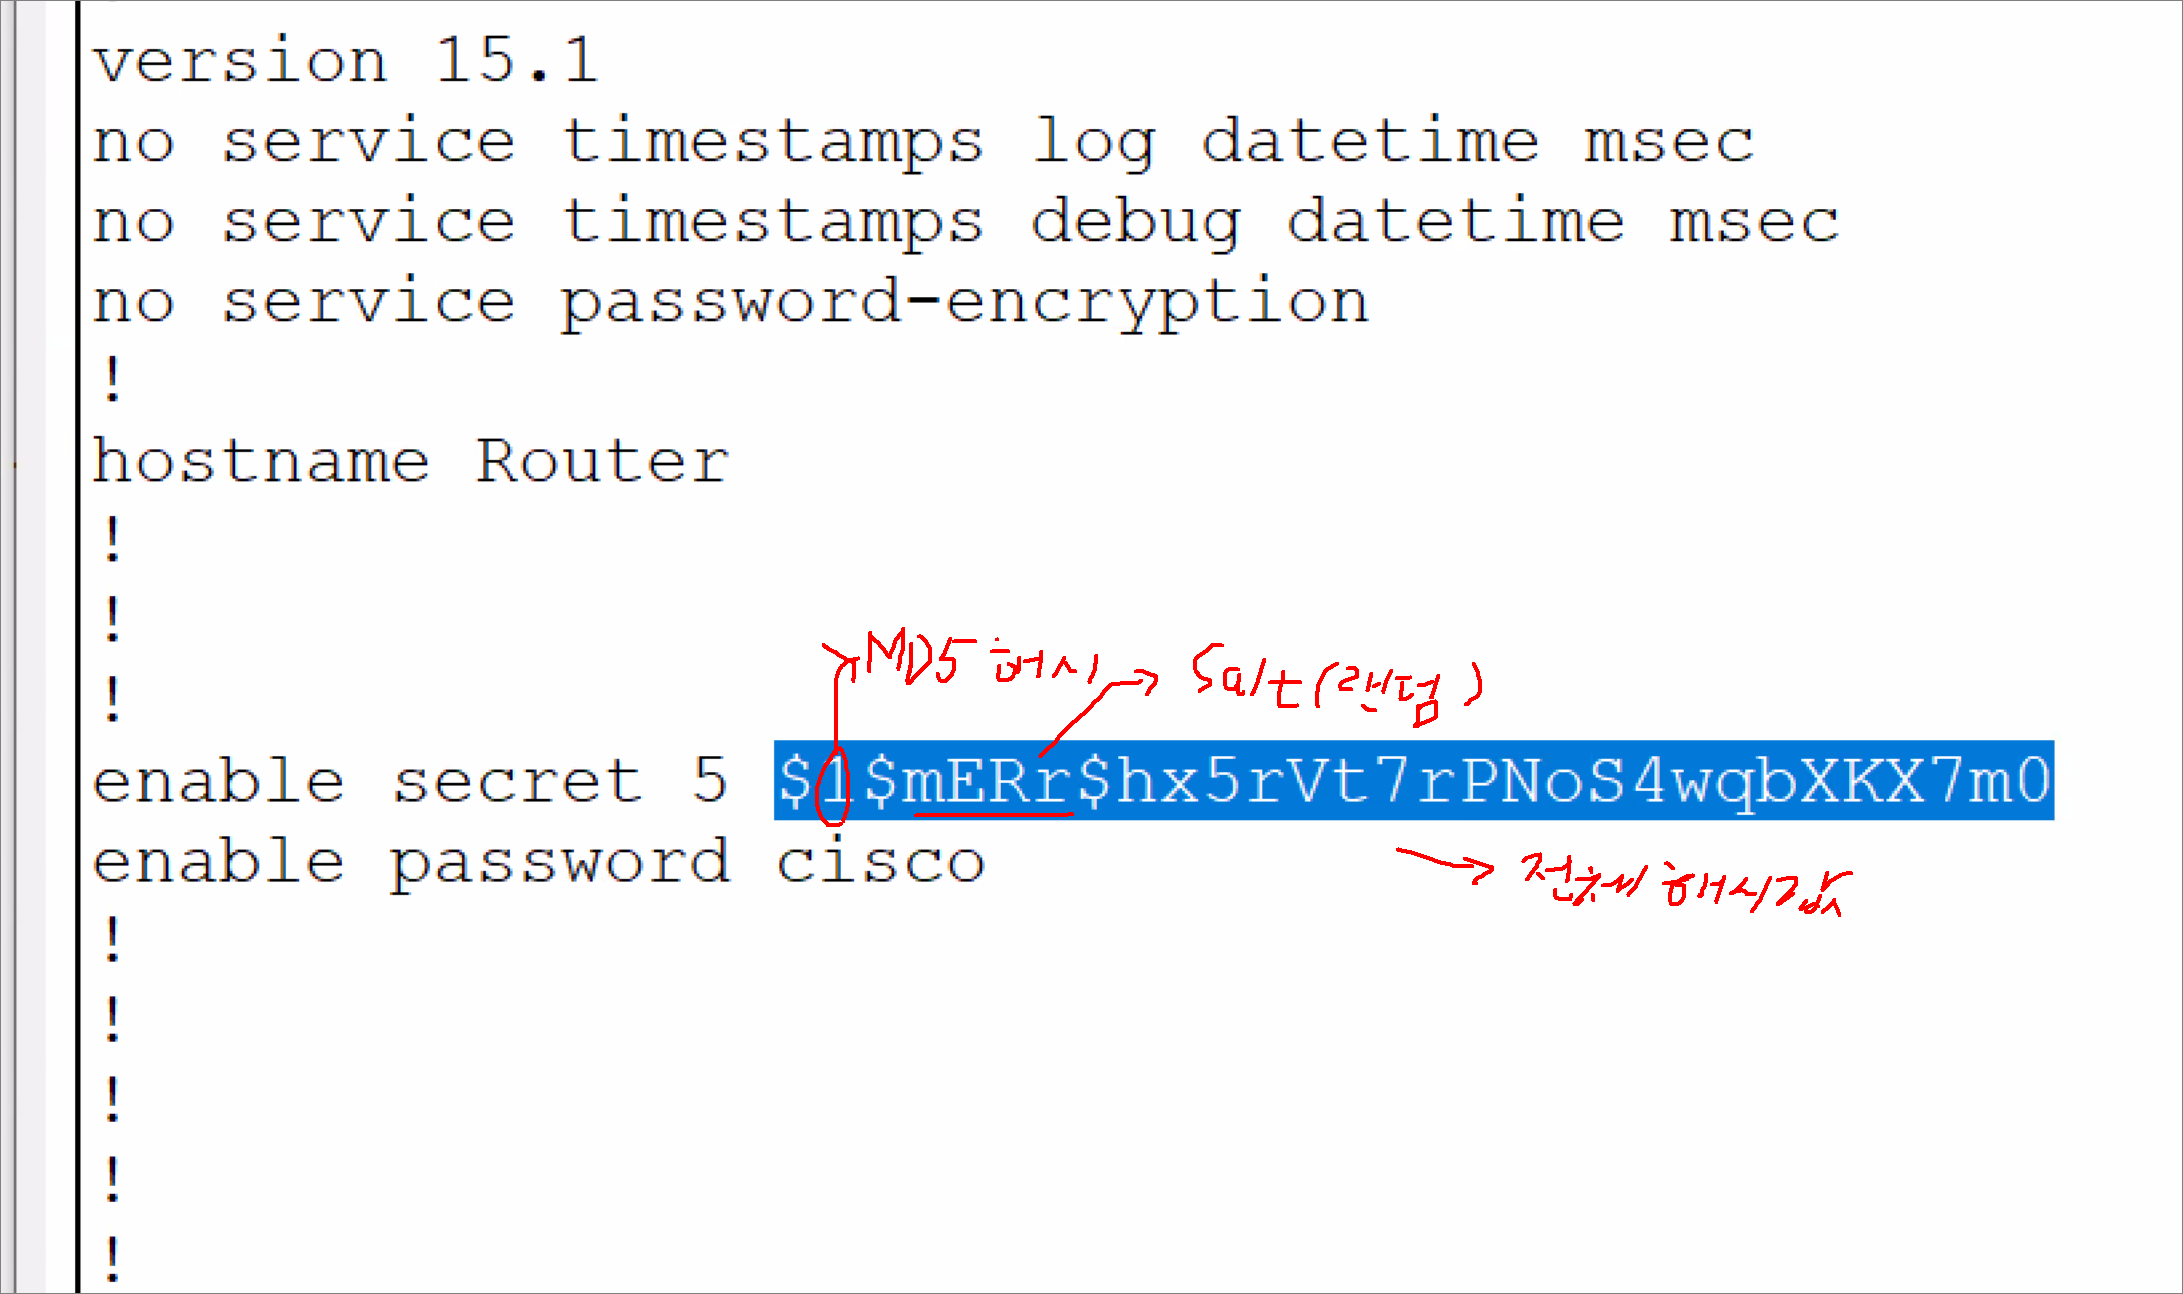
enable secret 5 mERr$hx5rVt7rPNoS4wqbXKX7m0
enable password cisco
!
:
:
enable password 삭제하기
Router(config)#no enable password
:
:(생략)
!
!
enable secret 5 mERr$hx5rVt7rPNoS4wqbXKX7m0
!
!
!
q
Router(config)#no enable secret <-- enable secret을 해제한다.
Router(config)#do sh run
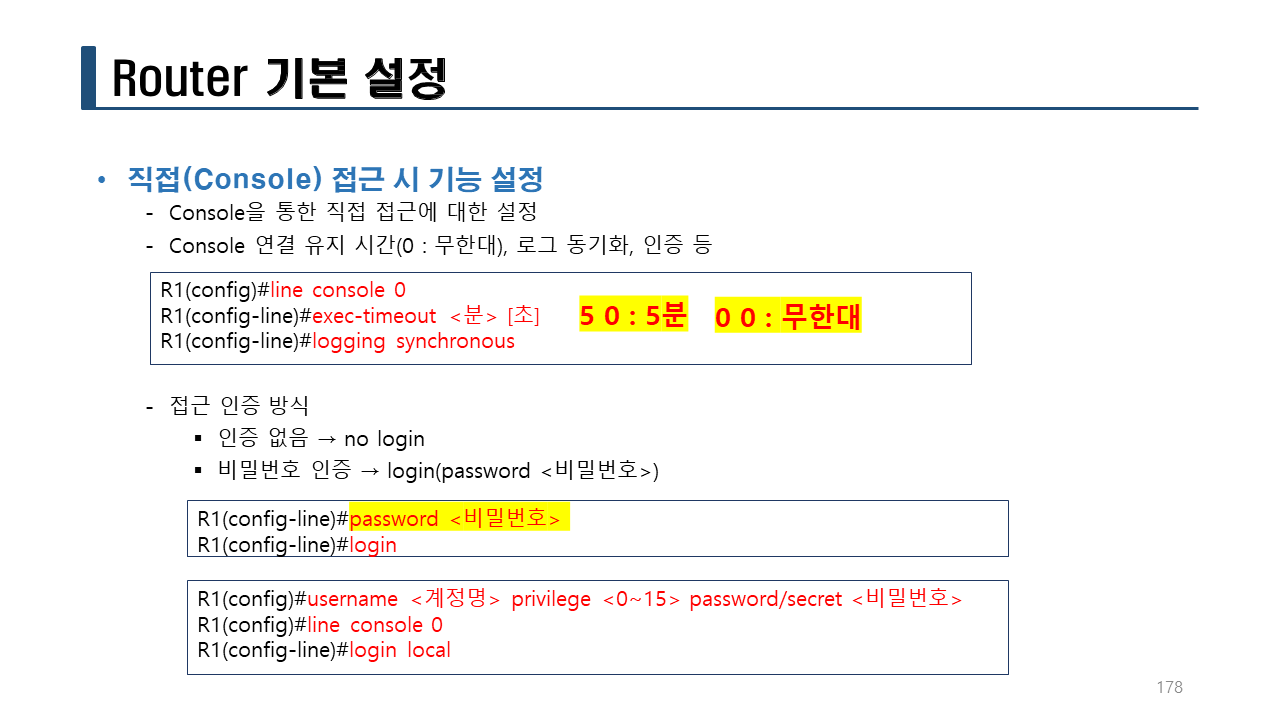
실습> console password 설정하기
👉 콘솔로 아무나 접근할 수 없게 하기 위해서 설정한다.
--> 인가된 사용자만 관리자 모드로 변경할 수 있도록 한다.
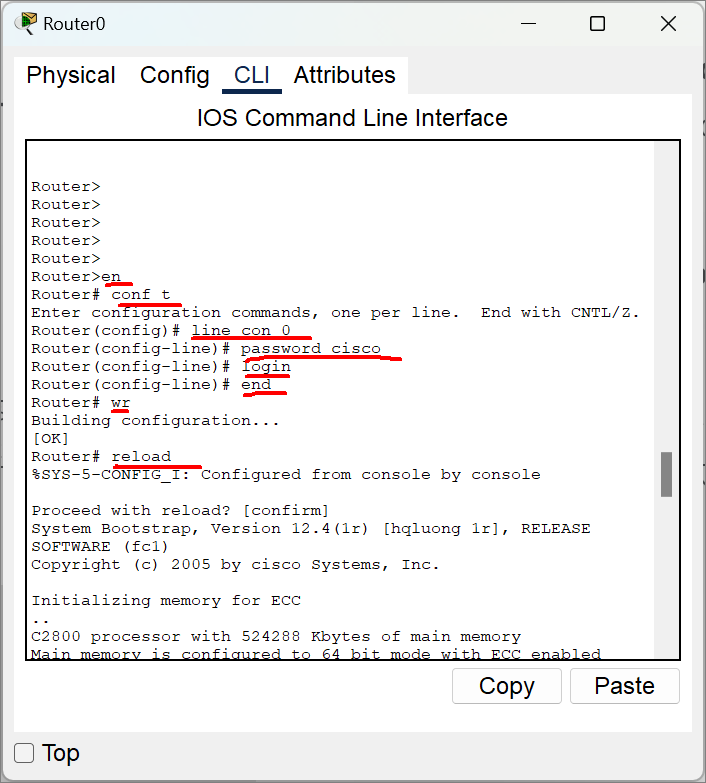
!R1
en
conf t
line con 0
password cisco
login
end
wr
reload
!
:
:(부팅중)
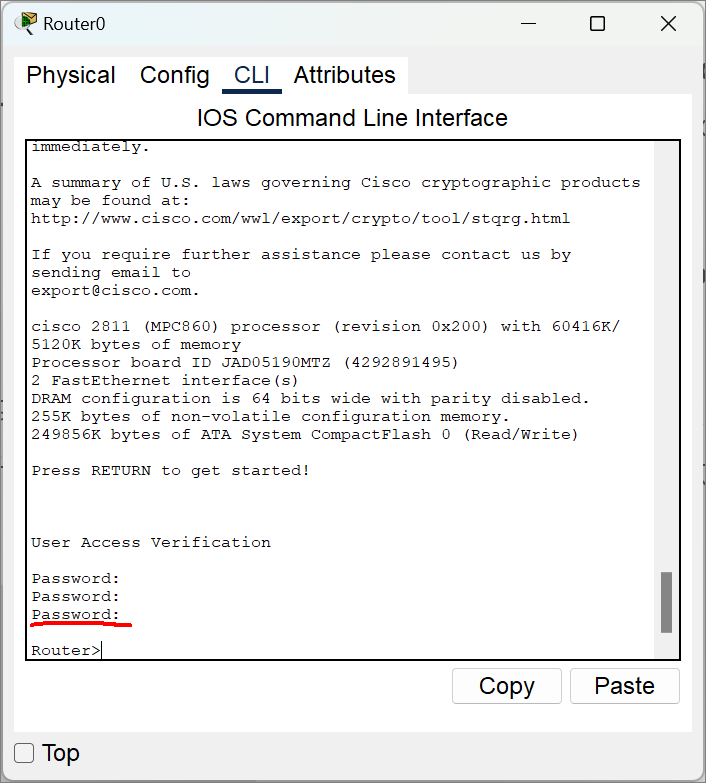
Press RETURN to get started!
User Access Verification
Password: <-- 콘솔에 비밀번호를 설정했기 때문이다.
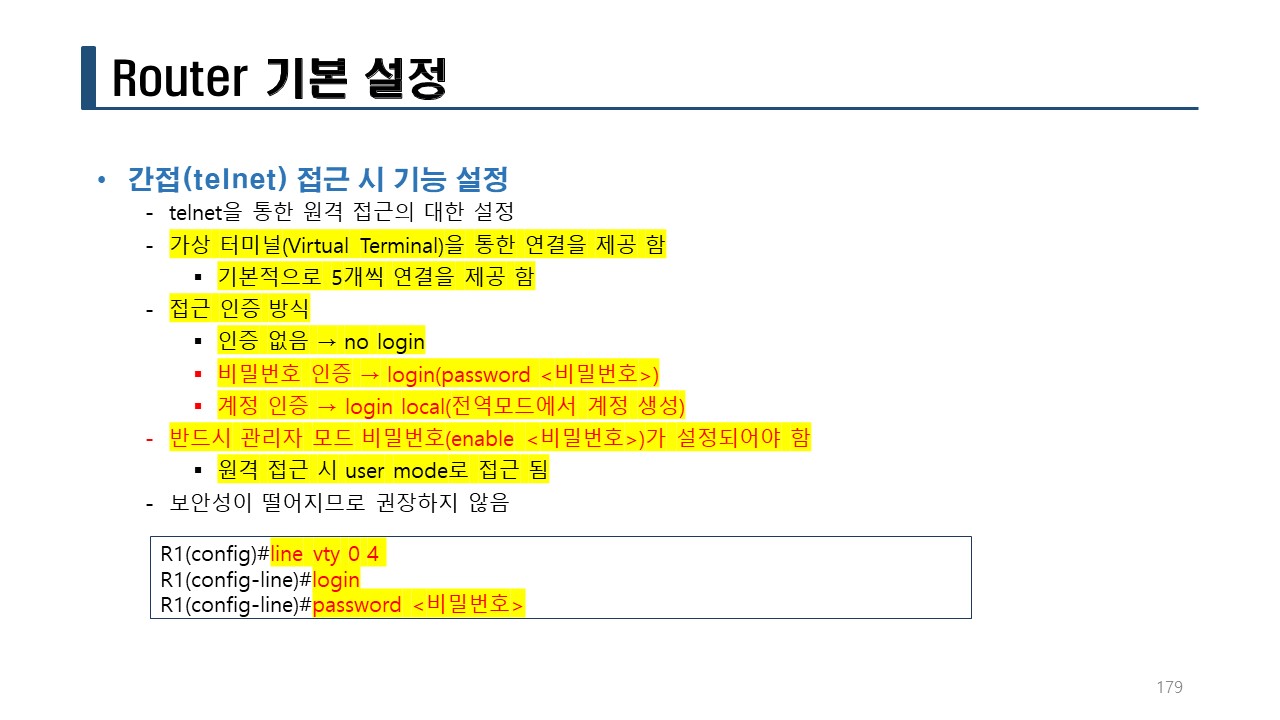
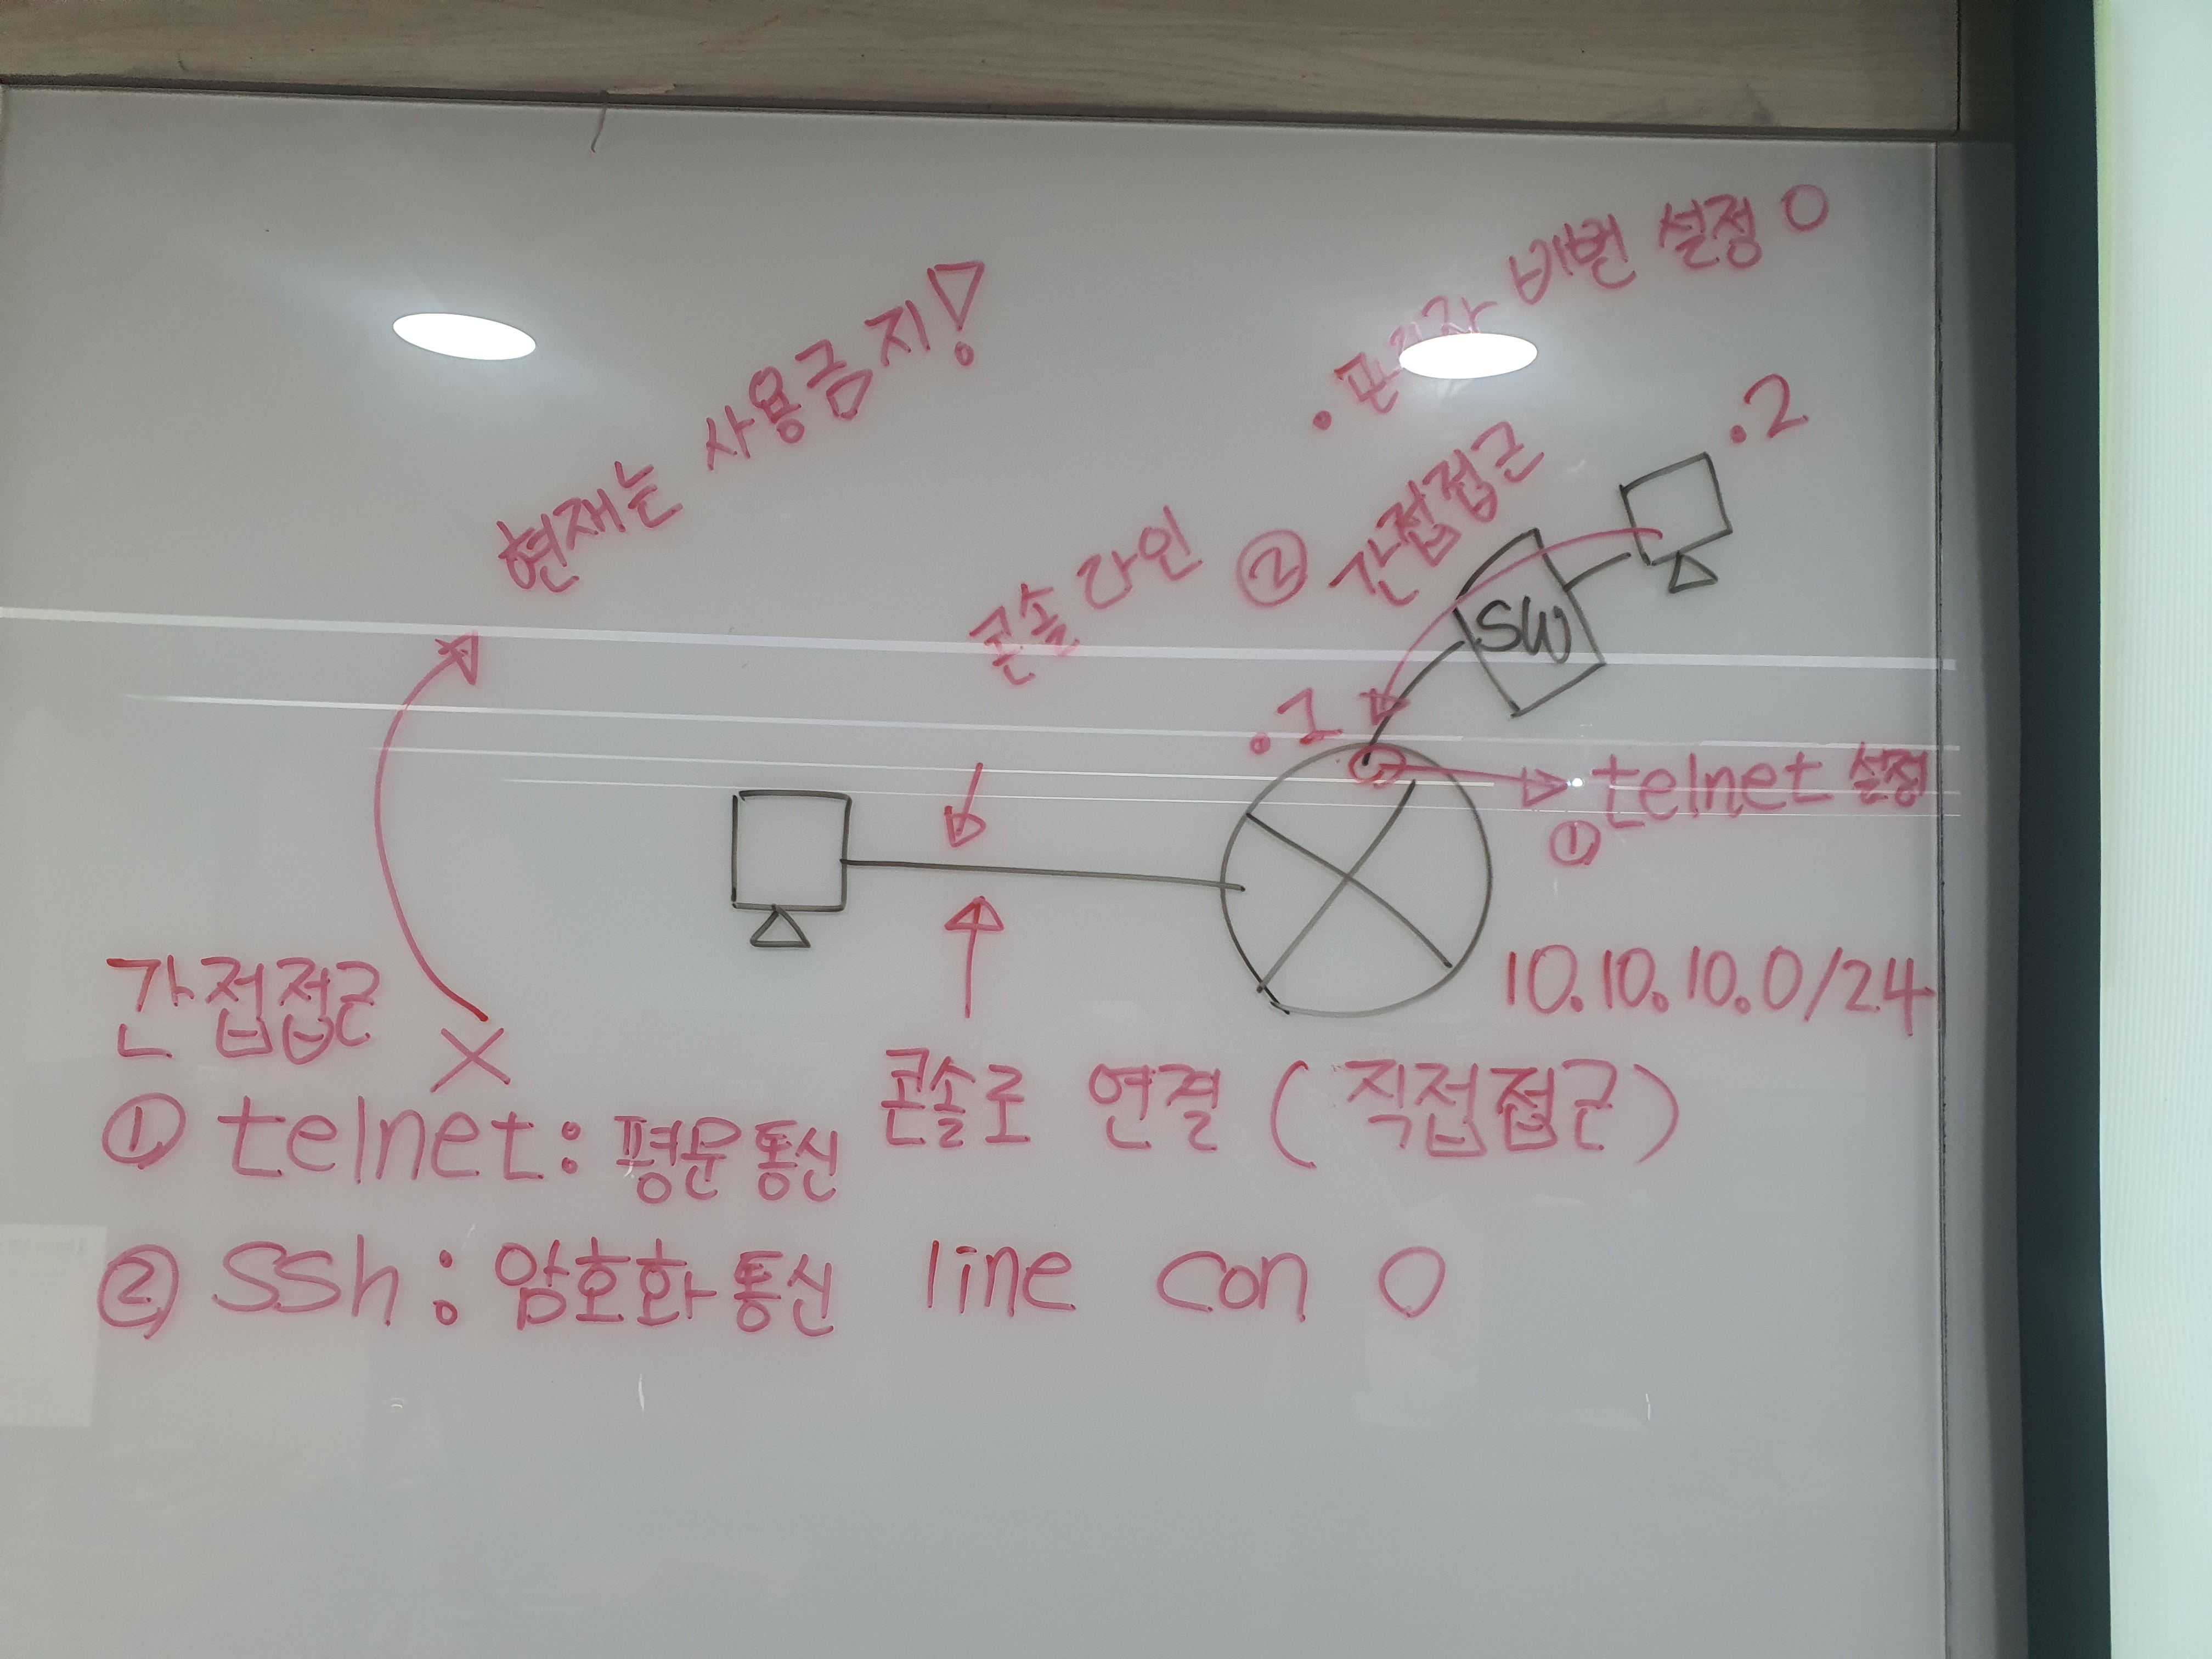
실습> 라우터에 원격 접속 설정하기
telnet: 평문으로 통신을 하므로 현재는 사용하지 않는다.
ssh: 암호문으로 통신을 하므로 현재 가장 많이 사용한다.
여기서는 원격 접속에 대한 부분이므로 telnet으로 설정해서 로그인한다.
콘솔 접속: line con 0
원격 접속: line vty 0 4
📌 Tip 📌
vty는 virtual teletype(또는 virtual terminal line)의 약자로, 원격지에서 가상 터미널을 이용하여 접속하는 방식을 말한다.
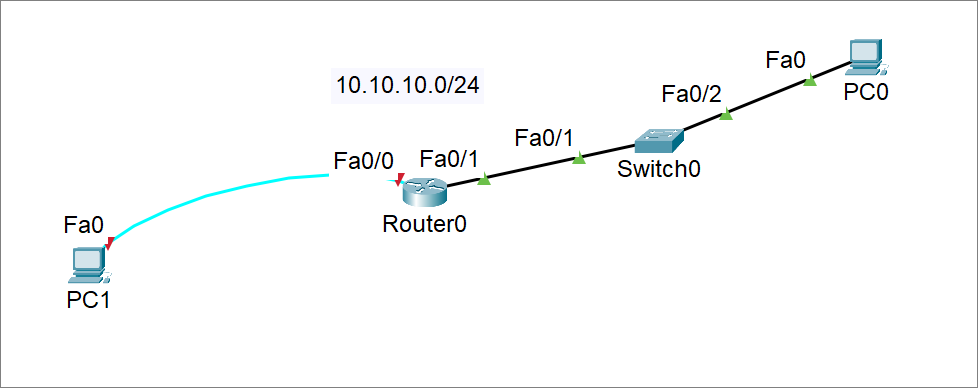
- Router 설정
!R1
en
conf t
enable secret cisco
line vty 0 4
login
password cisco
int f0/0
ip add 10.10.10.1 255.255.255.0
no sh
end
copy run start
!
- PC 설정
IPv4 address : 10.10.10.2
Subnet Mask : 255.255.255.0
Default Gateway : 10.10.10.1
- 통신 확인
C:>ping 10.10.10.1
Pinging 10.10.10.1 with 32 bytes of data:
Reply from 10.10.10.1: bytes=32 time<1ms TTL=255
Reply from 10.10.10.1: bytes=32 time<1ms TTL=255
Reply from 10.10.10.1: bytes=32 time<1ms TTL=255
Reply from 10.10.10.1: bytes=32 time<1ms TTL=255
Ping statistics for 10.10.10.1:
Packets: Sent = 4, Received = 4, Lost = 0 (0% loss),
Approximate round trip times in milli-seconds:
Minimum = 0ms, Maximum = 0ms, Average = 0ms
- 원격 접속
C:>telnet 10.10.10.1
Trying 10.10.10.1 ...Open
User Access Verification
Password:
Router>en
Password:
Router#
- 일반 유저 생성
!
en
conf t
no ip domain-lookup
username admin privilege 1 password cisco
line vty 0 4
login local
end
wr
no ip domain-lookup ? ==> 스위치, 라우터 등에서 작업할 때 오타로 인해 인식할 수 없는 명령어가 입력되면 도메인 이름 여부를 자동으로 검색하게 되는데, 이게 시간이 오래걸립니다. 오타 등으로 인해서 도메인 이름을 검색하는데 걸리는 시간동안 작업하지 못하는 현상을 방지하기 위한 편의성 관련 명령어 임.
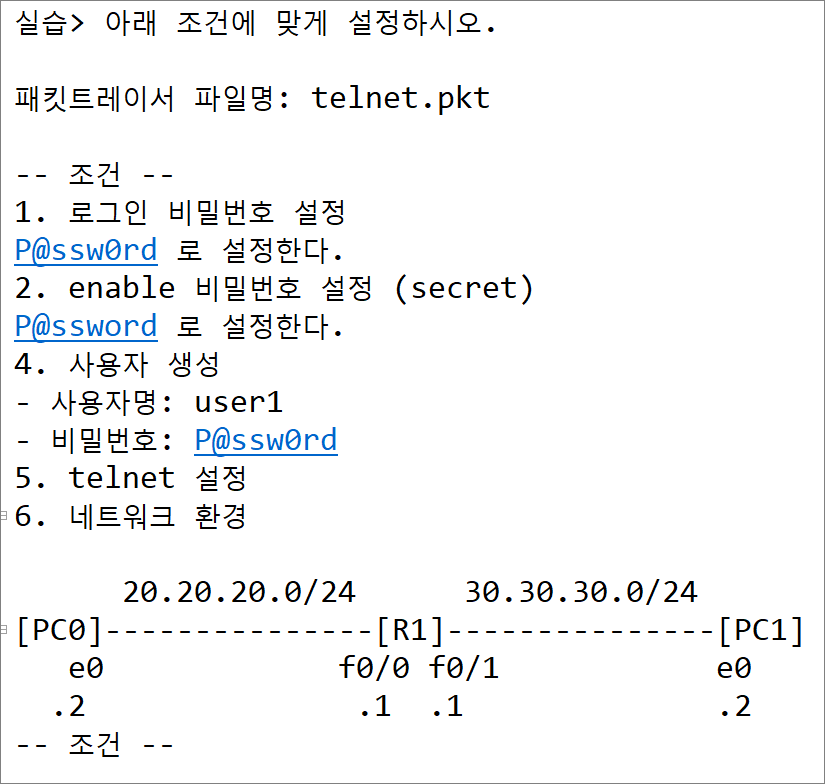
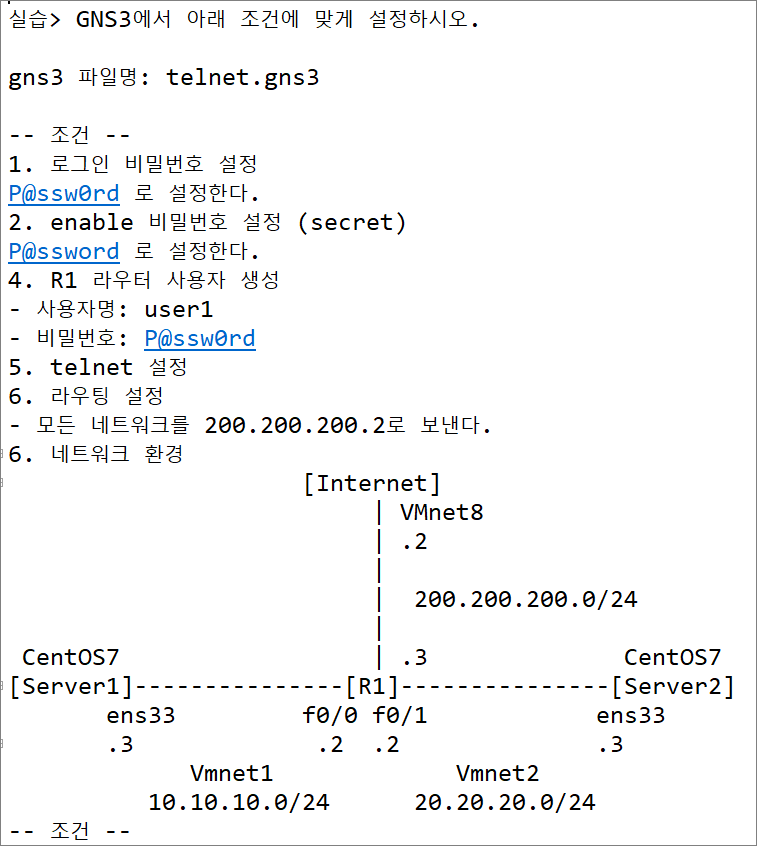
실습> 아래 조건에 맞게 설정하시오.
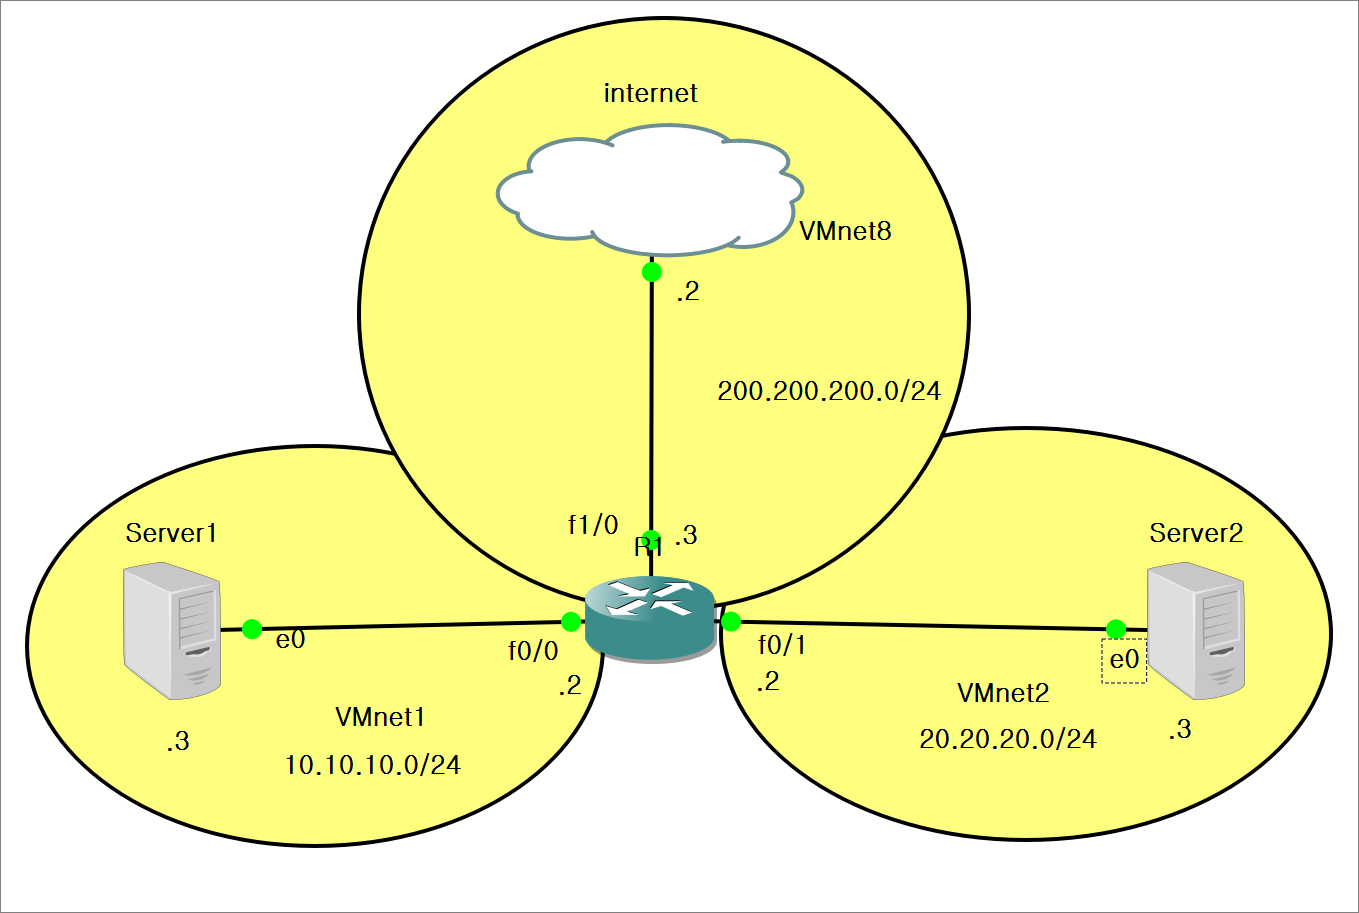
실습> GNS3에서 아래 조건에 맞게 설정하시오.
- Server1 설정
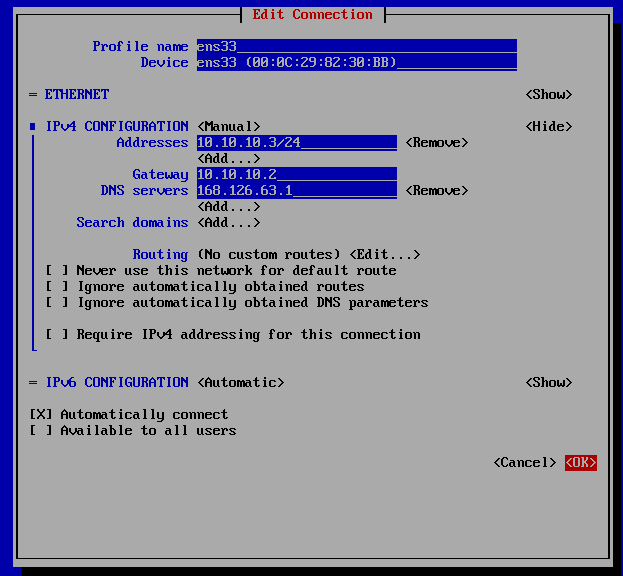
nmtui 명령어로 네트워크 정보를 수정한다.
[root@localhost ~]# nmtui
[연결 편집] > [ens33 편집...] >
IPv4 설정: <수동> <보기>
주소: 10.10.10.3/24
게이트웨이: 10.10.10.2
DNS 서버: 168.126.63.1
[X] 자동으로 연결
[ ] 모든 사용자에게 사용 가능 <-- space bar를 눌러서 체크를 해제한다.
눌러서 저장한다.
뒤로 계속 가서 종료를 눌러서 프로그램을 종료한다.
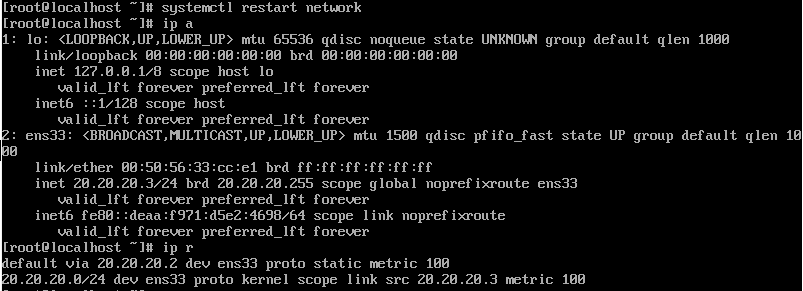
네트워크를 재시작 한다.
[root@localhost ~]# systemctl restart network
[root@localhost ~]# ip a
[root@localhost ~]# ip r
cmd > ssh 명령어로 Server1로 접속한다.
C:\Users\user2>del .ssh\known_hosts
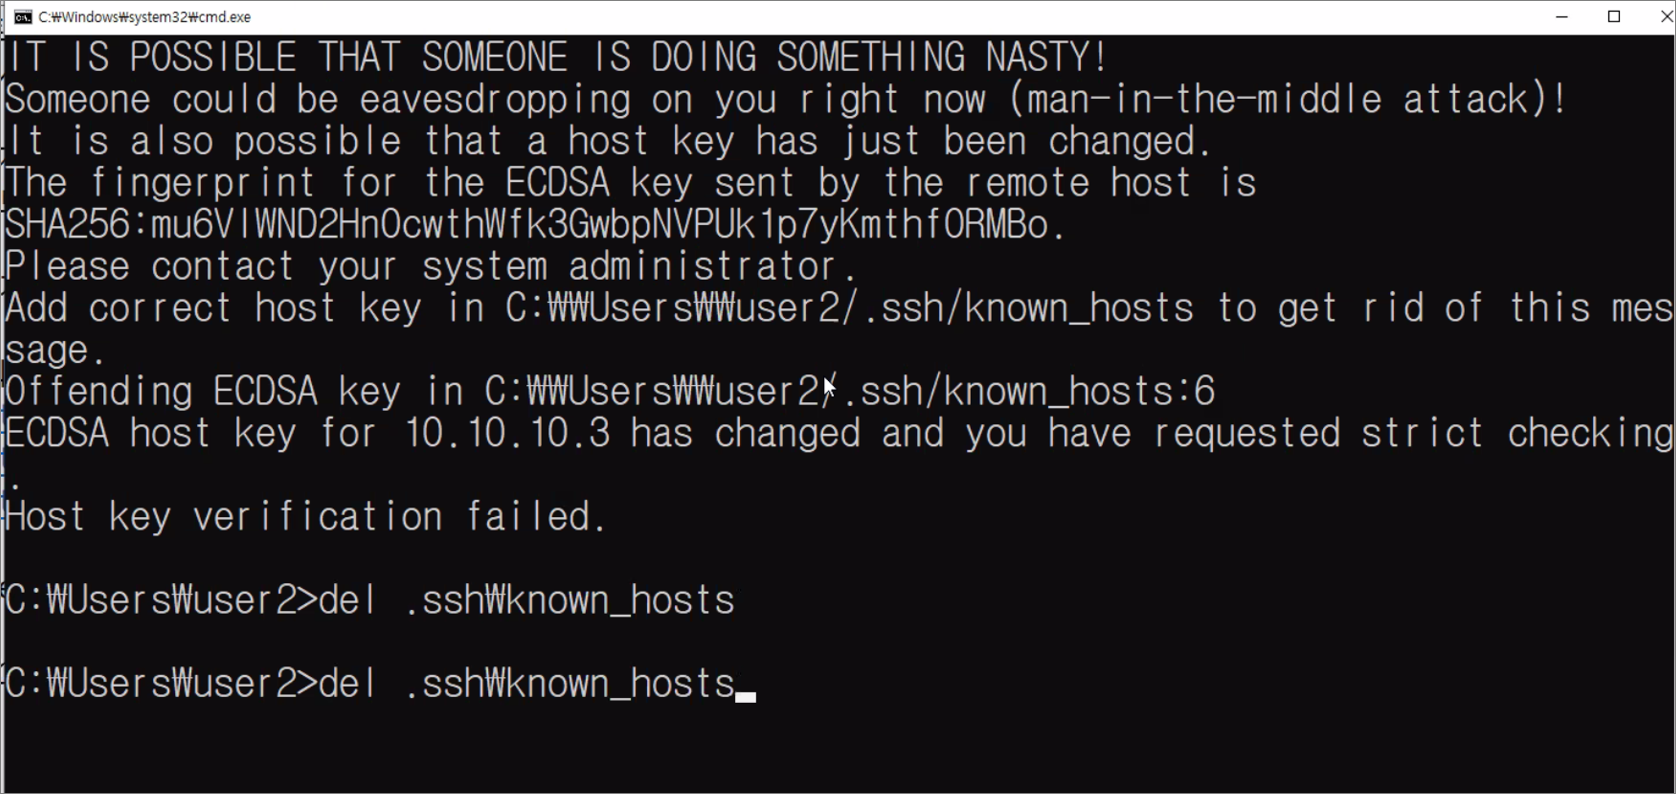
C:\Users\user2>ssh root@10.10.10.3
The authenticity of host '10.10.10.3 (10.10.10.3)' can't be established.
ECDSA key fingerprint is SHA256:mu6VIWND2Hn0cwthWfk3GwbpNVPUk1p7yKmthf0RMBo.
Are you sure you want to continue connecting (yes/no/[fingerprint])? yes
Warning: Permanently added '10.10.10.3' (ECDSA) to the list of known hosts.
root@10.10.10.3's password:
Last login: Fri Dec 2 02:50:29 2022 from 10.10.10.1
[root@localhost ~]#
telnet 패키지를 설치한다.
[root@localhost ~]# yum -y install telnet
- Server2 설정
nmtui 명령어로 네트워크 정보를 수정한다.
[root@localhost ~]# nmtui
[연결 편집] > [ens33 편집...] >
IPv4 설정: <수동> <보기>
주소: 20.20.20.3/24
게이트웨이: 20.20.20.2
DNS 서버: 168.126.63.1
[X] 자동으로 연결
[ ] 모든 사용자에게 사용 가능 <-- space bar를 눌러서 체크를 해제한다.
눌러서 저장한다.
뒤로 계속 가서 종료를 눌러서 프로그램을 종료한다.
네트워크를 재시작 한다.
[root@localhost ~]# systemctl restart network
[root@localhost ~]# ip a
[root@localhost ~]# ip r

cmd > ssh 명령어로 Server1로 접속한다.
C:\Users\user2>ssh root@20.20.20.3
The authenticity of host '20.20.20.3 (20.20.20.3)' can't be established.
ECDSA key fingerprint is SHA256:h6n2wtnBwRLZUkbSZmomOdrtJm5ayt4hGGr4KKbzwug.
Are you sure you want to continue connecting (yes/no/[fingerprint])? yes
Warning: Permanently added '20.20.20.3' (ECDSA) to the list of known hosts.
root@20.20.20.3's password:
Last login: Fri Dec 2 14:11:24 2022
[root@localhost ~]#
리눅스에 telnet 패키지를 설치한다.
[root@localhost ~]# yum -y install telnet
-
R1 설정
!R1
conf t
int f0/0
ip add 10.10.10.2 255.255.255.0
no sh
int f0/1
ip add 20.20.20.2 255.255.255.0
no sh
int f1/0
ip add 200.200.200.3 255.255.255.0
no sh
ip route 0.0.0.0 0.0.0.0 200.200.200.2
enable secret P@ssw0rd
line con 0
password P@ssw0rd
login
exit
username user1 privilege 1 password P@ssw0rd
line vty 0 4
login local
end
!
wr
!
do sh ip route
do sh ip int b
ping 10.10.10.3
ping 20.20.20.3
ping 8.8.8.8
! -
telnet 접속
R1 자기 자신으로 접속
설정이 완료되면 telnet으로 자기 자신으로 접속한다.
R1#telnet 10.10.10.2
Trying 10.10.10.2 ... Open
User Access Verification
Username: user1
Password: <-- P@ssw0rd
R1>en
Password: <-- P@ssw0rd
R1#exit
Server1에서 R1으로 접속
[root@localhost ~]# telnet 10.10.10.2
Trying 10.10.10.2...
Connected to 10.10.10.2.
Escape character is '^]'.
User Access Verification
Username: user1
Password: <-- P@ssw0rd 입력
R1>en
Password: <-- P@ssw0rd 입력
R1#exit
Server2에서 R1으로 접속
[root@localhost ~]# telnet 20.20.20.2
Trying 20.20.20.2...
Connected to 20.20.20.2.
Escape character is '^]'.
User Access Verification
Username: user1
Password:
R1>en
Password:
R1#exit
실습> logging synchronous
logging synchronous? ==> 스위치/라우터 등의 장비에 접속하여 작업하다보면, 내가 입력하고 있는 중간에 장비로부터 어떤 메세지가 발생하면 내 명령어 중간에 마구 뒤섞인 메세지 형태로 보여지기 때문에 작업하기 어렵게 된다. 그런 현상을 방지하기 위해 장비의 메세지가 화면에 마구 뿌려지는 것을 방지하고, 내가 작업하고 있는 명령어가 고스란히 보여지게 해주는 편의성 관련 명령어 임.
logging synchronous: GNS3에서는 자동 설정되어 있다.
packet tracer: 설정이 안되어 있다.
GNS3에서 테스트 한다.
- logging synchronous 가 설정되어 있는 경우
!R1
conf t
line con 0
logging synchronous
int f0/0
sh
로그가 나오면서 자동으로 엔터가 인식되서 프롬프트가 출력된다.
R1(config-if)#
Mar 1 00:07:13.763: %LINK-5-CHANGED: Interface FastEthernet0/0, changed state to administratively down
Mar 1 00:07:14.763: %LINEPROTO-5-UPDOWN: Line protocol on Interface FastEthernet0/0, changed state to down
R1(config-if)#
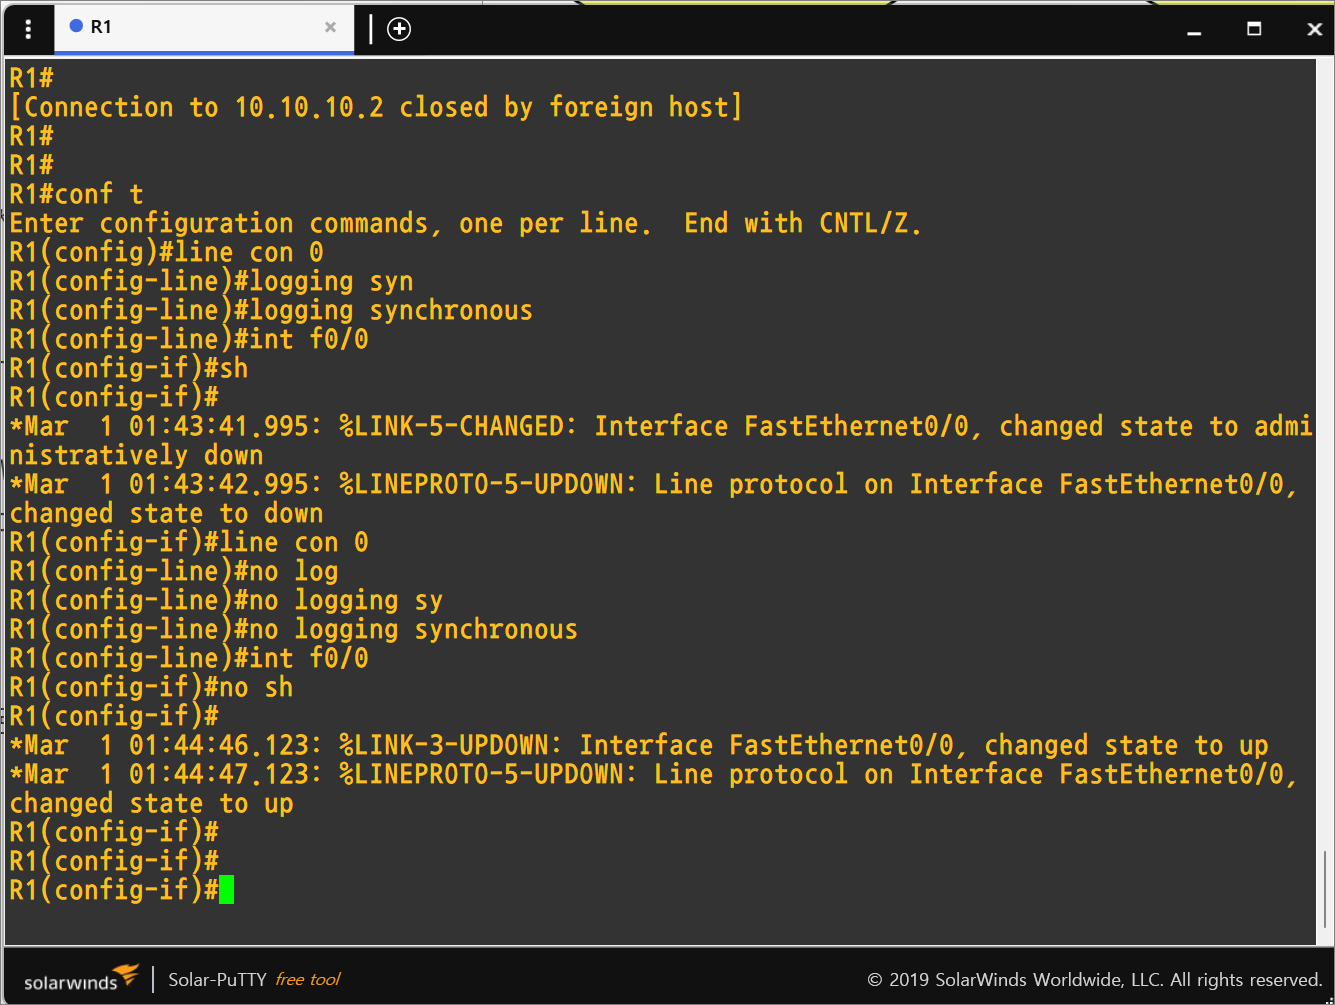
- logging synchronous 가 설정되지 않은 경우
!R1
conf t
line con 0
no logging synchronous
int f0/0
no sh
로그가 나오면서 프롬프트가 출력이 안된다.
R1(config-if)#
Mar 1 00:09:51.187: %LINK-3-UPDOWN: Interface FastEthernet0/0, changed state to up
Mar 1 00:09:52.187: %LINEPROTO-5-UPDOWN: Line protocol on Interface FastEthernet0/0, changed state to up
그러므로 사용자가 엔터를 쳐야 프롬프트가 나온다.
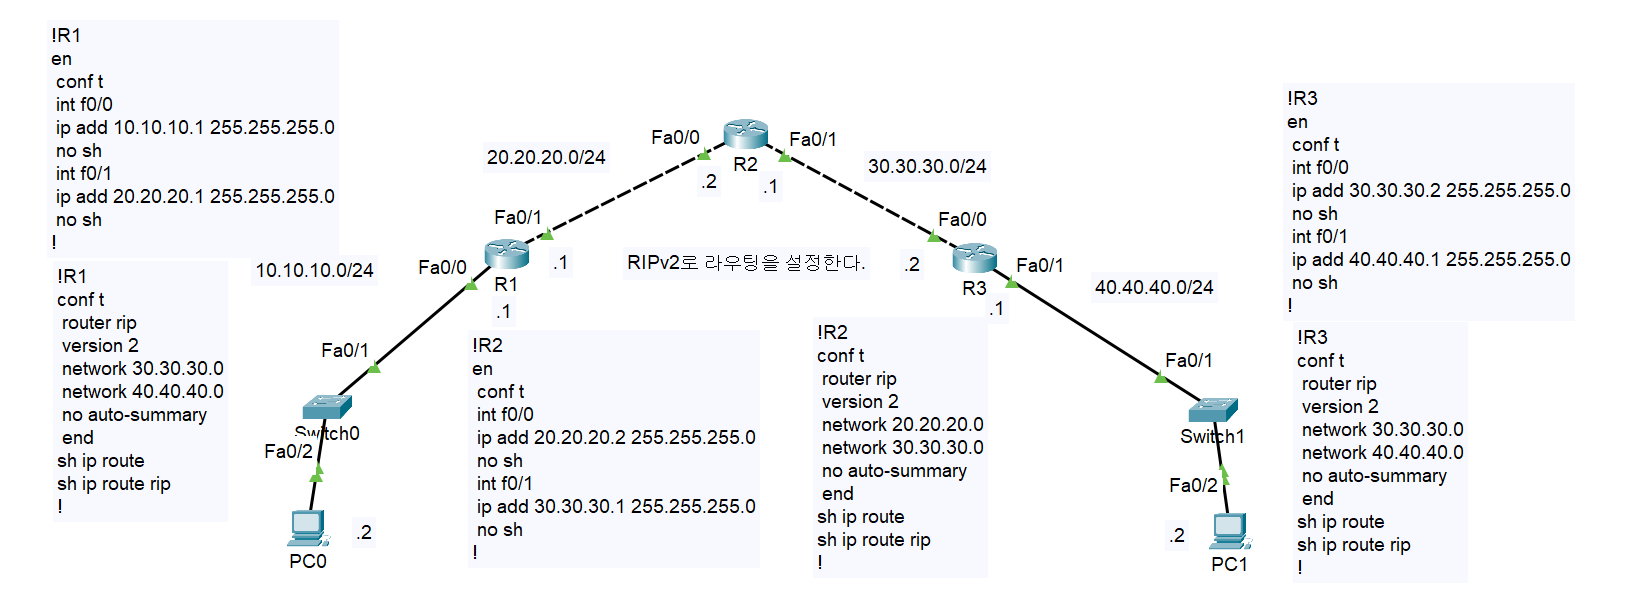
실습> 동적 라우팅 RIP
동적 라우팅 RIP 설정
router rip : 동적 라우팅 프로토콜 RIP 설정
version 2 : RIP version 2 설정
network: 광고할 네트워크 정보
no auto-summary : Classless 방식으로 광고하는 설정
passive-interface: (Option) 불필요한 interface로 광고하지 않도록 설정
- 인터페이스 설정
!R1
en
conf t
int f0/0
ip add 10.10.10.1 255.255.255.0
no sh
int f0/1
ip add 20.20.20.1 255.255.255.0
no sh
!R2
en
conf t
int f0/0
ip add 20.20.20.2 255.255.255.0
no sh
int f0/1
ip add 30.30.30.1 255.255.255.0
no sh
!R3
en
conf t
int f0/0
ip add 30.30.30.2 255.255.255.0
no sh
int f0/1
ip add 40.40.40.1 255.255.255.0
no sh
2. 동적라우팅 설정
!R1
conf t
router rip
version 2
network 10.10.10.0
network 20.20.20.0
no auto-summary
end
sh ip route
sh ip route rip
!
!R2
conf t
router rip
version 2
network 20.20.20.0
network 30.30.30.0
no auto-summary
end
sh ip route
sh ip route rip
!
!R3
conf t
router rip
version 2
network 30.30.30.0
network 40.40.40.0
no auto-summary
end
sh ip route
sh ip route rip
!